
In this post, we will learn how we could start with Rad Controls for Windows 8.
Download Trial Version from here
As of now these controls are available,
- Chart
- DatePicker
- Pagination
- Gauge
- TimePicker
- HubTile
- BulletGraph
- NumericBox
- Slider
- ComboBox
- AutoCompleteBox
- DropDownList
You can download Demo Applications exploring the controls from here
After downloading, follow the Telerik Installer Wizard.

Make sure that Windows8 is selected. Click on OK.LET’S DO THIS. Configure installation folder , accept license terms and click on Go to Next Step

Provide credential and click on Install to start the installation.

After successful installation, you will get following message

By this step, you have successfully installed Rad Controls for Windows 8. Now go ahead and launch Visual Studio and create an Application for Windows Store. Let us choose Blank Application from the XAML Windows Store template.

Once the project is created in Solution Explorer right click on the Reference and select Add Reference

In the dialog box make sure that you have selected Extension and select Rad Controls for Windows 8.

After adding rerefence in solution explorer verify that refence of Rad Controls has been added successfully.

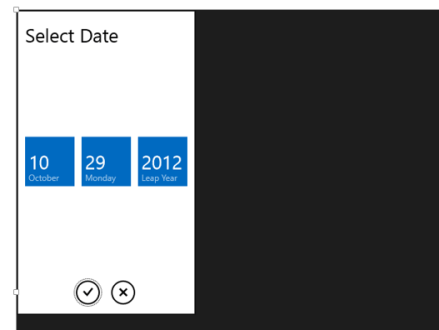
By this step you have succesfully created the project and added the required refrence. Now you are all set to use Rad Controls for Windows 8 in your application. Let us go ahead and add RadDatePicker control on the MainePage.xaml. Before using any Rad Control , you need to add namespace. Add namespace as following
![]()
After adding namespace put RadDatePicker control as following

Now press F5 and run the application. You should able to get RadDatePicker control

In this way you can start working with Rad Controls for Windows 8. In further posts we will explore each controls individually. I hope you find this post useful. Thanks for reading.

Pingback: Getting Started with Rad Controls for Windows 8
Pingback: Using RadControls in JavaScript based Windows 8 Application « Telerik Helper