How To Get Started With Telerik’s ASP.NET AJAX Controls

Overview:

Recently when talking to one of our clients, I had a question from them. They said your demos are great and covers most of the scenarios but when I take a particular control lets say Grid, how do I get started. Well that question prompted me to write this blog post. So if you are one of those who get the exact question in your mind about our controls, then do read on.

About Telerik’s ASP.NET AJAX Controls:

RadControls for ASP.NET AJAX is a complete development tool set for developing web sites or web apps based on ASP.NET AJAX technology. Our suite for ASP.NET AJAX contains nearly 70+ controls and helps you in rapid UI development. We also provide you with nearly 15 themes out of the box. If this excites you, check out the product page here: http://www.telerik.com/products/aspnet-ajax.aspx

ASP.NET AJAX Controls Help Documentation:

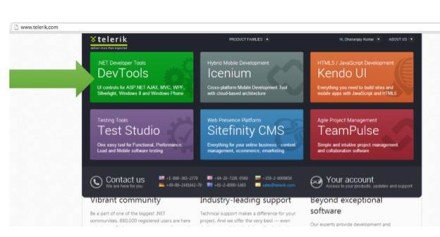
Almost all suites of Telerik have a very rich documentation support. Various formats of help is available. You can choose which mode you want to use the help documentation. If you navigate to page – http://telerik.com/help, it will list all suites help options. We will concentrate on ASP.NET AJAX controls for now. Here is the screen shot of the page with ASP.NET AJAX Controls Help Documentation Options:

image

Lets spend a moment here to understand the help options. For ASP.NET AJAX we have the following resources:

  • Online Help or you can download a copy of CHM format, MS Help 2 format or MS Help 3 format. Clicking on “Online Help” will give you the documentation online. Where as other options you can download the help documentation on to your hard disks.
  • Step-by-step tutorial – the name says it all
  • Knowledge Base – a vast base of knowledge articles for you to do a quick glance at
  • Code Library – a vast library of codes for specific scenarios or requirements

For this blog post I will consider the “Online Help” option and point you to resources there. This will be the same for other formats too.

Navigating Help Documentation:

If you are starting new on a specific control, first thing you should do is to head over to the help documentation and get to the section which deals with the control you want work with. II f you navigate to online help link which is at http://www.telerik.com/help/aspnet-ajax/introduction.html, you will see the following page:

image

If you notice the help documentation page, we have a tree on the left hand side. This tree lists down a lot options for you to get help on. I have highlighted 2 sections, namely – RadControls for ASP.NET AJAX Fundamentals and RadControls. The RadControls for ASP.NET AJAX Fundamentals will give you fundamental details about ASP.NET AJAX and about the RadControls itself. If you want to get to the documentation of controls you will need to expand the section “RadControls” which then will list all of our controls. As a shortcut, on the center section of the online help page, you will see links to controls directly and you can click on your control of interest. You will be navigated to that controls Documentation now.

Getting Started with a Control:

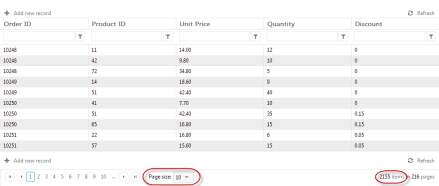
Now that you know how to navigate to the Help Documentation, the next step is to figure out getting started with a control. Remember the short cut I said that is available on the help documentation home page – well find the control you want to learn and click on it (the control name is a hyperlink which will take you to its documentation). For this exercise I will take our most popular control Grid and walk you through. Once I click on the RadGrid hyperlink, it will take me to RadGrid for ASP.NET AJAX Overview page. The left side tree on the page will now have the node RadGrid under RadControls be default selected and the sub nodes under it would have been expanded.

image

Now you will see a sub node called Getting Started. Click on it to expand the node. You will now see a child node which says “Getting Started with RadGrid for ASP.NET AJAX”. Click on the link and you will get a step by step guide on how to start working with our Grid.

image

And that’s it – now you can first go through the getting started, understand steps required to get a Grid on your page and start using the grid.

Looking at the Demos:

Now that you know how to get started with the Telerik RadGrid, next step would be to start looking at our demos to understand different features and how to work with those features. In our demos we try to provide you with all the scenarios in which a Grid will be used in real world applications. So take a look at the demos online here – http://demos.telerik.com/aspnet-ajax/. Note that, when you download our product, the same online demo is shipped and installed on your hard disk. So you can just open the local demos right from your hard disk and go through them.

image

Telerik TV:

Another great resource for anybody getting started with our Telerik Suites is to look at our Telerik TV. This is a public site available on the internet and you don’t need to be a licensee of Telerik to access the site. Telerik TV has videos on all of our products which are short in nature and very focused on a particular feature of a control. These videos are created by evangelists like me in Telerik. Personally I use this a lot to quickly understand how to work with a control. I highly recommend book marking this one in your browsers. Here is the Telerik TV URL: http://tv.telerik.com

Conclusion:

Whenever you are starting new, without knowing the right resources and guide its little tough to get started. Idea of this blog post was to hold your hand and walk you through various resources we here at Telerik have to make your experience of developing with Telerik controls an easy one. Personally as a developer at heart first place I go to is our documentation to understand the control and to go over its API exposed. Next stop would be Telerik TV and finally a look at the demos to understand different features and scenario in which the control can be used. Hope these simple steps will help you all with your evaluation of Telerik controls and make it much more easier and simpler to evaluate. Do feel free to get in touch with us in case you need further assistance.

Advertisement
RadGrid

RadGrid and SqlDataSource control – Be Careful with your DataSource choice

Overview:

This blog post is in response to one of the customer queries we received a couple of days back. One of our India customer called us up and said that they are seeing slowness in couple of pages where they are using RadGrid. Problem statement was – when they click on “Add New Row” button it takes nearly 1.5 minutes for the row to appear on the grid. This made it even scary for them as they had moved the code to production. Through this blog post I will try to outline what I found out and what could have been done better to resolve the problem.

Analysis:

I went in to a call with the customer and took a look at their code. There were couple of things they were doing. Let me list them down:

  • DataSource for the RadGrid was a SqlDataSource control defined in the .ASPX page
  • They were handling OnItemCommand and OnItemDataBound. They had some logic in this method which would execute on every data bound and every item command
  • The new item template had lot of drop down lists and each of them were bound to SqlDataSource control as their data source.

Now, next thing I did was to take look at the timing. We used IE Developer Tools and captured the network traffic when Add New button was clicked. What I found out was, server was taking close to 10 seconds to finish its server side processing. That’s a lot of time if you ask me. What was surprising for them was, they had paging enabled on the grid. So they were thinking that paging is happening correctly but still why is the add new row scenario slow.

So this made me to delve little bit deeper into what exactly is happening in this scenario. So rest of this blog post is all about my observation. Read on if you have faced a similar problem.

Observations:

Did two experiments to figure out what was happening. First I use a RadGrid and bind it to SqlDataSource control and look at the query executed at the DB side. Second was to use entity data source instead of SQL data source and look at the query executed at the DB.

For my experiments I am using Northwind Database and in particular Order Details table. Order Details table contains nearly 2155 records. So this makes a good candidate to mimic a scenario where you are paging the RadGrid lets say 10 records per page.

I assume that you have RadControls for ASP.NET AJAX suite installed on your system. If not, you can always download from our products page – www.telerik.com/products/aspnet-ajax.aspx. You will need that if you want to follow along with this post. Also in order to trace the SQL Queries executed, I am making use of a open source tool called “Express Profiler” which is available at CodePlex here: http://expressprofiler.codeplex.com/. I had to use this as I have a SQL Server 2012 express edition and express edition does not come with Profiler option. You need a full blown SQL server to get the profiler.

I have created a RadControls Web Application for my experiments. When you install the RadControls for ASP.NET AJAX suite, you will get project templates in Visual Studio, using which you can create a web application.

SNAGHTML47a123f

Fig 1: RadControls Web Application Project Template

DataBinding with SqlDataSource control:

First experiment was placing a RadGrid and bind it to SqlDataSource control. I placed a RadGrid and set its basic properties.  Then added a SqlDataSource control to the page and set its connection string and provided a select command. Here is the code snippet for grid and SQL data source control:

 
    <telerik:RadGrid ID="RadGrid1" runat="server" 
                     DataSourceID="SqlDataSource1" 
                     AllowPaging="true" AllowSorting="true" 
                     AllowFilteringByColumn="true" AllowAutomaticInserts="True"
                     MasterTableView-EditMode="InPlace"  
                     MasterTableView-CommandItemDisplay="TopAndBottom" />
    <asp:SqlDataSource ID="SqlDataSource1" runat="server" 
                       ConnectionString="<%$ ConnectionStrings:NorthwindConnectionString %>"
                       ProviderName="System.Data.SqlClient" 
                       SelectCommand="SELECT * FROM [Order Details]" />

Analyzing the queries:

Now, before you run the application, lets get ready to trace the SQL queries that get executed. You should have downloaded the Express Profiler. Start the express profiler – Set the server details, select the authentication mechanism and finally select the events you want to trace. Here is the screen shot:

SNAGHTML4aaebbd

Fig 2: Express Profiler Settings

Run the web application. Notice that if we just set AllowPaging=true on RadGrid and do not provide a page size, by default RadGrid puts 10 as the PageSize. So in my case I should see only 10 rows on my first page of the RadGrid. Here is the Grid output:

image

Fig 3: RadGrid output

When I ran the app and looked at the trace, here is what I get:

SNAGHTML4af9b0f

Fig 4: SQL Query Trace for SQL Data Source Control bound to RadGrid

What you see here is a call to retrieve all the records from the table. You may be asking but the page size is set to 10. That is correct but what really happens is this: RadGrid will go ahead and ask SQL Data Source to get the data. SQL Data Source will blindly execute the query that has been set for the select command. RadGrid will not be able to do any tinkering with query because the SQL Data Source does not provide us a chance to put paging related statements.

Now lets do a page change on the grid. I will go ahead and click on Page 2.  RadGrid will now navigate to Page 2. Here is the trace that is generated for this:

SNAGHTML4c8b053

Fig 5: SQL Trace for Page Change Event

What you notice is, the SQL Data Source goes ahead and brings all the records from the table. RadGrid will then pick up only the second page rows and displays it.

Now lets go ahead and click on the Add New Row button and trace the query executed:

SNAGHTML4cdbf80

Fig 6: SQL Trace for Add New Record Event

As you can see it again retrieves all the records from the table.

What this tells us is the time taken is due to the fact that its going and getting all the table records no matter whatever is the situation we have. Now hitting DB and getting everything does call for some time although small but it till takes up time on the server.

Now lets do the same experiment but with Entity Data Source.

DataBinding with Entity Data Source:

I will use the same data grid but instead of SQL Data Source I will use a Entity Data Source. In order to work with Entity Data Source, you need a Entity Data Model. I will not get into how to create a Entity Data Model but assume that you know how to do it. Just create a ADO.NET Entity Data Model and generate the models from the database and use the same Northwind database. Once you have the ADO.NET Entity Data Model created, create a Entity Data Source on the page. Here is the Entity Data Source code snippet that I have:

 
<asp:EntityDataSource ID="EntityDataSource1" runat="server" 
                          OnContextCreating="EDS_ContextCreating" 
                          EntitySetName="Order_Details" />

I am making use of the OnContextCreating event to set the DbContext of ADO.NET Data Model to Entity Data Source ObjectContext. Here is the code for the event handler of OnContextCreating:

 
protected void EDS_ContextCreating(object sender, EntityDataSourceContextCreatingEventArgs e)
{
    var db = new NORTHWINDEntities();
    e.Context = (db as IObjectContextAdapter).ObjectContext;
}

Here NORTHWINDEntities is my Entity Data Model context. I am just casting it to ObjectContext since Entity Data Source works with ObjectContext. I set this entity data source as the data source of the RadGrid.

Analyzing the Queries:

Now lets run the app and trace SQL queries for the same set of actions we did with SQL Data Source control.

First, on page load:

SNAGHTML509e74c

Fig 7: Entity Data Source – Page Load – Query Trace

As you can see we have put in a “SELECT TOP 10” statement in the query. So its not bringing all 2155 records rather only 10 records. So time spent to do this will be very negligible. We also execute one additional query to get the total record count.

Now lets see what happens when we do a paging:

SNAGHTML50e4016

Fig 8: Entity Data Source – Paging – Query Trace

Now, lets trace the query when we do ‘’Add new record” scenario:

SNAGHTML50fd88d

Fig 9: Entity Data Source – Add New Record – Query Trace

Notice that, in this scenario, we automatically page to the last row and add a blank record.

As you can see from the above experiments, RadGrid is intelligent enough to optimize the queries based on the scenario you are dealing with.

Conclusion:

It was very evident from the experiments that if you are using SQL Data Source as your data source choice, there is not much RadGrid can do to optimize the query before it gets executed. Where as with Entity Data Source, RadGrid is smart enough to optimize the query and always have a optimized data fetch. I personally recommend using an ORM in the project for the data access scenarios and use the Entity Data Source as your data source choice. We i.e at Telerik have a free ORM called OpenAccess. Its free for life so you can pretty much use this in your production without any hassle at all. Do give it a try and let us know how you feel about it.

I hope this blog post does give you information on things you need to take care while doing data binding to Grids. This is just not in particular to RadGrid, this is mostly about any data binding scenario. Trace your queries and be sure that write and optimized queries are getting executed in your apps.

Till next time, Happy Coding.

Working with RadWindows & Converting GridView to RadGrid

Lets first talk about the Grid. Many developers face problem while implementing the GridView in the ASP.Net technology. Either the implementation of the design is too cumbersome or the display of the data as required is difficult. Hence, we replace GridView with RadGrid. Here, we have replaced the GridView of “Inbox” from our event networking application. Initially, the grid view look like the following:

image

A few controls needed to support the RadGrid are

1. RadAjaxManager

Here, we define the event where the loading symbol need to be popped as a modal window. For example, when you refresh your inbox. We need to define only one LoadingPanel which can be reused every-time we need one.

<telerik:RadAjaxManager ID="RadAjaxManager1" runat="server" OnAjaxRequest="RadAjaxManager1_AjaxRequest">
<AjaxSettings>
<telerik:AjaxSetting AjaxControlID="RadAjaxManager1">
<UpdatedControls>
<telerik:AjaxUpdatedControl ControlID="ReceivedMessagesGrid" LoadingPanelID="LoadingPanel"></telerik:AjaxUpdatedControl>
</UpdatedControls>
</telerik:AjaxSetting>
<telerik:AjaxSetting AjaxControlID="ReceivedMessagesGrid">
<UpdatedControls>
<telerik:AjaxUpdatedControl ControlID="ReceivedMessagesGrid" LoadingPanelID="LoadingPanel"></telerik:AjaxUpdatedControl>
</UpdatedControls>
</telerik:AjaxSetting>
</AjaxSettings>
</telerik:RadAjaxManager>

2. RadAjaxPanel

The rest of the rad controls are placed within the RadAjaxPanel which acts very similar to the Ajax Panel. Here, we have RadWindowManager, RadAjaxLoadingPanel, RadCodeBlock and RadGrid,

2.1 RadWindowsManager

RadWindow is used like a popup on the screen and the complete message is displayed in this window. We can either set the screen to be modal or not. This is called a child window the page which calls it is called a parent window. This windows will be called from the RadCodeBlock once the message row is selected/clicked.

<telerik:RadWindowManager ID="RadWindowManager1" runat="server" EnableShadow="true">
<Windows>
<telerik:RadWindow ID="DisplayRead" runat="server" Title="Read and Reply"
Left="150px" ReloadOnShow="true" ShowContentDuringLoad="true" AutoSize="true"
Modal="true">
</telerik:RadWindow>
</Windows>
</telerik:RadWindowManager>

2.2 RadAjaxLoadingPanel

This is where we define the loading panel which is explained in the RadAjaxManager.

<telerik:RadAjaxLoadingPanel ID="LoadingPanel" Skin="Windows7" runat="server"></telerik:RadAjaxLoadingPanel>

2.3 RadCodeBlock

RadCodeBlock helps define javascript which can be called from within a RadWindow or the parent window. It defines the functions with various parameters. Here we have DisplayReadReply function which opens the RadWindow with a different page defined as “ViewMessage.aspx” and a few parameters being sent through URL. The refreshGrid function is used to refresh the binding of grid so that the data gets updated.

<telerik:RadCodeBlock ID="CodeBlock" runat="server">
<script type="text/javascript">
//not used here...to be used by hyperlink
function DisplayReadReply(id, rowIndex) {
var grid = $find("<%=ReceivedMessagesGrid.ClientID%>");

var rowControl = grid.get_masterTableView().get_dataItems()[rowIndex].get_element();
grid.get_masterTableView().selectItem(rowControl, true);

window.radopen("ViewMessage.aspx?RequestID=" + id, "DisplayRead");
return false;
}

function refreshGrid(arg) {
if (!arg) {
$find("<%=RadAjaxManager1.ClientID %>").ajaxRequest("Rebind");
}
else {
$find("<%= RadAjaxManager1.ClientID %>").ajaxRequest("RebindAndNavigate");
}
}

function RowDblClick(sender, eventArgs) {
window.radopen("ViewMessage.aspx?RequestID=" + eventArgs.getDataKeyValue("ContactRequestID"), "DisplayRead");
}
</script>
</telerik:RadCodeBlock>

2.4 RadGrid

This is the actual control which is going to enhance your experience.

<telerik:RadGrid ID="ReceivedMessagesGrid" runat="server" CellSpacing="0" AutoGenerateColumns="false"
GridLines="None" AllowPaging="True" AllowSorting="True" PageSize="15" AllowMultiRowSelection="True" Skin="Windows7"
ShowGroupPanel="True" AllowFilteringByColumn="True" ViewStateMode="Enabled"
OnItemCommand="ReceivedMessagesGrid_ItemCommand" DataMember="Member">

<ClientSettings AllowDragToGroup="True" AllowColumnsReorder="True" ReorderColumnsOnClient="True">
<Selecting AllowRowSelect="True"></Selecting>
<ClientEvents OnRowClick="RowDblClick" />
</ClientSettings>

<PagerStyle Mode="NextPrevAndNumeric" />

<MasterTableView DataKeyNames="ContactRequestID" ClientDataKeyNames="ContactRequestID" DataMember="Member"
AllowMultiColumnSorting="true">
<RowIndicatorColumn FilterControlAltText="Filter RowIndicator column"></RowIndicatorColumn>
<ExpandCollapseColumn Visible="True" Created="True" FilterControlAltText="Filter ExpandColumn column" />
<GroupByExpressions>
<telerik:GridGroupByExpression>
<SelectFields>
<telerik:GridGroupByField FieldAlias="MessageStatus" FieldName="MessageStatus1.MessageStatusText"
HeaderValueSeparator=" : " />
</SelectFields>
<GroupByFields>
<telerik:GridGroupByField SortOrder="Descending" FieldName="MessageStatus1.MessageStatusText"
HeaderText="Header for Group" />
</GroupByFields>
</telerik:GridGroupByExpression>
</GroupByExpressions>
<Columns>
<telerik:GridTemplateColumn UniqueName="Sender" DataField="UserProfile.Username" Groupable="false"
HeaderText="From/ Subject" HeaderStyle-Width="300px" SortExpression="ContactRequestID">
<ItemTemplate>
<br />
<asp:Label CssClass="MailSubject" ID="abstractLabel" runat="server" Text='<%# String2Extract(String.Format("{0}{1}{2}",Eval("Message1"),"|",Eval("MessageType")))%>'></asp:Label>;
</ItemTemplate>
</telerik:GridTemplateColumn>
<telerik:GridBoundColumn HeaderStyle-Width="100px" UniqueName="Type" HeaderText="Type" DataField="MessageType1.MessageTypeDesc" SortExpression="MessageType"></telerik:GridBoundColumn>
<telerik:GridBoundColumn HeaderStyle-Width="100px" UniqueName="Status" HeaderText="Status" DataField="MessageStatus1.MessageStatusText" SortExpression="MessageStatus"></telerik:GridBoundColumn>
<telerik:GridBoundColumn HeaderStyle-Width="80px" ItemStyle-Width="60px" UniqueName="SentOn" HeaderText="Sent On" DataField="SentDate" SortExpression="SentDate" />
</Columns>
</MasterTableView>
</telerik:RadGrid>

Under RadGrid we have further defined the following:

2.4.1 ClientSettings

This defines all the client side events, if any. Here, we have defined OnRowClick event which is fired at the client side when we click any of the RadGrid row. This fires the function defined in the RadCodeBlock.

2.4.2 PagerStyle

This gives us an option for the type of paging. Types available are:

  1. Advanced
  2. NextPrev
  3. NextPrevAndNumeric
  4. NextPrevNumericAndAdvanced
  5. NumericPages
  6. Sliders
2.4.3 MasterTableView

This is where we define all the columns, their appearance and their sorting as well as grouping expressions. Few of the column types we have used are GridTemplateColumn and GridBoundColumn.
GridBoundColumn can directly be bound by specifying the column name of the table in the data field property.

Whereas, to implement a complex query, we use GridTemplateColumn. As the name suggests, we create a template and define our own values. Under grid template we have item template where we can have other ASP.Net controls like Label, Hyperlink, etc. We can even call a function from within a property like

Text='<%# String2Extract(String.Format("{0}{1}{2}",Eval("Message1"),"|",Eval("MessageType")))%>'

This String2Extract function is defined in the code behind. . The code above also explains how to call a function from code behind into a control and using some parameters.

3. Page_Load()

Prior to writing the page load event we include the Eventnetworking.Data and Telerik.Web.UI references in our code behind and then create a context NetworkingDataContext ndx = new NetworkingDataContext();

In the page load event we create a context for Sent messages, and then we bind the data with our RadGrid.

var InboxMessageDX = from im in ndx.Messages
where im.ReceiverUserId == Convert.ToInt32(UserIDValue.Value) && im.MessageStatus <= 4 && im.UserProfile1.Active== true
orderby im.SentDate descending
select im;

ReceivedMessagesGrid.DataSource = InboxMessageDX;
ReceivedMessagesGrid.DataBind();

4. String2Extract(string str)

This function is used to display the first 100 characters of the message as the subject in the list of the inbox.

protected string String2Extract(string str)
{
if (str != null)
{
string[] strArray = str.Split('|');
if (Convert.ToInt16(strArray[1]) == 1)
if (str.Length > 100)
return strArray[0].Substring(0, 100);   //.TrimEnd(';');
else
return strArray[0];
else return "";
}
else
return "";
}

5. Ajax Request

This event is fired each time the page is ajax-ified.
If there is an AjaxRequest calling either “Rebind” or “RebindAndNavigate”.

protected void RadAjaxManager1_AjaxRequest(object sender, AjaxRequestEventArgs e)
{
if (e.Argument == "Rebind")
{
ReceivedMessagesGrid.MasterTableView.SortExpressions.Clear();
ReceivedMessagesGrid.MasterTableView.GroupByExpressions.Clear();
ReceivedMessagesGrid.Rebind();
}
else if (e.Argument == "RebindAndNavigate")
{
ReceivedMessagesGrid.MasterTableView.SortExpressions.Clear();
ReceivedMessagesGrid.MasterTableView.GroupByExpressions.Clear();
ReceivedMessagesGrid.MasterTableView.CurrentPageIndex = ReceivedMessagesGrid.MasterTableView.PageCount - 1;
ReceivedMessagesGrid.Rebind();
}
}

After all we are done with all the changes, the new page looks like the following:

image

And once you click any of the message a child window open which displays the message and you have the option to respond to the message depending on the message type.

image

Read- Revamping Web Application Part-10 : Implementing RadScheduler

How to perform localization on RadGrid for ASP.NET AJAX

Overview:

I attended TechEd India 2013 which was held at Bangalore on Mar 18 & 19. I was talking to couple of developers on their experience with our Rad Controls. One of the developer with whom I was talking to wanted to know if localizing string is easy or difficult with our Grid. He was talking about the static texts which we have in our Grids like – message shown on the group bar, message shown in mouse over of columns for sorting, message shown in our filter menu items etc. His project was looking at using a 3rd party control and localizing the controls with minimal effort was one of the main criteria for them. I told him that it was as easy as creating one file and adding it to the project. In this post we will explore our option on localizing Telerik controls in general the RadGrid.

Global Resource Files:

When you download and install the RadControls for ASP.NET AJAX, we also ship resource files for all our controls and is installed in “App_GlobalResources” folder. Below is a screen shot of the resource files installed on your hard disk:

image

Fig1: Global Resources for RadControls

Notice the resource file for Grid high lighted. The file name is RadGrid.Main.resx. This contains all the resource string for neutral culture and will be used by our RadGrid control.

When you create a ASP.NET project, you can add certain specific named folders which the ASP.NET recognizes and specific types of content can be kept in this folder. One such folder is App_GlobalResources and can contain resources namely .resx files and .resources files. These are compiled into assemblies with global scope. These resources are strongly typed and can be accessed programmatically also.

Steps involved in Localizing the RadGrid

Following steps are involved in localizing the RadGrid:

  1. Add RadGrid.Main.resx file to your application’s App_GlobalResources folder
  2. Create a language pack i.e. RadGrid.Main.<locale id>.resx and add it to App_GlobalResources folder
  3. Set the culture to use on the RadGrid

We will go through the above steps one by one in following sections.

1. Adding RadGrid resource files:

Open Visual Studio and create a new project. Select Telerik > Web template and “C# RadControls Web Application”.

SNAGHTML263dbfce

Fig2: New Project Dialog

Once Visual Studio finishes creating the project, solution will look like below:

image

Fig3: Solution Explorer

Open Default.aspx and add a RadGrid from the toolbox. We will bind the grid to Products table from Northwind database. We will make use of OpenAccess to create a Data Model or Domain Model and OpenAccess Data Source for data binding. If you are not familiar with OpenAccess, it is a free ORM tool from Telerik. I encourage you to download and play with it. Add a new item to the project of type “Telerik OpenAccess Domain Model”.

image

Fig4: Add New Item Context Menu

For this demo, I have selected only Products table and created my OpenAccess Domain Model. Here is how the domain model should look like now:

image

Fig5: OpenAccess Domain Model Diagram

After adding the domain model, do a build to make sure everything is ok. Next, open the Default.aspx in designer mode, click on the smart tag of RadGrid, the smart tag property window will be shown. From the choose data source dropdown select <New data source> option. You will be presented with “Choose a Data Source Type” window. Select OpenAccessLinqDataSource. Specify  name for the data source and proceed. Next in “Select OpenAccess Context Type” window, it will automatically select the domain model we have added and select the products table as the entity and click Next. In “Configure Data Selection” window select the columns that needs to be shown on the grid and click Finish. Now we have  a data source and our RadGrid is bound to that data source. Enable Paging, Sorting, Grouping and Filtering on the grid by using the smart tag.

image

Fig6: RadGrid Smart Tag

Add a new folder called “App_GlobalResources”. Add RadGrid.Main.resx file from App_GlobalResources folder found in your RadControls for ASP.NET AJAX installation folder and paste it in your applications App_GlobalResources folder. At this point run the application and you will see the below output of the grid:

image

Fig7: RadGrid output

Notice the static text on – grouping bar, Sort tool tip (when you mouse over on the columns), filter conditions and the page size. So we will see how to localize these.

2. Add language pack:

For the purpose of this blog post I will try to create a French language pack or resource file and the RadGrid will use the strings from it to display the static text. In order to add a language pack for RadGrid, copy the RadGrid.Main.resx and paste it in App-GlobalResources folder. Rename the pasted file to RadGrid.Main.fr-FR.resx. Here fr-FR is the locale that we would like to localize the grid. This can be any other locale that you need to support in your applications. If you double click RadGrid.Main.fr-FR.resx in Visual Studio, you will see the resource editor open and show the strings as a grid. Here is the screenshot of that:

image

Fig8: RESX Editor

As you can see we see the string name and value for that. Since we copied from language neutral resource file, the values are all in English locale. Now all we are required to do is to change the value of the keys to French locale. I will use Bing translator to translate the values and replace them in the RadGrid.Main.fr-FR.resx. After translating some of the values to French, here is how the RESX file looks like:

image

Fig9: French Resource File

3. Set locale on RadGrid

In order for the RadGrid to pick up the right locale you can either set the Culture property of the RadGrid explicitly or set the Culture property to CurrentUICulture. For the purpose of this demo, I am explicitly setting the culture of RadGrid to fr-FR i.e. French.

image

Fig10: RadGrid Culture property

Here is the RadGrid with culture set to fr-FR:

image

Fig11: RadGrid localized to fr-FR locale

Note: The column headers are not localized because I haven’t provided any strings for them. You can pretty much use the same global resource file and use the resource strings instead of the static text. This blog post was to show how parts of RadGrid can be easily localized.

Summary:

With simple 3 steps we were able to localize different texts of RadGrid without much hassle. All we needed to do was to create a language pack and keep it in App_GlobalResources folder. All Telerik controls respect the ASP.NET folder and know how to use the resources from this folder. Hope this helps you all those folks who are looking at localizing our controls. Do leave any feedback if you may have.

Working with LINQ to SQL Class and AJAX RadGrid

In this post we will take a look on working with RadGrid and LINQ to SQL Class. We will display data in RadGrid using LINQ to SQL Class from SQL Server database.

image

Very first let us create DataSource to be used with RadGrid. We will use LINQ to SQL class to create data model here. To create data model using LINQ to SQL class right click on the project and select Add then New Item. From Data tab, choose LINQ to SQL Classes

image

If you want you can change name of the LINQ to SQL class, however I am leaving default name and clicking on the Add button. Choose Server Explorer on the design surface to create data classes.

image

In Server Explorer right click on the Data Connection and Add Connection. In Add Connection dialog box provide database server name and choose the database to create data model. Click on Ok to add a new Data Connection in Server Explorer.

image

On successfully adding of data connection , you can see that in server explorer

image

Next drag and drop Tables, Views , Stored Procedures and Functions from Server Explorer on dbml design surface to make a part of data model. In this case , I am going ahead with only one table Person. Now you can see that Person is added on dbml file.

image

As of now we have added the data model in the project. Now let us go ahead and add a RadGrid on the page. To add RadGrid on the page drag and drop it from Toolbox on the page. If you don’t find RadControls in toolbox then right click on the General tab in tool box and select Add Tab

image

Give name of the tab . Right click on newly created tab and selecte Choose Items. Then browse to

C:\Program Files (x86)\Telerik\RadControls for ASP.NET AJAX Q1 2012 SP1\Bin40

and choose Telerik.Web.UI.dll and after selecting dll click on Ok button to add the controls in toolbox.

image

In toolbox you can see that RadControls are successfully added.

image


Next from the Telerik AJAX Data Component tab , drag and drop RadGrid on the page.

<pre><asp:Content runat="server" ID="BodyContent" ContentPlaceHolderID="MainContent">
<telerik:RadGrid ID="RadGrid1" runat="server" AllowPaging="True">

</telerik:RadGrid>
</asp:Content>


As of now we have added RadGrid on the page . Next we need to create data source from the data model and bind to the RadGrid. Below is the function returning List of Person.


private List<Person> GetStudents()
{
DataClasses1DataContext context = new DataClasses1DataContext();
return  context.Persons.ToList();
}

In function we are creating instance of DataContext class and returning list of person on that. Now we need to bind data returning from this function to RadGrid. We can do that as following


using System;
using System.Collections.Generic;
using System.Linq;
using System.Web.UI;

namespace GridSample
{
public partial class _Default : Page
{
protected void Page_Load(object sender, EventArgs e)
{
RadGrid1.AllowPaging = true;
RadGrid1.NeedDataSource += RadGrid1_NeedDataSource;


}

void RadGrid1_NeedDataSource(object sender, Telerik.Web.UI.GridNeedDataSourceEventArgs e)
{
RadGrid1.DataSource = GetStudents();
}


private List<Person> GetStudents()
{
DataClasses1DataContext context = new DataClasses1DataContext();
// return context.Persons.SortBy("FirstName").ToList();
return context.Persons.ToList();
}
}
}

Now when you press F5 to run the application , you should get data in RadGrid using LINQ to SQL class.

image

In this way you can pull data from database using LINQ to SQL class and bind to a RadGrid. I hope you find this post useful. Thanks for reading.