Step by Step Creating WCF Data Service using Telerik Open Access ORM

In this post we will learn step by step to create WCF Data Service using Telerik Open Access ORM. We will create data model of data from SQL Server and further exposed that as WCF Data Service using Telerik Open Access ORM.

Learn more about Open Access ORM here

We are going to follow step by step approach. To create WCF Data Service follow the steps given below,

Step 1: Create Telerik Web Access Web Application project

After installation of Telerik Open Access ORM you will get Telerik Web Access Web Application project template while creating a new project. Go ahead and create a project selecting Telerik Web Access Web Application project template from Web group

image

Step 2: Create Domain Model

Next you will be prompted to create Domain Model. Open Access ORM allows you to create domain model from any of the following type of database. If required you can create Empty Domain Model as well.

image

Let us go ahead and create data model from Microsoft SQL Server. Choose Microsoft SQL Server from drop down and click on the Next.

Step 3: Setup Database connection

In this step you need to set up Database connection. Either you can provide Connection String manually or can create a New Connection. To create new connection click on Add New Connection. You will get window to add new connection. In this window provide database server name and choose database from the dropdown. To test the connection click on Test Connection and after successful testing click on Ok to add a new connection.

image

Step 4: Setup Database Connection

In this step you need to setup database connection. If you want you can change connection string name. Let us leave it to default and click on the Next.

Step 5: Choose Database Items

In this step you need to choose

  • Schemas
  • Tables
  • Views
  • Stored Procedure to create data model.

Let us say we are choosing only one table to create data model. After choosing items click on the next .

image


Step 6: Define Naming Rules

In this step you can define naming rules of Classes, Fields and Properties if required. Let us leave to default and click on next to proceed further

Step 7: Code Generation Settings

In this step you can configure Code Generation Settings. Let us leave settings to default and click on Finish to generate data model.

Once Data Model is created you will find *.rlinq file added in the project. Click on *.rlinq file to view the data model.

image

Step 8: Add Open Access Service

By step 7 you have created data model. Now let us go ahead and add WCF Data Service on the created Data Model. For this right click on the project and select Add Open Acccess Service. You will be prompted with Add Open Access Service Wizard. Before adding Open Access Service make sure that once you have built the project.

You need to choose

  • Context : Select Context from the drop down
  • Project : Use the existing project

image

Click on the Next after selecting Context and Project.

Step 9: Select Service Type

In this step you need to choose type of Service you want to create. Since we want to create WCF Data Service, let us choose that from the option and click on the next.

image

Step 10: Choose Entity to expose a part of the Service

In this step we need to choose entity to expose as part of service. Since there is only one entity choose that and click on the Next

image

In last step you can preview various References being added and changes to config files. Click on Finish to create Service. After WCF Data Service being created you can test that in browser. Run the application and browse to *.svc to test the service in browser.

You should get data of People in browser as below after successful creation of the service.

image

Conclusion

In this post we learnt to create WCF Data Service using Open Access ORM. I hope you find this post useful. Thanks for reading.

Working with RadAutoCompleteBox in JavaScript based Application for Windows Store

In this post we will take a look on working with RadAutoCompleteBox in JavaScript based Windows Store Application.

Getting Started with RadAutoCompleteBox

You can create RadAutoCompleteBox by setting data-win-control property of a div or span as Telerik.UI.RadAutoCompleteBox. See the code below,


<div id="sportsAutoComplete"
 data-win-control="Telerik.UI.RadAutoCompleteBox"
 data-win-options="{placeholder:'enter player...'}">
</div>

In above code

  • data-win-control attribute of div is set as Telerik.UI.RadAutoCompleteBox
  • In data-win-options attribute

You can set datasource of RadAutoCompleteBox in two ways. You can directly set datasource either in data-win-options attribute or in the JavaScript function. You can set datasource in code behind as following,


var sportsArray = ['Sachin Tendulkar', 'Saurabh Ganguli', 'MS Dhoni', 'Rahul Dravid', 'Kevin Pierson', 'Kalis'];
 var sportsAutoComplete = document.getElementById("sportsAutoComplete").winControl;
 sportsAutoComplete.dataSource.data = sportsArray;

In above code we are

  • Creating an array named sportsArray
  • Creating reference of RadAutoCompleteBox as winControl
  • Setting datasource of RadAutoCompleteBox with the sportsArray

At the point if you run application you should get Auto Complete Box as following,

image

Working with Template for RadAutoCompleteBox

There may be scenario when you need to set data source of RadAutoCompleteBox to array of complex objects. For example there is an array as following,

 var movieArray = [
 { title: "The Artist", picture: "images/TheArtist.jpg" },
 { title: "A Better Life", picture: "images/abetterlife.jpg" },
 { title: "Abduction", picture: "images/abduction.jpg" },
 { title: "African Cats", picture: "images/africancats.jpg" },
 { title: "Angel Crest", picture: "images/angelscrest.jpg" },
 { title: "Arthur", picture: "images/arthur.jpg" },
 { title: "Anonymous", picture: "images/anonymous.jpg" },
 { title: "A Dangerous Method", picture: "images/adangerousmethod.jpg" },
 { title: "A Good Old Fashioned Orgy ", picture: "images/agoodoldfashionedorgy.jpg" },
 { title: "A Seperation ", picture: "images/aseparation.jpg" },
 { title: "Another Earth ", picture: "images/anotherearth.jpg" },
 { title: "A Heartbeat Away ", picture: "images/aheartbeataway.jpg" },
 { title: "Bad Teacher ", picture: "images/badteacher.jpg" },
 { title: "Begineers ", picture: "images/beginners.jpg" },
 { title: "Brotherhood ", picture: "images/brotherhood.jpg" },
 { title: "Bridesmaids ", picture: "images/bridesmaids.jpg" },
 { title: "Born To Be Wild ", picture: "images/borntobewild.jpg" },
 { title: "Blackthorn ", picture: "images/blackthorn.jpg" },
 { title: "Bellflower ", picture: "images/bellflower.jpg" },
 { title: "Butter ", picture: "images/butter.jpg" },
 { title: "Bunraku ", picture: "images/bunraku.jpg" },
 { title: "Cars 2 ", picture: "images/cars2.jpg" },
 { title: "Cost Of A Soul", picture: "images/costofasoul.jpg" },
 { title: "Carnage ", picture: "images/carnage.jpg" },
 { title: "Crazy Stupid Love ", picture: "images/crazystupidlove.jpg" },
 { title: "Cracks ", picture: "images/cracks.jpg" },
 { title: "Colombiana ", picture: "images/colombiana.jpg" },
 { title: "Cedar Rapids ", picture: "images/cedarrapids.jpg" },
 { title: "Captain America ", picture: "images/captainamerica.jpg" },
 ];

You can set this array also, as data source of RadAutoComplte Box. This can be done as following,


var movieAutoComplete = document.getElementById("movieAutoComplete").winControl;
 movieAutoComplete.dataSource.data = movieArray;

On HTML RadAutoComplete with id movieAutoComplete is created as following

<div id="movieAutoComplete"
 data-win-control="Telerik.UI.RadAutoCompleteBox"
 data-win-options="{placeholder:'enter movie...',
 template:moviestemplate,
 dataTextField: 'title'}">
</div>

  • Placeholder is set as enter movie
  • dataTextField is set as title . title is one of the property in array.
  • template is set as moviestemplate. Template decides how data will be displayed in the control. Template can be created by setting data-win-control property of a div or span as WinJS.Binding.Template

We have created moviestemplate as following

<div id="moviestemplate" data-win-control="WinJS.Binding.Template">
 <div style="width: 100px;height: 100px;">
 <img src="#" style="width: 70px;height: 70px;" data-win-bind="src:picture" />
 <h4 data-win-bind="innerText:title" />
 </div>
 </div>

We are binding title of the array to h4 element and picture property of the array to image element. When you run the application, you should get RadAutoCompleteBox as following

image

Working with onSelect Event

You can read the selected item in RadAutoCompleteBox in onSelect event. You can attach select event and read the selected value as given in following,

movieAutoComplete.addEventListener("select", function (e) {
 document.getElementById("selectedmovie").src = movieAutoComplete.dataItem(e.item.index()).picture;
 });

In above code selectmovie is id of the image element. Image of the selected movie item will be displayed.

So in this way you can start using RadAutoCompleteBox in application. I hope you find this post useful. Thanks for reading.

Working with RadDropDownList in JavaScript based Windows Store Application

Read here to set up environment to use RadControls in your application.

In this post we will take a look on working with RadDropDownList in JavaScript based application for Windows 8. RadDropDownList allows you to select one item from list of items.

Getting Started with RadDropDownList

You can create a RadDropDownList by setting data-win-control property of a span or div element as Telerik.UI.RadDropDownList. You can do that as following,


<span id="sportsdropdown"
 data-win-control="Telerik.UI.RadDropDownList"
 data-win-options="{height: 250,
 dataSource:['Cricket','Soccer','Tennis']
 }"
 >
 </span>

RadDropDownList allows you to select an element from the list of elements displaying in drop down. RadDropDownList can display a local array or data returning from remote service as data. dataSource property of RadDropDown defines the data to be displayed . In above RadDropDown we have set the dataSource with inline array in the data-win-options. You can also bind dataSource of RadDropDownList from array defined in other files or JSON data returning from the remote services.

Let us say there is an array on default.js as following


var sportsArray = ['Cricket','FootBall','Hockey','Tennis','BaseBall'];

To set it as dataSource of RadDropDownList, first you need to create a Namespace. You can create that as following,

WinJS.Namespace.define("sportsdata", { sports: sportsArray }
 );

So far we have create array and namespace. Now you can set dataSource of RadDropDownList with array defined on default.js as following,

<div id="sportsdropdown"
 data-win-control="Telerik.UI.RadDropDownList"
 data-win-options="{height: 250,
 dataSource:sportsdata.sports
 }"
 >
 </div>

On running the application you should get RadDropDownList as populated with data from sportsArray as following,

image

Working with Remote Data

Above we used local data as dataSource of RadDropDownList. We can bind data from remote data source as well. For example if we want to display movies title from Netflix we can do that following below steps ,

  • Make a call to Netflix Odata serveice
  • Parse the resturned JSON
  • Construct array from parsed JSON data
  • Set array as datasource of RadDropDownList

WinJS.xhr({
 url: "http://odata.netflix.com/Catalog/Titles" + "?$format=json&$select=ShortName,BoxArt&$top=300"
 }).then(function (xhr) {
 var movies = JSON.parse(xhr.response).d;
 movies.forEach(function (i) {
 movieArray.push(i.ShortName);
 });
 var moviedropdown = document.getElementById("moviesdropdown").winControl;
 moviedropdown.dataSource.data = movieArray;
 });

In above code,

  • we are making call to Netflix OData feed using WinJS.xhr
  • Prasing returned JSON using JSON.parse
  • Iterting each element and pushing it to array
  • Taking reference of RadDropDownList using document.getElementbyID
  • Setting the datasource

And on HTML there is a div elment with id moviedropdown


<div id="moviesdropdown"
 data-win-control="Telerik.UI.RadDropDownList"
 data-win-options="{height: 250,

 }"
 >
 </div>

When you run the application you will get RadDropDownList populated with movies title from Netflix.

image

Attaching Change Event

You can attach change event to RadDropDownList and read the selected value . You can do that as following


moviedropdown.addEventListener("change", function (e) {
 document.getElementById("output").innerText = e.target.value;

});

In above code

  • Output is id of the span
  • Selected value will be displayed as text of the output span

In this way you can work with RadDropDownList in the application. In this post we learnt on getting started, working with remote data and about change event. I hope you find this post useful. Thanks for reading.

Working with RadHubTile in XAML based Windows Store Application

In this post we will take a look on working with RadHubTile in XAML based Windows Store Application. RadHubTile gives you same immersive experience as you see on the home screen of Windows 8. You can display message, notification, title and message on flipping of tile using RadHubTiles. RadHubTile gives you experience like below image.

image

To start working with RadHubTile let us start with Creating Application for Windows Store. To create this choose Blank App from Windows Store project tab. After creating project you need to add reference Of Rad Control for Windows 8 in the project. To do that right click on the reference and select Add Reference. From the Reference Manager Dialog box select Rad Control for Windows8.

image

After adding reference in the project, you need to add namespace on the XAML page. You can do that as following,

image

You can create a HubTile on XAML as following ,

image

Since you have not set any propery of RadHubTile like Message , Title etc , so as output you will get a simple rectangular tile as below,

image

Some of the important properties of RadHubTiles are as following ,

image

Now let us go ahead and set properties of RadHubTiles ,

 <telerik:RadHubTile Title="Score"
 Message="India/Eng Score"
 ImageSource="/Assets/indengmatchlogo.JPG"
 Notification="100/0"
 BackContent="Score of India England first Test"
 >

 </telerik:RadHubTile>

Above we have set several properties of RadHubTiles . Now let us go ahead and run the application to see the output

image

Now let is go ahead and create template for BackContent. We crate template to show information in back of the RadHubTile as we want. Let us say , we want to display Image and Title in the back of the RadHubTile. We can do that by creating a DataTemplate and then setting that as value of BackContentTemplate. We can do that as following ,

image

You see that in above code we have created DataTemplate . There is StackPanel and one Image control along with TextBlock have put vertically in the StackPanel. When you run the application , you will get RadHubTile back content as following ,

image

For your reference full code with BackContent Template is given below,

 <telerik:RadHubTile Title="Score"
 Message="India/Eng Score"
 ImageSource="/Assets/indengmatchlogo.JPG"
 Notification="100/0"
 BackContent="Score of India England first Test"
 Margin="93,209,0,388">
 <telerik:RadHubTile.BackContentTemplate>
 <DataTemplate>
 <StackPanel Orientation="Vertical">
 <TextBlock Text="India England Test Series" />
 <Image Source="/Assets/indengmatchlogo.JPG" />
 </StackPanel>
 </DataTemplate>
 </telerik:RadHubTile.BackContentTemplate>

</telerik:RadHubTile>

As we set BackContentTemplate , we can set

  • NotificationTemplate
  • MessageTemplate

As well. Let us go ahead and create the NotificationTemplate. We will bind controls in NotificationTemplate with the data coming from the background. Let us say there is function returning Data. In this case I am hard coding the data value, however in real time scenario you will like to fetch data from a remote service.

 Data GetRun()
 {
 // Put code here to fetch data from remote service
 return new Data ()
 {
 Runs = 200,
 Country = "India"
 };

 }

Data class is defined as following,


namespace HubTilesXaml
{
 public class Data
 {
 public int Runs { get; set; }
 public string Country { get; set; }
 }
}

We need to set DataContext of RadHubTile as given below,


protected override void OnNavigatedTo(NavigationEventArgs e)
 {

rdRunsHubTiles.DataContext = GetRun();

}

Now let us go ahead and create NotificationTemplate . NotficationTemplate can be created as following.

image

We are creating a DataTemplate and setting it as value of NotificationTemplate property of RadHubTile. For your reference full code with BackContentTemplate and NotficationTemplate for RadHubTile is given below,

<telerik:RadHubTile x:Name="rdRunsHubTiles"
 Title="Score"
 Message="India/Eng Score"
 ImageSource="/Assets/indengmatchlogo.JPG"

 BackContent="Score of India England first Test"
 DataContext=""
 Margin="93,209,0,388">
 <telerik:RadHubTile.BackContentTemplate>
 <DataTemplate>
 <StackPanel Orientation="Vertical">
 <TextBlock Text="India England Test Series" />
 <Image Source="/Assets/indengmatchlogo.JPG" />
 </StackPanel>
 </DataTemplate>
 </telerik:RadHubTile.BackContentTemplate>
 <telerik:RadHubTile.NotificationTemplate>
 <DataTemplate>
 <StackPanel Orientation="Horizontal" >
 <TextBlock Text="{Binding Runs}" />
 <TextBlock Text="{Binding Country}" />
 </StackPanel>
 </DataTemplate>
 </telerik:RadHubTile.NotificationTemplate>

</telerik:RadHubTile>

At this point if you run the application you should get a RadHubTile with BackContentTemplate , NotficationTemplate , Message and Image.

image

We can get all the information from RadHubTile in code behind and can use them. For example let us say when user is tapping on the RadHubTile , we want to display the NotificationCount. We can do that as following,


void rdRunsHubTiles_Tapped(object sender, TappedRoutedEventArgs e)
 {

var runset = (sender as RadHubTile).Notification;
 }

In this way we can work with RadHubTile in Application for Windows Store. I hope you find this post useful. Thanks for reading.

Working with RadNumericBox in JavaScript Windows 8 Application

In this post we will take a look on working with RadNumericBox. If first time you are working with RadControls in JavaScript based Windows 8 Application, I recommend you to read this post .

To work with RadNumericBox simply set data-win-control property of a div or span as Telerik.UI.RadNumericBox


You will get RadNumericBox configured with default values as following,

You can work with RadNumericBox from JavaScript as well.


Here agebox is id of span.

You can set different options for RadNumericBox. Some of those options are as following,

Options can be set as following,

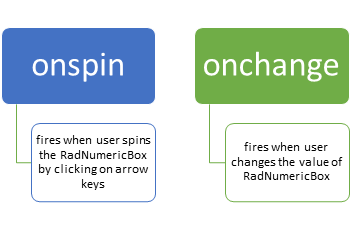
Now when you run the application, you should get RadNumericBox configured with default value 40, minimum value 0, maximum value 255 and step as 10. While working with RadNumericBox there are two important events,

In code behind you can attach event to RadNumericBox as following,

You can work with spin event as following

And showmessage function is written as below,


For your reference code is given below,

Default.html

<!DOCTYPE html>
<html>
<head>
 <meta charset="utf-8" />
 <title>javascriptAutoComplete</title>

<!-- WinJS references -->
 <link href="//Microsoft.WinJS.1.0/css/ui-dark.css" rel="stylesheet" />
 <script src="//Microsoft.WinJS.1.0/js/base.js"></script>
 <script src="//Microsoft.WinJS.1.0/js/ui.js"></script>

<!--Telerik references -->
 <script src="///Telerik.UI/js/jquery.js"></script>
 <script src="/Telerik.UI/js/ui.js"></script>
 <link href="/Telerik.UI/css/dark.css" rel="stylesheet" />
 <link href="/Telerik.UI/css/common.css" rel="stylesheet" />

<!-- javascriptAutoComplete references -->
 <link href="/css/default.css" rel="stylesheet" />
 <script src="/js/default.js"></script>
</head>
<body>
 <h1>Numeric Box Demo</h1>
 <div id="agebox"
 data-win-control="Telerik.UI.RadNumericBox"
 data-win-options="{value: 40,
 min: 0,
 max: 255,
 step: 10,
 decimals: 2,
 format: 'n0',
 }">
 </div>
 <br />
 <span id="output" >

 </span>
</body>
</html>

&nbsp;

Default.js


if (args.detail.kind === activation.ActivationKind.launch) {
 if (args.detail.previousExecutionState !== activation.ApplicationExecutionState.terminated) {
 // TODO: This application has been newly launched. Initialize
 // your application here.
 } else {
 // TODO: This application has been reactivated from suspension.
 // Restore application state here.
 }
 args.setPromise(WinJS.UI.processAll());
 var nbage = document.getElementById("agebox").winControl;
 nbage.addEventListener("spin", showmessage);
 nbage.addEventListener("change", function (e) {
 document.getElementById("output").innerText = "You have selected" + nbage.value;
 });
 }
 };

 function showmessage(e) {

document.getElementById("output").innerText = "You have selected" + e.target.value;
 }

I hope you find this post useful. Thanks for reading.

Webinar : Telerik Tools for Ninja Developer – Just Mock

Telerik India in a new initiative has started a series of webinars known as “Telerik tools for the Ninja Developer – The Series”. We have already completed 3 webinars as part of the series which includes Kendo UI, Just Code and Test Studio.

Continuing the series we are hosting a webinar on Aug 29 for Asia region. Here is the details of the webinar:

Title: Telerik Tools for Ninja Developer : Just Mock

Date: Aug 29 2012

Time: 3PM – 4PM IST

(Note: click on the title above to get to the registration link)

Do you avoid running your unit tests for fear they will never be complete? Do you wish for a better way? Well, look no further! With Telerik JustMock, you can make sure your code works as intended and be out of the office in time for happy hour. In this session, you will learn how to separate dependencies to make your tests run faster with JustMock Lite. You will then learn how the full edition of JustMock is used to tackle those hard-to-reach bits of code. Whether you’re new to unit testing, new to mocking, or just looking for a better way, this webinar is for you!

image

JustMock is an easy, fast, feature rich framework for creating unit tests. This complete mocking tool allows for mocking of non-virtual methods, non-public members, sealed classes and static methods and classes – all within one simple API. JustMock is the easy and fun way to test your code – anyone can mock with JustMock!

So join me as I take you through a tour of Just Mock and Unit Testing. Hope you will be there and will enjoy the ride. So what you waiting for – book a seat for yourself now. Register here.

See you at the webinar. Happy coding!