
In this blog post i will take a lap around on of the interesting controls we have in our Portfolio. UI for ASP.NET AJAX is one of the popular control suites in our portfolio. As part of the suite we have “RadMap” – an Server Control which renders HTML5 based map on your web page. Rest of this blog post will focus on how to getting started with RadMap. If you want to quickly jump to the demos we have and take a sneak peek – well head over here.
What is “UI for ASP.NET AJAX” ?
UI for ASP.NET AJAX is our product line where we provide you 80+ controls which meet all your project needs. The controls are performance optimized which help you build high quality professional line of business applications. From a complex control like Data Grid to simplest control like Editor (which is used by Microsoft on sites like MSDN, Technet etc.) – we have it covered for you.
You can know more about “UI for ASP.NET AJAX” suite here.
Pre-Requisites:
In order to follow along the rest of the blog post, i highly suggest you download a trial of “UI for ASP.NET AJAX” suite from the product page mentioned in previous section. If you have downloaded the suite already – you are all set. Just follow along.
What is “RadMap” ?
I wont reinvent a wheel here. Here is what our official documentation say about this Server Controls:
RadMap for ASP.NET AJAX is a control powered by the Kendo UI DataViz Map widget. This control simplifies the setup of Map Tile Services with OpenStreetMap and Bing. You can use different Shape layers and GeoJSON data to create helpful map modules in ASP.NET web applications. The rich built-in functionality of the Map allows you to add and control predefined layouts, markers, tooltips, zoom levels, UI elements and many more.
In simple terms – its a web server control like any other control in ASP.NET AJAX. The Map that is rendered is actually from our flagship product Kendo UI. Kendo UI is a HTML5 based client side UI framework. So the Map that is rendered is HTML5 based – can run anywhere i.e. desktop/mobile/tablet browser.
Getting Started:
I am assuming you have already installed our “UI for ASP.NET AJAX” suite on your machine. First lets create a ASP.NET Web Application. Follow the below steps:
- Fire up your Visual Studio.
- Select File > New Project. In the New Project dialog select Telerik > Web and “Telerik C# Web Forms Application”.
- Provide a name for your application and click Ok.
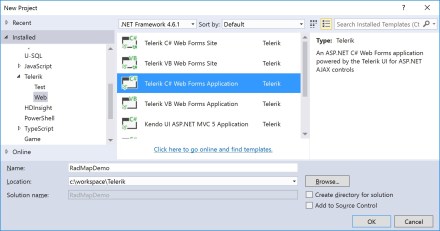
Fig 1. New Project Dialog
- Next, you will be presented with a Project Wizard. It will ask you what kind of application you want to scaffold now – Blank, Responsive or Outlook Inspired application layout. I will select blank for now and click Finish.
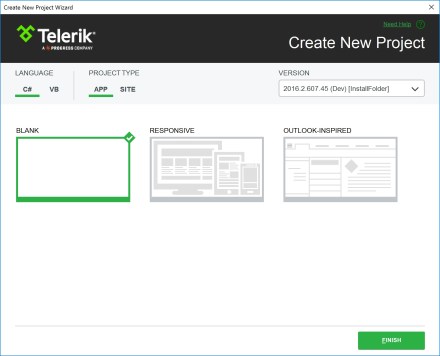
Fig 2. New Project Wizard
Visual Studio will go ahead and spin up our new project. It will add the necessary references to UI for ASP.NET AJAX DLLs from your installation folder.
Adding RadMap to a page:
When you install our UI for ASP.NET AJAX product, we install toolbox items. So when you open a ASPX page and take a look at the toolbox all our controls are there. You can just drag and drop any control from the toolbox on to your page. For this example, I will open Default.aspx, then drag& drop RadMap control from the toolbox on to the page. Here is how my default page looks like now:

Fig 3. RadMap in a Web Form
Next we will see how to add Layers & Markers.
Adding Map Layers:
RadMap is just an UI for any Web Map service or Map Tile service. Some examples of Tile Map service are OpenStreetMap or BING. Apart from Web Map or Map Tile services RadMap also support Shapes and GeoJSON data to create maps. For this example i will be using OpenStreeMap tile map service and use that as the base Map layer in RadMap. You add a Layer to LayersCollection of RadMap. Here is the code snippet for adding OpenStreeMap service as the base Map layer:
| <telerik:RadMap ID="RadMap1" runat="server"> | |
| <LayersCollection> | |
| <telerik:MapLayer Type="Tile" Subdomains="a,b,c" | |
| UrlTemplate="http://#= subdomain#.tile.openstreetmap.org/#= zoom #/#= x #/#= y #.png" | |
| Attribution="© <a href='http://osm.org/copyright' title='OpenStreetMap contributors' target='_blank'>OpenStreetMap contributors</a>."> | |
| </telerik:MapLayer> | |
| </LayersCollection> | |
| </telerik:RadMap> |
Lets go over the code that we wrote above and understand it better:
- We have created a MapLayer and added it to LayerCollection of RadMap.
- The type of the layer is Tile. Since we are using OpenStreetMap – its a Map Tile Service. Hence we let the RadMap know that this is a Tile layer.
- OpenStreetMap provides 3 subdomain under which their Map Tile service is available. We set the Subdomains property withe the domain values.
- We then set the UrlTemplate property of RadMap Layer. This is basically the template RadMap should use to ping the Map Tile service to get the map images.
- Typically you will have an attribution set on the map based on which service you are using. In this case we have set attribution to OpenStreetMap using the Attribution property of the layer.
Now, save the file and run the application. A browser should open with RadMap rendering the map from OpenStreetMap. Here is a screenshot of the output:

Fig 4. RadMap rendering OpenSTreetMap map
Next up, lets see how to add markers to the map.
Adding Markers in the RadMap:
We just saw how to add a layer to the RadMap. In order to add a marker on the map, we will need to add a MapMarker to the MarkersCollection property of RadMap. MapMarker will have information such as Latitude & Longitude, Shape and Title for the marker itself. Here is a code snippet where i add Markers for all of our offices worldwide:
| <telerik:RadMap ID="RadMap1" runat="server"> | |
| <LayersCollection> | |
| <telerik:MapLayer Type="Tile" | |
| Subdomains="a,b,c" | |
| UrlTemplate="http://#= subdomain#.tile.openstreetmap.org/#= zoom #/#= x #/#= y #.png" | |
| Attribution="© <a href='http://osm.org/copyright' title='OpenStreetMap contributors' target='_blank'>OpenStreetMap contributors</a>."> | |
| </telerik:MapLayer> | |
| </LayersCollection> | |
| <MarkersCollection> | |
| <telerik:MapMarker Shape="PinTarget" Title="Palo Alto"> | |
| <TooltipSettings Content="US - Palo Alto, CA"></TooltipSettings> | |
| <LocationSettings Latitude="37.444610" Longitude="-122.163283" /> | |
| </telerik:MapMarker> | |
| <telerik:MapMarker Shape="PinTarget" Title="Boston"> | |
| <TooltipSettings Content="US - Boston, MA"></TooltipSettings> | |
| <LocationSettings Latitude="42.375067" Longitude="-71.272233" /> | |
| </telerik:MapMarker> | |
| <telerik:MapMarker Shape="PinTarget" Title="Copenhagen"> | |
| <TooltipSettings Content="Denmark - Copenhagen"></TooltipSettings> | |
| <LocationSettings Latitude="55.670312" Longitude="12.538266" /> | |
| </telerik:MapMarker> | |
| <telerik:MapMarker Shape="PinTarget" Title="Sydney"> | |
| <TooltipSettings Content="Australia - Sydney"></TooltipSettings> | |
| <LocationSettings Latitude="-33.838707" Longitude="151.207959" /> | |
| </telerik:MapMarker> | |
| <telerik:MapMarker Shape="PinTarget" Title="Austin"> | |
| <TooltipSettings Content="US - Austin, TX"></TooltipSettings> | |
| <LocationSettings Latitude="30.268162" Longitude="-97.744873" /> | |
| </telerik:MapMarker> | |
| <telerik:MapMarker Shape="PinTarget" Title="Sofia"> | |
| <TooltipSettings Content="Bulgaria - Sofia"></TooltipSettings> | |
| <LocationSettings Latitude="42.650613" Longitude="23.379025" /> | |
| </telerik:MapMarker> | |
| <telerik:MapMarker Shape="PinTarget" Title="Gurgaon"> | |
| <TooltipSettings Content="India - Gurgaon"></TooltipSettings> | |
| <LocationSettings Latitude="28.410139" Longitude="77.042439" /> | |
| </telerik:MapMarker> | |
| <telerik:MapMarker Shape="PinTarget" Title="London"> | |
| <TooltipSettings Content="UK - London"></TooltipSettings> | |
| <LocationSettings Latitude="51.515986" Longitude="-0.085798" /> | |
| </telerik:MapMarker> | |
| <telerik:MapMarker Shape="PinTarget" Title="Munich"> | |
| <TooltipSettings Content="Germany - Munich"></TooltipSettings> | |
| <LocationSettings Latitude="48.117227" Longitude="11.601990" /> | |
| </telerik:MapMarker> | |
| </MarkersCollection> | |
| </telerik:RadMap> |
Here is the how the the map looks like now:

Notice we have a problem. The Map is not centered and we dont see all the markers in place. This can be solved by configuring the map for center settings and zoom levels.
Configuring RadMap:
Some of the configuration you can perform on the map are as follows:
- Zoom of the Map can be configured by setting “Zoom” property of the RadMap. The values range from 0 to 18.
- Width & Height of the map can be configured by setting the respective property on the RadMap.
- Map can be centered to a specific Latitude & Longitude by using the CenterSettings inner tag of the RadMap.
Here is the code snippet of the just the configuration things:
| <telerik:RadMap ID="RadMap1" runat="server" Zoom="2" Width="1000" Height="500"> | |
| <CenterSettings Latitude="23" Longitude="10" /> | |
| <%-- ommitted for brevity --%> | |
| </telerik:RadMap> |
And with this configuration in place – here is how our map renders now:

Fig 6. RadMap with Configuration
Summary:
If you have made till here that means that you really have a requirement for Maps in your project :). As a developer it was a breeze for me to get started with RadMap in a Web Forms application. With simple properties to set i was able to get going with adding a map layer, adding markers and configuring the map. Hope you too felt it easy to work with RadMap. “UI for ASP.NET AJAX” is available for a 30 day free trial. If you liked what you read and want to give it a try – go ahead and download a trial.
Hope this blog post provided you that initial step to work with RadMap.
Till next time – Happy Coding!
