Objective
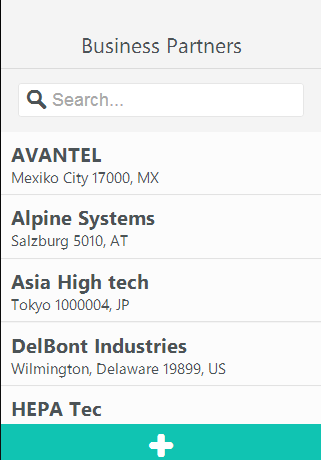
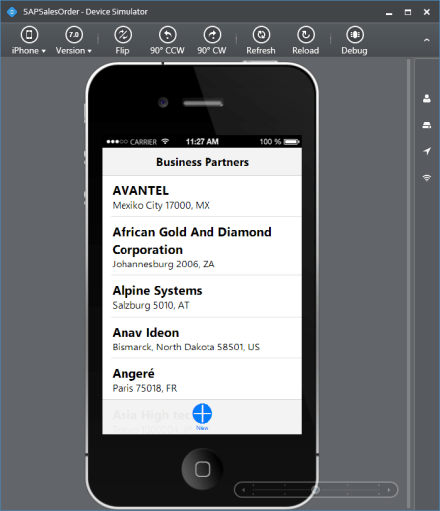
In this post series we are going to make Netflix Movie Explorer App. We will use Kendo UI OData feed of Netflix to create application. Final application (after this post) will look like as following,

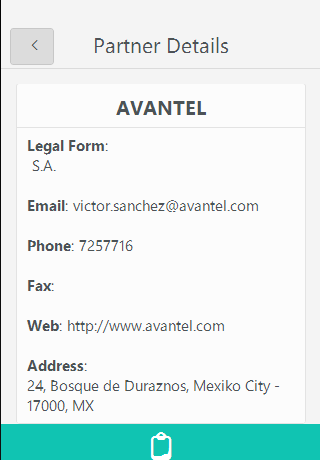
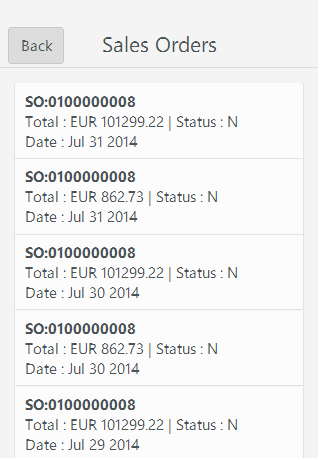
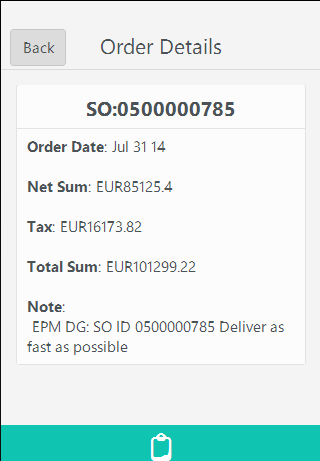
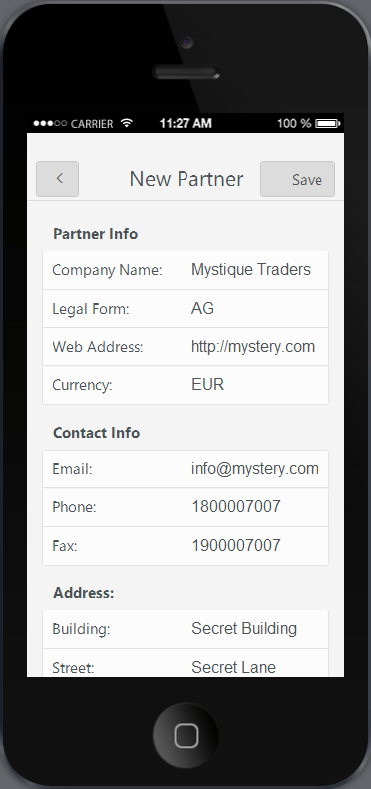
And on tapping of a movie, we will be navigated to

In order to create this application we will explore following in this post
- Working with KendoUI Mobile ListView
- Working with KendoUI Mobile View
- Working with kendoUI Mobile View Layout
- Working with Navigation between views
- Working with creating datasource and OData.
To start with we need to add following reference on HTML page

After adding all the required references let us try to create a Mobile View. A Mobile view contains single HTML page with multiple mobile views on that. For example you can have LoginView, ShowDataView ,AboutView . All mobile views are a div element with data-role property set to view. A View can be created as following,

You can set default view of the application in Application Startup. Let us set default view of the application as LoginView. That can be set as following,

Additionally we can set layout of the mobile application as well. There are two ways we can set the layout. Either we can set on the application level or we can set on particular view level. Let us set layout on application level. This can be set as following,

We have set the layout of the application. Now we need to create application layout we set. A Layout can be created as following,
- Create a <div> element.
- Set data-role property as “layout”
Hence layout can be created as following,

A Layout can have a Header and Footer. We can define Header and Footer in layout as following,

Let us put a back button in the header. A back button can be put as following

We have put nav bar and inside that a back button as header. A nav bar can be created as following
- Create a <div> element.
- Set data-role property to “navbar”
Inside the navigation bar we are putting a back button. That can be put as <a> link with setting data-role as “backbutton”
As of now we are done with navigation bar in header. Now let us create TabStrip in the footer.

A TabStrip can be created as following,
- Create a <div> element
- Set data-role property to “tabstrip”
Inside “tabstrip” we can have buttons to navigate between the pages. We are putting three buttons to navigate. We can specify view to navigate in href property of <a>.
- View to be navigated can be set by providing view id with hash tag as href property.
- Data-icon can be set to provide a specific look to button.
Putting all the codes together,
<html>
 <head>
 <title>
 Test Application
 </title>
 <link href="http://cdn.kendostatic.com/2012.1.515/styles/kendo.common.min.css" rel="stylesheet" />
 <link href="http://cdn.kendostatic.com/2012.1.515/styles/kendo.default.min.css" rel="stylesheet" />
 <link href="http://cdn.kendostatic.com/2012.1.515/styles/kendo.mobile.all.min.css" rel="stylesheet" />
 <script src="js/jquery.min.js" type="text/javascript"></script>
 <!-- Kendo UI Scripts -->
 <script src="http://cdn.kendostatic.com/2012.1.515/js/kendo.all.min.js" type="text/javascript"></script>
 <script src="http://cdn.kendostatic.com/2012.1.515/js/kendo.mobile.min.js" type="text/javascript"></script>
 </head>
 <body>
 <div data-role="view">
 <div data-role="header">Header</div>
 Hello world!
 <div data-role="footer">Footer</div>
 </div>

<div data-role="view" id="LoginView" >
 <h1>This is a Login View </h1>
 </div>
 <div data-role="view" id="DataView" >
 <h1>This is a Data View </h1>
 </div>
 <div data-role="view" id="AboutView" >
 <h1>This is a About View </h1>
 </div>
 <div data-role="layout" data-id="TestAppLayout">
 <div data-role="header">
 <div data-role="navbar">
 <a data-role="backbutton" data-align="left">
 Back
 </a>
 Test Application
 </div>
 </div>
 <div data-role="footer">
 <div data-role="tabstrip">
 <a href="#LoginView" data-icon="settings">Login</a>
 <a href="#DataView" data-icon="download">Data</a>
 <a href="#AboutView" data-icon="home">About</a>
 </div>
 </div>
 </div>

<script type="text/javascript">
 var app = new kendo.mobile.Application($(document.body), {
 initial: "LoginView",
 layout: "TestAppLayout"
 }
 );
 </script>

 </body>
</html>
</html>
Now go ahead and run the application. In mobile browser you should be getting output as following

As of now we have set layout at the application level. If we want we can have different layout for different view. Let us try that by giving different layout to DataView.
Create specific layout for DataView as following,

We can set layout for DataView as following,

If you notice here we have set layout at application level as well as view level. When layout is set at both levels then view level layout takes precedence over application level layout. After doing above modifications we should be getting following output,

On clicking of Data, you should be getting below output. If you notice Back button from header is working as expected.

Now let us try to show some data from service. In this case we will be displaying Movie details from OData feed of Netflix.
You can find Title of all the Movies from Netflix ODATA from below link.
http://odata.netflix.com/Catalog/Titles
Very first we need to create DataSource reading data from ODATA feed. We can create KendoUI Datasource as following

- Instance of kendo.data.DataSource being created
- Since data being fetched from ODATA feed so type is set to odata
- Pagesize property is set to tell server how many records need to be fetched. In this case it is 5.
- In Trasnport property we need to provide URL of ODATA feed.
Once we created datasource we need to create Template. In template we say how we want to show data in listview. A template can be created as following

In template we set property of DOM elements with the property of datasource. For example we want to display name of the movie. We are setting that with datasource property data.Name. Here data is name of the datasource and Name is property. A very important point need to be noticed is href value of <a> DOM element. We are setting that to DataDetailView. On tap user will be navigated to this view.
As of now we have created datasource and temple. Now let us create listview. To create a listview modify data div as following,

A listview can be created by setting data-role property of <ul> as listview. If you notice we are setting data-init property of view as getMovieDetails. In getMovieDetails function we are fetching data from OData feed and setting the template as following. We are setting template and datasource value in the property.

Combining all the discussions together and putting all the codes together we should have following code in HTML file.
<html>
<head>
<title>
Test Application
</title>
<link href="http://cdn.kendostatic.com/2012.1.515/styles/kendo.common.min.css" rel="stylesheet" />
<link href="http://cdn.kendostatic.com/2012.1.515/styles/kendo.default.min.css" rel="stylesheet" />
<link href="http://cdn.kendostatic.com/2012.1.515/styles/kendo.mobile.all.min.css" rel="stylesheet" />
<script src="js/jquery.min.js" type="text/javascript"></script>
<!-- Kendo UI Scripts -->
<script src="http://cdn.kendostatic.com/2012.1.515/js/kendo.all.min.js" type="text/javascript"></script>
<script src="http://cdn.kendostatic.com/2012.1.515/js/kendo.mobile.min.js" type="text/javascript"></script>
</head>
<body>
<div data-role="view">
<div data-role="header">Header</div>
Hello world!
<div data-role="footer">Footer</div>
</div>
<div data-role="view" id="LoginView" >
<h1>This is a Login View </h1>
</div>
<div data-role="view" id="DataView" data-init="getMovieDetails" >
<ul id="movieTitleView" data-role="listview"></ul>
</div>
<div data-role="view" id="AboutView" >
<h1>This is a About View </h1>
</div>
<div data-role="layout" data-id="TestAppLayout">
<div data-role="header">
<div data-role="navbar">
<a data-role="backbutton" data-align="left">
Back
</a>
Test Application
</div>
</div>
<div data-role="footer">
<div data-role="tabstrip">
<a href="#LoginView" data-icon="settings">Login</a>
<a href="#DataView" data-icon="download">Data</a>
<a href="#AboutView" data-icon="home">About</a>
</div>
</div>
<script type="text/javascript">
var app = new kendo.mobile.Application($(document.body), {
initial: "LoginView",
layout: "TestAppLayout"
}
);
</script>
<script id="movieTemplate" type="text/x-kendo-template">
<div>
<img src=${data.BoxArt.MediumUrl} height="50" width="50" />
<strong>${data.Name}</strong>
<a href="\#DataDetailView?Id=#:data.Id#"" data-role="detailbutton" data-style="detaildisclose"></a>
</div>
</script>
<script>
var data;
data = new kendo.data.DataSource(
{
type: "odata",
pageSize: 5,
endlessScroll: true,
scrollTreshold: 30,
transport:{
read: {
url: "http://odata.netflix.com/Catalog/Titles",
dataType: "jsonp",
data: {
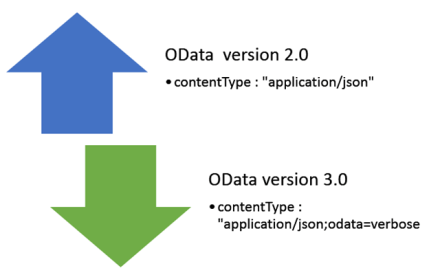
Accept: "application/json"
}
}
}
});
var getMovieDetails = function () {
$("#movieTitleView").kendoMobileListView(
{
template: kendo.template($("#movieTemplate").html()),
endlessScroll: true,
scrollTreshold: 30,
dataSource: data
});
};
</script>
</body>
</html>
On running we should be getting output as following

On tap of Data button we should get below output

At this point of time of you tap on the detail button you will be getting an exception because we have not created detail view yet. Let us create detail view

Here we are setting different layout to DataDetailView. Let us create layout as below,

This layout structure is same as we discussed previously. Now we need to write function shwDeatilsView function. In this function we will fetch selected data from the server on basis of Movie selected in first view.

This function is quiet simple. First we are reading query parameter as following,

After that we are making a call to server to fetch specific detail of the movie. Server call is as following. We are setting filter to fetch specific record.

Once data is being fetched from the server, we need to initialize downloaded data to Movie Detail template. This template will tell how we are going to show data in movie detail page.

We need to write MovieDetailtemplate as following,

Combining all the discussions together and putting all the codes together we should have following code in HTML file.
<html>
 <head>
 <title>
 Test Application
 </title>
 <link href="http://cdn.kendostatic.com/2012.1.515/styles/kendo.common.min.css" rel="stylesheet" />
 <link href="http://cdn.kendostatic.com/2012.1.515/styles/kendo.default.min.css" rel="stylesheet" />
 <link href="http://cdn.kendostatic.com/2012.1.515/styles/kendo.mobile.all.min.css" rel="stylesheet" />
 <script src="js/jquery.min.js" type="text/javascript"></script>
 <!-- Kendo UI Scripts -->
 <script src="http://cdn.kendostatic.com/2012.1.515/js/kendo.all.min.js" type="text/javascript"></script>
 <script src="http://cdn.kendostatic.com/2012.1.515/js/kendo.mobile.min.js" type="text/javascript"></script>

 </head>
 <body>
 <div data-role="view">
 <div data-role="header">Header</div>
 Hello world!
 <div data-role="footer">Footer</div>
 </div>

<div data-role="view" id="LoginView" >
 <h1>This is a Login View </h1>
 </div>

<div data-role="view" id="DataView" data-init="getMovieDetails" >
 <ul id="movieTitleView" data-role="listview"></ul>
 </div>

 <div data-role="view" id="AboutView" >
 <h1>This is a About View </h1>
 </div>
 <div data-role="layout" data-id="TestAppLayout">
 <div data-role="header">
 <div data-role="navbar">
 <a data-role="backbutton" data-align="left">
 Back
 </a>
 Test Application
 </div>
 </div>
 <div data-role="footer">
 <div data-role="tabstrip">
 <a href="#LoginView" data-icon="settings">Login</a>
 <a href="#DataView" data-icon="download">Data</a>
 <a href="#AboutView" data-icon="home">About</a>
 </div>
 </div>
 </div>
 <div data-role="layout" data-id="TestAppDataLayout">
 <div data-role="header">
 <div data-role="navbar">
 <a data-role="backbutton" data-align="left">
 Back
 </a>
 Data
 </div>
 </div>
 <div data-role="footer">
 <div data-role="tabstrip">
 <a href="#DataView" data-icon="download">Save</a>
 </div>
 </div>
 </div>
 <div data-role="view" id="DataDetailView"
 data-layout="TestAppDataLayout"
 data-show="showDetailsView">
 <h1>This is a Data Detail View </h1>
 </div>

<script type="text/javascript">
 var app = new kendo.mobile.Application($(document.body), {
 initial: "LoginView",
 layout: "TestAppLayout"

 }
 );
 </script>

<script id="movieTemplate" type="text/x-kendo-template">
 <div>
 <img src=${data.BoxArt.MediumUrl} height="50" width="50" />
 <strong>${data.Name}</strong>
 <a href="\#DataDetailView?Id=#:data.Id#"" data-role="detailbutton" data-style="detaildisclose"></a>
 </div>
 </script>

<script id="movieDetailTemplate" type="text/x-kendo-template">
 <div>
 <img src=${data.BoxArt.MediumUrl} height="100" width="100"/>
 <br/>
 Movie Name : <strong>${data.Name}</strong>
 <br/>
 ${data.Synopsis}
 </div>
 </script>
 <script>
 var data;
 data = new kendo.data.DataSource(
 {
 type: "odata",
 pageSize: 5,
 endlessScroll: true,
 scrollTreshold: 30,

 transport:{
 read: {
 url: "http://odata.netflix.com/Catalog/Titles",
 dataType: "jsonp",

data: {
 Accept: "application/json"
 }
 }
 }

});

console.log(data);

 var getMovieDetails = function () {

$("#movieTitleView").kendoMobileListView(
 {
 template: kendo.template($("#movieTemplate").html()),
 endlessScroll: true,
 scrollTreshold: 30,
 dataSource: data
 });
 };
 var movieDetailTemplate = kendo.template($("#movieDetailTemplate").text());

function showDetailsView(e) {
 var view = e.view;
 console.log(view.params.Id);
 var query = view.params.Id.toString();
 var data1 = new kendo.data.DataSource(
 {
 type: "odata",
 serverPaging: true,
 serverFiltering: true,
 pageSize: 50,
 transport: {

 read: "http://odata.netflix.com/Catalog/Titles"
 },

filter: { filters: [{ field: "Id", operator: "eq", value: query}] }
 });
 data1.read();
 data1.fetch(function () {
 var item = data1.at(0);
 console.log(item);
 view.scrollerContent.html(movieDetailTemplate(item));
 kendo.mobile.init(view.content);
 });
 }

</script>

 </body>
</html>
Now let us go ahead and run application

Now when we select a movie, we will go into detail of that movie

Conclusion
Yes detail view is not that immersive. In second part of this post, we will make it more immersive and implement much more features. I hope you like this post. Thanks for reading.