
While creating hybrid mobile application or a web application, we always come across requirement when we need to insert a record or create a record in the database. In this post we will take a look on creating a record from Kendo UI DataSource. Kendo DataSource will make a call to OData Service to insert a record. Essentially structure we are assuming in the post is as given in below diagram,

Let us follow step by step approach to perform insertion. Very first let us make variables to holding URLS to create and read data from OData service. In your case these URL values will be as per your service
![]()
Now we need to create Kendo DataSource. While creating Kendo data source we can configure it for reading and creating records.
To read values in the transport of data source set the value of read property with READ_URL. In below image you will notice that we are setting type of data source as odata because we are interacting with database via OData service. To read data you need to set following attribute of Kendo datasource.

We want to configure Kendo datasource for creating record also. For that we need to configure create property of Kendo datasource. In create property is a JSON object and essentially it takes following parameters
- url: OData url to created record.
- type : to create a record type should be POST
- datatype : this should be set to json or xml.
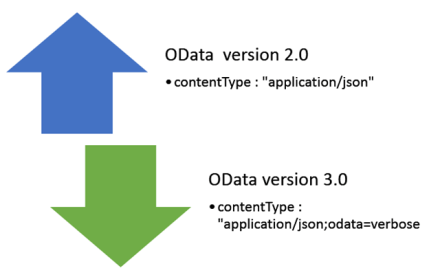
- contentType : This attribute is set for the content type

For OData version 2.0 contentType should be set to application/json .However in case of OData version 3.0 it should be set to application/json;odata=verbose.

After configuring Kendo datasource to create record, we need to set the schema of the kendo datasource. We must set schema of data source to successfully perform create record operation. In the schema, we need to create model defining different fields or columns. We need to provide type of the columns. Other types can be number, date, and string. Make sure you are setting total property of schema with count.

After setting all the required properties code to create Kendo data source is as following,
var READ_URL = "http://localhost:62272/SudentModelService.svc/Peoples";
var CREATE_URL = "http://localhost:62272/SudentModelService.svc/Peoples";
var dataSource = new kendo.data.DataSource({
type: "odata",
transport: {
read: {
url: READ_URL
},
create: {
url: CREATE_URL,
type: "POST",
dataType: "json",
contentType: "application/json;odata=verbose"

}
},
schema: {
total: "count",
model: {
id: "PersonID",
fields: {
PersonID: {

type: "number"
},
LastName: {
type: "string"
},
FirstName: {
type: "string"
}

}
}
}

});
As of now we have created data source to perform read and create operation. Now to create a record we need to create an item. Item can be created from reading values from the view. After creating item call add function on data source. Last step is to sync data with the server. This can be done by callinf sync function on the datasource.
var item = {
FirstName: $("#txtFirstName").val(),
LastName: $("#txtLastName").val()
}

dataSource.add(item);
dataSource.sync();
console.log("done");
In this way we can create or insert a record in database from Kendo UI data source using OData service. I hope you find this post useful. Thanks for reading.

Great article for beginners, thanks. Do you have an article showing similar details required for update of a modified record?
Thanks that you like article. I will write on requested topic soon !
how to connect the sql server 2008 database with icenum visual studioextension