RadHtmlChart

How to Bind RadHtmlChart for ASP.NET AJAX to SQL Data Source Control

Introduction:

RadControls for ASP.NET AJAX contains a HTML5 powered charting control known as RadHtmlChart. This charting component outputs SVG and is completely client side rendering of the chart. The charting component will output SVG on modern browsers and falls back to VML when running in older browsers. When it comes to data binding the chart, it supports a wide range of data binding mechanism starting from simple array to your custom object collection. In this blog post we will take a look at one of the data binding mechanism namely binding to SqlDataSource.

Pre-Requisites:

In order to follow this post, you will need our RadControls for ASP.NET AJAX suite. You can download a 30 day free trial from http://www.telerik.com/products/aspnet-ajax.aspx. So download the trial and install it on your system. If you already have a licensed version installed that’s even better. Following sections assume that you have done this.

Getting Started:

First lets create a “C# RadControls Web Application”. Fire up a Visual Studio and do the customary File > New Project action. In the new project dialog, you will see Telerik as one of the installed template. Expand Telerik and you will see Web as one of the nodes. Select Web and you will presented with different project templates. Select “C# RadControls Web Application”. Give your project a name and click Ok.

SNAGHTML1665f329Fig 1: New Project Dialog

You will be presented with 2 more dialogs to select theme and web settings. Select appropriately and finish the wizard. Visual Studio will go ahead and create the project.

Adding SQL Data Source to the page:

The project template will add all references required for Telerik ASP.NET Ajax controls, necessary updates to Web.config and create a Default.aspx page. We will be working with Default.aspx for this blog post. Since we need to bind the chart to a SqlDataSource control, lets go ahead and add one to the page. You can configure the data source using the smart tag option in the ASPX page or just go to design and select the smart tag on the control.

image

Fig 2: Configuring SqlDataSource

Clicking on Configure Data Source, will open “Choose Your Data Connection” dialog. So go ahead and set up your connection for the data source. For this example I will be using Northwind as the database and Products table. Once you pass the connection settings dialog, you will be required to configure the select statement. For this demo I will just do a select of top 10 products by their price in descending order. Here is how my test query looks like:

SNAGHTML1678372cFig 3: Test Query Dialog

Click Finish to finish configuring the SqlDataSource. Next we will see how to work with RadHtmlChart.

Adding RadHtmlChart to the page:

From the Toolbox, drag and drop a RadHtmlChart on the page. In the ASPX page, select the smart tag on the RadHtmlChart. It will open a configuration window. We will configure the RadHtmlChart now to work with SqlDataSource control.

image

Fig 4: RadHtmlChart Smart Tasks

Select the DataSource from the Choose Data Source drop down.Then click on the Open Configuration Wizard. You will see the following Configuration Wizard pop up:

SNAGHTML167ef05cFig 5: RadHtmlChart Configuration Wizard

We will go through the configuration one by one.

Chart Type:

For this blog post I will be going with Column chart. So in the Type tab, select Column Chart.

SNAGHTML1680fd76Fig 6: Chart Type selection

Data:

Now to let the chart know where to read the data from, select the Data tab. The data source would have been defaulted to the sql data source we had added in previous section. Now we need to add a series to the chart. Click on the “+” button next to the Series section. Provide Name, AxisName, Type of the series and what field in the data source should the Y axis data point be read from. For this example UnitPrice will be my Y axis data point. I will be plotting the price on the Y axis. Here is how my settings look like:

SNAGHTML1684d53e

Fig 7: Series configuration

X Axis:

Now we need to configure how our X axis will look like. If you want to customize the Min Value, Max Value, Step and Axis Crossing Value or you want to hard code the X axis items, you can do so in the XAxis tab.

SNAGHTML168eec95

Fig 8: XAxis Configuration

Once done with the settings click Apply. Now we need to show the product name as the X axis data point. For that we will need to get back to the code, add a property called “DataLabelsField” and value of this property will be the column name from the data source which will contain the data points. In our case this will be ProductName column. Here is the code:

<XAxis DataLabelsField="ProductName"></XAxis>

Y Axis:

Similar to XAxis you can customize how you want the YAxis to look. The YAxis tab provides you options to customize the axis and also allows you to add additional Y Axis to the chart.

SNAGHTML1694c8e0

Fig 9: YAxis Configuration

In our current example, we don’t have to do anything here. The Min and Max value and Step will be calculated automatically based on the data source.

Legend, Title:

Last but not the least, we can customize how the Legend and the Title of chart should look like. Click on the Legend/Title tab and provide the appropriate data. Here is my settings:

SNAGHTML169795df

Fig 10: Legend, Title Configuration

Click Ok when done. This will generate the following code in the ASPX:

<telerik:RadHtmlChart ID="RadHtmlChart1"
runat="server" DataSourceID="SqlDataSource1">
 <ChartTitle Text="Top 10 Products By Price">
 <Appearance>
 <TextStyle FontSize="16px"></TextStyle>
 </Appearance>
 </ChartTitle>
 <Legend>
 <Appearance Position="Top"></Appearance>
 </Legend>
 <PlotArea>
 <XAxis DataLabelsField="ProductName">
 </XAxis>
 <YAxis Name="Price">
 </YAxis>
 <Series>
 <telerik:ColumnSeries Name="Price"
 DataFieldY="UnitPrice" />
 </Series>
 </PlotArea>
 </telerik:RadHtmlChart>

So we are now done with the RadHtmlChart configuration. We have configured it to work with the Sql Data Source we added in the previous section. We have set what chart we want and configured the series, XAxis, YAxis and Legend/Title. Its time now to look at the output.

Output:

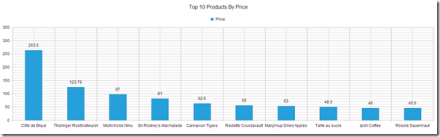
Build and run the project. It should open up a browser and show you the following chart output:

image

Fig 11: RadHtmlChart output

Conclusion:

In this post we saw how easy it is to configure RadHtmlChart to work with Sql Data Source. Also we looked at the RadHtmlChart configuration wizard which makes it super easy to configure the chart with various settings and best of all you don’t have to write any code. The configuration wizard gives you a GUI and when you are done with the settings, it will generate the code for you. I say this is a productivity gainer. Let us know how you are using RadHtmlChart in your projects. We will love to hear your feedback or suggestions. So do drop in a line in the comments.

Till next time, Happy Coding.

Advertisement

How to use existing Test Scripts to create new test in Test Studio

Learn more about Test Studio here

In one of customer demo, I came across a question that how we could use test scripts recorded on different machine or rather an existing test script to create a new test in Test Studio.

This can be done very easily in Test Studio. Each Test Project in Test Studio can be opened in File system. Let us say you want to use Test1 to create another test. So right click on Test1 and from context menu select Show in Windows Explorer

image

On File system you will find Test Studio Test file. You need to use this Test Studio Test File to create new test with existing scripts.

clip_image002

Next to use existing test script, right click on Test Project you get option to Add Existing Test in content menu.

clip_image004

Browse to existing Test Studio Test File you want to use to create new test. Select Test File click on Open.

clip_image006

On clicking on Open you will find that you have created new test with existing test. Newly created test will have same name as of existing test. If you want you can rename test by right clicking on the test and selecting rename option from context menu.

So just we learnt that it is very simple to use existing test scripts to create new test in Test Studio. I hope you find this post useful. Thanks for reading.

Learn more about Test Studio here

JavaScript Objects and Inheritance using Kendo UI

Learn more about Kendo UI here

In this post we will take a look on JavaScript Inheritance using Kendo UI. To start with you create JavaScript object using Literals as following,


var Vehicle = {

model: "car",
 color: "red",
 sayGreeting: function () {

alert(this.model + this.color);
 }

};

There are other two ways to create JavaScript object also exists

  1. Using new operator
  2. Using Object.Create() static method.

Learn more about Objects in JavaScript here

Kendo UI gives you different syntax to create object and for inheritance.

image

Kendo UI gives you different syntax to create a JavaScript Object. You can create same Vehicle object using Kendo UI as below,

 var Vehicle = kendo.Class.extend({

model: "car",
 color: "red",
 sayGreeting: function () {

alert(this.model + this.color);
 }

});

You can use object created using Kendo UI as below,

var v = new Vehicle();
 v.sayGreeting();

You will get output as below,

clip_image001

In kendo UI , you can create object with Constructor as well. Using init method you can add a constructor to object. In below code snippet we are creating object with constructor.


var Vehicle = kendo.Class.extend({

model: "car",
 color: "red",
 init: function (model, color)
 {
 if(model) this.model = model;
 if(color) this.color = color;

},
 sayGreeting: function () {

alert(this.model +" "+this.color);
 }

});

Now you can create object passing with constructor as below,

 var v = new Vehicle("truck", "black");
 v.sayGreeting();

Above we are creating object passing argument to constructor and then calling sayGreeting() function as well. As output you will get alert message.

clip_image001[6]

Now we can extend object using extend method.


var luxuryVehicle = Vehicle.extend(
 {
 brand: "bmw",
 price : "23560$"

});

As you see that we added two more properties in child object. Let us go ahead and create a new instance of this object.


var a = new luxuryVehicle();
 a.color = "dark grey"
 a.sayGreeting();

Above we are overriding color property of parent class and calling method of parent class. As a output you will get overridden value of color and parents value for model.

clip_image001[8]

In this way you can work with object and inheritance in JavaScript using Kendo UI. I hope you find this post useful. Thanks for reading.

Learn more about Kendo UI here

How to create Support Ticket from Telerik Test Studio Desktop

Learn more about Test Studio here

In this post we will take a look on creating Support Ticket from Test Studio Desktop. To create support ticket after launching Test Studio Desktop click on Help in top menu

clip_image002

After clicking on Help menu in ribbon you get option to Submit Ticket. Click on Submit Ticket to create a support ticket.

clip_image004

Now either you need to create a new Telerik account or login with existing account. I am login with existing Telerik account

clip_image005

After successful login, you will be provided with options from various products. Select TestStudio and click on Contact Support Team

clip_image007

You will get option to create Support Ticket under product Test Studio. If Test Studio is expired for you then you will get message as like below,

clip_image009

These steps you need to follow create Support Ticket. I hope you find this post useful. Thanks for reading.

Learn more about Test Studio here

Telerik India Webinars–Monsoon Edition

MP900410082[1]The country is drenched with monsoon. Hope you have stepped out and enjoyed getting soaked in the rains sometime.

Your monthly quota of e-learning fun is here too. We would like to thank you for your enthusiastic participation and are pleased to share the webinars for Aug-Sept ‘13. The webinars are free to attend.

Date Time (IST) Description
8th Aug 3:00 – 4:00 PM Modern UI in your Web Applications using Telerik RadTileList
22nd Aug 3:00 – 4:00 PM Integrating coded steps in functional tests of Telerik Test Studio
5th Sep 3:00 – 4:00 PM Make Windows Forms speak the Windows 8 Modern UI design
19th Sep 3:00 – 4:00 PM Agile Project Management applied across all your projects with Telerik  TeamPulse
26th Sep 3:00 – 4:00 PM Implementing Charting in WPF

We love T-Shirts and are pleased to confirm that we would be giving out 2 T-Shirts to lucky attendees at each of the webinars above. The T-shirt is sure shot way to gather some admiration in your campus.

If there are any topics that you would like to see in the future webinars, please do let us know in the comments section.

If you would like view the past webinars recordings can be found on our blog here: https://telerikhelper.net/category/webinars/

Radcontrols for ASP.NET AJAX

Resources for Webinar “HTML5 Charting with RadControls for ASP.NET AJAX”

On Jul 25 we conducted a webinar titled “HTML5 Charting with RadControls for ASP.NET AJAX”. This is part of the ongoing webinar series we here at Telerik India are doing targeting the APAC region. We call this the Telerik .NET Ninja Developer Webinar series.

RadControls for ASP.NET AJAX is one of our most sought out suite of controls. With over 70+ controls on ASP.NET AJAX platform, this gives you a complete development toolset and also a rapid UI development suite for your project needs. You can know more about our RadControls for ASP.NET AJAX suite at: http://www.telerik.com/products/aspnet-ajax.aspx

Slide Decks:

Here is the slide deck used in the webinar:

Webinar Video:

Many of you had asked whether the webinar will be available as a recorded video for later viewing. We record all our webinars and here is the video of this webinar:

Q & A:

A lot of questions were asked in the webinar. We were able to answer some of the them. So I will be trying to collate all the questions asked during the webinar and put them here in this blog post. So here are the questions from the webinar and their answers:

Q: Can we add series items dynamically and show legend with this dynamic name?
A: Yes this is supported. You can use data source for dynamically creating a chart based on the data in the DB.

Q: Can these charts be exported?
A: Yes you can. Take a look at the following example: http://www.telerik.com/community/code-library/aspnet-ajax/html-chart/exporting-radhtmlchart-to-png-and-pdf.aspx

Q: Is there a version available for MVC?
A: Yes we do. Please look at http://www.kendoui.com/server-wrappers/mvc.aspx

Q: is there a option for additional x-axis?
A: No. We support additional Y axis

Q: How many Additional Y Axis we can add?
A: Unlimited.

Q: Do we need to install SVG viewer?
A: No. All browsers support SVG. So no need to install anything. Older browsers support VML. So we fallback to VML when we see that its an older browser.

Q: We already have Telerik controls, do we have chart control there?
A: Yes you have. RadHtmlChart is supported from Q2 2012 onwards.

Q: Can we zoom or pan this chart or lines?
A: RadHtmlChart at the moment does not support the Zoom or Pan feature.

Q: Are these printer freindly?
A: While the charts can be printed, we have a reporting suite more suitable for printing requirements that supports charts, barcodes etc. http://www.telerik.com/products/reporting.aspx

Q: Does this supports mobile development also?
A: We have another suite more suitable for mobile development called Kendo DataViz. http://www.kendoui.com/dataviz.aspx

Q: What is the benefit of HTML 5 charts than Visual Studio .net , i mean asp.net chart?
A: ASP.NET charting controls generate the charts on the server side as IMAGE and then send it to the client. Where as RadHtmlChart does client side rendering of the chart. RadHtmlChart outputs SVG which is a HTML5 standard where as ASP.NET chart is still a IMAGE.

Q: Can we create speedometer dials using the html5 instead of dojo tool kit
A: http://demos.kendoui.com/dataviz/radial-gauge/index.html

Q: Chart drill down is also possible?
A: No. Drill down is not supported at the moment. But you can implement this easily by listening to OnSeriesClicked client side event.

Q: Is there an option to update the controls periodically to fetch data from db?
A: You will need to implement this by writing some code. Since RadHtmlChart supports client side binding, you can ping a JSON end point, get the data and bind it to the RadHtmlChart on the client side. You can have a window timer and get the data periodicaly.

Q: What is the difference between HTML 5 Application Cache and regular HTML Browser Cache?
A: App Cache is a feature introduced by HTML 5 spec that is available for developers. Browser Cache is a location where browser caches all data e.g. images, HTML etc.

Q: Are more than 5 colors available in pie chart?
A: With the release of Q2 2013, RadHtmlChart now has 10 built-in colors for the series for each skin.

Webinar Giveaway – .NET Ninja T-Shirt:

We normally giveaway 2 .NET Ninja t-shirts as part of the webinar. So we have selected the following two persons to receive out t-shirts:

  • Lavanya Koduru
  • Namrata Dhanak

Congratulations to the winners. Others don’t worry, make sure you attend our next webinar and who knows you could be the winner of the t-shirt.

Thanks to one and all who made it to the webinar. We hope it was useful and looking forward to you joining us in future webinars.

Till next time – Happy Coding!

Resources for Webinar “Data Driven Testing using Test Studio”

Learn more about Test Studio here

On Jul 18 we conducted a webinar titled “Data Driven Testing using Test Studio”. This is part of the ongoing webinar series we here at Telerik India are doing targeting the APAC region. We call this the Telerik. .NET Ninja Developer Webinar series. You can take a look at the Jun-Jul schedule here: https://telerikhelper.net/2013/05/24/telerik-webcasts-june-july/

image

Learn more about Test Studio here

Slides deck of webinar is here,

For those of you who missed attending the webinar live, we have it covered for you. We record all our webinars and so was this one. Here is the recording of the webinar:

Telerik Ninja T-Shirt Giveaway:

We select 2 person from the webinar attendees and give away our .NET Ninja T-Shirt in each of our webinars. We have picked up 2 lucky persons in this webinar too. They are:

Sharma, Avinash

Neha Tiwari

Congratulations to the winners. We will be contacting you shortly and we will ship your t-shirts.

Excited to see you in next webinar

Automate Database Insertion Test using Test Studio

Learn more about Test Studio here

Inserting data from application is very prominent task. You will find this functionality in all kind of applications. In this post we will take a look on automating the test to verify insertion of data in database.

Let us assume you have following application to insert data in database,

image

And you have recorded test steps for insertion operation as following. As you see that all the test steps are passed and data got inserted in database.

image

At this point there is no step to verify that whether data got inserted to database successfully or not? Only manually Tester can verify that data being inserted or not. Now let us see that how can we automate this test.

We will automate this test using

  • Coded step
  • Performing database verification operation in coded step. We will choose LINQ to verify that whether data got inserted successfully not. You can choose any other data base technology like ADO.Net or other library to perform operation against database.
  • We will use NUnit for assertion

Very first we need to add a Coded step. To add coded step select Test from menu and then Script Step from ribbon as given in below image.

image

You will be asked to select scripting language. I am selecting C# as scripting language here.

image

Once Code step is added export test project to Visual Studio. To export to visual studio from menu click on Export to Visual Studio as shown in image below,

image

Next select Visual Studio version to export project.

image

Creating Library to work with LINQ

Now in visual studio you need to add operations related to LINQ in different class library. Idea is that we will create separate library for LINQ operation and later we will add that library to Test Studio.

clip_image002

Assume that we have created a library with name DataLibrary. This Library got

  • LINQ data context classes
  • We added a static class in which operation is being performed to verify that whether data exist with given user name or not? If data does not exist static function will return false else true.

So DataHelper class contains following code to verify that whether data exist or not.


public static class DataHelper
 {
 public static bool VerifyInsertion(string username)
 {
 DataClasses1DataContext conext = new DataClasses1DataContext();
 var result = (from r in conext.User_Login_Datas
 where
 r.username.Equals(username)
 select r).FirstOrDefault();
 if (result == null)
 return false;
 else
 return true;

}
 }

Adding Reference in Test Project

There are in two ways you can work on Test Studio. Either on Visual Studio plugin or on Test Studio Desktop.

Adding reference in Visual Studio is simpler. Right click on test project and from context menu select Add Reference. Browse to DataHelper.dll library and add reference in test project.

Even though you have added reference in Visual Studio make sure that you have added reference in test project opened in Test Studio desktop version else you will get exception.

To add DataHelper.dll assembly in Test Studio desktop version you need to follow following steps,

In project tab or project dashboard select Settings option from ribbon

clip_image002[6]

In dialog box click on Script Options. To add assembly reference click on Add Reference.

clip_image004

The way you added DataHelper library add Add reference of nunit.framework dll in Test Project as well. Make sure to add this in Test Studio desktop version also.

After adding references you need to write codes for coded steps. We need add two coded steps,

First coded step to read username value before Post back or Form get submitted. In this particular application when user will click on Insert Data button, a post back will occurred or form will get submitted and this will clear value of all the elements in DOM. So we need to read value before form submission. We can do that in coded step as following,

image

We are reading text of UserName field using TestStudio Framework API.

Second coded step will call VerifyInsertion function from DataHelper library and using NUnit we will assert the validation. We can do that as following,

image

For your reference both coded steps are as follows,


string insertedValue = string.Empty;

 [CodedStep(@"New Coded Step")]
 public void Data_Insert_Test_CodedStep()
 {

 bool result = DataHelper.VerifyInsertion(insertedValue);
 NUnit.Framework.Assert.AreEqual(true, result);
 }

[CodedStep(@"New Coded Step")]
 public void Data_Insert_Test_CodedStep1()
 {
 insertedValue = Find.ById<HtmlInputText>("MainContent_txtUserName").Text;

}

Your test should be like following

clip_image001

In this way you can automate data insertion test in database. I hope you find this post useful. Thanks for reading.

Learn more about Test Studio here

Kendo UI Logo

Resources for Webinar “Developing ASP.NET MVC Applications Quicker with Kendo UI”

On Jul 11 we conducted a webinar titled “Developing ASP.NET MVC Application Quicker with kendo UI”. This is part of the ongoing webinar series we here at Telerik India are doing targeting the APAC region. We call this the Telerik .NET Ninja Developer Webinar series. You can take a look at the Jun-Jul schedule here: https://telerikhelper.net/2013/05/24/telerik-webcasts-june-july/

image

Kendo UI is a HTML5 based JavaScript framework for developing HTML5 based sites or apps. Its everything you need to develop the sites and apps. Its one package which will give you pretty much everything you need to develop a HTML5 based apps or sites. Although it is a client side framework and that means a lot of JavaScripting, we have you covered if you want to develop on the server side. We have what we call as ASP.NET MVC Wrappers for Kendo UI. This give you the power of JavaScript but the productivity of server side. So this webinar was all about how you can build UI quicker in ASP.NET MVC using Kendo UI.

Slide Deck:

Here is the slide deck which I used for the webinar:

Webinar Video:

For those of you who missed attending the webinar live, we have it covered for you. We record all our webinars and so was this one. Here is the recording of the webinar:

Questions & Answers:

During the webinar, my team tried hard to answer as many questions as we can. With the interest of the time we normally collect all your questions and try to answer them through this recap blog post. So here is all the questions and answers for them:

Q: What is the license cost or purchase cost for Kendo ?
A: kendo UI costing is available at this page: http://www.kendoui.com/purchase.aspx

Q: Can we use Kendo UI for asp .net apps without MVC?
A: Yes you can. But note that Kendo UI is all about client side. So no server side programming of Kendo UI controls. You will need to use JavaScript way of working with Kendo UI in technology other than ASP.NET MVC. The server side wrappers are available only for ASP.NET MVC.

Q: Is Kendo UI available as part of Telerik Controls ?
A: You can buy Kendo UI as a single product. Here is the Kendo UI pricing – http://www.kendoui.com/purchase.aspx.  Also, if you buy any of our DevCraft bundles, kendo UI is included in the bundle. Here is our DevCraft bundle pricing – http://www.telerik.com/purchase.aspx

Q: Any live application developed using kendo UI?
A: You can take a look at www.kendouimusicstore.com. This is a famous reference app for ASP.NET MVC which was developed by Microsoft. We took the same and converted it to a Kendo UI application with front end being completely done using Kendo UI controls and back end powered by Web API.

Q: Before starting development, which language knowledge required?
A: If you know JavaScript, then you know Kendo UI. Kendo UI is built on JQuery. So nothing new to learn. If you want to program Kendo UI using a server side technology – we support Server Side Wrappers for ASP.NET MVC, JSP and PHP.

Q: Can we use kendo UI with Web API?
A: Yes absolutely. Kendo UI has Data Source that easily connects with Web API.

Q: To develop app in Kendo UI little bit JS is enough?
A: Yes, you do require JS knowledge especially awareness of jquery kind of syntax. But you can directly use ASP.NET MVC, PHP or JSP server side technologies too.

Q: How do we decide between jQuery UI and Kendo UI? Do we have comparison charts between these products?
A: Take a look at this article – http://jqueryuivskendoui.com/

Q: Will Kendo UI Support SharePoint 2010?
A: Kendo UI is a client side control set. As long as you develop a webpart which supports accessing external JavaScript and Stylesheet, Kendo UI can be used anywhere.

Q: Can we use knockout.js in Kendo UI or it’s not required because it’s different JavaScript library similar to knockout.js
A: Kendo UI has all the capabilities that you require (even of KO). But you can also use KO with Kendo UI.

Q: What kindsof data sources are supported?
A: Out of the box Kendo UI Data Source can handle JSON and XML.

Q: Does it support multiple cultures?
A: Globalization is one of the features in built in Kendo UI. So you can include the appropriate culture Kendo UI JS file and set the culture you want to work with. Rest will be handled by Kendo UI.

Q: Is Kendo UI a jquery plugin?
A: Kendo UI is not a Jquery plugin or a clone. Kendo UI is written from ground up but is based on Jquery. Jquery is the only dependency Kendo UI has. All the constructs in Kendo UI are similar to Jquery so that the learning curve is less.

Q: What are the key features of Kendo UI Mobile?
A: You can take a look at our Kendo UI Mobile product page – http://www.kendoui.com/mobile.aspx

Q: Is there any Kendo Controls for Winforms?
A: No. Kendo UI is for Desktop Browser based application and Cross Platform Hybrid Mobile Application development. for WinForms we have a separate control suite which you can take a look at here – http://www.telerik.com/products/winforms.aspx

Q: Can we have Scheduler control in Kendo UI?
A: Yes. Scheduler control is available as part of Q2 2013 release of Kendo UI.

Q: Can we use Kendo UI to show data in modal and provide CRUD operations with validations in Kendo UI
A: Kendo UI Grid already supports this feature. Take a look at our Grid demos online at – http://demos.kendoui.com/web/grid/index.html

Q: Kendo UI is only a Java Script library or any server side components are also involved?
A: Kendo UI is a client side HTML5 based JavaScript framework. We have server side wrappers to speed up your Kendo UI programming. The wrappers just output the necessary JavaScript code which otherwise you would have to write.

Q: Can we bind data from SQL DB?
A: You need to create Web Service or Web API which can return the data as JSON. Kendo UI has a JavaScript data source which can work out of the box with a service returning JSON payload or xml payload.

Q: Does that mean apps developed using Kendo UI can be used on mobile browser?
A: Yes. Kendo UI Web controls are touch aware and can run on all modern browsers.

Q: How do we compile to native app after completing the app in Kendo UI mobile?
A: If you are using our Cloud Based IDE – ICENIUM, it lets you build for iOS and Android platform right from the IDE. Otherwise you will need to use PhoneGap build mechanism to generate the package.

Q: How Kendo UI is different when compared with Knockout.Js ?
A: As far as I know, Knockout.js is a library to achieve data binding where as Kendo UI is a complete framework which provide Widgets/MVVM/Validation etc.

Q: Is there any project template for VS2012 from kendo UI?
A: Yes. When you install Kendo UI using our installers, we ship in a Visual Studio project template to speed up your ASP.NET MVC development with Kendo UI.

Q: Can we integrate WPF app in this Kendo UI?
A: WPF is a different technology set. Kendo UI is meant for Web applications & not WPF.

Q: What are the mandatory script files need to be included in kendo UI on working in MVC 4?
A: You need to include Kendo UI Web JavaScript and Kendo Stylesheet files into your project.

Q: Does charts in DataViz support on IE8 ?
A: Yes, it is supported.

Q: Can the CSS be modified as per our need?
A: Yes absolutely. We even provide an online tool to facilitate this: http://demos.kendoui.com/themebuilder/index.html

Q: Can you talk about Kendo UI licensing?
A: Kendo UI is licensed on per developer basis. For more details and discounts, please write to sales@telerikindia.com

Q: Do you have any facility for group license?
A: Yes, absolutely. Please write to sales@telerikindia.com

Q: In the era where the line between PC/Laptop display and mobile display getting blurred day by day, e.g. PCs getting touchscreen, mobiles/tablets getting Full HD/Retina displays, how one should plan their investment for web application? I mean if we are targetting global reach, how you recommend Kendo UI for mobile/MVC?
A: Kendo UI Mobile is used to create Cross-Platform Apps. Using that you create apps for devices and phones . Kendo MVC Wrapper is used in MVC based web apps .

Q: Is this light weight control?
A: Yes, Kendo controls are very light weight controls with no addition to ViewState etc. Since it can use the client side processing capabilities as well, the performance is phenomenonal. It also supports virtualization etc.

Q: Can you elaborate more on “Virtualization”?
A: do take a look here: http://demos.kendoui.com/web/grid/virtualization-remote-data.html

Q: what is MVVM framework?
A: Kendo comes with its own optimized MVVM framework. Please refer to the following webcast that we had done on the same: https://telerikhelper.net/2013/05/31/resources-for-webinar-mvvm-validation-using-kendo-ui-in-web-applications/

Q: Can we use trail version control in any professional web site?
A: No, trial license explicitly forbids you from using it in live/professional web sites. Please write to sales@telerikindia.com and we can help you further with more information.

Q: Not clear how chart series changes according to data
A: Learn more about charts here http://demos.kendoui.com/dataviz/bar-charts/index.html

Q: How can we do conditional validation in KENDO UI?
A: Please do take a look at the demo here: http://demos.kendoui.com/web/validator/index.html

Q: Kendo is for web based or mobile based services?
A: Kendo UI web is meant for web apps. Kendo UI Mobile is meant for mobile. They both share a common base framework.

Q: Will there be wrapper for ASP.NET wrapper in future. We currently use ASP.NET Telerik.
A: We already have a wrapper for ASP.NET MVC. If you are using WebForms, the RadControls are the ideal controls to use. We are constantly adding & updating those controls.

Q: Can we use Kendo UI for java web application
A: Yes, we have a JSP wrapper for the same. More details here: http://www.kendoui.com/server-wrappers/jsp.aspx

Q: Can i use knockout.js with Kendo UI mvc
A: Pls take a look here: http://rniemeyer.github.io/knockout-kendo/

Q: Can we use kendo controls in VS2008
A: Sure, you can. they are simple JS libraries that can be added. It has no IDE requirements.

Q: Is there any other separate editor for Telerik development?
A: We don’t have any IDE requirement for Kendo UI. If you are doing MVC development you will want to use VS and Kendo UI wrapper for MVC

Q: Does the kendo mobile support in all the browser?
A: Yes. It only requires HTML 5 support in the browser. All modern browsers support that.

.NET Ninja T-Shirt Giveaway:

we select 2 person from the webinar attendees and give away our .NET Ninja T-Shirt in each of our webinars. we have picked up 2 lucky persons in this webinar too. They are:

  • Karthikeyan R

  • Harvinder Singh

Congratulations to the winners. We will be contacting you shortly and we will ship your t-shirts. Rest of the folks don’t worry – we still have loads of webinars lined up for this year. So do attend our future webinars without fail and try your luck to be the .NET Ninja.

Till next time – Happy Coding.

How to execute Test in different Environment in Test Studio

Learn more about Test Studio here

To execute test in different environment you need to set base URI at project level. Very first let us understand that why we need BaseURL? Assume a scenario when you need to run test in different environment. For example your test should run in following environments

  • Testing environment
  • Staging environment
  • Production environment

Now suppose for testing environment you have recorded test as follows,

clip_image001

As you see first step of test is navigating to base URL of testing environment. Problem will occur when you will move test from testing environment to some other environment. In that scenario for each step you will have to come back and change URL.

Test Studio provides a simple solution of this by option of setting baseURL at project level. To set baseURL at project level navigate to project tab and click on project setting in ribbon

clip_image003

In project setting you have option to provide baseURL. Provide base URL here and click on ok.

clip_image005

After providing base URL when you rerecord test you will find portion specified in base URL hs been removed.

clip_image006

So setting base URL at project level allows you easily to move test from one environment to another environment. For example in case of test environment set base URL as test environment and perform all testing. When you need to execute test in production environment all you need to change base URL in the project setting. I hope you find this post useful.

Learn more about Test Studio here

How to record test using Google Chrome Browser in Test Studio

image

In this post we will take a look on how to use Chrome Browser to record in Test Studio Desktop. New release of Test Studio allows you to record in any browser.

Learn more about Test Studio here

Let us say you have created a Web Test with title Login Test HR. On project dash board double click on test to navigate test dash board.

image

On Test dashboard you see that on ribbon there is Quick Execution section. In that select browser you want to record with. After selecting browser click on Record button. Once Test Studio is successfully connected to Chrome, you will find chrome ready for recording as given in below image,

image

Navigate to page for testing. You need to provide page URL in Test Studio recorder built in navigation bar. You will get Test Studio Recorder navigation bar in bottom of browser.

image

In bottom of browser you will find Test Studio Recorder tool box

image

Here you get below options,

  • Pause recording
  • Highlight element
  • Help with recording
  • Expand recording menu

Choose option of Highlight Elements to select any element on DOM. After clicking on Highlight element when you move mouse over page, you will find red rectangle around selected DOM element. On selecting an element you will get hand icon on selected element. On clicking you will get many options related to selected element as shown in below image,

image

Here you got different options to work with selected elements.

  • Verification
  • Locate in DOM
  • Add to repository option
  • Muse actions etc.

When you click on All Action in bottom of browse you will find Test Studio recorder expanded.

image

Here you can select any verification option like and all them in test

  • Content
  • Attributes
  • Style
  • Properties

In this way you can now record a test using Chrome in Test Studio. I hope you find this post useful. Thanks for reading.

Join me for the Webinar on Data Driven Testing with Telerik Test Studio

Learn more about Test Studio here

Register here to attend webinar

clip_image001

On 18th July 2013 we are conducting webinar on Automated Data Driven Testing with Test Studio from 3 pm to 4 pm

Register here to attend webinar

When same test gets executed several times with different set of data then it is called Data Driven Testing. Data used in test is called “Test Data “. Test Data can reside in any external form like in Excel file, XML file or Databases. Before using, Test Data should be added as data source in test project. In Data Driven Testing same test get executed several times with different input data. There may be scenario in which test logics and test results both are data bound.

In this webinar we will learn to automate Data Driven Testing using Test Studio. We will learn how we can data bind test from various data sources like Excel and databases.

Learn more about Test Studio here

See you in the webinar .

Register here to attend webinar

Hello Test Studio Desktop: New Immersive experience

Test Studio has got all new user interface and look. Now it is lighter and more immersive. After installing latest version you will find TEST STUDIO Desktop home as given in below image.

clip_image002

There are three section

  1. Recent Projects section
  2. Option to create new project , open existing project and open sample project
  3. Option to watch Get Started video right from launching pad

You can create new project by clicking on Create new project option. Here you select location to create project and can give a desired name to project.

image

In latest Test Studio desktop version Project dashboard look like below,

image

Right from project dashboard you can connect to TFS and do Check In and Check Out.

image

You can perform following operation on TFS from project dash board

  1. Check in
  2. Check out
  3. Open existing project from source control
  4. Connect to TFS

Right from project dash board you can connect to

  1. Team Pulse
  2. QC
  3. Bug tracking tools

Now there is new experience to create new test also

image

Now you can record test in any browser. Test Studio supports cross browser recording. In later posts I will show you in detail recording options. In new version recorded tests look like as following,

image

In further posts we will explore other new features of new Test Studio Desktop. I hope you find this post useful. Thanks for reading.

Resources for Webinar “Hybrid Mobile Application Development with cloud based IDE – Icenium”

On Jun 25th we conducted a webinar titled “Hybrid Mobile Application Development with Cloud based IDE Icenium”. This is part of an ongoing webinar series we here at Telerik India are doing targeting APAC region. We call this the Telerik .NET Ninja Developer Webinar Series. You can take a look at the Jun-Jul schedule here: https://telerikhelper.net/2013/05/24/telerik-webcasts-june-july/

Get it started with Icenium here

image

In webinar we discussed following topics,

  • What is Hybrid Application
  • Introducing Icenium
  • Introducing Kendo UI Mobile
  • Creating Employee Details App on Northwind database
  • Working with Views , Template , Datasource
  • Consuming services

Slide Deck

Here is the slide deck which I used for the webinar

Recorded webinar

Here is the recorded webinar


NET Ninja T-Shirt Giveaway:

We select 2 person from the webinar attendees and give away our .NET Ninja T-Shirt in each of our webinars. We have picked up 2 lucky persons in this webinar too. They are:

Jalani S

Nitish Agarwal

Congratulations to the winners. We will be contacting you shortly and we will ship your t-shirts.