Working with RadWindows & Converting GridView to RadGrid

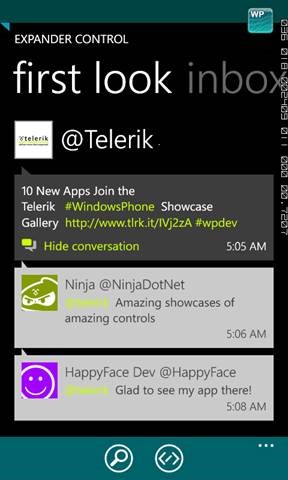
Lets first talk about the Grid. Many developers face problem while implementing the GridView in the ASP.Net technology. Either the implementation of the design is too cumbersome or the display of the data as required is difficult. Hence, we replace GridView with RadGrid. Here, we have replaced the GridView of “Inbox” from our event networking application. Initially, the grid view look like the following:

image

A few controls needed to support the RadGrid are

1. RadAjaxManager

Here, we define the event where the loading symbol need to be popped as a modal window. For example, when you refresh your inbox. We need to define only one LoadingPanel which can be reused every-time we need one.

<telerik:RadAjaxManager ID="RadAjaxManager1" runat="server" OnAjaxRequest="RadAjaxManager1_AjaxRequest">
<AjaxSettings>
<telerik:AjaxSetting AjaxControlID="RadAjaxManager1">
<UpdatedControls>
<telerik:AjaxUpdatedControl ControlID="ReceivedMessagesGrid" LoadingPanelID="LoadingPanel"></telerik:AjaxUpdatedControl>
</UpdatedControls>
</telerik:AjaxSetting>
<telerik:AjaxSetting AjaxControlID="ReceivedMessagesGrid">
<UpdatedControls>
<telerik:AjaxUpdatedControl ControlID="ReceivedMessagesGrid" LoadingPanelID="LoadingPanel"></telerik:AjaxUpdatedControl>
</UpdatedControls>
</telerik:AjaxSetting>
</AjaxSettings>
</telerik:RadAjaxManager>

2. RadAjaxPanel

The rest of the rad controls are placed within the RadAjaxPanel which acts very similar to the Ajax Panel. Here, we have RadWindowManager, RadAjaxLoadingPanel, RadCodeBlock and RadGrid,

2.1 RadWindowsManager

RadWindow is used like a popup on the screen and the complete message is displayed in this window. We can either set the screen to be modal or not. This is called a child window the page which calls it is called a parent window. This windows will be called from the RadCodeBlock once the message row is selected/clicked.

<telerik:RadWindowManager ID="RadWindowManager1" runat="server" EnableShadow="true">
<Windows>
<telerik:RadWindow ID="DisplayRead" runat="server" Title="Read and Reply"
Left="150px" ReloadOnShow="true" ShowContentDuringLoad="true" AutoSize="true"
Modal="true">
</telerik:RadWindow>
</Windows>
</telerik:RadWindowManager>

2.2 RadAjaxLoadingPanel

This is where we define the loading panel which is explained in the RadAjaxManager.

<telerik:RadAjaxLoadingPanel ID="LoadingPanel" Skin="Windows7" runat="server"></telerik:RadAjaxLoadingPanel>

2.3 RadCodeBlock

RadCodeBlock helps define javascript which can be called from within a RadWindow or the parent window. It defines the functions with various parameters. Here we have DisplayReadReply function which opens the RadWindow with a different page defined as “ViewMessage.aspx” and a few parameters being sent through URL. The refreshGrid function is used to refresh the binding of grid so that the data gets updated.

<telerik:RadCodeBlock ID="CodeBlock" runat="server">
<script type="text/javascript">
//not used here...to be used by hyperlink
function DisplayReadReply(id, rowIndex) {
var grid = $find("<%=ReceivedMessagesGrid.ClientID%>");

var rowControl = grid.get_masterTableView().get_dataItems()[rowIndex].get_element();
grid.get_masterTableView().selectItem(rowControl, true);

window.radopen("ViewMessage.aspx?RequestID=" + id, "DisplayRead");
return false;
}

function refreshGrid(arg) {
if (!arg) {
$find("<%=RadAjaxManager1.ClientID %>").ajaxRequest("Rebind");
}
else {
$find("<%= RadAjaxManager1.ClientID %>").ajaxRequest("RebindAndNavigate");
}
}

function RowDblClick(sender, eventArgs) {
window.radopen("ViewMessage.aspx?RequestID=" + eventArgs.getDataKeyValue("ContactRequestID"), "DisplayRead");
}
</script>
</telerik:RadCodeBlock>

2.4 RadGrid

This is the actual control which is going to enhance your experience.

<telerik:RadGrid ID="ReceivedMessagesGrid" runat="server" CellSpacing="0" AutoGenerateColumns="false"
GridLines="None" AllowPaging="True" AllowSorting="True" PageSize="15" AllowMultiRowSelection="True" Skin="Windows7"
ShowGroupPanel="True" AllowFilteringByColumn="True" ViewStateMode="Enabled"
OnItemCommand="ReceivedMessagesGrid_ItemCommand" DataMember="Member">

<ClientSettings AllowDragToGroup="True" AllowColumnsReorder="True" ReorderColumnsOnClient="True">
<Selecting AllowRowSelect="True"></Selecting>
<ClientEvents OnRowClick="RowDblClick" />
</ClientSettings>

<PagerStyle Mode="NextPrevAndNumeric" />

<MasterTableView DataKeyNames="ContactRequestID" ClientDataKeyNames="ContactRequestID" DataMember="Member"
AllowMultiColumnSorting="true">
<RowIndicatorColumn FilterControlAltText="Filter RowIndicator column"></RowIndicatorColumn>
<ExpandCollapseColumn Visible="True" Created="True" FilterControlAltText="Filter ExpandColumn column" />
<GroupByExpressions>
<telerik:GridGroupByExpression>
<SelectFields>
<telerik:GridGroupByField FieldAlias="MessageStatus" FieldName="MessageStatus1.MessageStatusText"
HeaderValueSeparator=" : " />
</SelectFields>
<GroupByFields>
<telerik:GridGroupByField SortOrder="Descending" FieldName="MessageStatus1.MessageStatusText"
HeaderText="Header for Group" />
</GroupByFields>
</telerik:GridGroupByExpression>
</GroupByExpressions>
<Columns>
<telerik:GridTemplateColumn UniqueName="Sender" DataField="UserProfile.Username" Groupable="false"
HeaderText="From/ Subject" HeaderStyle-Width="300px" SortExpression="ContactRequestID">
<ItemTemplate>
<br />
<asp:Label CssClass="MailSubject" ID="abstractLabel" runat="server" Text='<%# String2Extract(String.Format("{0}{1}{2}",Eval("Message1"),"|",Eval("MessageType")))%>'></asp:Label>;
</ItemTemplate>
</telerik:GridTemplateColumn>
<telerik:GridBoundColumn HeaderStyle-Width="100px" UniqueName="Type" HeaderText="Type" DataField="MessageType1.MessageTypeDesc" SortExpression="MessageType"></telerik:GridBoundColumn>
<telerik:GridBoundColumn HeaderStyle-Width="100px" UniqueName="Status" HeaderText="Status" DataField="MessageStatus1.MessageStatusText" SortExpression="MessageStatus"></telerik:GridBoundColumn>
<telerik:GridBoundColumn HeaderStyle-Width="80px" ItemStyle-Width="60px" UniqueName="SentOn" HeaderText="Sent On" DataField="SentDate" SortExpression="SentDate" />
</Columns>
</MasterTableView>
</telerik:RadGrid>

Under RadGrid we have further defined the following:

2.4.1 ClientSettings

This defines all the client side events, if any. Here, we have defined OnRowClick event which is fired at the client side when we click any of the RadGrid row. This fires the function defined in the RadCodeBlock.
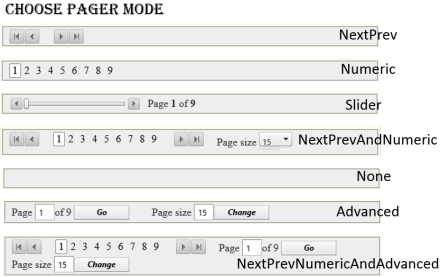
2.4.2 PagerStyle

This gives us an option for the type of paging. Types available are:

  1. Advanced
  2. NextPrev
  3. NextPrevAndNumeric
  4. NextPrevNumericAndAdvanced
  5. NumericPages
  6. Sliders
2.4.3 MasterTableView

This is where we define all the columns, their appearance and their sorting as well as grouping expressions. Few of the column types we have used are GridTemplateColumn and GridBoundColumn.
GridBoundColumn can directly be bound by specifying the column name of the table in the data field property.

Whereas, to implement a complex query, we use GridTemplateColumn. As the name suggests, we create a template and define our own values. Under grid template we have item template where we can have other ASP.Net controls like Label, Hyperlink, etc. We can even call a function from within a property like

Text='<%# String2Extract(String.Format("{0}{1}{2}",Eval("Message1"),"|",Eval("MessageType")))%>'

This String2Extract function is defined in the code behind. . The code above also explains how to call a function from code behind into a control and using some parameters.

3. Page_Load()

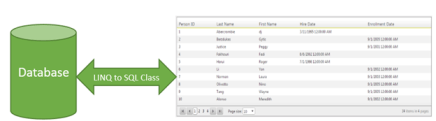
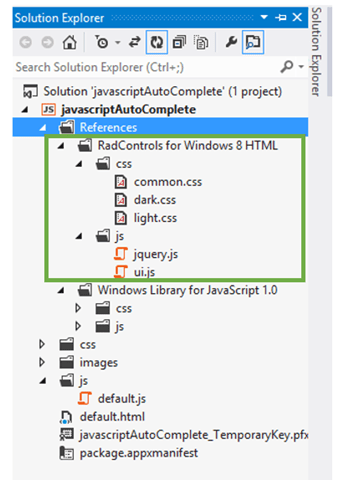
Prior to writing the page load event we include the Eventnetworking.Data and Telerik.Web.UI references in our code behind and then create a context NetworkingDataContext ndx = new NetworkingDataContext();

In the page load event we create a context for Sent messages, and then we bind the data with our RadGrid.

var InboxMessageDX = from im in ndx.Messages
where im.ReceiverUserId == Convert.ToInt32(UserIDValue.Value) && im.MessageStatus <= 4 && im.UserProfile1.Active== true
orderby im.SentDate descending
select im;

ReceivedMessagesGrid.DataSource = InboxMessageDX;
ReceivedMessagesGrid.DataBind();

4. String2Extract(string str)

This function is used to display the first 100 characters of the message as the subject in the list of the inbox.

protected string String2Extract(string str)
{
if (str != null)
{
string[] strArray = str.Split('|');
if (Convert.ToInt16(strArray[1]) == 1)
if (str.Length > 100)
return strArray[0].Substring(0, 100);   //.TrimEnd(';');
else
return strArray[0];
else return "";
}
else
return "";
}

5. Ajax Request

This event is fired each time the page is ajax-ified.
If there is an AjaxRequest calling either “Rebind” or “RebindAndNavigate”.

protected void RadAjaxManager1_AjaxRequest(object sender, AjaxRequestEventArgs e)
{
if (e.Argument == "Rebind")
{
ReceivedMessagesGrid.MasterTableView.SortExpressions.Clear();
ReceivedMessagesGrid.MasterTableView.GroupByExpressions.Clear();
ReceivedMessagesGrid.Rebind();
}
else if (e.Argument == "RebindAndNavigate")
{
ReceivedMessagesGrid.MasterTableView.SortExpressions.Clear();
ReceivedMessagesGrid.MasterTableView.GroupByExpressions.Clear();
ReceivedMessagesGrid.MasterTableView.CurrentPageIndex = ReceivedMessagesGrid.MasterTableView.PageCount - 1;
ReceivedMessagesGrid.Rebind();
}
}

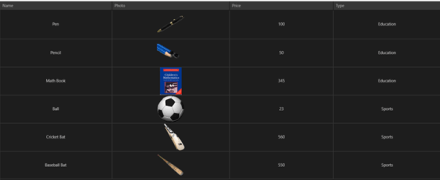
After all we are done with all the changes, the new page looks like the following:

image

And once you click any of the message a child window open which displays the message and you have the option to respond to the message depending on the message type.

image

Read- Revamping Web Application Part-10 : Implementing RadScheduler

Advertisement

Revamping Web Applications: Upgrading to RadListView

We have finished the ORM deployment with our previous post. Now we are ready to start migrating the default controls to Telerik controls. In this post we will take a look at converting asp:ListView to telerik:RadListView and we would learn about telerik:RadDataPager which will replace the asp:DataPager.

Add RadListView

For this exercise we will take Directory page from our Event Networking application. Remove the existing ListView control and add a RadListView control from the Telerik AJAX Components.image

Note: After adding the control rename the ID property same as your asp:ListView ID property. We might see an error because the underlying type has changed. The error occurs because initially the same id was linked to asp:ListView. The error will eventually disappear. Again, we need to first remove the already existing methods defined for the ListView from the aspx.cs i.e. codebehind page. Now copy the rest of the properties from ListView. We need to add the property DataKeyNames to our RadListView. Now we copy all the templates from asp:ListView.

image

If you run the application RadListView should have been populated by the data, as the data binding has already been handled at the Page_Load event (explained in our previous blog <Hyperlink>).

Your data is now populated but currently there is no paging option. To provide paging add the property AllowPaging=”true” to RadListView.

Add Event Handler to RadListView

To add an event, type the name of the event and click <Create New Event>. So add an event handler for OnItemCreated. We are using this event to populate the pictures of each attendee.

We had the following code under asp:ListView event:

image

Lets tweak the existing code for the RadListView:

NOTE: Do not forget to add “using Telerik.Web.UI;” in your aspx.cs

protected void directoryListView_ItemCreated(object sender, RadListViewItemEventArgs e)
 {
var item = e.Item as RadListViewDataItem;
if (item != null)
{
var userId = item.GetDataKeyValue("UserId").ToString();
var u = (from x in uu
where x.UserID == int.Parse(userId)
select x);
if (u.Count() != 0)
{
((Image)e.Item.FindControl("ProfileImage")).ImageUrl = u.First().URL;
}
 }
 }

Add RadDataPager

If you use ASP pager, you only have the numeric option. But using RadDataPager gives you lot more option.
imageimage

The main aim is to get a better UX and hence we replace asp:DataPager with telerik:RadDataPager. We changed the following properties PagedControlID=”directoryListView” and PageSize=”15″. Next we add a field and within it we insert the <telerik:RadDataPagerSliderField /> . This provides us a natural gesture to slide through various pages.

To do it declaratively switch to Design view and select the RadDataPager. Then expand the smart-tag and change the PagedControlID and the Pager Mode to NextPrevNumericAndAdvanced. This would allow users to do more than just select the page numbers.

Error Explanation

But if we had copied the same code to our RadListView item created event it throws following error:

‘Telerik.Web.UI.RadListViewItem’ does not contain a definition for ‘DataItem’ and no extension method ‘DataItem’ accepting a first argument of type ‘Telerik.Web.UI.RadListViewItem’ could be found (are you missing a using directive or an assembly reference?)

This occurs because the “e” defines the event argument which at runtime has type RadListViewDataItem but has RadListViewItem at compile time. Hence we need to explicitly need to typecast it into RadListViewDataItem and then we can use it in a similar way.

Why Change it after all:

In case of customisation RadListView gives us far better UX and functionality.

The dataPager is static for ASP control whereas we have many more features and modes in which we can operate while using RadDataPager varying from just numeric pagers to smooth sliders gesture.

The following image gives us an overview of how the ASP control looked. And in the following image we can the great UX and the additional features available with us.

image

image

Read- Revamping Web Applications Part-9: Working with RadWindows & Converting GridView to RadGrid

Windows Azure Mobile Services Data and Telerik RadDataGrid: Two good things together

Learn more about Rad Controls for Windows 8 here

Recently I was in a Windows Azure event for local user group. Attendees were very excited about Windows Azure Mobile Services. When I discussed with them how more immersive and user friendly it could be working with data from Windows Azure Mobile Service Table in Telerik RadDataGrid, they got more excited. In this post we will go very basic and learn basic required steps to fetch data from Mobile Service Data Table in RadDataGrid.

image

If you are new to Mobile Services and Windows Store App development then before you proceed in this post, I recommend you to read these two posts

Step by Step working with Windows Azure Mobile Service Data in XAML based Windows Store Apps

Three Steps to work with RadDataGrid in XAML based Windows Store Application

Video: Getting started with RadDataGrid in XAML based Windows Store Application

Mobile Service Data Table

You can view all Windows Azure Mobile Services and tables by login to Windows Azure Management Portal.

We are going to display data from techbloggers table. I have created this table in Windows Azure Mobile Service as shown below. There are three columns in table. We will display content from techbloggers Mobile Service table in RadDataGrid.

image

We need App URL and key. You need key and application URL to work with Mobile Services from Windows Store application. You will find key and application URL at the portal.

image

Creating Windows Store App

Very first you need to install Windows Azure SDK for Windows 8. You can download that from here . After installing make sure that you have installed RadControls for Windows 8. You can download trial from here

Now go ahead and create a Windows Store App by choosing Blank App project template from Windows Store project tab. After project being created add Rad Controls for Windows 8 reference and Windows Azure Mobile Services Managed Client reference in the project. To add reference right click on Reference in project and select Add Reference.

image

After adding reference on XAML add namespace on MainPage.xaml to work with RadDataGrid


xmlns:telerik="using:Telerik.UI.Xaml.Controls.Grid"

Next add following namespaces on MainPage.xaml.cs to work with Mobile Services client.


using Microsoft.WindowsAzure.MobileServices;
using System.Runtime.Serialization;

Next you need to create entity class representing table from the Windows Azure Mobile Service. Let us create entity class as following. We are creating entity class TechBloggers.


public class TechBloggers
 {
 public int id { get; set; }
 [DataMember(Name = "name")]
 public string Name { get; set; }
 [DataMember(Name = "technology")]
 public string Technology { get; set; }

}

After creating entity class go ahead and add following global variables.


MobileServiceClient client;
IMobileServiceTable<TechBloggers> bloggerstable;

Once global variable is defined in the constructor of page you need to create instance of MobileServiceClient and MobileServiceTable. Let us go ahead and create that in constructor of the page.


public MainPage()
 {

 this.InitializeComponent();
 MobileServiceClient client = new MobileServiceClient("https://youappurl", "appkey");
 bloggerstable = client.GetTable<TechBloggers>();
 }

Next you need to put RadDataGrid on XAML and bind it to data source. RadDataGrid can be created as following


<telerik:RadDataGrid x:Name="BloggerGrid" />

Next you need to bind RadDataGrid to List of Bloggers. List of Bloggers will be fetched from Mobile Service data table. You can do this as following.


protected async override void OnNavigatedTo(NavigationEventArgs e)
 {
 var items = await bloggerstable.ToListAsync();
 this.BloggerGrid.ItemsSource = items;
 }

Next go ahead and run application. You will get records from Mobile Service table bind to RadDataGrid.

image

These are basic steps to fetch data from Windows Azure Mobile Services Table Data and display in RadDataGrid. In further posts we will get into further details of working with these two together. I hope you find this post useful. Thanks for reading.

Learn more about Rad Controls for Windows 8 here

How to work with Images in RadDataGrid in XAML based Windows Store Application

Learn more about Rad Controls for Windows 8 here

Before you start with this post I recommend you to read following blog posts to get it started with RadDataGrid.

Video: Getting started with RadDataGrid in XAML based Windows Store Application

Three Steps to work with RadDataGrid in XAML based Windows Store Application

In this post we will take a look on working with Images as column value in RadDataGrid. As we discussed in this post that there are two types of columns in RadDataGrid.

image

To work with images we need to work with TemplateColumns. TemplateColumn uses DataTemplate to define content of column. To start with let us create business class Product. We will display collection of Products in RadDataGrid. Product class is defined as following. Along with other properties there is a property of Product Image. ProductImage property will hold URL of Image to be displayed for each Products.


public class Product
 {
 public string ProductName { get; set; }
 public double ProductPrice { get; set; }
 public string ProductType { get; set; }
 public BitmapImage ProuctImage { get; set; }
 }

Next let us create collection of Products locally. GetProducts function will return list of Products. We will bind this function as ItemSource of RadDataGrid.


private List<Product> GetProducts()
 {
 List<Product> lstProduct = new List<Product>()
 {
 new Product
 {
 ProductName = "Pen",
 ProductPrice = 100,
 ProductType = "Education",
 ProuctImage = new BitmapImage(new Uri("/ProductImages/Pen.jpg",UriKind.Relative))
 },
 new Product
 {
 ProductName ="Pencil",
 ProductPrice = 50,
 ProductType = "Education",
 ProuctImage = new BitmapImage(new Uri("/ProductImages/Pencil.jpg",UriKind.Relative))

 },
 new Product
 {
 ProductName ="Math Book",
 ProductPrice = 345,
 ProductType = "Education",
 ProuctImage = new BitmapImage(new Uri("/ProductImages/Mathbook.jpg",UriKind.Relative))

 },
 new Product
 {
 ProductName ="Ball",
 ProductPrice = 23,
 ProductType = "Sports",
 ProuctImage = new BitmapImage(new Uri("/ProductImages/Ball.jpg",UriKind.Relative))

 },
 new Product
 {
 ProductName ="Cricket Bat",
 ProductPrice = 560,
 ProductType = "Sports",
 ProuctImage = new BitmapImage(new Uri("/ProductImages/Cricketbat.jpg",UriKind.Relative))

 },
 new Product
 {
 ProductName ="Baseball Bat",
 ProductPrice = 550,
 ProductType = "Sports",
 ProuctImage = new BitmapImage(new Uri("/ProductImages/Baseballbat.jpg",UriKind.Relative))

 },
 };
 return lstProduct;
 }

As of now we have data source in place. Next we need to create RadDataGrid. After creating RadDataGrid we will create DataGridTemplateColumn with DataTemplate. To create RadDataGrid with image as one of the column value we need to follow following steps inside RadDataGrid.

Step 1: Create DataGridTemplateColumn

Step 2: Create DataGridTemplateColumn.CellContentTemplate

Step 3: Create DataTemplate and put Image inside this

We can create RadDataGrid Column with Image in column value as following,

image

We can create columns for each properties in the same way we created for ProductImage property. Final RadDataGrid with columns can be created as following,


<Page
 x:Class="RadDataGridProductDemo.MainPage"
 xmlns="http://schemas.microsoft.com/winfx/2006/xaml/presentation"
 xmlns:x="http://schemas.microsoft.com/winfx/2006/xaml"
 xmlns:local="using:RadDataGridProductDemo"
 xmlns:d="http://schemas.microsoft.com/expression/blend/2008"
 xmlns:mc="http://schemas.openxmlformats.org/markup-compatibility/2006"
 xmlns:telerik="using:Telerik.UI.Xaml.Controls.Grid"
 mc:Ignorable="d">

<Grid Background="{StaticResource ApplicationPageBackgroundThemeBrush}">
 <telerik:RadDataGrid x:Name="ProductGrid" AutoGenerateColumns="False">
 <telerik:RadDataGrid.Columns>
 <telerik:DataGridTemplateColumn Header="Name" >
 <telerik:DataGridTemplateColumn.CellContentTemplate>
 <DataTemplate>
 <TextBlock Text="{Binding ProductName}"
 VerticalAlignment="Center"
 HorizontalAlignment="Center"/>
 </DataTemplate>
 </telerik:DataGridTemplateColumn.CellContentTemplate>
 </telerik:DataGridTemplateColumn>
 <telerik:DataGridTemplateColumn Header="Photo" >
 <telerik:DataGridTemplateColumn.CellContentTemplate>
 <DataTemplate>
 <StackPanel>
 <Image Source="{Binding ProductImage}"
 Height="100"
 Width="100" />
 </StackPanel>
 </DataTemplate>
 </telerik:DataGridTemplateColumn.CellContentTemplate>
 </telerik:DataGridTemplateColumn>
 <telerik:DataGridTemplateColumn Header="Price" >
 <telerik:DataGridTemplateColumn.CellContentTemplate>
 <DataTemplate>
 <TextBlock Text="{Binding ProductPrice}"
 VerticalAlignment="Center"
 HorizontalAlignment="Center"/>
 </DataTemplate>
 </telerik:DataGridTemplateColumn.CellContentTemplate>
 </telerik:DataGridTemplateColumn>
 <telerik:DataGridTemplateColumn Header="Type" >
 <telerik:DataGridTemplateColumn.CellContentTemplate>
 <DataTemplate>
 <TextBlock Text="{Binding ProductType}"
 VerticalAlignment="Center"
 HorizontalAlignment="Center"/>
 </DataTemplate>
 </telerik:DataGridTemplateColumn.CellContentTemplate>
 </telerik:DataGridTemplateColumn>

 </telerik:RadDataGrid.Columns>
 </telerik:RadDataGrid>
 </Grid>
</Page>

Now go ahead and run application. You will find Product Images as one of the column value.

image

In this way you can work with Images as column value in RadDataGrid. I hope you find this post useful. Thanks for reading.

Learn more about Rad Controls for Windows 8 here

Three Steps to work with RadDataGrid in XAML based Windows Store Application

Recently I was talking to Windows Store App Developers. When I show them demo of RadDataGrid , all they got very excited. One of the manager asked me to show working with RadDataGrid in simplest steps. In this post we will take a look on working with RadDataGrid in three simple steps.

Learn more about Rad Controls for Windows 8 here

Step 1: Add Rad Controls for Windows 8 reference

Go ahead launch Visual Studio and create a new Windows Store Application. Select Blank App project template to create application. After project being created add Rad Controls for Windows 8 reference in the project. To add reference right click on Reference in project and select Add Reference.

image

After adding reference on XAML add namespace to work with RadDataGrid


xmlns:telerik="using:Telerik.UI.Xaml.Controls.Grid"

Step 2: Create Business object

Next step you need to create business object. Let us create business objects for Product


public class Product
 {

 public string ProductName { get; set; }
 public double ProductPrice { get; set; }
 public string ProductType { get; set; }
 public bool InStock { get; set; }
 }

We will display Products in RadDataGrid. In real time scenario List of Products will be fetched from Services. For purpose of this post let us create List of Products as collection locally.


private List<Product> GetProducts()
 {
 List<Product> lstProduct = new List<Product>
 {
 new Product
 {
 ProductName ="Pen",
 ProductPrice = 100,
 ProductType = "Education",
 InStock = true
 },
 new Product
 {
 ProductName ="Pencil",
 ProductPrice = 50,
 ProductType = "Education",
 InStock = false
 },
 new Product
 {
 ProductName ="Math Book",
 ProductPrice = 345,
 ProductType = "Education",
 InStock = true
 },
 new Product
 {
 ProductName ="Ball",
 ProductPrice = 23,
 ProductType = "Sports",
 InStock = true
 },
 new Product
 {
 ProductName ="Cricket Bat",
 ProductPrice = 560,
 ProductType = "Sports",
 InStock = true
 },
 new Product
 {
 ProductName ="Baseball Bat",
 ProductPrice = 550,
 ProductType = "Sports",
 InStock = false
 },
 };

return lstProduct;
 }

Step 3: Create RadDataGrid and bind with the datasource

In last step you need to put RadDataGrid on XAML and bind it to data source. RadDataGrid can be created as following


<telerik:RadDataGrid x:Name="ProductGrid" />

Next you need to bind RadDataGrid to List of Products. You can do that as following


this.ProductGrid.ItemsSource = GetProducts();

Run Application

On running application you will find RadDataGrid. You will notice that by default RadDataGrid supports sorting on columns

image

In these 3 simple steps you can start working with RadDataGrid in XAML based Windows Store Application. In further posts we will get into deeper concepts of RadDataGrid. I hope you find this post useful. Thanks for reading.

Learn more about Rad Controls for Windows 8 here

Complex Object and RadAutoCompleteBox in XAML based Windows Store Application

Learn more about Rad Controls for Windows 8 here

In this post we will take a look on working with Complex Business object and RadAutoCompleteBox in XAML based Windows Store Application. To start with make sure that you have added RadControls for Windows 8 reference in project. To add reference right click on project and from Extensions tab select RadControls for Windows8.

image

After adding reference of RadControls for Windows 8 you need to create business object. Let us assume, we are going to work with Employee object. You need to create Employee class is as follows,

public class Employee
 {
 public string FirstName { get; set; }
 public string LastName { get; set; }
 public string Department { get; set; }

}
}

As of now you have created Employee class. Next you need to create or rather populate Employee data. There are many ways Employee data can be populated in application. Some of them are as follows,

  • From WCF SOAP Service
  • From WCF REST based Service returning either JSON or XML.
  • From OData Service etc

For purpose of this post we are going to populate data locally. Let us create a function returns collection of Employee

private List<Employee> GetEmployees()
 {
 List<Employee> lstEmployee = new List<Employee>
 {
 new Employee
 {
 FirstName = "Dhananjay",
 LastName = "Kumar",
 Department = "Team1"
 },
 new Employee
 {
 FirstName = "Dhananjay",
 LastName = "Kumar",
 Department = "Team1"
 },
 new Employee
 {
 FirstName = "Deepak",
 LastName = "Chwala",
 Department = "Team2"
 },
 new Employee
 {
 FirstName = "Amit",
 LastName = "Chawla",
 Department = "Team1"
 },
 new Employee
 {
 FirstName = "Arun",
 LastName = "Narayn",
 Department = "Team2"
 },
 new Employee
 {
 FirstName = "Bunty",
 LastName = "Goyel",
 Department = "Team1"
 },
 new Employee
 {
 FirstName = "Boman",
 LastName = "Irani",
 Department = "Team2"
 },
 new Employee
 {
 FirstName = "Charu",
 LastName = "Sharma",
 Department = "Team2"
 },
 new Employee
 {
 FirstName = "Depanker",
 LastName = "Banerjee",
 Department = "Team1"
 },
 new Employee
 {
 FirstName = "Ashok",
 LastName = "Singhal",
 Department = "Team2"
 },
 new Employee
 {
 FirstName = "Chabhi",
 LastName = "Rastogi",
 Department = "Team1"
 },

};

return lstEmployee;
 }

As of now you have collection of business object with you. Now you need to create RadAutoCompleteBox. Very first on XAML add following namespace


xmlns:tinput="using:Telerik.UI.Xaml.Controls.Input"

After adding namespace you need to add RadAutoCompleteBox on XAML a follows,


<tinput:RadAutoCompleteBox
 Height="70"
 Width="200"
 x:Name="autocompleteEmployee"
 DisplayMemberPath="FirstName">

 </tinput:RadAutoCompleteBox>

You can set one of the property of complex object as suggestion term. Above we are setting FirstName property as suggestion term.

In last step you need to set ItemSource of RadAutoCompleteBox. This can be set as following

protected override void OnNavigatedTo(NavigationEventArgs e)
 {
 autocompleteEmployee.ItemsSource = GetEmployees();

 }

Now on running application you will find RadAutoCompleteBox bind with complex object.

image

In this way you can work with complex object as RadAutoCompleteBox in XAML based Windows Store Application. I hope you find this post useful. Thanks for reading.

How to perform localization on RadGrid for ASP.NET AJAX

Overview:

I attended TechEd India 2013 which was held at Bangalore on Mar 18 & 19. I was talking to couple of developers on their experience with our Rad Controls. One of the developer with whom I was talking to wanted to know if localizing string is easy or difficult with our Grid. He was talking about the static texts which we have in our Grids like – message shown on the group bar, message shown in mouse over of columns for sorting, message shown in our filter menu items etc. His project was looking at using a 3rd party control and localizing the controls with minimal effort was one of the main criteria for them. I told him that it was as easy as creating one file and adding it to the project. In this post we will explore our option on localizing Telerik controls in general the RadGrid.

Global Resource Files:

When you download and install the RadControls for ASP.NET AJAX, we also ship resource files for all our controls and is installed in “App_GlobalResources” folder. Below is a screen shot of the resource files installed on your hard disk:

image

Fig1: Global Resources for RadControls

Notice the resource file for Grid high lighted. The file name is RadGrid.Main.resx. This contains all the resource string for neutral culture and will be used by our RadGrid control.

When you create a ASP.NET project, you can add certain specific named folders which the ASP.NET recognizes and specific types of content can be kept in this folder. One such folder is App_GlobalResources and can contain resources namely .resx files and .resources files. These are compiled into assemblies with global scope. These resources are strongly typed and can be accessed programmatically also.

Steps involved in Localizing the RadGrid

Following steps are involved in localizing the RadGrid:

  1. Add RadGrid.Main.resx file to your application’s App_GlobalResources folder
  2. Create a language pack i.e. RadGrid.Main.<locale id>.resx and add it to App_GlobalResources folder
  3. Set the culture to use on the RadGrid

We will go through the above steps one by one in following sections.

1. Adding RadGrid resource files:

Open Visual Studio and create a new project. Select Telerik > Web template and “C# RadControls Web Application”.

SNAGHTML263dbfce

Fig2: New Project Dialog

Once Visual Studio finishes creating the project, solution will look like below:

image

Fig3: Solution Explorer

Open Default.aspx and add a RadGrid from the toolbox. We will bind the grid to Products table from Northwind database. We will make use of OpenAccess to create a Data Model or Domain Model and OpenAccess Data Source for data binding. If you are not familiar with OpenAccess, it is a free ORM tool from Telerik. I encourage you to download and play with it. Add a new item to the project of type “Telerik OpenAccess Domain Model”.

image

Fig4: Add New Item Context Menu

For this demo, I have selected only Products table and created my OpenAccess Domain Model. Here is how the domain model should look like now:

image

Fig5: OpenAccess Domain Model Diagram

After adding the domain model, do a build to make sure everything is ok. Next, open the Default.aspx in designer mode, click on the smart tag of RadGrid, the smart tag property window will be shown. From the choose data source dropdown select <New data source> option. You will be presented with “Choose a Data Source Type” window. Select OpenAccessLinqDataSource. Specify  name for the data source and proceed. Next in “Select OpenAccess Context Type” window, it will automatically select the domain model we have added and select the products table as the entity and click Next. In “Configure Data Selection” window select the columns that needs to be shown on the grid and click Finish. Now we have  a data source and our RadGrid is bound to that data source. Enable Paging, Sorting, Grouping and Filtering on the grid by using the smart tag.

image

Fig6: RadGrid Smart Tag

Add a new folder called “App_GlobalResources”. Add RadGrid.Main.resx file from App_GlobalResources folder found in your RadControls for ASP.NET AJAX installation folder and paste it in your applications App_GlobalResources folder. At this point run the application and you will see the below output of the grid:

image

Fig7: RadGrid output

Notice the static text on – grouping bar, Sort tool tip (when you mouse over on the columns), filter conditions and the page size. So we will see how to localize these.

2. Add language pack:

For the purpose of this blog post I will try to create a French language pack or resource file and the RadGrid will use the strings from it to display the static text. In order to add a language pack for RadGrid, copy the RadGrid.Main.resx and paste it in App-GlobalResources folder. Rename the pasted file to RadGrid.Main.fr-FR.resx. Here fr-FR is the locale that we would like to localize the grid. This can be any other locale that you need to support in your applications. If you double click RadGrid.Main.fr-FR.resx in Visual Studio, you will see the resource editor open and show the strings as a grid. Here is the screenshot of that:

image

Fig8: RESX Editor

As you can see we see the string name and value for that. Since we copied from language neutral resource file, the values are all in English locale. Now all we are required to do is to change the value of the keys to French locale. I will use Bing translator to translate the values and replace them in the RadGrid.Main.fr-FR.resx. After translating some of the values to French, here is how the RESX file looks like:

image

Fig9: French Resource File

3. Set locale on RadGrid

In order for the RadGrid to pick up the right locale you can either set the Culture property of the RadGrid explicitly or set the Culture property to CurrentUICulture. For the purpose of this demo, I am explicitly setting the culture of RadGrid to fr-FR i.e. French.

image

Fig10: RadGrid Culture property

Here is the RadGrid with culture set to fr-FR:

image

Fig11: RadGrid localized to fr-FR locale

Note: The column headers are not localized because I haven’t provided any strings for them. You can pretty much use the same global resource file and use the resource strings instead of the static text. This blog post was to show how parts of RadGrid can be easily localized.

Summary:

With simple 3 steps we were able to localize different texts of RadGrid without much hassle. All we needed to do was to create a language pack and keep it in App_GlobalResources folder. All Telerik controls respect the ASP.NET folder and know how to use the resources from this folder. Hope this helps you all those folks who are looking at localizing our controls. Do leave any feedback if you may have.

Step by Step working with Telerik Charts in Windows Phone 8

In this post we will take a look on working RadCharts in Windows Phone 8 Applications. I shall follow simplistic step by step approach for better learning of yours. At the end of this post we will complete creating a chart application as below.

Learn more Rad Controls for Windows Phone here

image

Step1: Create a Windows Phone 8 Application

Start with creating a Windows Phone 8 Application. To create Windows Phone Application choose Windows Phone App project template from Windows Phone tab.

clip_image002

Choose Windows Phone 0S 8.0 as Target Windows Phone OS version.

clip_image003

Next we need to add following references in the project to work with RadChart. To add references right click on the project and from context menu select Add Reference. After adding reference we are all set to work with RadCharts in Windows 8 project.

clip_image004

Step2: Add namespace on XAML

To work with chart now we need to add required references on XAML.


xmlns:chart="clr-namespace:Telerik.Windows.Controls;assembly=Telerik.Windows.Controls.Chart"
xmlns:chartEngine="clr-namespace:Telerik.Charting;assembly=Telerik.Windows.Controls.Chart"

After adding namespace we can put Chart on Xaml. A Chart can be created with following mark-up.


<chart:RadCartesianChart x:Name="chart">

 </chart:RadCartesianChart>

At this point if we go ahead and run application, we will find message that HorizontalAxis not set VerticalAxis not set.

image

Step3: Add VertialAxis and HorizontalAxis

Next step we need to add VerticalAxis and HorizontalAxis to chart. We can add axis as following,


<chart:RadCartesianChart x:Name="chart">
 <chart:RadCartesianChart.HorizontalAxis>
 <chart:CategoricalAxis/>
 </chart:RadCartesianChart.HorizontalAxis>
 <chart:RadCartesianChart.VerticalAxis>
 <chart:LinearAxis Maximum="100"/>
 </chart:RadCartesianChart.VerticalAxis>

</chart:RadCartesianChart>

There are different kind of Axes available. We will not get into details of each type in this post. However different kind of axes are as follows,

image

We are using Linear Axis for Vertical Axis and Cateogrical Axis as Horizontle axis in this example. At on running application we will get chart with two axis. However there will be no data rendered on chart. We are getting message that No Series added.

image

Step 4: Add Series to the Chart

In this step we will add Series to chart. We can add series to chart as following ,


<chart:RadCartesianChart.Series>
 <chart:LineSeries Stroke="Orange" StrokeThickness="2"></chart:LineSeries>
 </chart:RadCartesianChart.Series>

Likely Axis there are different kind of series is also available . We will talk about different series in later post. However different kind of series is as follows

image

At this point if we run application we will get message that there is no datapoint added in the chart. We will get expected output as following ,

image

Step 4: Add Data Point to Chart

We can add Data Point as following in the chart. We are adding data point in XAML here. In real time scenario we will have to fetch data from services and bind data point to chart at runtime. We can achieve that using data binding.

<chart:RadCartesianChart.Series>
 <chart:LineSeries Stroke="Orange" StrokeThickness="2">
 <chart:LineSeries.DataPoints>
 <chartEngine:CategoricalDataPoint Value="20"/>
 <chartEngine:CategoricalDataPoint Value="40"/>
 <chartEngine:CategoricalDataPoint Value="35"/>
 <chartEngine:CategoricalDataPoint Value="40"/>
 <chartEngine:CategoricalDataPoint Value="30"/>
 <chartEngine:CategoricalDataPoint Value="50"/>
 </chart:LineSeries.DataPoints>
 </chart:LineSeries>
</chart:RadCartesianChart.Series>

At this point on running application we should get chart as following,

clip_image002

If we want we can add one more series to Chart as following

 <chart:RadCartesianChart.Series>
 <chart:LineSeries Stroke="Orange" StrokeThickness="2">
 <chart:LineSeries.DataPoints>
 <chartEngine:CategoricalDataPoint Value="20"/>
 <chartEngine:CategoricalDataPoint Value="40"/>
 <chartEngine:CategoricalDataPoint Value="35"/>
 <chartEngine:CategoricalDataPoint Value="40"/>
 <chartEngine:CategoricalDataPoint Value="30"/>
 <chartEngine:CategoricalDataPoint Value="50"/>
 </chart:LineSeries.DataPoints>
 </chart:LineSeries>
 <chart:LineSeries Stroke="Red" StrokeThickness="2">
 <chart:LineSeries.DataPoints>
 <chartEngine:CategoricalDataPoint Value="10"/>
 <chartEngine:CategoricalDataPoint Value="20"/>
 <chartEngine:CategoricalDataPoint Value="45"/>
 <chartEngine:CategoricalDataPoint Value="60"/>
 <chartEngine:CategoricalDataPoint Value="50"/>
 <chartEngine:CategoricalDataPoint Value="40"/>
 </chart:LineSeries.DataPoints>
 </chart:LineSeries>

&nbsp;

After adding two series application should render Chart like following,

clip_image002[5]

Step 5: Add Data Point to Chart from Code behind

In previous steps we added Data Points in XAML. We can very much add Data Points at run time. To add data point from code behind let us go ahead and delete data point from XAML. We can add that in code behind as following,

this.chart.Series[0].ItemsSource = new double[] { 20, 30, 50, 10, 60, 40, 20, 80 };
 this.chart.Series[1].ItemsSource = new double[] {10,30,40,60,34,59,20,75 };

In this way we can work with Charts in Windows Phone 8. I hope you find this post useful. Thanks for reading.


Join me for the webinar: Developing Applications for Nokia Lumia using Telerik Controls

We are conducting webinar for Windows Phone Developers on 7th March 2013 at 3PM to 4PM IST.

Register for the Webinar here

Learn more about Rad Controls for Windows Phone

clip_image002

Windows Phone application development or creating application for Nokia Lumia devices is keeping a lot of developers very busy. Developers have the envious task of creating quality Windows Phone Application in short span of time. Telerik RadControls for Windows Phone provide the set of controls that significantly speed up the Windows Phone App Development process.

In this webinar we will start with Rad Controls for Windows Phone. We will explore various Rad Controls. We will keep webinar demo oriented and we will more focus on writing and understanding codes. RadControls for Windows Phone provides you different controls and building blocks to cut your development time. These controls are designed to shorten your app development time.

Register for the Webinar here

Learn more about Rad Controls for Windows Phone

See you there in the webinar.

How to work with Pie Charts in JavaScript based Application for Windows 8

In this post we will take a look on working with Pie Charts in JavaScript based Application for Windows Store. We will follow step by step approach in this blog post.

Step 1: Add References

Very first we will add Telerik JS and CSS files references in the project. If first time you are working with Rad Controls in Windows 8, I suggest you to read blog post to setup the environment

After adding the files in the project we need to refer them on the html file . Files can be referred as given in following code snippet.

<!--Telerik References -->
 <script src="/Telerik.UI/js/jquery.js"></script>
 <script src="/Telerik.UI/js/ui.js"></script>
 <link href="/Telerik.UI/css/dark.css" rel="stylesheet" />
 <link href="/Telerik.UI/css/common.css" rel="stylesheet" />

Step 2: Create a Chart

A Pie chart can be created by setting data-win-control attribute of a div as Telerik.UI.RadChart and setting series type as pie


<div id="performancechart" data-win-control="Telerik.UI.RadChart"
 data-win-options="{
 series: [{
 type: 'pie',
 data : [

{value:30,category:'Math'},
 {value:20,category:'Physics'},
 {value:22,category:'Chemistry'},
 {value:28,category:'Economics'}

 ],
 lables :
 {
 visible:true
 }

 }
 ]}"

 />

&nbsp;

In above code snippet,

  • We are setting data-win-control attribute as Telerik.UI.RadChart
  • In data-win-options , series type is set as pie
  • In data-win-options data is set locally.
  • Data array contains two properties. They are values and categories

At this point if we go ahead and run the application, we will get an output something like below

image

Step 3: Configure More Pie Chart options

You can configure common options of char series as discussed in this blog post . Apart from common options you can configure options like following,

  1. colorField
  2. explodeField
  3. categoryFiled

Assume you have data source as following

image

You can configure these values for pie chart as following

image

On running you will pie chart as following. You will find that colours of categories have been changed.

image

You can explode a category as following. Even though in following example we are setting explode attribute with explode property in data array, you are free to set any property of data array as explode field by setting explodeField attribute as we set colorField.

image

On running you will pie chart as following.

image

In this we can work with pie charts. Below is the consolidated code of above discussion


<!DOCTYPE html>
<html>
<head>
 <meta charset="utf-8" />
 <title>TestDemoJavaScript</title>

<!-- WinJS references -->
 <link href="//Microsoft.WinJS.1.0/css/ui-dark.css" rel="stylesheet" />
 <script src="//Microsoft.WinJS.1.0/js/base.js"></script>
 <script src="//Microsoft.WinJS.1.0/js/ui.js"></script>

<!--Telerik References -->
 <script src="/Telerik.UI/js/jquery.js"></script>
 <script src="/Telerik.UI/js/ui.js"></script>
 <link href="/Telerik.UI/css/dark.css" rel="stylesheet" />
 <link href="/Telerik.UI/css/common.css" rel="stylesheet" />

 <!-- TestDemoJavaScript references -->
 <link href="/css/default.css" rel="stylesheet" />
 <script src="/js/default.js"></script>
</head>
<body>

 <h1>Chart Demo</h1>

<div id="performancechart" data-win-control="Telerik.UI.RadChart"
 data-win-options="{
 series: [{
 type: 'pie',
 data : [

{value:30,subject:'Math',color :'red',exlode : 'true'},
 {value:20,subject:'Physics',color:'blue',explode:'false'},
 {value:22,subject:'Chemistry',color:'green',explode:'true'},
 {value:28,subject:'Economics',color:'gray',explode:'true'}

 ],
 field: 'value',
 categoryField: 'subject',
 colorField :'color',
 lables :
 {
 visible:true
 },
 tooltip :
 {
 visible : true
 }

 }
 ]}"

 />

&nbsp;

</body>
</html>

&nbsp;

Future Post

In this post we learnt working with pie Charts. We focused on only one type of series. In further posts we will explore various series type and working with remote data in the Rad Chart. I hope you find this post useful. Thanks for reading.

How to work with RadChart in JavaScript based Application for Windows 8

In this post we will take a look on working with RadChart in JavaScript based Application for Windows Store. We will follow step by step approach in this blog post.

Step 1: Add References

Very first we will add Telerik JS and CSS files references in the project. If first time you are working with Rad Controls in Windows 8, I suggest you to read blog post to setup the environment

After adding the files in the project we need to refer them on the html file . Files can be referred as given in following code snippet.


<!--Telerik References -->
 <script src="/Telerik.UI/js/jquery.js"></script>
 <script src="/Telerik.UI/js/ui.js"></script>
 <link href="/Telerik.UI/css/dark.css" rel="stylesheet" />
 <link href="/Telerik.UI/css/common.css" rel="stylesheet" />

Step 2: Create a Chart

A chart can be created by setting data-win-control attribute of a div as Telerik.UI.RadChart.

image

At this point if we go ahead and run the application, we will get an output something like below

image

Step 3: Add Series

We can add series to a chart in two ways

  1. Declaratively in HTML
  2. Programmatically in JavaScript

Declaratively a series can be added by setting value of data-win-options. In following code snippet we are creating one series in the chart.


<div id="performancechart" data-win-control="Telerik.UI.RadChart"
 data-win-options="{
 series: [
 { type: 'column', name: 'Runs', data: [1000, 860,425,956,320]}

]
 }"
 />

&nbsp;

Series takes three parameters

  1. Type of the series
  2. Name of the series
  3. Data to be displayed in the series

In above code snippet, we are creating column type of series with name Runs and 5 data points. At this point if we go ahead and run the application, we should get a chart as following.

image

Programmatically chart series can be created as following,


var performancechart = document.getElementById("performancechart").winControl;
 var wicketcolumnseries = new Telerik.UI.Chart.ColumnSeries();
 wicketcolumnseries.data = [30,100,67,123,49];
 wicketcolumnseries.name = "Wicket";
 wicketcolumnseries.color = "green";
 wicketcolumnseries.visibleInLegend = true;
 performancechart.series.push(wicketcolumnseries);
 performancechart.refresh();

&nbsp;

In above code snippet following tasks has been performed

  1. Line 1: Getting reference of Chart as win control
  2. Line 2: Creating series of type Column
  3. Line 3: Setting data for the column series
  4. Line 4: Setting name of the column series
  5. Line 5: Setting colour of series
  6. Line 6: Making sure series is visible in Chart Legend
  7. Line 7: Pushing created column series to the series collection of chart
  8. Line 8: Refreshing the chart

Let us add one more series to chart declaratively in HTML.


<h1>Chart Demo</h1>
 <div id="performancechart" data-win-control="Telerik.UI.RadChart"
 data-win-options="{
 series: [
 { type: 'column', name: 'Match', data: [30, 25,22,28,25]},
 { type: 'column', name: 'Runs', data: [500, 360,125,456,320]}

],

 }"
 />

&nbsp;

So far we have added three series to chart. At this point of we go ahead and run the application then we should get a chart as following

image

There are many other types of series. We will explore them one by one in further posts.

Step 4: Add Category Axis

Category Axis can also be added in two ways,

  1. Declaratively in HTML
  2. Programmatically in JavaScript

In HTML we can add Category Axis as following


<div id="performancechart" data-win-control="Telerik.UI.RadChart"
 data-win-options="{
 series: [
 { type: 'column', name: 'Match', data: [30, 25,22,28,25]},
 { type: 'column', name: 'Runs', data: [500, 360,125,456,320]}

],
 categoryAxis: {
 categories: [2008, 2009, 2010, 2011, 2012]
 }

 }"
 />

&nbsp;

In JavaScript we can add Category Axis as following code snippet,

image

On running we will find chart with Category Axis as following,

image

Step 5: Working with Tooltip

We can configure tooltip at two levels

  1. At the chart level
  2. At the series level

Chart level tooltip can be configured as following snippet,

<div id="performancechart" data-win-control="Telerik.UI.RadChart"
 data-win-options="{
 series: [
 { type: 'column', name: 'Match', data: [30, 25,22,28,25]},
 { type: 'column', name: 'Runs', data: [500, 360,125,456,320]}

],
 categoryAxis: {
 categories: [2008, 2009, 2010, 2011, 2012]
 },
 tooltip: {
 visible: true
 }

 }",

 />

&nbsp;

At the series level we can configure tooltip as following

image

Now on running of the application we will find that when we move mouse on the chart values of the series are displayed as tooltip.

Final chart should look like as following,

image

For your reference full source code is given below,


<!DOCTYPE html>
<html>
<head>
 <meta charset="utf-8" />
 <title>TestDemoJavaScript</title>

<!-- WinJS references -->
 <link href="//Microsoft.WinJS.1.0/css/ui-dark.css" rel="stylesheet" />
 <script src="//Microsoft.WinJS.1.0/js/base.js"></script>
 <script src="//Microsoft.WinJS.1.0/js/ui.js"></script>

<!--Telerik References -->
 <script src="/Telerik.UI/js/jquery.js"></script>
 <script src="/Telerik.UI/js/ui.js"></script>
 <link href="/Telerik.UI/css/dark.css" rel="stylesheet" />
 <link href="/Telerik.UI/css/common.css" rel="stylesheet" />

 <!-- TestDemoJavaScript references -->
 <link href="/css/default.css" rel="stylesheet" />
 <script src="/js/default.js"></script>
</head>
<body>

 <h1>Chart Demo</h1>
 <div id="performancechart" data-win-control="Telerik.UI.RadChart"
 data-win-options="{
 series: [
 {
 type: 'column',
 name: 'Match',
 data: [30, 25,22,28,25],
 tooltip: {
 visible: true

 }
 },
 { type: 'column', name: 'Runs', data: [500, 360,125,456,320],}

],
 categoryAxis: {
 categories: [2008, 2009, 2010, 2011, 2012]
 }

 }",

 />

&nbsp;

</body>
</html>

&nbsp;

Future Post

In this post we learnt basics of working with Rad Chart. We focused on only one type of series. In further posts we will explore various series type and working with remote data in the Rad Chart. I hope you find this post useful. Thanks for reading.

Webinar on Telerik Tools for Ninja Developer: Windows 8 RadControls

Register for the Webinar here

Date: 21st November 2012

Time: 3PM to 4PM (IST)

Launch of Windows 8 has brought enormous enthusiasm among developers along with normal users. Developers are aspired to write fascinating killer apps and want to reach maximum Windows 8 users. If you are one of those aspired developer then this webinar is for you. In this webinar we will talk and learn about Rad Controls for Windows 8. Rad Controls for Windows 8 allows you to write fascinating touch enabled Windows 8 Application which your users will love. It helps you to shorten development time, quickly take application to market and get better ranking.  There are 15+ native controls available for you to use in your application.  You can use controls natively in your application regardless you are developing in XAML or HTML.

Read more about RadControls for Windows 8 here

This will be demo oriented webinar. In webinar we will write code from scratch and learn how different Rad Controls can be used in application.

Register for the Webniar here

For any query do send a mail to Dhananjay.kumar@telerik.com . Hope to see you in the webinar.

Working with LINQ to SQL Class and AJAX RadGrid

In this post we will take a look on working with RadGrid and LINQ to SQL Class. We will display data in RadGrid using LINQ to SQL Class from SQL Server database.

image

Very first let us create DataSource to be used with RadGrid. We will use LINQ to SQL class to create data model here. To create data model using LINQ to SQL class right click on the project and select Add then New Item. From Data tab, choose LINQ to SQL Classes

image

If you want you can change name of the LINQ to SQL class, however I am leaving default name and clicking on the Add button. Choose Server Explorer on the design surface to create data classes.

image

In Server Explorer right click on the Data Connection and Add Connection. In Add Connection dialog box provide database server name and choose the database to create data model. Click on Ok to add a new Data Connection in Server Explorer.

image

On successfully adding of data connection , you can see that in server explorer

image

Next drag and drop Tables, Views , Stored Procedures and Functions from Server Explorer on dbml design surface to make a part of data model. In this case , I am going ahead with only one table Person. Now you can see that Person is added on dbml file.

image

As of now we have added the data model in the project. Now let us go ahead and add a RadGrid on the page. To add RadGrid on the page drag and drop it from Toolbox on the page. If you don’t find RadControls in toolbox then right click on the General tab in tool box and select Add Tab

image

Give name of the tab . Right click on newly created tab and selecte Choose Items. Then browse to

C:\Program Files (x86)\Telerik\RadControls for ASP.NET AJAX Q1 2012 SP1\Bin40

and choose Telerik.Web.UI.dll and after selecting dll click on Ok button to add the controls in toolbox.

image

In toolbox you can see that RadControls are successfully added.

image


Next from the Telerik AJAX Data Component tab , drag and drop RadGrid on the page.

<pre><asp:Content runat="server" ID="BodyContent" ContentPlaceHolderID="MainContent">
<telerik:RadGrid ID="RadGrid1" runat="server" AllowPaging="True">

</telerik:RadGrid>
</asp:Content>


As of now we have added RadGrid on the page . Next we need to create data source from the data model and bind to the RadGrid. Below is the function returning List of Person.


private List<Person> GetStudents()
{
DataClasses1DataContext context = new DataClasses1DataContext();
return  context.Persons.ToList();
}

In function we are creating instance of DataContext class and returning list of person on that. Now we need to bind data returning from this function to RadGrid. We can do that as following


using System;
using System.Collections.Generic;
using System.Linq;
using System.Web.UI;

namespace GridSample
{
public partial class _Default : Page
{
protected void Page_Load(object sender, EventArgs e)
{
RadGrid1.AllowPaging = true;
RadGrid1.NeedDataSource += RadGrid1_NeedDataSource;


}

void RadGrid1_NeedDataSource(object sender, Telerik.Web.UI.GridNeedDataSourceEventArgs e)
{
RadGrid1.DataSource = GetStudents();
}


private List<Person> GetStudents()
{
DataClasses1DataContext context = new DataClasses1DataContext();
// return context.Persons.SortBy("FirstName").ToList();
return context.Persons.ToList();
}
}
}

Now when you press F5 to run the application , you should get data in RadGrid using LINQ to SQL class.

image

In this way you can pull data from database using LINQ to SQL class and bind to a RadGrid. I hope you find this post useful. Thanks for reading.

Using RadControls in JavaScript based Windows 8 Application

In this post we will set up project to use RadControls for Windows 8 in JavaScript based Application. Before you go ahead with this post, read here

Getting Started with Rad Controls for Windows 8

Once you have done with downloading and installing Rad Control for Windows 8, create a new JavaScript based Windows Store project

image

Right click on the reference in solution explorer and add a new reference. Choose Windows Library for JavaScript and add to the project.

image

After adding references, verify in solution explorer that you have successfully added the references

image

Once references are successfully added in the project, you need to add references of Rad Control JS files and CSS files on the HTML page. You can refer them as following listing,

image

Now you are all set to use RadControls for Windows 8 in your application. To test that whether we have added all the references correctly or not ,let us put a RadSlider control on HTML

image

Now when you run the application you should get a RadSlider control on the page successfully.

image

In this way you can get it started with Rad Controls for Windows 8 in JavaScript based application for Windows Store. I hope you find this post useful. Thanks for reading.

Getting Started with Rad Controls for Windows 8

In this post, we will learn how we could start with Rad Controls for Windows 8.

Download Trial Version from here

As of now these controls are available, 

  • Chart
  • DatePicker
  • Pagination
  • Gauge
  • TimePicker
  • HubTile
  • BulletGraph
  • NumericBox
  • Slider
  • ComboBox
  • AutoCompleteBox
  • DropDownList

You can download Demo Applications exploring the controls from here

After downloading, follow the Telerik Installer Wizard.

 image

Make sure that Windows8 is selected. Click on OK.LET’S DO THIS. Configure installation folder , accept license terms and click on Go to Next Step

image

Provide credential and click on Install to start the installation.

image

After successful installation, you will get following message

 image

By this step, you have successfully installed Rad Controls for Windows 8. Now go ahead and launch Visual Studio and create an Application for Windows Store. Let us choose Blank Application from the XAML Windows Store template.

image

Once the project is created in Solution Explorer right click on the Reference and select Add Reference

image

In the dialog box make sure that you have selected Extension and select Rad Controls for Windows 8.

image

After adding rerefence in solution explorer verify that refence of Rad Controls has been added successfully.

image


By this step you have succesfully created the project and added the required refrence. Now you are all set to use Rad Controls for Windows 8 in your application. Let us go ahead and add RadDatePicker control on the MainePage.xaml. Before using any Rad Control , you need to add namespace. Add namespace as following

image

After adding namespace put RadDatePicker control as following

image

Now press F5 and run the application. You should able to get RadDatePicker control

image

In this way you can start working with Rad Controls for Windows 8. In further posts we will explore each controls individually. I hope you find this post useful. Thanks for reading.