
Learn more about Rad Controls for Windows 8 here
In this post we will take a look on working with Complex Business object and RadAutoCompleteBox in XAML based Windows Store Application. To start with make sure that you have added RadControls for Windows 8 reference in project. To add reference right click on project and from Extensions tab select RadControls for Windows8.

After adding reference of RadControls for Windows 8 you need to create business object. Let us assume, we are going to work with Employee object. You need to create Employee class is as follows,
public class Employee
 {
 public string FirstName { get; set; }
 public string LastName { get; set; }
 public string Department { get; set; }

}
}
As of now you have created Employee class. Next you need to create or rather populate Employee data. There are many ways Employee data can be populated in application. Some of them are as follows,
- From WCF SOAP Service
- From WCF REST based Service returning either JSON or XML.
- From OData Service etc
For purpose of this post we are going to populate data locally. Let us create a function returns collection of Employee
private List<Employee> GetEmployees()
 {
 List<Employee> lstEmployee = new List<Employee>
 {
 new Employee
 {
 FirstName = "Dhananjay",
 LastName = "Kumar",
 Department = "Team1"
 },
 new Employee
 {
 FirstName = "Dhananjay",
 LastName = "Kumar",
 Department = "Team1"
 },
 new Employee
 {
 FirstName = "Deepak",
 LastName = "Chwala",
 Department = "Team2"
 },
 new Employee
 {
 FirstName = "Amit",
 LastName = "Chawla",
 Department = "Team1"
 },
 new Employee
 {
 FirstName = "Arun",
 LastName = "Narayn",
 Department = "Team2"
 },
 new Employee
 {
 FirstName = "Bunty",
 LastName = "Goyel",
 Department = "Team1"
 },
 new Employee
 {
 FirstName = "Boman",
 LastName = "Irani",
 Department = "Team2"
 },
 new Employee
 {
 FirstName = "Charu",
 LastName = "Sharma",
 Department = "Team2"
 },
 new Employee
 {
 FirstName = "Depanker",
 LastName = "Banerjee",
 Department = "Team1"
 },
 new Employee
 {
 FirstName = "Ashok",
 LastName = "Singhal",
 Department = "Team2"
 },
 new Employee
 {
 FirstName = "Chabhi",
 LastName = "Rastogi",
 Department = "Team1"
 },

};

return lstEmployee;
 }
As of now you have collection of business object with you. Now you need to create RadAutoCompleteBox. Very first on XAML add following namespace
xmlns:tinput="using:Telerik.UI.Xaml.Controls.Input"
After adding namespace you need to add RadAutoCompleteBox on XAML a follows,
<tinput:RadAutoCompleteBox
 Height="70"
 Width="200"
 x:Name="autocompleteEmployee"
 DisplayMemberPath="FirstName">

 </tinput:RadAutoCompleteBox>
You can set one of the property of complex object as suggestion term. Above we are setting FirstName property as suggestion term.
In last step you need to set ItemSource of RadAutoCompleteBox. This can be set as following
protected override void OnNavigatedTo(NavigationEventArgs e)
 {
 autocompleteEmployee.ItemsSource = GetEmployees();

 }
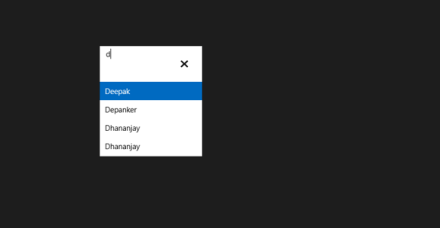
Now on running application you will find RadAutoCompleteBox bind with complex object.

In this way you can work with complex object as RadAutoCompleteBox in XAML based Windows Store Application. I hope you find this post useful. Thanks for reading.
