Revamping Web Application: Implement RadAutoCompleteBox

Read – Revamping Web Applications: Implementing RadScheduler

We have used this particular control in the admin page for adding or deleting tags attached to the sessions. We use two Open Access data source here. First to fetch the TagName and set the property to DataTextField and second we attach TagID to the DataValueField.

Following is the DataSource we are talking about:

<telerik:OpenAccessDataSource ID="tagLDS" runat="server" EnableDelete="False" EnableInsert="False"
EnableUpdate="False" ObjectContextProvider="EventNetworking.Data.NetworkingDataContext,
EventNetworking.Data" OrderBy="this.TagName" TypeName="EventNetworking.Data.Tag">
</telerik:OpenAccessDataSource>

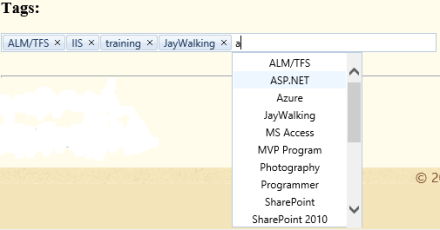
Our RadAutoCompleteBox control looks like the following on the aspx page:

<telerik:RadAutoCompleteBox ID="TagsAutoCompleteBox" runat="server" DataSourceID="tagLDS"
DataTextField="TagName" DataValueField="TagID" Skin="Windows7" Width="500px"
DropDownWidth="150px" DropDownHeight="200px" OnEntryAdded="TagsAutoCompleteBox_EntryAdded"
OnEntryRemoved="TagsAutoCompleteBox_EntryRemoved" OnDataBound="TagsAutoCompleteBox_DataBound">
 </telerik:RadAutoCompleteBox>

As you can see we have 3 events being assigned to the control:

  1. Let us first talk about the DataBound control:
    This control adds the tags to the control which are already associated to the session we are dealing with.image

    protected void TagsAutoCompleteBox_DataBound(object sender, EventArgs e)
     {
     var sessionTagsX = (from st in ndx.SessionTags
     where st.SessionID == Convert.ToInt32(SessionID.Value)
     select st).ToList();
    
     for (int i = 0; i < sessionTagsX.Count; i++)
     {
     TagsAutoCompleteBox.Entries.Add(new AutoCompleteBoxEntry(sessionTagsX[i].Tag.TagName, sessionTagsX[i].TagID.ToString()));
     }
     }
    
    
  2. To add an entry we just start typing and the list would be populated automatically. We can either select from the list or just type in the whole tag. clip_image001
    protected void TagsAutoCompleteBox_EntryAdded(object sender, AutoCompleteEntryEventArgs e)
     {
     SessionTag sessionTagsX = new SessionTag();
     sessionTagsX.SessionID = Convert.ToInt32(SessionID.Value);
     sessionTagsX.TagID = Convert.ToInt32(e.Entry.Value);
     ndx.Add(sessionTagsX);
     ndx.SaveChanges();
     }
    
    
  3. To remove a specified tag we just click the cross symbol and the EntryRemoved code will get executed. Here we specify the session and the tag and it get removed from the sessionTags table.
    protected void TagsAutoCompleteBox_EntryRemoved(object sender, AutoCompleteEntryEventArgs e)
     {
     SessionTag sessionTagsX = (from st in ndx.SessionTags
     where st.SessionID == Convert.ToInt32(SessionID.Value) && st.TagID == Convert.ToInt32(e.Entry.Value)
     select st).FirstOrDefault();
     sessionTagsX.SessionID = Convert.ToInt32(SessionID.Value);
     sessionTagsX.TagID = Convert.ToInt32(e.Entry.Value);
     ndx.Delete(sessionTagsX);
     ndx.SaveChanges();
     }


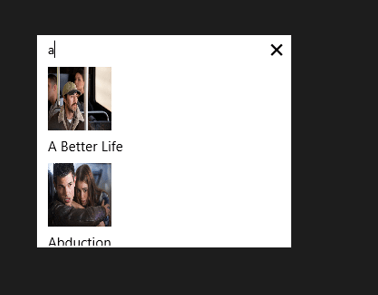
This control is useful when few elements need to be selected from a huge list. We had the same scenario and hence we used the RadAutoCompleteBox.

Read – Revamping Web Application: The UI changes

Working with RadAutoCompleteBox in JavaScript based Application for Windows Store

In this post we will take a look on working with RadAutoCompleteBox in JavaScript based Windows Store Application.

Getting Started with RadAutoCompleteBox

You can create RadAutoCompleteBox by setting data-win-control property of a div or span as Telerik.UI.RadAutoCompleteBox. See the code below,


<div id="sportsAutoComplete"
 data-win-control="Telerik.UI.RadAutoCompleteBox"
 data-win-options="{placeholder:'enter player...'}">
</div>

In above code

  • data-win-control attribute of div is set as Telerik.UI.RadAutoCompleteBox
  • In data-win-options attribute

You can set datasource of RadAutoCompleteBox in two ways. You can directly set datasource either in data-win-options attribute or in the JavaScript function. You can set datasource in code behind as following,


var sportsArray = ['Sachin Tendulkar', 'Saurabh Ganguli', 'MS Dhoni', 'Rahul Dravid', 'Kevin Pierson', 'Kalis'];
 var sportsAutoComplete = document.getElementById("sportsAutoComplete").winControl;
 sportsAutoComplete.dataSource.data = sportsArray;

In above code we are

  • Creating an array named sportsArray
  • Creating reference of RadAutoCompleteBox as winControl
  • Setting datasource of RadAutoCompleteBox with the sportsArray

At the point if you run application you should get Auto Complete Box as following,

image

Working with Template for RadAutoCompleteBox

There may be scenario when you need to set data source of RadAutoCompleteBox to array of complex objects. For example there is an array as following,

 var movieArray = [
 { title: "The Artist", picture: "images/TheArtist.jpg" },
 { title: "A Better Life", picture: "images/abetterlife.jpg" },
 { title: "Abduction", picture: "images/abduction.jpg" },
 { title: "African Cats", picture: "images/africancats.jpg" },
 { title: "Angel Crest", picture: "images/angelscrest.jpg" },
 { title: "Arthur", picture: "images/arthur.jpg" },
 { title: "Anonymous", picture: "images/anonymous.jpg" },
 { title: "A Dangerous Method", picture: "images/adangerousmethod.jpg" },
 { title: "A Good Old Fashioned Orgy ", picture: "images/agoodoldfashionedorgy.jpg" },
 { title: "A Seperation ", picture: "images/aseparation.jpg" },
 { title: "Another Earth ", picture: "images/anotherearth.jpg" },
 { title: "A Heartbeat Away ", picture: "images/aheartbeataway.jpg" },
 { title: "Bad Teacher ", picture: "images/badteacher.jpg" },
 { title: "Begineers ", picture: "images/beginners.jpg" },
 { title: "Brotherhood ", picture: "images/brotherhood.jpg" },
 { title: "Bridesmaids ", picture: "images/bridesmaids.jpg" },
 { title: "Born To Be Wild ", picture: "images/borntobewild.jpg" },
 { title: "Blackthorn ", picture: "images/blackthorn.jpg" },
 { title: "Bellflower ", picture: "images/bellflower.jpg" },
 { title: "Butter ", picture: "images/butter.jpg" },
 { title: "Bunraku ", picture: "images/bunraku.jpg" },
 { title: "Cars 2 ", picture: "images/cars2.jpg" },
 { title: "Cost Of A Soul", picture: "images/costofasoul.jpg" },
 { title: "Carnage ", picture: "images/carnage.jpg" },
 { title: "Crazy Stupid Love ", picture: "images/crazystupidlove.jpg" },
 { title: "Cracks ", picture: "images/cracks.jpg" },
 { title: "Colombiana ", picture: "images/colombiana.jpg" },
 { title: "Cedar Rapids ", picture: "images/cedarrapids.jpg" },
 { title: "Captain America ", picture: "images/captainamerica.jpg" },
 ];

You can set this array also, as data source of RadAutoComplte Box. This can be done as following,


var movieAutoComplete = document.getElementById("movieAutoComplete").winControl;
 movieAutoComplete.dataSource.data = movieArray;

On HTML RadAutoComplete with id movieAutoComplete is created as following

<div id="movieAutoComplete"
 data-win-control="Telerik.UI.RadAutoCompleteBox"
 data-win-options="{placeholder:'enter movie...',
 template:moviestemplate,
 dataTextField: 'title'}">
</div>

  • Placeholder is set as enter movie
  • dataTextField is set as title . title is one of the property in array.
  • template is set as moviestemplate. Template decides how data will be displayed in the control. Template can be created by setting data-win-control property of a div or span as WinJS.Binding.Template

We have created moviestemplate as following

<div id="moviestemplate" data-win-control="WinJS.Binding.Template">
 <div style="width: 100px;height: 100px;">
 <img src="#" style="width: 70px;height: 70px;" data-win-bind="src:picture" />
 <h4 data-win-bind="innerText:title" />
 </div>
 </div>

We are binding title of the array to h4 element and picture property of the array to image element. When you run the application, you should get RadAutoCompleteBox as following

image

Working with onSelect Event

You can read the selected item in RadAutoCompleteBox in onSelect event. You can attach select event and read the selected value as given in following,

movieAutoComplete.addEventListener("select", function (e) {
 document.getElementById("selectedmovie").src = movieAutoComplete.dataItem(e.item.index()).picture;
 });

In above code selectmovie is id of the image element. Image of the selected movie item will be displayed.

So in this way you can start using RadAutoCompleteBox in application. I hope you find this post useful. Thanks for reading.

Complex object in RadAutoCompleteBox control for Windows Phone

Read documentation here

RadAutoCompleteBox control provides suggestion to user. It provides suggestion on basis of set criteria filtering data from a SuggestionSource. SuggestionSource is nothing but a Data Source.

RadAutoCompleteBox control gives you immersive experience as following. It can be bind to data source as simple as collection of strings or collection of complex objects. In below RadAutoCompleteBox SuggestionSource is of complex objects.

image

To start working with RadAutoCompleteBox first you need to add following namespace on the XAML page.

clip_image002

You can create a simple RadAutoCompleteBox as following

image

There are many properties exposed to configure RadAutoCompleteBox. You can set values of those properties as per your requirement. Two important properties are AutoCompleteMode and AutoCompletePopupDisplayMode. AutoCompleteMode property defines the way filtering should be done. Filtering criteria will be can be set to two values.

image

AutoCompletePopupDisplayMode defines the place of popup windows to open. This property can be set to four values. Those four values are as following

image

SuggestionSource can be created as following. It is a function returning List of Strings.

image

After creating SuggestionSource you can set that in code behind as given below.

image

At this point on running the application, you should get experience of RadAutoCompleteBox as given in below image,

image

Now let us see how we can work with a complex object. For that go ahead and create a class called CountryData. There are three properties in the class.


public class CountryData
{

public string CountryName { get; set; }
public string  CountryCapital { get; set; }
public ImageSource CountryFlag { get; set; }

}

Next you need to create data source or suggestion source. For that I have created a function returning List of CountryData. I have put images in the Images folder. In below function using collection initializer we are creating List of object of CountryData and returning that.


private List<CountryData> GetCountryDetails()
{
List<CountryData> lstCountryData = new List<CountryData>
{
new CountryData
{
CountryName = "India" , CountryCapital ="New Delhi " , CountryFlag= GetImageSource("/Images/indiaflag.jpg")
},
new CountryData
{
CountryName = "USA" , CountryCapital ="Washington" , CountryFlag= GetImageSource("/Images/usaflag.jpg")
},
new CountryData
{
CountryName = "France" , CountryCapital ="Paris" , CountryFlag= GetImageSource("/Images/franceflag.jpg")
},
new CountryData
{
CountryName = "England" , CountryCapital ="London" , CountryFlag= GetImageSource("/Images/englandflag.jpg")
},
new CountryData
{
CountryName = "Germany" , CountryCapital ="Berlin" , CountryFlag= GetImageSource("/Images/germanyflag.jpg")
},
new CountryData
{
CountryName = "China" , CountryCapital ="Shanghai" , CountryFlag= GetImageSource("/Images/chinaflag.jpg")
},
new CountryData
{
CountryName = "Japan" , CountryCapital ="Tokyo" , CountryFlag= GetImageSource("/Images/japanflag.jpg")
},
new CountryData
{
CountryName = "Australia" , CountryCapital ="Canberra" , CountryFlag= GetImageSource("/Images/ausflag.jpg")
},
new CountryData
{
CountryName = "Brazil" , CountryCapital ="Rio" , CountryFlag= GetImageSource("/Images/brazilflag.jpg")
},

};
return lstCountryData;
}

GetImageSource function is defined as following. This function is taking image path as string and converting that to ImageSource such that directly can be bind to Image control.


private ImageSource GetImageSource(string fileName)
{
return new BitmapImage(new Uri(fileName, UriKind.Relative));
}

Finally you need to set SuggestionSource of radAutoCompleteBox. You can set that in page constructor as given below,


public MainPage()
{
InitializeComponent();
this.radAutoCompleteBox.SuggestionsSource = GetCountryDetails();

}

Now you need to put radAutoCompleteBox on xaml. We are filtering on a SuggestionSource consist of complex objects so you need to set the value of property FilterKeyPath. You can set value of this property to any property of the object. In this case we are filtering on CountryName. SuggestionSelected event gets fired when user selects an item from the popup.

image

By now you have created radAutoCompleteBox and bind to a SuggestionSource of complex objects. Next we need to create SuggestionTemplate. SuggetionTemplate defines the way data from complex object bind as SuggestionSource will be displayed in the suggestion popup. Since there are three properties in the object and one of them is an image. So simply we have put a StackPanel with horizontal orientation and binding properties value in controls inside the StackPanel.

image

Last but not least we want items highlighting on filtering. We want to highlight item on property set as FilterKeyPath. We set CountryName as FilterKeyPath. You can highlight item on filtering as following. You can set highlight style on background or foreground.

image

Consolidating codes from above discussion you will have XAML as following. There is one StackPanel in second row of Grid. On selection of an item, that item will get displayed in controls inside StackPanel.


<phone:PhoneApplicationPage
x:Class="Demo.MainPage"
xmlns="http://schemas.microsoft.com/winfx/2006/xaml/presentation"
xmlns:x="http://schemas.microsoft.com/winfx/2006/xaml"
xmlns:phone="clr-namespace:Microsoft.Phone.Controls;assembly=Microsoft.Phone"
xmlns:shell="clr-namespace:Microsoft.Phone.Shell;assembly=Microsoft.Phone"
xmlns:d="http://schemas.microsoft.com/expression/blend/2008"
xmlns:mc="http://schemas.openxmlformats.org/markup-compatibility/2006"
xmlns:telerikPrimitives="clr-namespace:Telerik.Windows.Controls;assembly=Telerik.Windows.Controls.Primitives"
xmlns:telerikData="clr-namespace:Telerik.Windows.Controls;assembly=Telerik.Windows.Controls.Data"
xmlns:telerikInput="clr-namespace:Telerik.Windows.Controls;assembly=Telerik.Windows.Controls.Input"
mc:Ignorable="d" d:DesignWidth="480" d:DesignHeight="768"
FontFamily="{StaticResource PhoneFontFamilyNormal}"
FontSize="{StaticResource PhoneFontSizeNormal}"
Foreground="{StaticResource PhoneForegroundBrush}"
SupportedOrientations="Portrait"  Orientation="Portrait"
shell:SystemTray.IsVisible="True">

<!--LayoutRoot is the root grid where all page content is placed-->
<Grid x:Name="LayoutRoot" Background="Transparent">
<Grid.RowDefinitions>
<RowDefinition Height="Auto"/>
<RowDefinition Height="*"/>
</Grid.RowDefinitions>

<!--TitlePanel contains the name of the application and page title-->
<StackPanel x:Name="TitlePanel" Grid.Row="0" Margin="12,17,0,28">
<TextBlock x:Name="ApplicationTitle" Text="DEMO RAD CONTROLS" Style="{StaticResource PhoneTextNormalStyle}"/>
<TextBlock x:Name="PageTitle" Text="Autocomplete" Margin="9,-7,0,0" Style="{StaticResource PhoneTextTitle1Style}"/>
</StackPanel>

<!--ContentPanel - place additional content here-->
<Grid x:Name="ContentPanel" Grid.Row="1" Margin="12,0,12,0">

<Grid.RowDefinitions>
<RowDefinition Height="*" />

</Grid.RowDefinitions>

<telerikInput:RadAutoCompleteBox x:Name="radAutoCompleteBox"
Height="100"
AutoCompleteMode="Contains"
FilterKeyPath="CountryName"
SuggestionSelected="radAutoCompleteBox_SuggestionSelected"
Margin="-6,19,6,185">

<telerikInput:RadAutoCompleteBox.SuggestionItemTemplate>
<DataTemplate>
<StackPanel Orientation="Horizontal">
<Image Source="{Binding CountryFlag}" Height="60" Width="60" />
<TextBlock Text="{Binding CountryName}"
telerikInput:RadAutoCompleteBox.IsElementHighlighted="True">
<telerikInput:RadAutoCompleteBox.HighlightStyle>
<telerikInput:HighlightStyle Foreground="Red" FontSize="26"/>
</telerikInput:RadAutoCompleteBox.HighlightStyle>
</TextBlock>
<TextBlock Text="," />
<TextBlock Text="{Binding CountryCapital}" />
</StackPanel>
</DataTemplate>
</telerikInput:RadAutoCompleteBox.SuggestionItemTemplate>

</telerikInput:RadAutoCompleteBox>

<StackPanel Grid.Row="1" Orientation="Vertical">
<Image x:Name="imgMessage" Height="250" Width="200" />
<TextBlock  x:Name="txtMessage"  FontSize="40" Style="{StaticResource PhoneTextAccentStyle }"/>
</StackPanel>

</Grid>
</Grid>

</phone:PhoneApplicationPage>

Last but not least you need to handle SuggestionSelected event. In this event we will bind selected item in controls inside StackPanel.


private void radAutoCompleteBox_SuggestionSelected(object sender, SuggestionSelectedEventArgs e)
{

CountryData data  = e.SelectedSuggestion as CountryData;
radAutoCompleteBox.Text = data.CountryName + "," + data.CountryCapital;
txtMessage.Text = "You selected " + data.CountryName;
imgMessage.Source = data.CountryFlag;
}

Now if you go ahead and run the application you should get experience of radAutoCompleteBox as following

image

In this way you can work with radAutoCompleteBox. I hope you find this post useful. Thanks for reading.