
In this post we will take a look on working with RadAutoCompleteBox in JavaScript based Windows Store Application.
Getting Started with RadAutoCompleteBox
You can create RadAutoCompleteBox by setting data-win-control property of a div or span as Telerik.UI.RadAutoCompleteBox. See the code below,
<div id="sportsAutoComplete"
 data-win-control="Telerik.UI.RadAutoCompleteBox"
 data-win-options="{placeholder:'enter player...'}">
</div>
In above code
- data-win-control attribute of div is set as Telerik.UI.RadAutoCompleteBox
- In data-win-options attribute
You can set datasource of RadAutoCompleteBox in two ways. You can directly set datasource either in data-win-options attribute or in the JavaScript function. You can set datasource in code behind as following,
var sportsArray = ['Sachin Tendulkar', 'Saurabh Ganguli', 'MS Dhoni', 'Rahul Dravid', 'Kevin Pierson', 'Kalis'];
 var sportsAutoComplete = document.getElementById("sportsAutoComplete").winControl;
 sportsAutoComplete.dataSource.data = sportsArray;
In above code we are
- Creating an array named sportsArray
- Creating reference of RadAutoCompleteBox as winControl
- Setting datasource of RadAutoCompleteBox with the sportsArray
At the point if you run application you should get Auto Complete Box as following,

Working with Template for RadAutoCompleteBox
There may be scenario when you need to set data source of RadAutoCompleteBox to array of complex objects. For example there is an array as following,
 var movieArray = [
 { title: "The Artist", picture: "images/TheArtist.jpg" },
 { title: "A Better Life", picture: "images/abetterlife.jpg" },
 { title: "Abduction", picture: "images/abduction.jpg" },
 { title: "African Cats", picture: "images/africancats.jpg" },
 { title: "Angel Crest", picture: "images/angelscrest.jpg" },
 { title: "Arthur", picture: "images/arthur.jpg" },
 { title: "Anonymous", picture: "images/anonymous.jpg" },
 { title: "A Dangerous Method", picture: "images/adangerousmethod.jpg" },
 { title: "A Good Old Fashioned Orgy ", picture: "images/agoodoldfashionedorgy.jpg" },
 { title: "A Seperation ", picture: "images/aseparation.jpg" },
 { title: "Another Earth ", picture: "images/anotherearth.jpg" },
 { title: "A Heartbeat Away ", picture: "images/aheartbeataway.jpg" },
 { title: "Bad Teacher ", picture: "images/badteacher.jpg" },
 { title: "Begineers ", picture: "images/beginners.jpg" },
 { title: "Brotherhood ", picture: "images/brotherhood.jpg" },
 { title: "Bridesmaids ", picture: "images/bridesmaids.jpg" },
 { title: "Born To Be Wild ", picture: "images/borntobewild.jpg" },
 { title: "Blackthorn ", picture: "images/blackthorn.jpg" },
 { title: "Bellflower ", picture: "images/bellflower.jpg" },
 { title: "Butter ", picture: "images/butter.jpg" },
 { title: "Bunraku ", picture: "images/bunraku.jpg" },
 { title: "Cars 2 ", picture: "images/cars2.jpg" },
 { title: "Cost Of A Soul", picture: "images/costofasoul.jpg" },
 { title: "Carnage ", picture: "images/carnage.jpg" },
 { title: "Crazy Stupid Love ", picture: "images/crazystupidlove.jpg" },
 { title: "Cracks ", picture: "images/cracks.jpg" },
 { title: "Colombiana ", picture: "images/colombiana.jpg" },
 { title: "Cedar Rapids ", picture: "images/cedarrapids.jpg" },
 { title: "Captain America ", picture: "images/captainamerica.jpg" },
 ];
You can set this array also, as data source of RadAutoComplte Box. This can be done as following,
var movieAutoComplete = document.getElementById("movieAutoComplete").winControl;
 movieAutoComplete.dataSource.data = movieArray;
On HTML RadAutoComplete with id movieAutoComplete is created as following
<div id="movieAutoComplete"
 data-win-control="Telerik.UI.RadAutoCompleteBox"
 data-win-options="{placeholder:'enter movie...',
 template:moviestemplate,
 dataTextField: 'title'}">
</div>
- Placeholder is set as enter movie
- dataTextField is set as title . title is one of the property in array.
- template is set as moviestemplate. Template decides how data will be displayed in the control. Template can be created by setting data-win-control property of a div or span as WinJS.Binding.Template
We have created moviestemplate as following
<div id="moviestemplate" data-win-control="WinJS.Binding.Template">
 <div style="width: 100px;height: 100px;">
 <img src="#" style="width: 70px;height: 70px;" data-win-bind="src:picture" />
 <h4 data-win-bind="innerText:title" />
 </div>
 </div>
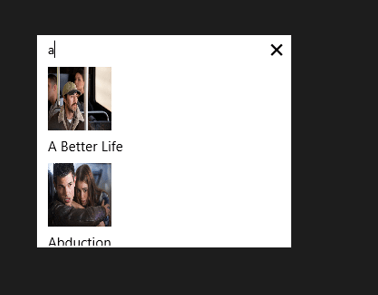
We are binding title of the array to h4 element and picture property of the array to image element. When you run the application, you should get RadAutoCompleteBox as following

Working with onSelect Event
You can read the selected item in RadAutoCompleteBox in onSelect event. You can attach select event and read the selected value as given in following,
movieAutoComplete.addEventListener("select", function (e) {
 document.getElementById("selectedmovie").src = movieAutoComplete.dataItem(e.item.index()).picture;
 });
In above code selectmovie is id of the image element. Image of the selected movie item will be displayed.
So in this way you can start using RadAutoCompleteBox in application. I hope you find this post useful. Thanks for reading.

Pingback: Working with RadAutoCompleteBox in JavaScript based Application for Windows Store