Indian GDPR (DPDP) affects every marketer in India

The Indian government has recently passed the Digital Personal Data Protection Bill (DPDP) in 2023. This is a significant step towards establishing a framework for managing citizens’ data in India.

Previously, data protection was governed by the Information Technology Act of 2000 (Section 21). With this law, customers have been granted specific rights over their data including correction, erasure, grievance redressal, and withdrawing consent.

For every marketer in India, it’s essential to understand and follow the provisions of the DPDP law to avoid severe penalties. Whether you do digital marketing, events marketing or are an organisation collecting data, this bill affects you. Even companies collecting data from their employees are within ambit of this law.

Penalties for Data Fiduciaries/ data collectors breaching customer data security can reach up to Rs 250 crore or USD 30 mn. Penalties are influenced by severity, repetition, and actions taken by the fiduciary.

In this blog post, we’ll highlight the key points of this law that are relevant for marketers:

To grasp the DPDP, it’s important to know the main entities involved:

  1. Data Fiduciaries: These are the parties primarily responsible for handling data. As a website owner, you are a Data Fiduciary.
  2. Data Principals: These are your customers or individuals whose data you are handling.
  3. Data Processors: These are entities that process data on behalf of Data Fiduciaries. Processing includes various operations like collecting, storing, transmitting, and more.

Whether your website is hosted in India or abroad, if it deals with data of Indian citizens, the DPDP law applies (Section 3(b)). As website owners, you can appoint a different Data Processor (Section 8(2)), but you are responsible for data handling and ensuring the processor complies by implementing appropriate measures. This means that you can use external service providers e.g. for emails, SMSs, Whatsapp, Social Media but are responsible for their adherence to these laws.

Obligations of Data Fiduciaries are as follows:

  • Processing for Lawful Purposes (Section 4): Data can only be used for lawful purposes for which the data principal has given consent. You need to notify individuals about the purpose of data collection at the time of data collection. If you acquired customers before this law was enacted, you must provide this notification as soon as possible. The burden of proof for consent lies with the Data Fiduciary.
  • Consent and Withdrawal (Section 6): Individuals can withdraw consent at any time, and you must stop processing their data within a reasonable time (not defined). This includes deleting data from both the processor and fiduciary.
  • Data Protection Officer (Section 8(9)): You must appoint this officer to address customer data queries.
  • Exceptions for Processing without Consent (Section 7): Certain exceptions exist where prior consent isn’t needed, such as government processing, medical emergencies, financial assessments, compliance with legal judgments, and natural disasters.
  • Breach Notification (Section 8(6)): If there’s a data breach, you must notify affected parties.
  • Data of Children (Section 9): Consent from parents is required for individuals under 18. Advertising targeting children is prohibited.

DPDP isn’t as strict as GDPR in terms of processing data within national boundaries, but this can be restricted by government notification. It clarifies that if other laws limit data residency, DPDP doesn’t relax those restrictions. The Government can override data protection laws for maintaining state security and sovereignty (Section 17(2)).

Foreign citizens’ data can be processed in India through valid contracts (Section 17).

DPDP provides an additional advantage to registering yourself as a startup. A lot of exceptions around data compliance apply to startups (Section 17(3)).

As a final clarification, if there are any other laws that are in conflict with this law, then the provisions of this law will prevail to the extent of this conflict.

Disclaimer: This is an overview, consult your legal representative for specific advice.

Securing Azure Databricks ML Model Serving Endpoint with Service Principals: Step by Step

A recent customer of mine had deployed a Machine Learning Model developed using Databricks. They had correctly used MLFlow to track the experiments and deployed the final model using Serverless ML Model Serving. This was deemed extremely useful as the serverless capability allowed the compute resources to scale to zero when not in use shaving off precious costs.

Once deployed, the inferencing/ scoring can be done via an HTTP POST request that requires a Bearer authentication and payload in a specific JSON format.

curl -X POST -u token:$DATABRICKS_PAT_TOKEN $MODEL_VERSION_URI \
  -H 'Content-Type: application/json' \
  -d '{"dataframe_records": [
    {
      "sepal_length": 5.1,
      "sepal_width": 3.5,
      "petal_length": 1.4,
      "petal_width": 0.2
    }
  ]}'

This Bearer token can be generated using the logged in user dropdown -> User Settings -> Generate New Token as shown below:

Databricks Personal Access Token

In Databricks parlance, this is the Personal Access Token (PAT) and is used to authenticate any API calls that are made to Databricks. Also, note that lifetime of the token (defaults to 90 days) and is easily configured.

The customer had the Data Scientist generate the PAT and use it for calling the endpoint.

However, this is an anti-pattern for security. Since the user is a Data Scientist on the Databricks workspace, the PAT would get access to the workspace and allow a nefarious actor to achieve higher privileges. If a user’s account is decommissioned, the user loses access to all Databricks objects. This user based PAT was flagged by the security team and they were requested to replace it with a service account as is a standard practice in any in-premise system.

Since this is an Azure deployment, the customer’s first action was to create a new user account in the Azure Active Directory, add the user to the Databricks workspace and generate the PAT for this “service account”. However, this is still a security hazard given the user has interactive access to Databricks workspace.

I suggested the use of Azure Service Principal that would secure the API access with the lowest privileges. The service principal acts as a client role and uses the OAuth 2.0 client credentials flow to authorize access to Azure Databricks resources. Also, the service principal is not tied to a specific user in the workspace.

We will be using two separate portals and Azure CLI to complete these steps:

  1. Azure Portal
  2. Databricks Workspace

In this post, I am detailing the steps required to do the same (official documentation here):

  1. Generate an Azure Service Principal: Now this step is completely done in the Azure Portal (not Databricks workspace). Go to Azure Active Directory -> App Registrations -> Enter some Display Name -> Select “Accounts in this organisation only” -> Register. After the service principal is generated, you will need its Application (client) ID and Tenant ID as shown below:
  2. Generate Client Secret and Grant access to Databricks API: We will need to create Client Secret and Register Databricks access.
    To generate client secret, remain on Service Principal’s blade -> Certificates & Secrets -> New Client secret -> Enter Description and Expiry -> Add. Copy and store the Client Secret’s Value (not ID) separately. Note: The client secret Value is only displayed once.

    Further, In the API permissions -> Add a permission -> APIs my organization users tab -> AzureDatabricks -> Permissions.
  3. Add SP to the workspace: Now, Databricks has the ability to sync all identities created to the workspace if “Identity Federation” is enabled. Unfortunately, for this customer this was not enabled. Next, they needed to assign permission for this SP.
    This step in done in your Databricks workspace. Go to Your Username -> Admin Settings -> Service Principals tab -> Add service principal -> Enter Application ID from the Step 1 and a name -> No other permissions required -> Add.
  4. Get Service Principal Contributor Access: Once the service principal has been generated, you will need to get Contributor access to the subscription. You will need help of your Azure Admin for the same.
  5. Authenticate as service principal: First login into Azure CLI as the Service Principal with the command:
az login \
--service-principal \
--tenant <Tenant-ID>
--username <Client-ID> \
--password <Client-secret> \
--output table

Use the values from Step 1 (tenant ID & Client ID) and Step 2 (Client Secret) here:

  1. Generate Azure AD tokens for service principals: To generate Azure AD token you will need to use the following command:
az account get-access-token \
--resource 2ff814a6-3304-4ab8-85cb-cd0e6f879c1d \
--query "accessToken" \
--output tsv

The resource ID should be the same as shown above as it represents Azure Databricks.

This will create a Bearer token that you should preserve for the final step.

  1. Assign permissions to SP to access Model Serving: The Model Serving endpoint has its own access control that provides for following permissions: Can ViewCan Query, and Can Manage. Since we require to query the endpoint, we need to grant “Can Query” permission to the SP. This is done using the Databricks API endpoints as follows:
$ curl -n -v -X GET -H "Authorization: Bearer $ACCESS_TOKEN" https://$WORKSPACE_URL../api/2.0/serving-endpoints/$ENDPOINT_NAME 

// $ENDPOINT_ID = the uuid field from the returned object 

Replace @ACCESS_TOKEN with the bearer token generated in Step 6. The @WORKSPACE_URL should be replaced by the Databricks Workspace URL. Finally, the $ENDPOINT_NAME should be replaced by the name of the endpoint created.

This will give you the ID of the Endpoint as shown:

Next, you will need to issue the following command:

$ curl -n -v -X PATCH -H "Authorization: Bearer $ACCESS_TOKEN" -d '{"access_control_list": [{"user_name": "$SP_NAME", "permission_level": "CAN_QUERY"}]}' https://$WORKSPACE_URL../api/2.0/permissions/serving-endpoints/$ENDPOINT_ID

$ACCESS_TOKEN: From Step 6
$SP_NAME: Name of the service principal as created in Azure Portal
$WORKSPACE_URL: Workspace URL
@ENDPOINT_ID: Generated in the command above

  1. Generate Databricks PAT from Azure AAD Token: While you have the Azure AAD token now available and it can used for calling the Model Serving endpoint, the Azure AAD tokens are shortlived.
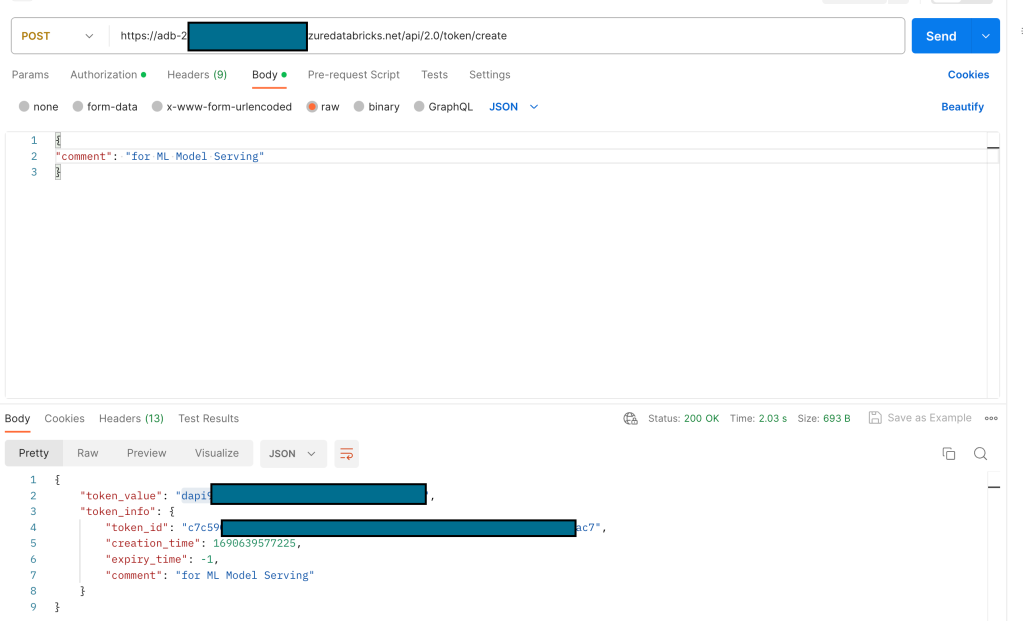
    To create a Databricks PAT, you will need to make a POST request call to the following endpoint (I am using Postman for the request): https://$WORKSPAE_URL/api/2.0/token/create
    The Azure AAD Bearer token should be passed in the Authorization header. In the body of the request, just pass in a JSON with “comment” attribute.
    The response of the POST request will contain an attribute – “token_value” that can be used as Databricks PAT.

The token_value, starting with “dapi” is the PAT that can be used for calling the Model Serving Endpoint that is in a secure configuration using the Service Principal.