Icenium Cloud based IDE got launched and I found this “one stop solution” to create Hybrid applications or Cross-platform application very impressive. While playing around Icenium, I liked almost every features in this Cloud based IDE. However below I am listing my favorite 5 features. In further post, I will discuss more features and step by step explanation to work with them.
Code Editor
Being a hybrid application developer, we need to write lot of HTML, JavaScript and CSS. Code Editor in Icenium is clean and elegant editor. It allows us to write codes without much distraction.
Just Code is integrated with Code Editor. In Code Editor, we can perform tasks like
- Refactoring
- Navigation
- Code Commands
We can perform Code Commands like
- Formatting of Code
- Expand selection
- Duplicate a text
- Put a block comment
- Expand selection
The best part is, there is short cut for all the operation. In Navigation we can perform tasks like
- Go To File
- Go To Member
- Go to Symbol
- Go To Member
So my one of my favorite feature in Icenium is its elegant Code Editor.
Certificate Management
If you have created any Android application then you may be knowing that you need to have a certificate to create apk file. Icenium allows us to create and mange certificate right from the IDE.
Icenium provides two options to create a certificate,
- Request for a certificate
- Create self-signed certificate
Creating certificate right from the IDE is one of the cool feature.
Version Control
Icenuim provides complete version control solution for application development. We can work locally and can perform following tasks in Icenium
- Compare the changes in between local and latest versions from the server
- Commit the changes
- Revert the changes
- View the history log in the repository
- Commit the changes
We can compare changes, navigate from one change to another as shown in the below image.
We can view the
- history
- change sets
- Conflict etc. as shown in the following image,
Icenium allows us to commit or revert the changes. While committing we need to provide comment for that particular change. We can commit as shown in below image,
Version control is one of the cool feature I got impressed while playing with Icenium.
Integration with github Repository
Yes you read it corectly , right from the IDE you can push and pull yor project to github repository. Icenium allows us to
- Configure the repository
- Pull from the repository
- Push into the repository
- Invite the Collaborators
The best part is that right from the IDE we can Invite Collaboratoes . Before pushing to github we need to commit the changes to resposiory . Commit comment will be displayed next in the github respository comment
Code sign ,Permissions and Publish of application
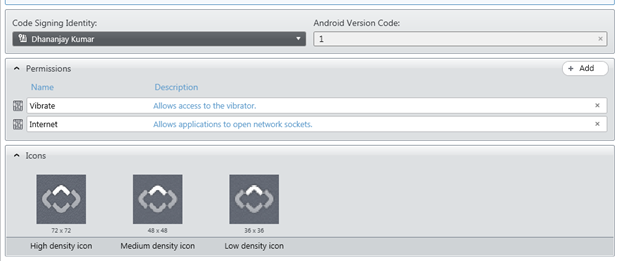
Right from Icenium IDE ,we can sign the code , configure the permissions and set the icons of the application.
In Icenium with a right click on the project , we can publish the application.
I hope you like these fetaure and you are all set to play around Icenium. Thanks for reading this post and I am looking very forward to share more learning on Icenium with you in furher post.


