Dynamic Values passing between test steps in Test Studio

Recently I was talking to a customer. He discussed a simple but important problem with me on test automation using Test Studio. He had a requirement to use values of variables from one test step in another test step.

To understand this problem in better way, consider below web application which is inserting data in database.

clip_image001

Let us try to understand this problem bit further. Suppose you have 6 test steps in test. In step2 user is typing UserName to be inserted.

clip_image003

To verify successful insertion of UserName in database, you need to do follow steps,

  • Read UserName inserted by user from step 2
  • Reading of username is done in step 4. So here you are reading value from step 2 in step4.
  • Use read value of step 4 to verify insertion in database.

In this post we are going to see how we can read variables value from one step in another step. In this case from step 2 to step 4 and then in step 6.

To use variable from one step in another you need Coded step. To add coded step select Test from menu and then Script Step from ribbon. In Visual Studio extension Coded Step can be added by clicking Add then selecting Coded Step.

clip_image001[6]

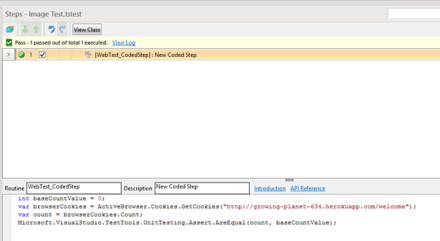
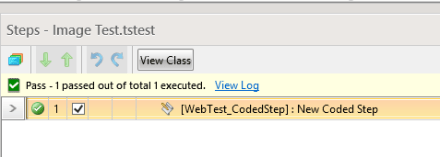
If you notice test steps in we have taken in example there are two test steps (step 4 and step 6) are coded steps. In step 4 we are reading user inserted value as below and assigning that to a public global variable.

clip_image003[6]

In step 4 (coded step) we read value from step 2 or in other words value from DOM element in which value got assigned in step 2. Now we need to read global variable value in step 6.

clip_image005

In this way very easily you can read variable values from one step in another step in a test project. I hope this post will help you. Thanks for reading.

Advertisement

How to Automate Test for Image verification using Test Studio

Learn more about Test Studio here

Telerik Test Studio got out of box feature to automate test for image verification. You can verify, whether image has been changed or distorted in application without writing any script. In this post we will take a look on, “How can image verification test can be automated in Test Studio

Let us consider that there is web application with an image as below,

clip_image001

To do verification around this image, start recording the test. Once application is launched for recording, select Enable or Disable over hover option from Test Studio control panel docked in recording browser window,

clip_image002

This will allow you to select image on DOM. Put mouse for some time and you will get a blue bubble.

clip_image004

On clicking of blue bubble you will get option to Image Verification.

clip_image005

Next you need to click on Image Verification. On clicking you will get Image Verification dialog box.

clip_image007

In dialog box you can configure various options like,

  • Verify entire image
  • Verify certain area of image

To do exact match you need to put Total Difference as 0. Recommended is to put in between 1 to 5 %. If you want to verify certain area of image then uncheck Verify Entire Image checkbox and configure X axis, Y axis, Width and Height value.

I have recorded a very simple test for image verification with two steps as below. You can see that error tolerance has been set to 2%.

clip_image002

Assume if test fails in image verification step then you will get information as below that Images are not the same.

clip_image004[6]

We just learnt that Test Studio allows us to perform automation of image verification without writing any script. I hope you find this post useful. Thanks for reading.

clip_image006

Error Solved: Binding Excel file as Data Source in Test Studio

Download free 30 days trial of TestStudio from here

Find more about Test Studio here

Okay, so have you come across this error while binding an Excel File as DataSource to a Test in Test Studio? You may get this error when you are working with fie saved in Excel 2013 format.

image

Now how to solve this error? Very easily you can solve this error by saving Excel file in Excel97-2003 Workbook format.

clip_image002

If you do not want and can save your file in Excel97-2003 format then probably you may want to check application log. To check application log follow these two steps,

  1. Navigate to Help Menu
  2. Click on Enable log to enable log in Test Studio.

image

In Log if you see something like Microsoft.ACE.OLEDB.12.0 is not registered on local machine then, you need to install Access Database Engine. You can download and install it from below link,

http://www.microsoft.com/en-us/download/details.aspx?id=23734

After installing it you should able to work with Excel file regardless of it format is Data Source in Test Studio.

I hope this post useful. Thanks for reading.

Download free 30 days trial of TestStudio from here

Find more about Test Studio here

Recap of webinar Journey from Manual to Automated Tester

image

On 12th December 2013, we conducted webinar on Journey from Manual to Automated Tester in 1 Hrs. We had great time teaching Automated Testing over web to audience of more than 150.

Download free 30 days trial of TestStudio from here

Find more about Test Studio here

In webinar we covered following topics,

  • Why to automate a Test
  • Advantage of Test Automation
  • Getting started with Test Studio
  • Record and Play a Test
  • Cross Browser Testing
  • Data Driven Testing
  • Test Lists and Scheduling

If you missed webinar then you can view recorded webinar below,


Some of the Questions and Answers from webinar are below,

Which all technologies that can be automated by Test Studio?

TestStudio can automate functional Testing of

  • Web Applications
  • Desktop Apps created using WPF
  • Load Testing
  • Load Testing of Web Services
  • Load Testing of Mobile Apps

Can we perform Load testing for more than 100 virtual users?

Yes Load Testing can be performed with more than 100 Virtual Users. Learn more about Load Testing here,

http://www.telerik.com/automated-testing-tools/support/documentation/user-guide/load-testing.aspx

Can we do automation testing for excel application?

What I understand from this question that you want to automate testing of

  • Reading Excel file
  • Verifying whether data being written to Excel file.

Yes you can do it using CODED STEPS. You need to write C# Code using File System API and Excel API to achieve automation .Learn more about Coded Steps here

http://www.telerik.com/automated-testing-tools/support/documentation/user-guide/coded_steps.aspx

What programming languages does it support?

Test Studio supports below programming languages,

  • C#
  • VB.Net

Can test studio access Linux System?

No Test Studio does not work on Linux system. As of now Test Studio supports only Windows.

Can you please show how we parameterise the user name and password?

As shown in demo you can do it using Data Driven Testing. Learn more about Data Driven Testing here,

http://www.telerik.com/automated-testing-tools/support/documentation/user-guide/data-driven-testing.aspx

When you choose any Browser for test recording

Learn more about recording here,

http://www.telerik.com/automated-testing-tools/support/documentation/user-guide/recording-tests.aspx

How this tool is handled browser pop-up?

Learn more about handling popup here,

http://www.telerik.com/automated-testing-tools/support/documentation/user-guide/dialogs-and-popups/dialogs.aspx

Is there any option for automating silver light application?

Yes Test Studio supports automation testing of Silverlight application. Learn more about that here,

http://www.telerik.com/automated-testing-tools/support/documentation/user-guide/write-tests-in-code/silverlight-test-automation/introduction.aspx

Does it support flex?

Unfortunately Test Studio does not support Flex application testing.

Can we do testing for Kendo UI applications?

Test Studio supports out of box testing of Kendo UI Widgets. See Kendo UI Grid testing video here,

http://tv.telerik.com/watch/automated-testing-tools/testing-kendoui-grid-with-test-studio

Webinar was highly demo oriented and PPT had very less role to play. However if PPT interests you then find it below,

Download free 30 days trial of TestStudio from here

Find more about Test Studio here

clip_image002

How to configure Identification or Find Logic of Element in Test Studio

In this post we will take a look on how to configure Find Logic of an element in Test Studio…

Being a Test Professional while automating test there is one common question all of us are worried about and question is,

Will Test fail if id of element being changed in development? Or what will happen if Element id is changed?

Yes Test will fail but there is a way you can change configuration and Find Logic

Test Studio allows you to change Find Logic at the project level. By Default Test Studio search an element on

  • Id of element
  • Name of element

You can browse to find logic setting of Test project by clicking on

Project -> Show Setting

clip_image002

In Project Setting dialog box click on identification logic option. Here you can find identification logic and change it as per requirement to your project.

clip_image004

As you can clearly see that by default Test Studio find an element on its Id. If you believe that ID of elements are very much likely to be changed with each development cycle then you may opt to find an element on its other property. If you believe that Name of the elements are not expected to change frequently then you can consider to change project setting to find an element on its Name attribute.

To change Find Logic select any attribute then click on up/down arrow to change its position. For example Name is at second from top. To make it first attribute on which Test Studio will find element select Name and then click on up arrow button to bring it at the top in the list.

clip_image006

In this way you can configure Find Logic. You may notice that if required you can add new Tag to list as well. So we just witnessed that Test Studio as automated testing tool is very flexible and allows us to configure Find Logic as our own requirement.

I hope you find this post useful. To speedup automated testing do not forget to download trail of Test Studio from here

image

How to work with NUnit Assertion as step in Test Studio

Learn more about Test Studio here

clip_image001

After I written this post How to work with MS Unit Test Assertion as step in Test Studio , I got a question,

How can I use NUnit Test Assertion in a Test Step while automating test with Test Studio?

Answer of this questions is also lies in three steps,

Step 1:

Add reference of nunit.framework dll in Test Project

Step 2:

Create a coded step

Step 3:

Write Assertion in test

Add Reference

There are in two ways you can work on Test Studio. Either on Visual Studio plugin or on Test Studio standalone version.

Adding reference in Visual Studio is simpler. Right click on test project and from context menu select Add Reference. Browse to nunit.framework.dll library and add reference in test project.

Even though you have added reference in Visual Studio make sure that you have added reference in test project opened in standalone version else you will get exception.

To add nunit.framework.dll assembly in Test Studio standalone version you need to follow following steps,

Select Project option in top menu

image

Click on Show Settings in project tab

image

On clicking on Show Settings you will get Project Settings dialog box. In dialog box click on Script Options. To add assembly reference click on Add Reference.

image

When you clock on Add Reference Test Studio will open File Chooser dialog box. In that browse nunit.framework.dll assembly reference location in file system and select that to add as reference in current Test project.

Create a coded step

To create Coded Step in select Test and from menu

image

You will find coded step added as below,

clip_image001[6]

Write Assertion in Test

Once Coded step is added you can write any assertion. To validate I am writing a very simple assertion as below,

You can view below code in Visual Studio,


[CodedStep(@"New Coded Step")]
 public void NunitTest_CodedStep()
 {
 NUnit.Framework.Assert.AreEqual("Telerik", "Telerik");

}

In Test Studio standalone version codes step will look like as following,

clip_image002

Now go ahead and execute test. You should able to get test passed successfully as given below,

clip_image003

I hope you find this post useful. To speedup automated testing do not forget to download trail of Test Studio from here

clip_image004

How to verify number of cookies while automating a test in Test Studio

Learn more about Test Studio here

Yes these kind of questions are very simple but have a sustainable impact while automating a test. Recently I got a question that,

I want to verify number of cookies in web application while automating test. How Test Studio can help me in that

This test scenario could be very important. Test Studio surprisingly simplify these kind of requirement while automating test. So to verify number of cookies in web application,

  1. Add Coded Step
  2. Add reference of MS Unit Test
  3. Read number of cookies
  4. Assert number of cookies with expected value.

To Add Coded Step and reference of MS Unit Test follow this post

Once you have added reference of MS Unit Test and added a coded step start writing following scripts in coded step,

Read cookies of web application being in test as following. Do not forget to change URL with URL of web application you are testing.

image

Now in browserCookies all cookies are being read. You can read count of cookies as below,

image

Once you have cookies count in variable count you can verify its exact value and assert result using MS Unit Test Assert. This can be done as following

image

Where baseCountValue could be any constant value. Putting all together script of coded step would like following,


[CodedStep(@"New Coded Step")]

 public void WebTest_CodedStep()
 {
 int baseCountValue = 2;
 var browserCookies = ActiveBrowser.Cookies.GetCookies("URL of your App");
 var count = browserCookies.Count;
 Microsoft.VisualStudio.TestTools.UnitTesting.Assert.AreEqual(count, baseCountValue);

}

On running you can see that below test is verifying that number of cookies associated with URI is zero.

image

In this way you can verify number of cookies in Test Studio. I hope you find this post useful. Thanks for reading.

I hope you find this post useful. To speedup automated testing do not forget to download trial of Test Studio from here

image

How to work with MS Unit Test Assertion as step in Test Studio

Learn more about Test Studio here

More you meet people more questions you get. I love this part of my job, meeting and answering people queries. I usually talk to Test Professional who are doing manual testing. So some of their questions are very basic and this is expected because they are not coming from coding or programming background.

Recently in one of seminar I came across a question

How can I use MS Unit Test Assertion in a Test Step while automating test with Test Studio?

Answer of this questions is in three steps,

Step 1:

Add reference of Microsoft.VisualStudio.QualityTools.UnitTestFramework dll in Test Project

Step 2:

Create a coded step

Step 3:

Write Assertion in test

Add Reference

There are in two ways you can work on Test Studio. Either on Visual Studio plugin or on Test Studio standalone version.

Adding reference in Visual Studio is simpler. Right click on test project and from context menu select Add Reference. Browse to Microsoft.VisualStudio.QualityTools.UnitTestFramework.dll library and add reference in test project.

Even though you have added reference in Visual Studio make sure that you have added reference in test project opened in standalone version else you will get exception.

image

To add Microsoft.VisualStudio.QualityTools.UnitTestFramework.dll assembly in Test Studio standalone version you need to follow following steps,

Select Project option in top menu

image

Click on Show Settings in project tab

clip_image001

On clicking on Show Settings you will get Project Settings dialog box. In dialog box click on Script Options. To add assembly reference click on Add Reference.

clip_image003

When you clock on Add Reference Test Studio will open File Chooser dialog box. In that browse Microsoft.VisualStudio.QualityTools.UnitTestFramework.dll assembly reference location in file system and select that to add as reference in current Test project.

Create a coded step

To create Coded Step in select Test and from menu

image

You will find coded step added as below,

clip_image001[6]

Write Assertion in Test

Once Coded step is added you can write any assertion. To validate I am writing a very simple assertion as below,

You can view below code in Visual Studio,


[CodedStep(@"New Coded Step")]

 public void WebTest_CodedStep()
 {
 Microsoft.VisualStudio.TestTools.UnitTesting.Assert.AreEqual("TestStudio", "TestStudio");

}

In Test Studio standalone version codes step will look like as following,

clip_image002

Now go ahead and execute test. You should able to get test passed successfully as given below,

clip_image003

I hope you find this post useful. To speedup automated testing do not forget to download trial of Test Studio from here

clip_image004