Testing SOAP APIs with Telerik Test Studio

The legacy SOAP based web services/ APIs are still in use at a lot of organisations. While Telerik Test Studio has direct support for REST based APIs, testing SOAP web services requires a few additional steps.

In the short video below, we share how we can test SOAP based APIs in Test Studio:

The three things needed include:

  1. A Test Oracle to encapsulate web services call: Built easily with Visual Studio
  2. Coded Steps in Test Studio
  3. Data Driven tests for testing various inputs

The transcript of the video is as follows:

Can Test studio test APIs? And i think most of you know the answer that it does support testing REST APIs. Recently one of the customers asked me if Telerik Test Studio can be used for automation of SOAP-based web services and the answer to that is it can be done in telerik test studio using coded tests.

In this video we will see how we can test SOAP based web services using Test Studio. The soap web service that i am using for testing is a publicly available service that converts digits to numbers. So in this web service i’m going to use the number and what it allows me to do is enter a number so let’s enter 789 and by invoking this i get the the words or the digits converted into words as seven eighty nine. So this is the web service that i’m going to test back in the test studio.

I have authored a test that will feed in various digits and verify if the web service returns the correct words for those digits. For the same i have put in some local data with digits in one column and in words in the second column. So this is going to be a data driven test. Let’s test this with our script. I’m just starting the test with the headless chrome as execution engine because web services don’t have a UI. The test has started and you can see that i’ve got the debugger going and already the test has finished.

Now there were four iterations of this test, this being a data driven test and if you want to see the logs for each of the iterations that’s visible here as well. In iteration number one you will notice the overall result is pass. In fact here it shows we’re using chrome headless version and our test was successful in iteration number two where we had put in two three eight nine the result is fail and the failure information is also mentioned here. Well we were expecting the web service to return two hundred and eighty nine but the web service actually returned two thousand three hundred and eight nine not eighty nine. So this actually indicates a failure on the assertion. Well the test continued because we have marked this step as continue on failure. Iteration number three has result as pass wherein we passed in a single digit 4 and we also got back the same value which is four. Iteration or the last iteration here is checking for digits 10 and inwords it should also be ten and once again the overall result is pass. So here you can see its result is pass but your overall result is a fail because one of the iterations here did actually fail.

So in the next few minutes we will see how we had created this SOAP test in telerik test studio. So to work the magic of a soap api test and it’s actually quite painless in telerik test studio. You need three things:

1. the first is a test oracle number

2. two is the coded step in test studio and

3. number three is data driving the verification

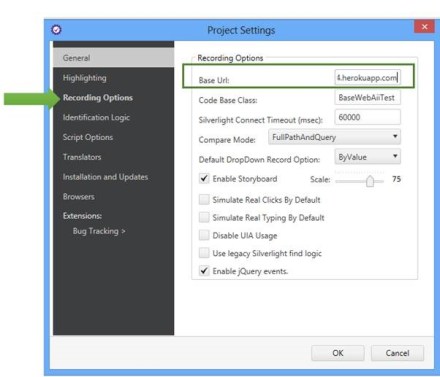
Okay let’s start with the test oracle. The test oracle is an external assembly that you are going to use within test studio inside your script but this assembly is going to be created by someone else. So what i had gotten done was to call the SOAP API using a visual studio function of adding web service reference and created that project as an assembly. Now the next step would be to add that assembly in test studio so if you go to your project and go to settings you will have a section that says script. Now within this section you will notice some assemblies that are automatically referenced here. Now if you notice this reference, this is something that has been added as a custom reference and this is where my test oracle has been created. So this assembly uses a simple function to invoke the SOAP API and provides a simple programmatic interface to invoke this soap service. So if you want to add more test oracles or external assemblies you can click on add reference and that’s what allows you to refer any .NET based assembly. So that takes care of the first step which is of getting a test article in place.

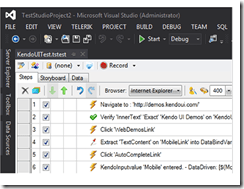
The second step is to add a coded step in my test script so you can add a coded step in test studio by using the step builder. Here where i’ve selected the common and within it there is a coded step and i can click on add step button. And this will add a coded step so that’s already done here. As you can see the coded step i am using is titled sample soap underscore coded step. In fact the code for this is available in the cs file located here. I just opened up the cs file the first thing that i need to do is to add a reference or to soap call namespace now in my function which is called as sample code underscore coded step. I am creating an instance of the object and within this i am passing in the specific digits. And finally i’m asserting if the digit that i have passed is the same as the one it should be in words.

Now the syntax here is slightly different. The syntax looks different because we are actually doing the third step in this demo which is data driving the verification. To data drive the verification as well as input values you’ve got to use the data and the specific column that you have created. So that’s what i’m using, so data and digits. And since the function towords requires me to give in an integer value i’m passing that in to the towords function of the test oracle. So conversion service and the function towords are actually coming from the test oracle. Finally i’m adding an assertion to see if the value that has been returned which is the nword value here and then the value that is there in my data driven column which is called inwords is also mentioned here. So both of them need to match up for this test to succeed. To quickly check where we had put in this data driven values we can go back to the test script and down below next to the test steps you will find the local data tab. And that’s where we can manually add these values.

This demonstration has showed you that Test Studio can be easily used to data drive SOAP based APIs automation

Enjoy watching the video and share your questions in the comments section below.

Advertisement

Webinar July-September’16

auto

Why Automation? Really you are still wondering on this…. Yes this saves a lot of time…

With this we also have these new webinars for you. Come and join us in these interesting session and have an experience of our latest updates

Date Time (IST) Session Title and Registration
Thursday, July 21 ’16 12:00 – 1:00 PM Build Rapid MVC Based Web Applications using Sitefinity Digital Platform
Thursday, July 28 ’16 12:00 – 1:00 PM Even Quicker Development with Xamarin Forms using Telerik UI for Xamarin
 Thursday, Aug 25’16   12:00 – 1:00 PM Building Bots that work across social apps with Microsoft Bot Framework      
Thursday, Sept 1 ’16 (updated) 12:00 – 1:00 PM Building Versatile Reporting Dashboards with Telerik Reporting Server
 Thursday, Sep 22’16    12:00-1:00PM Now Build Web Apps and API with Node.js
 Thursday, Sep 29’16 (updated)    12:00-1:00 PM API Testing with Telerik Test Studio

The audio will be streamed via GoToMeeting. Use of a headset is recommended

Comparison of Automated Testing Tools: Throwing in Telerik Test Studio

ComparisonI was reading this excellent article by Gouri Sohoni comparing various automated testing tools. The article is an excellent introduction to automation in testing and the various tools available to do the same. She compares the following tools: Selenium, QTP (Quality Test Professional) and Coded UI Test (CUIT) with Visual Studio 2012. I am taking this opportunity to extend the article and include Telerik Test Studio in the mix.

The following is written in the same format followed by the linked article:

Ease of Use

– Recording and Playback Functionality

Test Studio supports recording on various browsers i.e. IR, Chrome & Firefox. All the scripts can be played back on different browsers too.

– IDE and tools with which the tester can write the scripts

Test Studio comes with its own IDE and also integrates with Visual Studio. You can use Test Studio as a standalone IDE for recording and writing scripts or from within Visual Studio.

– Ease of Test Case execution

Test Studio test cases can be run from within Test Studio or using the Test Studio scheduler. The scheduler can be used to run all test suites or selected test cases at pre-defined schedule. Integration with CI tools is also supported via a command line test runner.

Platform Support

-Language Support

Test Studio doesn’t require you to write code in a lot of scenarios. However, if you do need to it supports C# and VB.NET.

– Support for various application types

Test Studio comes with testing for web applications, Silverlight applications, web services, mobile devices and WPF applications.

– Support for various browsers

Test Studio supports recording and playback in almost all browsers – IE, Chrome, Firefox and Safari.

– Support for Data Driven Testing

Test Studio supports Excel, XML, CSV and Databases (MS SQL Server, Oracle, MySQL and any QLEDB or ODBC supported DB) for data driven testing.

– Exception Handling

You can configure Test Studio to ignore all errors that happen during a test execution. If unexpected situations are expected to occur in a test suite you can convert them to Coded Steps and then use try and catch blocks for exception handling.

– Validations or Assertions

Test Studio supports Verify and Wait without need for writing any code. Any assert can also be included as needed using coded steps.

– Support for Objects

Test Studio has a unique Object Finder UI called DOM explorer that helps you locate elements on the application being tested easily. You can also customize the names and the locator logic that is used to identify the object.

Integration with Application Lifecycle Management and going beyond

– ALM Integration

Test Studio integrates with Telerik TeamPulse, HPs Quality Center and Microsoft TFS. Integration with TeamPulse allows for bug submission and linking test cases to its automation script. All the features of TFS are also available if you utilize the TFS as the ALM tool.

Additionally, submission of bugs is also supported for JIRA.

– Going beyond

Test Studio can easily automate JavaScript based applications. Special constructs like “Simulate RealTimeClick” and “Simulate RealTimeTyping” makes this possible. Test Studio provides you the capability to convert your functional tests to load tests. It also has the capability to take the workload from Fiddler traces and run it in Test Studio for performance test.

The RoI for the tool is enhanced as it is also available in the pay per use model. The minimum time that you need to buy Test Studio for is 1 month.


Summarizing the Comparison

Category Selenium QTP Coded UI Test Studio
Record & Playback Completely Supported Completely Supported Completely Supported Completely Supported
Ease of IDE & Features with tool Not Par Not Par Completely Supported Completely Supported
Ease of Execution Completely Supported Completely Supported Completely Supported Completely Supported
Languages Support C#, Java, Perl, PHP, Python or Ruby VB Script C# & VB.NET C# & VB.NET
Support for Objects Not Supported Not Supported Completely Supported Completely Supported
Browser Support Allmost All IE & Firefox Some IE Versions Allmost all
Support to various applications Only Web Almost All Almost All Almost all
Integration with ALM Partially Supported Partially Supported Completely Supported Partially Supported

How to Automate Test for Image verification using Test Studio

Learn more about Test Studio here

Telerik Test Studio got out of box feature to automate test for image verification. You can verify, whether image has been changed or distorted in application without writing any script. In this post we will take a look on, “How can image verification test can be automated in Test Studio

Let us consider that there is web application with an image as below,

clip_image001

To do verification around this image, start recording the test. Once application is launched for recording, select Enable or Disable over hover option from Test Studio control panel docked in recording browser window,

clip_image002

This will allow you to select image on DOM. Put mouse for some time and you will get a blue bubble.

clip_image004

On clicking of blue bubble you will get option to Image Verification.

clip_image005

Next you need to click on Image Verification. On clicking you will get Image Verification dialog box.

clip_image007

In dialog box you can configure various options like,

  • Verify entire image
  • Verify certain area of image

To do exact match you need to put Total Difference as 0. Recommended is to put in between 1 to 5 %. If you want to verify certain area of image then uncheck Verify Entire Image checkbox and configure X axis, Y axis, Width and Height value.

I have recorded a very simple test for image verification with two steps as below. You can see that error tolerance has been set to 2%.

clip_image002

Assume if test fails in image verification step then you will get information as below that Images are not the same.

clip_image004[6]

We just learnt that Test Studio allows us to perform automation of image verification without writing any script. I hope you find this post useful. Thanks for reading.

clip_image006

Learn about Telerik Testing Solution at STC 2013

Learn more about Test Studio here

We are happy to inform that Telerik team will be present at STC 2013 on 4-5th December in Bangalore. Do join us to learn more about Test Studio, along with other products at the event.

We invite you to join us at Telerik booth and explore Test Studio with us.

image

We are giving away one Nexus 7 Tablet as well at the booth. So if you come, interact and explore Test Studio with us then you have a chance to win Nexus 7 Tablet.

clip_image002

Our Evangelist Dhananjay Kumar will present on “A Look on Automated Web Testing”. In this session he will use Test Studio as tool to demonstrate the concepts. He will touch on following topics,

  • Getting started with Test Automation
  • Data Driven Testing
  • Ajax Testing
  • Grouping of Tests and Scheduling

We are excited to see you at event. If you have any further queries feel free to write us at Dhananjay.kumar@telerik.com

How to debug a Coded Step in Test Studio?

Learn more about Test Studio here

Recently in one of the customer interaction I came across a question that how a Coded Step in Test Studio can be debugged? This is an important query and can be very useful while writing complex Coded Step.

So let us begin with following recorded step,

image

As we see step 6 is a Coded Step. We need to debug this step. To being with we cannot debug a particular line of coded step in Test Studio desktop version. In Test Studio desktop version we can put breakpoint to debug only at Test Step level. So we can put a breakpoint on Test Step as given below. Test Studio will wait for user at step 3, 4 and 6.

image

Putting breakpoint at Test Step level is simple. However our requirement is to debug particular line of code in Coded Step. We cannot do this in Test Studio Desktop version. But this can be done in Test Studio plug-in of Visual Studio. So we need to follow below steps to debug coded step.

Very first open Test in Visual Studio and put a breakpoint in line of the code we need to debug. This can be done as follows,

image

After this open Test Explorer. To open it from menu select Test and then Windows and then Test Explorer. See the image below for reference.

image

Once Test Explorer is open select test (of which coded step you want to debug). In this case that is Test3 and right click on that and from context menu select Debug Selected Tests as given in below image,

image

Now on debugging of that particular test you will find breakpoint is being hit.

image

We learnt it is super easy to debug a codes step in Test Studio. I hope you find this post useful. Thanks for reading.

Learn more about Test Studio here

Automating Mouse Actions Test in Test Studio

Learn more about Test Studio here

When you automate a test, working with various mouse actions as desktop commands are essential. Mouse actions could be as following,

  • Single Click
  • Double Click
  • Right Click
  • Mouse Hover etc.

When I talk to customers who are coming from manual testing background or working with other automated testing tools they complain about automation of mouse actions like hover etc. They say it is tough in their existing tools to automate Mouse Actions. They require them to write some amount of scripts to achieve automation of mouse actions.

In Test Studio automating mouse actions are super simple. In this post we will take a look on how to do that.

Let us consider you are recording a test and Test Studio is connected to recording browser (IE in this case) . From Test Studio control panel docked on browser select second option. It will allow to select an element on the DOM

image

When you move mouse on page elements would be getting selected. There would be a red rectangle around selected element. Keep mouse for some time and you will get a blue bubble.

image

Next you need to click on blue bubble. You will get various options. In options select Mouse Actions options.

clip_image001

On selecting Mouse Actions option , you will get available mouse actions to automate.

clip_image002

For example if you want to add Mouse Hover action in your test just double click on Mouse Hover and a step will get added in the test. Next Test Studio will ask you further options like Centre and Specific Point.

clip_image003

You will find mouse actions are added in test as follows

clip_image005

We just witnessed how easy it is to automate various desktop mouse actions command using Test Studio. We did not have to write any script and automation can be done while recording test. I hope you find this post useful. Thanks for reading.

How to use existing Test Scripts to create new test in Test Studio

Learn more about Test Studio here

In one of customer demo, I came across a question that how we could use test scripts recorded on different machine or rather an existing test script to create a new test in Test Studio.

This can be done very easily in Test Studio. Each Test Project in Test Studio can be opened in File system. Let us say you want to use Test1 to create another test. So right click on Test1 and from context menu select Show in Windows Explorer

image

On File system you will find Test Studio Test file. You need to use this Test Studio Test File to create new test with existing scripts.

clip_image002

Next to use existing test script, right click on Test Project you get option to Add Existing Test in content menu.

clip_image004

Browse to existing Test Studio Test File you want to use to create new test. Select Test File click on Open.

clip_image006

On clicking on Open you will find that you have created new test with existing test. Newly created test will have same name as of existing test. If you want you can rename test by right clicking on the test and selecting rename option from context menu.

So just we learnt that it is very simple to use existing test scripts to create new test in Test Studio. I hope you find this post useful. Thanks for reading.

Learn more about Test Studio here

Resources for Webinar “Data Driven Testing using Test Studio”

Learn more about Test Studio here

On Jul 18 we conducted a webinar titled “Data Driven Testing using Test Studio”. This is part of the ongoing webinar series we here at Telerik India are doing targeting the APAC region. We call this the Telerik. .NET Ninja Developer Webinar series. You can take a look at the Jun-Jul schedule here: https://telerikhelper.net/2013/05/24/telerik-webcasts-june-july/

image

Learn more about Test Studio here

Slides deck of webinar is here,

For those of you who missed attending the webinar live, we have it covered for you. We record all our webinars and so was this one. Here is the recording of the webinar:

Telerik Ninja T-Shirt Giveaway:

We select 2 person from the webinar attendees and give away our .NET Ninja T-Shirt in each of our webinars. We have picked up 2 lucky persons in this webinar too. They are:

Sharma, Avinash

Neha Tiwari

Congratulations to the winners. We will be contacting you shortly and we will ship your t-shirts.

Excited to see you in next webinar

Automate Database Insertion Test using Test Studio

Learn more about Test Studio here

Inserting data from application is very prominent task. You will find this functionality in all kind of applications. In this post we will take a look on automating the test to verify insertion of data in database.

Let us assume you have following application to insert data in database,

image

And you have recorded test steps for insertion operation as following. As you see that all the test steps are passed and data got inserted in database.

image

At this point there is no step to verify that whether data got inserted to database successfully or not? Only manually Tester can verify that data being inserted or not. Now let us see that how can we automate this test.

We will automate this test using

  • Coded step
  • Performing database verification operation in coded step. We will choose LINQ to verify that whether data got inserted successfully not. You can choose any other data base technology like ADO.Net or other library to perform operation against database.
  • We will use NUnit for assertion

Very first we need to add a Coded step. To add coded step select Test from menu and then Script Step from ribbon as given in below image.

image

You will be asked to select scripting language. I am selecting C# as scripting language here.

image

Once Code step is added export test project to Visual Studio. To export to visual studio from menu click on Export to Visual Studio as shown in image below,

image

Next select Visual Studio version to export project.

image

Creating Library to work with LINQ

Now in visual studio you need to add operations related to LINQ in different class library. Idea is that we will create separate library for LINQ operation and later we will add that library to Test Studio.

clip_image002

Assume that we have created a library with name DataLibrary. This Library got

  • LINQ data context classes
  • We added a static class in which operation is being performed to verify that whether data exist with given user name or not? If data does not exist static function will return false else true.

So DataHelper class contains following code to verify that whether data exist or not.


public static class DataHelper
 {
 public static bool VerifyInsertion(string username)
 {
 DataClasses1DataContext conext = new DataClasses1DataContext();
 var result = (from r in conext.User_Login_Datas
 where
 r.username.Equals(username)
 select r).FirstOrDefault();
 if (result == null)
 return false;
 else
 return true;

}
 }

Adding Reference in Test Project

There are in two ways you can work on Test Studio. Either on Visual Studio plugin or on Test Studio Desktop.

Adding reference in Visual Studio is simpler. Right click on test project and from context menu select Add Reference. Browse to DataHelper.dll library and add reference in test project.

Even though you have added reference in Visual Studio make sure that you have added reference in test project opened in Test Studio desktop version else you will get exception.

To add DataHelper.dll assembly in Test Studio desktop version you need to follow following steps,

In project tab or project dashboard select Settings option from ribbon

clip_image002[6]

In dialog box click on Script Options. To add assembly reference click on Add Reference.

clip_image004

The way you added DataHelper library add Add reference of nunit.framework dll in Test Project as well. Make sure to add this in Test Studio desktop version also.

After adding references you need to write codes for coded steps. We need add two coded steps,

First coded step to read username value before Post back or Form get submitted. In this particular application when user will click on Insert Data button, a post back will occurred or form will get submitted and this will clear value of all the elements in DOM. So we need to read value before form submission. We can do that in coded step as following,

image

We are reading text of UserName field using TestStudio Framework API.

Second coded step will call VerifyInsertion function from DataHelper library and using NUnit we will assert the validation. We can do that as following,

image

For your reference both coded steps are as follows,


string insertedValue = string.Empty;

 [CodedStep(@"New Coded Step")]
 public void Data_Insert_Test_CodedStep()
 {

 bool result = DataHelper.VerifyInsertion(insertedValue);
 NUnit.Framework.Assert.AreEqual(true, result);
 }

[CodedStep(@"New Coded Step")]
 public void Data_Insert_Test_CodedStep1()
 {
 insertedValue = Find.ById<HtmlInputText>("MainContent_txtUserName").Text;

}

Your test should be like following

clip_image001

In this way you can automate data insertion test in database. I hope you find this post useful. Thanks for reading.

Learn more about Test Studio here

How to execute Test in different Environment in Test Studio

Learn more about Test Studio here

To execute test in different environment you need to set base URI at project level. Very first let us understand that why we need BaseURL? Assume a scenario when you need to run test in different environment. For example your test should run in following environments

  • Testing environment
  • Staging environment
  • Production environment

Now suppose for testing environment you have recorded test as follows,

clip_image001

As you see first step of test is navigating to base URL of testing environment. Problem will occur when you will move test from testing environment to some other environment. In that scenario for each step you will have to come back and change URL.

Test Studio provides a simple solution of this by option of setting baseURL at project level. To set baseURL at project level navigate to project tab and click on project setting in ribbon

clip_image003

In project setting you have option to provide baseURL. Provide base URL here and click on ok.

clip_image005

After providing base URL when you rerecord test you will find portion specified in base URL hs been removed.

clip_image006

So setting base URL at project level allows you easily to move test from one environment to another environment. For example in case of test environment set base URL as test environment and perform all testing. When you need to execute test in production environment all you need to change base URL in the project setting. I hope you find this post useful.

Learn more about Test Studio here

How to record test using Google Chrome Browser in Test Studio

image

In this post we will take a look on how to use Chrome Browser to record in Test Studio Desktop. New release of Test Studio allows you to record in any browser.

Learn more about Test Studio here

Let us say you have created a Web Test with title Login Test HR. On project dash board double click on test to navigate test dash board.

image

On Test dashboard you see that on ribbon there is Quick Execution section. In that select browser you want to record with. After selecting browser click on Record button. Once Test Studio is successfully connected to Chrome, you will find chrome ready for recording as given in below image,

image

Navigate to page for testing. You need to provide page URL in Test Studio recorder built in navigation bar. You will get Test Studio Recorder navigation bar in bottom of browser.

image

In bottom of browser you will find Test Studio Recorder tool box

image

Here you get below options,

  • Pause recording
  • Highlight element
  • Help with recording
  • Expand recording menu

Choose option of Highlight Elements to select any element on DOM. After clicking on Highlight element when you move mouse over page, you will find red rectangle around selected DOM element. On selecting an element you will get hand icon on selected element. On clicking you will get many options related to selected element as shown in below image,

image

Here you got different options to work with selected elements.

  • Verification
  • Locate in DOM
  • Add to repository option
  • Muse actions etc.

When you click on All Action in bottom of browse you will find Test Studio recorder expanded.

image

Here you can select any verification option like and all them in test

  • Content
  • Attributes
  • Style
  • Properties

In this way you can now record a test using Chrome in Test Studio. I hope you find this post useful. Thanks for reading.

Join me for the Webinar on Data Driven Testing with Telerik Test Studio

Learn more about Test Studio here

Register here to attend webinar

clip_image001

On 18th July 2013 we are conducting webinar on Automated Data Driven Testing with Test Studio from 3 pm to 4 pm

Register here to attend webinar

When same test gets executed several times with different set of data then it is called Data Driven Testing. Data used in test is called “Test Data “. Test Data can reside in any external form like in Excel file, XML file or Databases. Before using, Test Data should be added as data source in test project. In Data Driven Testing same test get executed several times with different input data. There may be scenario in which test logics and test results both are data bound.

In this webinar we will learn to automate Data Driven Testing using Test Studio. We will learn how we can data bind test from various data sources like Excel and databases.

Learn more about Test Studio here

See you in the webinar .

Register here to attend webinar