Learn more about Rad Controls for Windows 8 here
Recently I was in a Windows Azure event for local user group. Attendees were very excited about Windows Azure Mobile Services. When I discussed with them how more immersive and user friendly it could be working with data from Windows Azure Mobile Service Table in Telerik RadDataGrid, they got more excited. In this post we will go very basic and learn basic required steps to fetch data from Mobile Service Data Table in RadDataGrid.

If you are new to Mobile Services and Windows Store App development then before you proceed in this post, I recommend you to read these two posts
Step by Step working with Windows Azure Mobile Service Data in XAML based Windows Store Apps
Three Steps to work with RadDataGrid in XAML based Windows Store Application
Video: Getting started with RadDataGrid in XAML based Windows Store Application
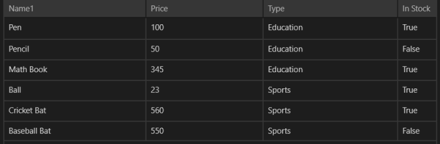
Mobile Service Data Table
You can view all Windows Azure Mobile Services and tables by login to Windows Azure Management Portal.
We are going to display data from techbloggers table. I have created this table in Windows Azure Mobile Service as shown below. There are three columns in table. We will display content from techbloggers Mobile Service table in RadDataGrid.

We need App URL and key. You need key and application URL to work with Mobile Services from Windows Store application. You will find key and application URL at the portal.

Creating Windows Store App
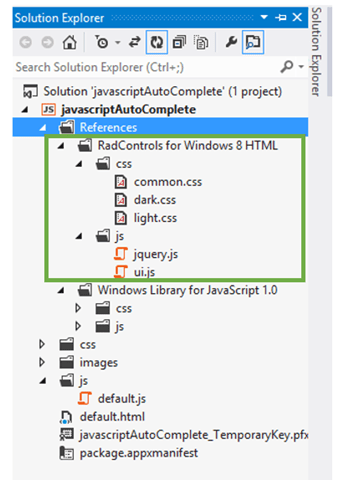
Very first you need to install Windows Azure SDK for Windows 8. You can download that from here . After installing make sure that you have installed RadControls for Windows 8. You can download trial from here
Now go ahead and create a Windows Store App by choosing Blank App project template from Windows Store project tab. After project being created add Rad Controls for Windows 8 reference and Windows Azure Mobile Services Managed Client reference in the project. To add reference right click on Reference in project and select Add Reference.

After adding reference on XAML add namespace on MainPage.xaml to work with RadDataGrid
xmlns:telerik="using:Telerik.UI.Xaml.Controls.Grid"
Next add following namespaces on MainPage.xaml.cs to work with Mobile Services client.
using Microsoft.WindowsAzure.MobileServices;
using System.Runtime.Serialization;
Next you need to create entity class representing table from the Windows Azure Mobile Service. Let us create entity class as following. We are creating entity class TechBloggers.
public class TechBloggers
 {
 public int id { get; set; }
 [DataMember(Name = "name")]
 public string Name { get; set; }
 [DataMember(Name = "technology")]
 public string Technology { get; set; }

}
After creating entity class go ahead and add following global variables.
MobileServiceClient client;
IMobileServiceTable<TechBloggers> bloggerstable;
Once global variable is defined in the constructor of page you need to create instance of MobileServiceClient and MobileServiceTable. Let us go ahead and create that in constructor of the page.
public MainPage()
 {

 this.InitializeComponent();
 MobileServiceClient client = new MobileServiceClient("https://youappurl", "appkey");
 bloggerstable = client.GetTable<TechBloggers>();
 }
Next you need to put RadDataGrid on XAML and bind it to data source. RadDataGrid can be created as following
<telerik:RadDataGrid x:Name="BloggerGrid" />
Next you need to bind RadDataGrid to List of Bloggers. List of Bloggers will be fetched from Mobile Service data table. You can do this as following.
protected async override void OnNavigatedTo(NavigationEventArgs e)
 {
 var items = await bloggerstable.ToListAsync();
 this.BloggerGrid.ItemsSource = items;
 }
Next go ahead and run application. You will get records from Mobile Service table bind to RadDataGrid.

These are basic steps to fetch data from Windows Azure Mobile Services Table Data and display in RadDataGrid. In further posts we will get into further details of working with these two together. I hope you find this post useful. Thanks for reading.