In this post we will learn to create RSS reader App in Telerik Icenium. While creating this app we will have learning on creating following topics,
Kendo DataSource
Kendo Template
Kendo ListView
In this post we will create RSS Reader of https://telerikhelper.net/. Final output should be as follows,
Step 1: Create DataSource
To start with we will use YML to read RSS feed. Let us configure URL of Yahoo Query and RSS feed of desired site. Below I have configured that for https://telerikhelper.net/.
var url = "https://telerikhelper.net/feed/";
var proxyUrl = "http://query.yahooapis.com/v1/public/yql?q=select%20*%20from%20xml%20where%20url%3D'" + encodeURIComponent(url) +"'";
Next we need to create Kendo DataSource. That can be created using proxyUrl. RSS feed returns XML and we need to configure that while creating DataSource.
There are couple of points worth discussing about above code snippet,
We are creating schema reading title , published date , story and url of the post
Id of model is set to guid
Setting up data type as xml
data is set as query/results/rss/channel/item
Step 2: Create Template
Once DataSource is created next we need to create Template. Kendo Template decide how data will be displayed. We are displaying title and publication date of post.
Have you ever come across scenario in which you need to send an Email from your app? There are various ways you can do that. Some of them are as follows,
Sending Email using PhoneGap API
Sending Email using HTML5
Delegate Send Email task to a server
In this post we will learn to send Email using Telerik Everlive. Everlive is a cloud based Backend as a Service. It provides you many functionalities using Email Services. You can send Email from your app using Telerik Everlive.
There are two components in Everlive Email Service.
Email Template
Send Email
Before sending Email, you need to create Email Template. You can create Email Template in two ways,
Using code in your app
At portal
You need id of Email Template to send Email. Okay so in this post we are going to create Email Template in portal. To create Email Template login to portal and you will get option to create Email Template.
As you see there are four default Email Templates already available in Telerik Everlive. To create new template click on Add an item and at right hand side you get option to create new Email Template. After successful creation of new Email Template you can view that in Template List. You need ID of the Email Template at code to send Email from App.
Make sure that you have copied API key and Account Key of application. You need this to send Email using code. You can get keys by clicking on API KEYS in left options.
Okay so we have done configuration at portal. We created Email Template. Next we need to send Email from app. We can send Email using REST API.
Very first you need to create recipients. You can create this as JavaScript object. In below code I am setting two Email addresses to send in TO.
var recipients = {
 "Recipients": [
 “Dhananjay.kumar@telerik.com”,
 “debugmode@outlook.com”
 ],
 "Context":{
 "SpecialOffer":"Happy New Year”
 }
 };
Once you have created recipients you need to make a AJAX post to send an Email using Telerik Email. You can send an Email using code below.
On success you can set a JavaScript function as callback
On error you can set a JavaScript function as callback
That’s it. You need to do only this much of work to send an Email using Telerik Everlive from Cross-platform application. I hope you find this post useful. Thanks for reading.
In this post we will take a look on fetching data from Telerik Everlive using REST API and use it in a web application. In web app we will be using Kendo UI DataSource to bind data to Kendo UI web ListView.
We are going to learn following,
Fetch data from Telerik Everlive using REST API
Create Kendo DataSource from returned data
Bind data to Kendo UI ListView
Okay so to keep it simple, I have created a simple Content Type Products in Everlive project as below. Permission of this Products content type is set as Public.
To fetch data from Telerik Everlive using REST API, Simply you can fetch data from Icenium Everlive using a AJAX call. You need to provide
URL of the Everlive project with API key
Content type name should be appended in URL. In this case we have appended Products (name of content type) in URL.
Set type as GET
You need to set two callback function. One Callback function will be called on success and another on error.
So data can be fetched using below code. You may want to notice that you need to replace yourapikey in URL with API key for your Everlive project.
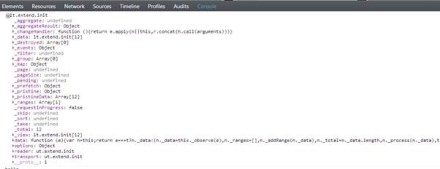
BindDataToListView is callback function and this function will be called on success fetching of data. In this function you need to create Kendo UI DataSource from returned data. Before we do that let us examine what value we get from Everlive server.
You should get below output in browser console,
You can see that in output you are getting count and data in Result property of the returned Object. So you can create Kendo DataSource as follows,
function BindDataToListView(e)
{
 console.log(e);
 var dsource = new kendo.data.DataSource(
 {
 data: e.Result
 });

}
Again in Console log you can view that Kendo DataSource has been created from returned data.
Next we need to create Kendo Template and Kendo ListView. We are going to create a very simple template as follows,
And to create Kendo ListView create a HTML div as follows,
<div id="listView"></div>
Again let us go back to callback function BindDataToListView() and convert div to Kendo ListView and bind already datasource
function BindDataToListView(e)
{
 console.log(e);
 var dsource = new kendo.data.DataSource(
 {
 data: e.Result
 });
 console.log(dsource);

$("#listView").kendoListView({
 dataSource: dsource,
 template: kendo.template($("#producttemplate").html())
 });

}
This is it. We are setting datasource and template after converting HTML div as Kendo ListView. When you run this web application you should get output as below,
In this way you can fetch data from Telerik Everlive using REST API and use in Kendo UI Web. I hope you find this post useful. Thanks for reading.
On September 5th we conducted a webinar on our Icenium extension for Visual Studio. The webinar was titled “Building iOS and Android apps using Visual Studio”. This is part of the ongoing webinar series we here at Telerik India have been doing almost every Thursday of the month. If you want to know our webinar schedule, take a look at this blog post: https://telerikhelper.net/2013/10/04/technology-to-keep-you-company-in-the-holiday-season/
About Icenium:
Icenium is a product from Telerik which makes cross platform mobile development simplified. Icenium enables you to use HTML5, CSS and JavaScript to develop, test, and publish applications that run natively on the Apple iOS and Google Android mobile platforms. It combines the convenience of a local coding environment with cloud-based services powered by the Apache Cordova framework. Icenium also provides the seamless creation of a backend for your apps with data storage, user management, and email and push notifications.
As promised, here is the video recording of the webinar:
Q & A:
We had a lot of questions asked during the webinar. Our team was able to answer as much as we can during the webinar. We normally do a recap of the questions and try to provide answers to all of them through this blog post. So here are the questions from the webinar along with the answers:
Q: Are these native apps we are talking about?
A: We are talking about a model of Mobile App development called Hybrid Application Model. In this model you develop app using HTML5/JavaScript/CSS. You package this and it runs on the device pretty muck like a native app.
Q: Can we use Express Edition to practice this? A: Sorry. This needs a non-Express VS edition
Q: Can we practice it on any other ide other than VS or is it only for it?
A: The webinar featured a extension we have for Visual Studio. But Icenium comes as a stand alone IDE also. We have Windows Client called Icenium Graphite or you can use Icenium on the browser itself. Currently supported only on Chrome.
Q: For android development with visual studio can we do it without any explicit plugin?
A: Yes. It depends mostly on your application feature and design. If you are building a simple data entry application which does not require any custom plugin you can do it easily with just a HTML markup and a JavaScript code to handle service calls.
Q: How difficult/easy it is to design my app once, and create ios application and android application PARALLELY?
A: With Icenium and Kendo UI Mobile controls, you write your code only once. Icenium lets you build packages for Android and iOS right within Icenium. Kendo UI Mobile controls provide you the adaptive rendering capability i.e. Kendo UI Mobile controls adapt to platform they are running on and give you native look and feel.
Q: what is Icenium?
A: Icenium – Mobile application development tool from Telerik. More details: http://www.icenium.com
Q: Can the jQuery version file be changed at any time?
A: Yes you can.
Q: Is Icenium different from Kendo control set ?
A: Icenium = Cloud IDE + Build Services + Simulators + Debug Capabilitie + Mobile BaaS + Kendo Mobile
Q: Will Icenium Support design and development of Web Services or the same will have to be developed seperately in .NET?
A: This will need to be developed separately. We have a Visual Studio addin avaialble to do the same called OpenAccess. http://www.telerik.com/products/orm.aspx
Q: Is Icenium an opensource? A: No. Icenium is licensed product. It is per developer subscription based.
Q: Since iOS 7 is released, how do we set the version to 7.0 in iOS simulator? A:. Work is under way. We will update the simulator once we are ready. In fact we already have a flat theme in Kendo UI Mobile control set from past year or so. So you already have a flat theme to apply to your apps.
Q: Which Visual Studio version we are going to discuss to achieve this?
A: Icenium Extension for Visual Studio supports only Visual Studio 2012 at the moment.
Q: Can we run tis apps on windows phone 8 also?
A: Yes. But Icenium cannot make the package for you. You will need to copy the complete source code. use Windows Phone project template for HTML5 and dump your code. Then create the XAP file and put it to market place.
Q: this will be compatible with all device of Android and iPhone? A: Yes. Icenium also provides adaptive rendering for individual platform.
Q: Only VS 2012 is enough or do we need to install any plugins?
A: You will need to install Icenium Extension for Visual Studio from Visual Studio Gallery.
Q: From where can we download Icenium Plugin? We already have a license of telerik, do we need to buy a separate one?
A: You can download the Icenium extension from Visual Studio Gallery. You can develop an app and test in Icenium simulator. But when it comes to packaging you will need to buy Icenium subscription which is per developer and on monthly basis.
Q: Can we deploy directly to physical phone if its connected ?
A: Yes, you will be able to. LiveSync enables immidiate sync to all devices attached to the machine.
Q: An application developed on Telerik Silverlight, can it be replicated to Icenium app
A: No direct migration from Silverlight to Icenium.
Q: Can we access hardware including Camera, GPS and other sensors?
A: Yes, via the cordova library. Part of Icenium.
Q: I have a Kendo app (browser app) can we migrate it to Icenium?
A: Kendo Browser Apps using Kendo UI Web controls which is meant for running on desktop browsers. For mobile, we recommend using Kendo UI Mobile controls.
Q: Can we use debugger on trial version of Icenium A: Yes, the trials are fully featured trials.
Q: Does Icenium support windows mobile A: WP is supported by a slightly different procedure. Please write to sales@telerikindia.com in case you would like to explore this further.
Q: Does the API has support to access device specific functionalities A: Yes, via the plugin architecture.
Q: Can we create system apps via Icenium A: Sorry, Icenium can only build mobile apps.
Q: Where is the div attributes coming from (like data-role, data-icon) A: There are known as “data-“ attributes in HTML5 specification. HTML 5 makes provision for it. Icenium makes it functional.
Q: Can we get a trial version of Icenium? A: Yes, one month trial of Icenium is available at: http://www.icenium.com
Q: The difference between Jquey Mobile / Cordova app & Kendo UI is nativeness A: Yes. In addition, we have SPA framework + MVVM framework + Client side DataSource + Templates and more
Q: We need to know how to use ListView and how to bind a data to listview practically? A: Please write to sales@telerikindia.com and we will help you specifically.
Q: Are you using any MVVM framework like backbone.js A: Kendo UI framework has its own MVVM framework. This further reduces the size of the application by removing the need for adding more frameworks like backbone.js
Q: Is this a stand-alone or web based Mobille App? A: This is being like a web based app. Upon compilation/ build it will become a stand alone app (apk/ipa) that can be put on respective app stores.
Q: Just to confirm the support for ODATA using these controls? A: Yes, ODATA is supported. Use DataSource to connect to Odata services and controls can bind to this datasource
Q: Will a single code will work for both IOs and Android? A: Yes, it will. that’s magical, isn’t it?
Q: Any ETA to remove this BETA ? A: Icenium is a live app (not in BETA). The VS plugins is in BETA.
Q: Can we use VS2012 to write Objective C code using Icenium? A: No. This is not possible.
Q: Will kendo ui mobile and jQuery mobile work together? A: There is nothing that prevents jQuery Mobile from working with Kendo UI. However, it is needless as most capabilities are available in Kendo UI.
Q: is it support local database ie sqllite etc ? A: Yes. Icenium has support for SQLite plugin which can be included in your project.
Q: How Icenium plugin is aligned with iphone/android/windowsPhone design elements ? A: Icenium is just the IDE for developing Hybrid Mobile Apps. It’s the Kendo UI Mobile control set which adheres to design principles of the Mobile Platform and render the controls accordingly.
Q: do you have icenium extention for Eclipse/JBuilder/IntelliJ.? A: Not immidiately. you can use the Windows client of Icenium: http://www.icenium.com/product/graphite
Q: How we can publish our app for iOS? A: Publishing for Apple Store is directly supported from Icenium. No need for a Mac.
Q: To publish a app in Apple store, I need a mac device & Xcode? A: You will be excited to know that Icenium supports deployment to Apple Store directly. so, you don’t need a Mac or XCode for publishing. You can develop and deploy completely without the need for a Mac.
Q: Who does the magic behind the scene from different phone sets? is it Kendo, which recognizes and builds the layout A: Yes, Kendo is the magic behind support for different platforms/ form factors.
Q: Can you name any application developed using kendo UI and deployed in different markets for iOS,Android and Microsoft
A: SafeBridge, DevReach. Check out our showcase apps: http://www.icenium.com/resources/showcase
Q: How abt symbian apps A: sorry not supported by Icenium.
Q: An important question: What is % degrade in performance using Kendo UI v/s native html/css apps ? A: It is quite the opposite. We have seen improvements of 200 – 300% in performance when using Kendo versus other HTML/ CSS apps (not native)
Q: we have to write all the codes in one single page i.e. index.html A: it is a Single Page app :). However, we support browsing to other pages and hence you can have code in another page as well.
Q: Did you develop the KENDO framework by your own? A: Yes, Telerik developed it by itself 🙂
Q: Where can I get the help related to Kendo UI? A: Extensive documentation available at: http://docs.kendoui.com
Q: Can We Use Web Services in Icenium? A: Yes, we support REST/ OData services.
Q: Can I create ASP.NET MVC4 project, where I build views using cshtml files, however use the Kendo UI controls on views ?
A: Absolutely. You can use Kendo UI Web controls for serving to desktop browsers. You can develop .mobile.cshtml files and use Kendo UI Mobile controls.
Q: As you told like look and feel vary between android and iOS devices .. but if I want to make theme consistant across all platform what I will have to do? A: You can use our Flat theme which gives consistent theme across all the platforms. Otherwise you can always use our Theme Builder and build your own theme.
Q: Can we write custom plugin to ICENIUM like we can do in Cordova? A: Yes. Icenium allows you to import custom plugins too.
Q: Instead of using emulators, can we test the app on real mobile w/o submitting it to store? A: Yes. it is fully supported. On Android the deployment is direct and on iOS you can use Icenium Ion: http://www.icenium.com/product/ion
Q: How we can use Kendo Ui for WP8 ? A: Quickly, you got to use the PhoneGap template in VS. Insert the Kendo UI files in WWW folder. Compile the project to get WP8 app.
Webinar Giveaway:
In each of our webinars we pick random 2 people from the attendee list and they get out cool .NET Ninja T-Shirt. This webinar, we have picked the following folks:
Ajay Negi
Jaish Mathews
Congratulations to the winners. Our office will contact you for your details and we will ship your t-shirts.
For those of you who are felling sad about not winning, well try your luck next time by attending our next webinar on Oct 31.
On any kind of Apps sharing on Facebook could be a frequent task. Icenium a Cloud Based IDE allows you to create Cross Platform Apps. In this blog post we will take a look on sharing status on FaceBook from a Cross Platform App being created using Icenium.
To start with let us create view. I am putting an input text box and a button. On click of button text from input box will be shared on FB wall of user.
Very first we will create helper functions we need to post To start with let us create an identity provider. Identity Provider can be created as given in following code
var IdentityProvider = function (config) {
 var that = this;
 var ref;
 this.getAccessToken = function (callback) {

// Begin Authorization
 var authorize_url = config.endpoint
 + "?response_type=" + config.response_type
 + "&client_id=" + config.client_id
 + "&redirect_uri=" + config.redirect_uri
 + "&display=" + config.display
 + "&access_type=" + config.access_type
 + "&scope=" + config.scope

//CALL IN APP BROWSER WITH THE LINK
 ref = window.open(authorize_url, '_blank', 'location=no');

ref.addEventListener('loadstart', function (event) {
 that.locationChanged(event.url, callback);
 });

ref.addEventListener('loadstop', function (event) {
 that.locationChanged(event.url, callback);
 });
 }

this.locationChanged = function (loc, callback) {
 if (loc.indexOf("access_token=") != -1) {
 ref.close();
 var token = getParameterByName("access_token", loc);
 callback(token);
 }
 }
}
We are using a function to get parameter by name. Below function is doing this task.
function getParameterByName(name, url) {
 name = name.replace(/[\[]/, "\\\[").replace(/[\]]/, "\\\]");
 var regexS = name + "=([^&#]*)";

console.log("Parameter name: " + name);
 console.log("Url: " + url);

var regex = new RegExp(regexS);
 var results = regex.exec(url);

console.log("Result: " + results);

if (results == null) {
 return false;
 }
 else
 return decodeURIComponent(results[1].replace(/\+/g, " "));
}
Once identity provider is being created, next you need to create instance of IdentityProvider. Important configuration you need to pass are as follows
Name of the app
In client id make sure to pass client if for your app. You will get client id while registering your app to Facebook.
In case of Cross Platform mobile App redirect Uri will be always as given in below setting
loginMethodName would be always loginWithFaceBook
var facebook = new IdentityProvider({
 name: "My Test App",
 loginMethodName: "loginWithFacebook",
 endpoint: "https://www.facebook.com/dialog/oauth",
 response_type: "token",
 client_id: fbClientID,
 redirect_uri: "https://www.facebook.com/connect/login_success.html",
 access_type: "online",
 scope: "email,publish_actions",
 display: "touch"
});
By this step we have created all the helper functions we need to post an update on Facebook. Now on click event of the button we will
get Access Token from helper function
pass that to Graph API to post on FaceBook
Below we are reading textbox value, fetching access token and calling a function to make a FB post.
function PostOnFb(e)
{
 var msgToPost = $('#msgTxt').val();
 alert(msgToPost)
 facebook.getAccessToken(function (token) {
 makefbPost(msgToPost, "http://debugmode.net", "DebugMode", token);
 });
}
We are passing
message to post
URL of application
Title of the post and
FB token to post status message
Last function we need to create to make a FB post. That function is as given below.
function makefbPost(FBmessage, FBLink, FBLinkName, fbToken) {
 var postURL = "https://graph.facebook.com/me/feed";
 var data = {};
 data.message = FBmessage;
 data.name = FBLinkName;
 data.link = FBLink;

data.access_token = fbToken;
 console.log("Token:" + fbToken);

$.post(postURL, data)
 .done(function (results) {
 navigator.notification.alert("Status Posted", function () { }, "DebugMode", "Done");

})
 .error(function (err)
 navigator.notification.alert("Error encountered. Details:" + err.message, function () { }, "Error", "Done");
 });
}
Recently while conversing with one of the customers I came across some of the following queries,
How to do some tasks while navigating away from Mobile View
How to do some tasks while navigating to a Mobile View
Let us first simplify above queries. Essentially customer wants to call JavaScript functions while navigating to or navigating away from the Mobile View. There could be following combinations of scenarios like following,
Perform some task before Mobile View is visible
Perform some task after Mobile View is visible
Perform some task before Mobile View is hidden
Perform some task after Mobile View is hidden
Perform some task when Mobile View is visible
Perform some task when Mobile View is hidden
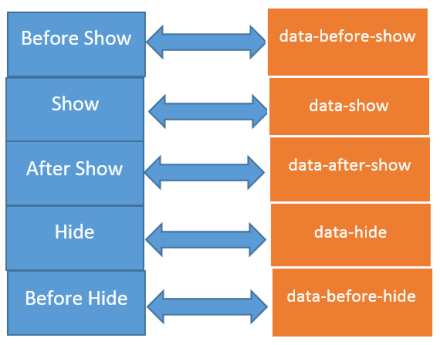
Kendo UI Mobile View provides events for all these scenario. As a developer what all you need to do is to call various events associated with Kendo UI Mobile View. Various events with their purpose is depicted in below image,
Now let us consider example that you need to perform a task before Kendo UI Mobile view is getting visible. You can do that by setting data-before-show attribute of Mobile View. In below image we are setting data-before-show property to a function with name myfunct.
Now each time before homeview (id of the view in example is set to homeview) will be navigated or get visible a function myfunct will be called. In the same way you can set other events as attributes to achieve a particular task while navigating to or away from view. Let us consider one more example that you want to achieve a task after view is hidden. In that scenario you need to set data-hide attribute of the view. We can achieve that as given in following image,
In this way you can set events as attributes to achieve any tasks while navigating to and from a Mobile View. Below I am putting codes from above discussion,
<div id="homeview"
 data-role="view"
 data-title="Mobile View"
 data-before-show="myfunct"
 data-hide="myfunct1" >

 <h1>Mobile View Contnet</h1>

 </div>

<script>
 function myfunct() {

alert("Called before View is Visible");
 console.log("Called before View is Visible");
 }
 function myfunct1() {

alert("Called after View is Hiden");
 console.log("Called after View is Hiden");
 }
 </script>
I hope you find this post useful. Thanks for reading.
In this post we will take a step by step look on creating Android app using Visual Studio. To create Android or iPhone app you need Icenium Extension for Visual Studio.
Let us start step by step from installation to creating Android APK package. Follow the steps below,
Step1: Download and Installation
Very first you need to install Icenium Extension for Visual Studio from here . After successful download close all running instances of Visual Studio and install Icenium Extension for Visual Studio.
After successful installation launch Visual Studio and you will get Icenium tab. There you can choose any project template as per your requirement.
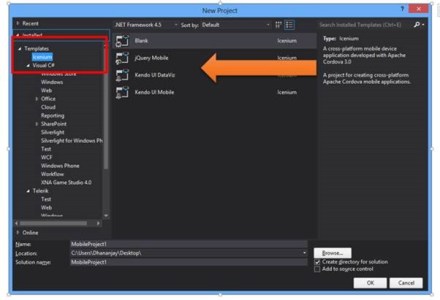
Step2: Create project
After successful download and installation go ahead and create project for Cross Platform Mobile Application. You have four options to create application depending on library you want to use.
For example if you want to use your own library then go ahead and select Blank Project Template and start adding your own library to create apps.
To create app using jQuery Mobile select jQuery Mobile project template.
To create app using Kendo UI Mobile select Kendo UI Mobile project template. In this scenario I am going to create app using Kendo UI Mobile.
Here I have created a project selecting Kendo UI Mobile. On successful creation of project, you get a reference project created for you. You can use this as reference to build your app further. Project structure in solution explorer will look like following,
In this post I am not going into much details of programming aspect so let us consider that we want to publish default created app to Google Play.
Step 3: Build and Test in Simulator
We are going to build default reference app got created. In menu you will find an option Icenium.
To test application in simulator select Run in Simulator option. You will get application running in simulator. Icenium supports iPhone, iPad, Android, Android tab simulator. In Android phone simulator default created app will look like as given in below image,
We will talk in detail about simulator in later posts.
Next we need to build app for Android. You can do that by selecting Build App in Cloud option from Icenium menu in visual studio.
Here select Android Build option. After successful build you will get two options to run Android app on device.
Option one is to scan the QR code and option two is that you will find apk package in project’s bin->debug->android folder.
You need to upload apk package in Google Play to publish your android app to Google Play.
We just learnt it is super easy to create Android app in Visual Studio using Icenium extension.
In this post we will take a look on working with camera in Icenium. You can access camera in Icenium using Cordova or PhoneGap.
Let us say we want to capture a photo on touch of a button. I have designed view as below. On touch of button camera will be launched and then taken photo will get bind to image control.
In above function we are using cordova function navigator.camera.getPicture() to launch camera and click photo. You can pass many optional parameters to this function like quality, destinationType, sourceType, targetWidth , targetHeight etc.
On successful selection of photo onPhotoDataSucess function will be called. In this function you can access photo and use that as per your required. In this scenario we are binding that too an image control.
function onPhotoDataSuccess(imageData) {

 var smallImage = document.getElementById('smallImage');


smallImage.src = "data:image/jpeg;base64," + imageData;
 }
As you see that we are reading image with data url and setting that as source of image. If there is error selecting photo then onFail() function will be called. We can simply display an error message in this function.
function onFail(message) {
 alert('Failed because: ' + message);
 }
In this way you can work with camera in Icenium. I hope you find this post useful. Thanks for reading.
Icenium Everlive is Backend as a Service offering from Telerik. In this post we will take a look on how easily KendoUI DataSource can be used to fetch data from Icenium Everlive.
To start with, in Everlive I have created a content type with name Session. In Everlive Content type represents a data type or loosely I can say it represents a table. I have created content type with name Sessions. Now we need to insert and item in Sessions content type using Kendo UI DataSource.
Very first we need to add reference of Everlive as below,
After adding reference create instance of Everlive as below. You need to pass Everlive application key as parameter while creating instance of Everlive. You will find application key on Everlive portal.
var el = new Everlive('W1286lVOH0DXYZ');
Now you will be amazed seeing how easily you can insert item in Session content type using Kendo UI DataSource. Before creating an item or inserting an item, create Kendo UI DataSource as following.
While creating Kendo UI Data Source, we need to set following
type as everlive
In transport typeName as content type name. You need to provide name of the content type which data items you want to fetch. In this case we want items of Sessions content type so typeName is Sessions
Once Kendo UI DataSource is created, you need to create item to be inserted in Everlive . So let us go ahead and create item for Sessions content type as following,
Now you have item to be inserted. Next add this item to DataSource using Add method. After adding that call sync() method on DataSource. You can achieve adding and syncing with Everlive server as given in below code,
In Icenium you have two Build Settings, they are as follows
Release
Debug
While developing apps you should have Build Settings set to debug whereas before publishing it to store, you should set it to Release. In this post I will walk you through how to change Build Settings.
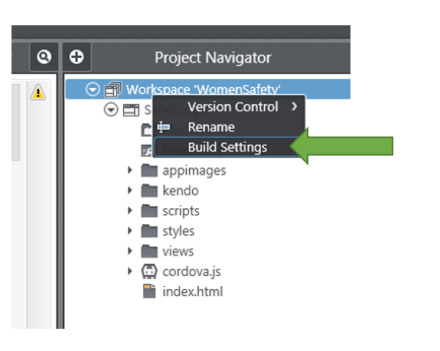
To change Build Settings, right click on project workspace and then select Build Settings option from context menu.
Next you get options to change Active build configuration. From drop down you can change Build Settings.
Just we learnt that it is very easy to work different Build Settings in Icenium. I hope you find this post useful. Thanks for reading.
Icenium Everlive is Backend as a Service offering from Telerik. In this post we will take a look on how easily KendoUI DataSource can be used to fetch data from Icenium Everlive.
To start with, in Everlive I have created a content type with name Session. In Everlive Content type represents a data type or loosely I can say a table. I have created content type with name Sessions. Now we need to fetch all the items from Sessions content type using Kendo UI DataSource.
Very first we need to add reference of Everlive as below,
After adding reference create instance of Everlive as below. You need to pass Everlive application key as parameter while creating instance of Everlive. You will find application key on Everlive portal.
var el = new Everlive('W1286lVOH0DXYZ');
Now you will be amazed seeing how easily you can fetch all the items from Session content type using Kendo UI DataSource. Only you need to provide type as everlive and in transport typeName as name of Everlive Content type.
While fetching data from Everlive using Kendo UI Data Source, we need to set following
type as everlive
In transport typeName as content type name. You need to provide name of the content type which data items you want to fetch. In this case we want items of Sessions content type so typeName is Sessions
You can verify in any debugger console that data is fetched from Everlive in Kendo UI DataSource.
Now once you have data at the client side you can use them as of your requirement. You can bind that ListView , GridView etc. I hope you find this post useful. Thanks for reading.
It was invite only event and 30 energetic developers attended full day workshop on Icenium. There was high energy discussions around native v/s hybrid, JavaScript or C# etc. It was great gathering of prominent and opinionated developers.
We started day with introduction of Icenium and setting up development environment on participant machines. Some of the participants preferred to work on Icenium MIST, so they did not need any installation.
Whole day we covered following topics,
Why Cross Platform Mobile Application
Getting started with Icenium
Creating your first Cross Platform App
Managing Certificates in Icenium
Debugging with Live Sync
Understanding version control and Github integration
Building and packaging App
Publishing Apps to store
Working with Kendo UI Framework elements like DataSource and Template
Consuming Services like OData
Understanding layout , transition etc
Working with Icenium Everlive
This was Hands on Lab workshop and all participants wrote codes for whole day with sheer passion.After successful completion of labs each participant got a participation certificate.
It was energetic learning day. We loved developers from Pune and excited to visit city again with more sharing on goodness of Telerik.
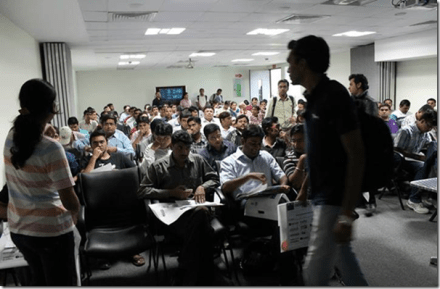
It was 10th Anniversary of India’s one of the most prominent Microsoft User Group and as always Pune User Group did not disappoint. PUG delivered packed two days event with more than 300 attendees and 25 speakers.
Telerik loves community and as part of our community engagement, Telerik India team participated in event.
We had a booth for both days and we had great interaction with Pune community. We loved the passion of community and discussion went on the topics ranging from Cross Platform Mobile Apps to Automate Testing. I and Telerik India country manager Abhishek Kant both presented in event.
Mr Kant presented on SPA with Kendo UI and I presented on Backend as a Service with Everlive. We gave away Ninja T-Shirts and one lucky winner got a Karbon Android tablet.
I loved passion being shown my developers around Kendo UI and Icenium .
In this post we will walkthrough working with Icenium Everlive Push Notification on an Android device. This post is divided in three parts from creating Google project to writing JavaScript code to enable notification on device.
Let us follow following steps to get it started with push notification on android devices
Step 1: Configure or Create Google Project
You need to start with creating Google Project. You need Google project ID to enable Push Notification.
In drop down you get an option to create a new project. From there create a new project
After creating project, you will get project number. There are two ways you can find project number, either in URL or on dashboard
After creating Google project, from left hand options select API Access. In that go ahead and click on Create a New Android Key. We need Android key at Everlive server side to enable Push Notification
After getting Android key next step you need to do to enable Service. To enable that click on Services in left and On Google Cloud Messaging for Android.
As of now we have created Google Project.
Step 2: Create and Configure project in Icenium Everlive
To create Icenium Everlive project, navigate to https://www.everlive.com/ . To create new project click on Create New Project on the home page. After successful creation of project go to Settings
In Settings select Push Notification from left menu options. We are going to enable Push Notification for Android, so check the check box of Android and provide Android Key created in previous step.
Step 3: Create Application
In this step we will create application to work with push notification. We will us EverLive JavaScript SDK. You can download sample Sample App from GitHub here
To start with you need following JavaScript files in your application. You can get these files from downloaded sample.
Now to start with, you need EverLive API key of your project and android project number. You will find API key on EverLive portal and android project number which you configured in step1 of this post.
As of now we have created environment in application to work with EverLive SDK for PushNotification. Next we need to create pushSettings for Android. You may notice that we are passing androidProjectNumber to create push setting for android.
Next you can enable notification on device by calling enableNotifications function and passing setting for push notification as input parameter in that. On successful enabling we are returning registration of device.
After enabling notification on device you need to register device in Everlive portal. To do this call register function on instance of current device.
These are two operations you need to perform to get push notification on android device from Everlive push notification. I have created two buttons on app view to enable notification on device and then register device to get push notification. View with buttons are as follows,
Below find full code to enable and register device for push notification.
(function (global) {
var everliveApiKey = 'I1eE4AuOaWv0Vp5y';
var androidProjectNumber = '1088191728786';
var emulatorMode = false;
var pushViewModel = kendo.data.ObservableObject.extend({
el: new Everlive({
apiKey: everliveApiKey
}),
message: function () {
alert("dhananjay");
},
onAndroidPushReceived: function (args) {
alert('Android notification received: ' + JSON.stringify(args));
},
enablePushNotifications: function () {
// Push Setting for Android
var pushSettings = {
android: {
senderID: androidProjectNumber
},
notificationCallbackAndroid: this.onAndroidPushReceived,
};
// Setting the current device
var currentDevice = this.el.push.currentDevice(this.emulatorMode);
currentDevice.enableNotifications(pushSettings)
.then(
function (initResult) { return currentDevice.getRegistration();
},
function (err) {
alert("ERROR!<br /><br />An error occured while initializing the device for push notifications.<br/><br/>" + err.message);
}
);
},
registerInEverlive: function () {
var currentDevice = this.el.push.currentDevice();
if (!currentDevice.pushToken) currentDevice.pushToken = "some token";
this.el.push.currentDevice()
.register({ Age: 15 })
.then(
this.onDeviceIsRegistered,
function (err) {
alert('REGISTER ERROR: ' + JSON.stringify(err));
}
);
},
onDeviceIsRegistered: function () {
alert("device registered");
}
});
app.pushService = {
viewModel: new pushViewModel()
};
})(window);
After successful operations on device, you will find device is registered in Everlive portal as below. All device registered for application will be listed here.
Now you can send push notification to device from portal. Device is enabled and registered to receive push notification from the Icenium Everlive server. We just witnessed that it is so easy working with push notification on Android devices from Icenium Everlive server. I hope you find this post useful. Thanks for reading.


![clip_image001[6]](https://telerikhelper.net/wp-content/uploads/2013/11/clip_image00161.png "clip_image001[6]")


![clip_image001[6]](https://telerikhelper.net/wp-content/uploads/2013/11/clip_image0016.png "clip_image001[6]")

![clip_image001[8]](https://telerikhelper.net/wp-content/uploads/2013/11/clip_image0018.png "clip_image001[8]")


![clip_image002[6]](https://telerikhelper.net/wp-content/uploads/2013/09/clip_image0026.jpg "clip_image002[6]")


![clip_image002[8]](https://telerikhelper.net/wp-content/uploads/2013/09/clip_image0028.jpg "clip_image002[8]")


![clip_image002[6]](https://telerikhelper.net/wp-content/uploads/2013/08/clip_image0026.jpg "clip_image002[6]")
![clip_image004[6]](https://telerikhelper.net/wp-content/uploads/2013/08/clip_image0046.jpg "clip_image004[6]")