
On Jan 12 2017, we concluded one more Webinar here at Progress India. This time we spoke about Hybrid Apps and how you can convert Hybrid Apps to Native Apps. This blog post is a recap of the webinar. You will find the Video recording of the webinar itself and Slide deck that was used in the webinar.
PhoneGap

How to work with camera in Icenium
In this post we will take a look on working with camera in Icenium. You can access camera in Icenium using Cordova or PhoneGap.
Let us say we want to capture a photo on touch of a button. I have designed view as below. On touch of button camera will be launched and then taken photo will get bind to image control.
<div id="home"
 data-role="view"
 data-title="Share">
 <button onclick="capturePhoto();">Capture Photo</button> <br>
 <img style="width:60px;height:60px;" id="smallImage" src="" />
 </div>
On touch of Capture Photo button we are calling function capturePhoto().
function capturePhoto() {

navigator.camera.getPicture(onPhotoDataSuccess, onFail, {
 quality: 50,
 destinationType: destinationType.DATA_URL
 }
 );

}
In above function we are using cordova function navigator.camera.getPicture() to launch camera and click photo. You can pass many optional parameters to this function like quality, destinationType, sourceType, targetWidth , targetHeight etc.
On successful selection of photo onPhotoDataSucess function will be called. In this function you can access photo and use that as per your required. In this scenario we are binding that too an image control.
function onPhotoDataSuccess(imageData) {

 var smallImage = document.getElementById('smallImage');


smallImage.src = "data:image/jpeg;base64," + imageData;
 }
As you see that we are reading image with data url and setting that as source of image. If there is error selecting photo then onFail() function will be called. We can simply display an error message in this function.
function onFail(message) {
 alert('Failed because: ' + message);
 }
In this way you can work with camera in Icenium. I hope you find this post useful. Thanks for reading.

Recap of webinar: Building Windows Phone 8 Apps using Kendo UI
Download Source Code and Slides from here

On 23rd May 2013, we at Telerik India hosted a webinar on “Building Windows Phone 8 Apps using Kendo UI Mobile”. This webinar received great response from audience and we had around 150 developers attending webinar. Participants were very active during webinar and there were a flood of questions around Windows Phone 8, Coredova and Kendo UI.
We discussed following topics in webinar,
- What is Hybrid App
- Why we need Hybrid App
- Setting Visual Studio2012 to develop Wp8 apps using coredova
- Setting WP8 App project to work with Kendo UI
In demo part we covered following topics,
- Creating Kendo Datasource
- Consuming OData and REST Srervice in Kendo Datasource
- Working with Kendo Template
- Working with Layout , Views
- Working with dynamic navigation
We learnt and experienced that how easily a developer could work with all complexities such that consuming services, navigating between views, working with layouts rendering native to WP 8, adaptive rendering etc. using Kendo UI Mobile.
If you create a Hybrid App for Windows Phone 8 using KendoUI Mobile and Coredova then with minimal or zero effort you can publish same app as iPhone app and Android App.

You can watch recorded webinar below,
As you can see in recorded webinar that we focused on writing codes and shown you how easily and quickly a Marketplace ready Windows Phone 8 app can be created using Kendo UI.
Download Source Code and Slides from here
You can revisit presentation of webinar below,
If you want us to do webinar on a particular topic related to Telerik products then feel free to send is mail at Dhananjay.kumar@telerik.com
Download Source Code and Slides from here
We had promised that we will be giving away 2 .NET Ninja T-Shirts as a webinar give away.

We normally pick 2 people randomly from the audience and raffle it out. So, as part of this webinar we are happy to say that the following 2 people are winners of our .NET Ninja T-Shirts:
- Ramu Naik
- Ardhendusekhar Kanungo
Congratulations to the winners. We will be contacting you shortly as we need your postal address to ship your t-shirts. Rest of you folks, don’t worry you still have chance to win the t-shirt. Do attend our next webinar which is on May 30 titled – MVVM and Validation with Kendo UI Web. Register for that webinar here
Download Source Code and Slides from here

How to Read Accelerometer values in Icenium
In this post we will take a look on reading device Accelerometer values in Icenium . As we know Icenium is a Cloud based IDE works on top of Cordova or Phonegap. We will use Accelerometer API of Cordova to read device accelerometer values.
Let us say on click event of button we want to read current accelerometer value. Button can be created as following
<div id="homeview" data-role="view" data-title="Home View">
 <a data-click="GetData" data-role="button">Get Accelorometer Data</a>
 <div id="outputdiv" ></div>
 </div>
On click event of the button we will read Accelerometer values and display them in output div. On click event of button we are calling GetData JavaScript function. In GetData function we are making a call to function navigator.accelerometer.getCurrentAcceleration. In Icenium by default Phonegap reference gets added hence we do not need to add any referenced to work with cordova.
function GetData() {
 navigator.accelerometer.getCurrentAcceleration(onSuccess, onError);
 }
In onSuccess we will read accelerometer values and in onError function we will display error message.
In onSucess function we will read X, Y, Z and TimeStamp values as data.x, data.y,data.z respectively.
 function onSuccess(data) {
 var outputdiv = document.getElementById('outputdiv');
 outputdiv.innerHTML = 'X: ' + data.x + '<br />' +
 'Y: ' + data.y + '<br />' +
 'Z: ' + data.z + '<br />' +
 'Time: ' + data.timestamp;
 }
In onError function let us display error message as following
function onError() {
 alert("error occured");
 }
In this way we can read accelerometer values in Icenium. I hope you find this post useful. Thanks for reading.
How to get Device information in Icenium
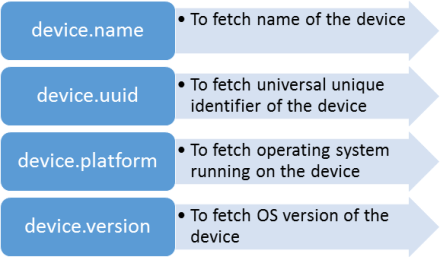
In this post we will take a look on fetching device information in Icenium. Internally Icenium usage PhoneGap to build the application. We will use PhoneGap API to fetch device information. It is always good idea to read device information when device is being ready. Device information can be fetched with reading values of following properties.

So in Icenium device information on device ready can be read as given in below code snippet,
document.addEventListener("deviceready", onDeviceReady, false);

// PhoneGap is ready
function onDeviceReady() {

var deviceName = device.name;
var deviceId = device.uuid;
var deviceOs = device.platform;
var deviceOsVersion = device.version;

//Use device information as required

console.log("devicename : " + deviceName + " deviceId: " + deviceId + " deviceOs: " + deviceOs + " deviceosversion : " + deviceOsVersion);

}
On running application in Graphite simulator you will find device information.

In this way device information can be fetched in Icenium. I hope you find this post useful. Thanks for reading.
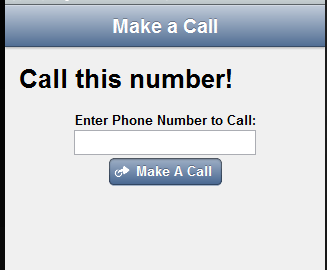
Make a Call on Icenium using PhoneGap
In this post we will take a look on making a call using PhoneGap in a Hybrid application creating using Icenium. Let us create a view like following to make a call,

Above view can be created using following code snippet,
<div data-role="view" id="callview" data-title="Make a Call">
<h1>Call this number!</h1>
<div id='Div1'>
<label for="txtName" style="display: inline-block;">Enter Phone Number to Call:</label>
<input type="text" id="Text1" value="" />
</div>
<div>
<a id="A1" data-role="button" data-click="callfunction" data-icon="action">Make A Call</a>
</div>
</div>
On click of Make a Call button a call can be done as following,
function callfunction() {

var phntocall = document.getElementById('txtPhoneNumber1').value;
window.location.href = "tel:" + phntocall;

}
In above code snippet we are reading phone number. After that using tel: to make a call. It will open native Call application with configured phone number to make a call.
I hope you find this post useful. Thanks for reading.
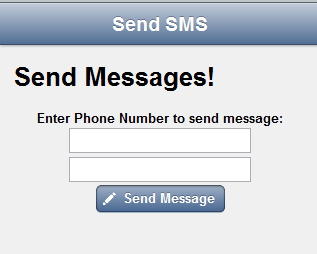
Send SMS on Icenium using PhoneGap
In this post we will take a look on sending SMS using PhoneGap in a Hybrid application creating using Icenium. Let us create a view like following to send SMS,

Above view can be created using following code snippet,
<div data-role="view" id="messageview" data-title="Send SMS">
<h1>Send Messages!</h1>
<div id='helloWorldInput'>
<label for="txtName" style="display: inline-block;">Enter Phone Number to send message:</label>
<input type="text" id="txtPhoneNumber1" value="" />
<input type="text" id="txtPhoneNumber2" value="" />
</div>
<div>
<a id="submitButton" data-role="button" data-click="sayMessage" data-icon="compose">Send Message</a>
</div>
</div>
On click of Send Message button a SMS can be send as following,
function sayMessage() {
var phn1 = document.getElementById('txtPhoneNumber1').value;
var phn2 = document.getElementById('txtPhoneNumber2').value;
var phonenumbers = phn1 + "," + phn2
window.location.href = "sms:" + phonenumbers + "?body=" + "hello test message";
}
In above code snippet we are reading two phone numbers and concat them with comma. After that using sms: to send the message. It will open native Message application with configured phone numbers and message body.
I hope you find this post useful. Thanks for reading.
