Resources for webinar “Beginning with Git Source Control for Enterprise Projects”

Git is the new source control technology that is getting wide spread adoption. In this presentation we cover the basics of Git and move on to strategies for developer workflows, source control migration to Git and Project Management with Git.

Slides:

Video:

Selected Q&A from the webinar is as follows:

Q: why should we use GIT,other than its an open source?
A: Git is extremely light weight steeply reducing your infrastructure needs. It provides for offline working and has great support for collaboration. It is also very fast.

Q: Can I Save Image File (like Logos) in Git?
A: Any known file types can be saved 🙂 remember you are just storing on a hard disk 🙂

Q: In TFS… we have only one process… called “Check-in” to make it store in server…. but in Git we have Commit and Push… why both are needed ?
A: Commit is meant to check in code to a local copy. and finally when everything is ready – you can just push to remote Git repo…

Q: Can i use in .net project;for .cs file
A: Yes … any type of files.

Q: is there a possiblity to switch my working directory file from one branch to other branch..?
A: yes you can, using checkout in Git

Q: how to update code in git.
A: Git has got nothing to do with the editing. You can use your favorite editors to work with your source code for e.g. notepad or Visual Studio or anything. Git detects the changes and allows your to commit and push

Q: may I know what is the command to switch a file from one branch to another branch in my working directory?
A: From the branch where you want to switch to, run this command: git checkout

Q: Does it have any Cloud Storage option on this Git?
A: Git is a Software to manage your source code and that is why its called source control. You can host it locally on your laptop/desktop or on your own cloud. Services like GitHub or BitBucket do the same. they have their own cloud and host Git on the cloud and you can just use their service

Q: Can i use in windows azure?
A: Yes. you will need to create a VM and then install the Git software and maintain yourself. The TFS online offering from Microsoft also offers Git repos.

Q: I am having a repo in the server and other systems that will develop the code i had lost all my data in server where i will store what should i do
A: The advantage of Git is that you have many full local copies available in computers where the code has been pulled. You can use any local copy to restore the server and let others connect to the same. Also, your server infrastructure should be in such a way that you do regular backups of your Git folders.

Q: Do we have any kind of provision for restore after delete in GIT?
A: Delete is a part of the commit. You can revert to an earlier point by checking out a specific commit.

The winners for the raffle for this webinar are:

  1. Karthi Keyan
  2. NareshKumar Kothamaddi
Advertisement

Resources for webinar “Getting Productive with ASP.NET MVC5”

On May 24 we conducted yet another webinar as part of our monthly webinars. This time the topic was “Getting Productive with ASP.NET MVC5”. This webinar was a lap around the new features released as part of ASP.NET MVC5.

ASP.NET MVC5 is the latest release for ASP.NET MVC and comes with Visual Studio 2013. In order to know more about this release you can go through the official documentation here: http://www.asp.net/mvc/mvc5

Slide Deck:

Here is the slide deck I used as part of the webinar:

Video Recording:

All of our webinars are recorded for on demand viewing. So here is the video recording of this webinar:

T-Shirt Giveaway:

One of the benefits of attending our webinars is that you can be a lucky winner of our Telerik .NET Ninja t-shirt. Every webinar we select 2 attendees in random and those 2 get our .NET Ninja t-shirt. So, following are the lucky winners of our t-shirt for this webinar:

  • Arpan Shah
  • Prakash Kumar

Congratulations to the winners. We will contact you on your registered email and get details about your postal address. We will ship your t-shirt through courier. Others, don’t worry as we have a lot of webinars planned for the rest of the year. Here is the May/June schedule that we have put up on our site: https://telerikhelper.net/2014/05/17/a-new-govt-for-india-and-new-tech-for-techies-in-india/

Till next time – Happy Coding.

Drill Down Chart

Drill Down Charts using Kendo UI DataViz

One of the fascinating things about being an evangelist is that, everyday I get to hear a new problem that people are trying to solve. It always keeps me on my toes as it gives me an opportunity to dig into our documentation once again and unearth the code necessary to solve the problem. In this blog post I will talk about one such problem a customer sent us. They wanted to know if Kendo UI DataViz charts support drill down or not. Out of the box Kendo UI DataViz does not have the capability in built but we provide events on the chart which will help you to achieve this functionality easily. So this blog post is all about achieving drill down functionality using Kendo UI DataViz chart. So if you have such a situation in your project, you may want to sit back and follow rest of the post.

Step 1 – Define the markup:

As you know in order to work with Kendo UI DataViz you will need to first add reference to Kendo UI DataViz CSS and then add reference to Kendo UI DataViz Theme CSS. Theme can be anything for e.g. black, metro, blue opal etc. Then add a reference to Jquery and Kendo UI DataViz JavaScript. Next define a div and give it a id of “chart”.

<link rel="stylesheet" href="http://cdn.kendostatic.com/2014.1.416/styles/kendo.dataviz.min.css">
<link rel="stylesheet" href="http://cdn.kendostatic.com/2014.1.416/styles/kendo.dataviz.black.min.css">
<body>
<div id="chart" ></div>
<script src="http://code.jquery.com/jquery-1.9.1.min.js"></script>
<script src="http://cdn.kendostatic.com/2014.1.416/js/kendo.all.min.js"></script>
<script>
<!-- chart draw logic here -->
</script>
</body>

Step 2 – Prepare Data:

For the sake of this blog post i am going to fake some data about browsers market share. So initially i will show column chart for major browsers. Then on clicking each column i should be able to drill down into its specific data. I will create my data as a JavaScript array and use them for binding to chart. Here are my data array which i will use while binding to chart:

<script>
var chartInitialData=[
 {category:"MSIE",value:55.11},
 {category:"Firefox",value:21.63},
 {category:"Chrome",value:11.94},
 {category:"Safari",value:7.15},
 {category:"Opera",value:2.14},
 ];
 var msieData = [
 {category:"MSIE 6.0",value:10.85},
 {category:"MSIE 7.0",value:7.35},
 {category:"MSIE 8.0",value:33.06},
 {category:"MSIE 9.0",value:2.81},
 ];
</script>

As you can see, I have an initial data to bind to the chart. And also the drill down data. For the sake of simplicity i have only shown drill down data for one of the columns. At the end of this post i will give link to the code which will have drill down data for all the columns of the chart.

Step 3 – Initialize the Chart:

Now we are ready to initialize the chart and bind the initial data to it. Here is the code snippet for initializing the chart:

$(document).ready(function(){

 $("#chart").kendoChart({
 theme:"Black",
 title: { text: "Browser market share, March, 2014"},
 dataSource:{ data:chartInitialData },
 series: [{
 type:"column",
 field:"value",
 categoryField:"category",
 labels:{
 visible:true,
 template:"${value}%"
 }
 }],
 tooltip:{
 visible:true,
 template:"<center>${category}: <b>${value}% market share</b><br/>Click to see ${category} versions</center>"
 },
 });
 })

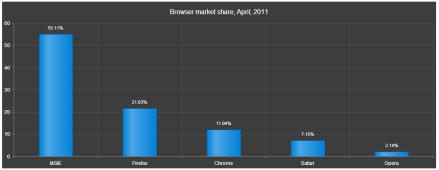
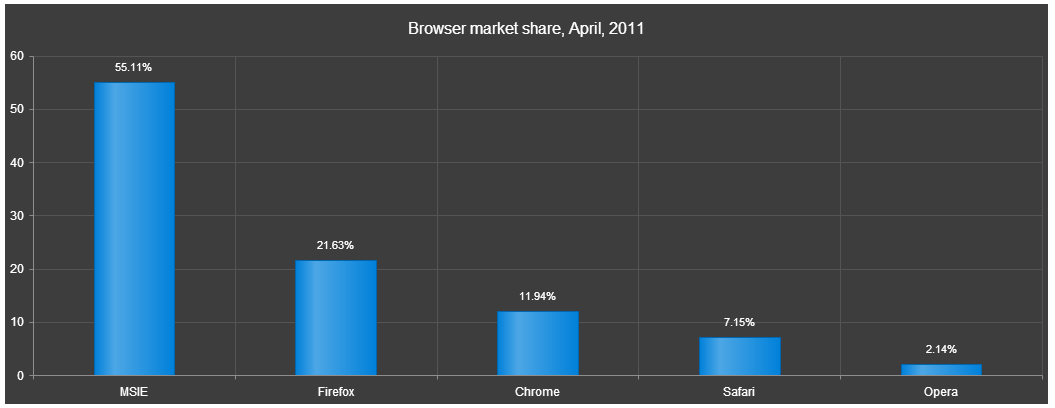
Let me go over the code once. I access an element with id “chart” and then initialize Kendo Chart on that element. I set the theme to Black. Then i provide a title to the chart. Next comes the data source and i create a Kendo.data.DataSource object and provide the value of chartInitialData to data property. Then I set the series as a column chart type. Next I set the value field and category field of the chart to corresponding column name from the data source. I also set the labels to be visible on top of each column. Lastly I set the tooltip to a custom template. Now if we run the code this is what we see:

Drill Down Chart

Drill Down Chart Initial Look


Step 4 – Handle Series Click:

Now that we have our chart initialized and see that the data is getting bound correctly, next step is to handle the series click. Series Click is an event fired when the user clicks on any columns in the chart. Chart API exposes a method called setDataSource(). So in order to achieve a drill down, handle the series click event and set a new data source to the chart. What this does is, it will repaint the chart area and provides the drill down effect. So here is the code snippet for the seriesClick event:

seriesClick: function(e)
 {
 var categorySelected = e.category;
 var chart = $("#chart").data("kendoChart");
 if(categorySelected === "MSIE")
 {
 chart.setDataSource(new kendo.data.DataSource({data:msieData}));
 }
 else if(categorySelected === "Firefox")
 {
 chart.setDataSource(new kendo.data.DataSource({data:ffData}));
 }
 else if(categorySelected === "Chrome")
 {
 chart.setDataSource(new kendo.data.DataSource({data:chromeData}));
 }
 else if(categorySelected === "Safari")
 {
 chart.setDataSource(new kendo.data.DataSource({data:safariData}));
 }
 else if(categorySelected === "Opera")
 {
 chart.setDataSource(new kendo.data.DataSource({data:operaData}));
 }
 else
 {
 //not handling the child level drill down - setting the chart back to original data source
 chart.setDataSource(new kendo.data.DataSource({data:chartInitialData}));
 }
 }

And thats all it is there to create a drill down with Kendo UI DataViz.

Here is a link to the source code of this demo: http://trykendoui.telerik.com/@kashyapa/eCEP/3.

The demo code is done using our Kendo UI Dojo. When you navigate to the demo page, left hand side will have the source code and right hand side will show the output. You will need to click on the Run button on the page to see the output.

Hope this demo helps somebody who want to achieve the same scenario.

Till next time – Happy Coding.

Indian Parliament

A New Govt. for India and New Tech for Techies in India

Congratulations to 1.2 bn Indians countrymen who participated in the elections to give ourselves a new Govt. It is exemplary that our democracy recorded over 66% voting. For perspective, USA voting percentage in Presidential elections of 2012 was 57%.

Telerik salutes all the responsible Indian citizens (esp. the youth) who voted and hope that the voting percentage would further increase in the next elections. For technologists, here are some fresh technical webinars that would get you started with the new technologies:

Date

Time (IST)

Title

May 22 2014

3:00 – 4:00 PM

Getting productive with ASP.NET MVC 5

May 29
2014

3:00 – 4:00 PM

Leveraging the Git Source Control for Enterprise Projects

June 12 2014

3:00 – 4:00 PM

Integrate Video and Photos in your ASP.NET applications with ease

June 19 2014

3:00 – 4:00 PM

Build Hybrid Mobile Applications for Nokia Lumia Devices

June 26 2014

3:00 – 4:00 PM

Mobilizing SAP with Telerik Platform

The webinars are free and can be attended from anywhere. Participate by registering for the webinars and attending them.


Resources for webinar “Integrating Knockout.js with Kendo UI”

On 24th April 2014 we hosted a webinar on Integrating KendoUI with Knockout.js. Now a days MV* patterns are most used patterns in almost all kind of applications. Knockout.js is one of the most popular library to achieve MVVM in JavaScript based web applications.

Learn more about Knockout.js here

Kendo UI provides complete capability to achieve MVVM. If you use Kendo UI, you don’t need to use any other JavaScript library to create applications based on MVVM or Single Page Application. In this webinar we tried to show you integration between Kendo UI and Knockout.js.

Learn more about Kendo UI here

Find below slides from the webinar,


Find below recording of webinar,


I hope you find this webinar useful.