Making sense of the Enterprise Mobility

imageMobile apps have mostly meant games and a few more utility apps. While this is a large section of the mobile app ecosystem, there is a potentially lucrative market waking up now to the possibilities of mobile apps – The Enterprise.

The enterprise mobility requires a different set of considerations than the consumer oriented mobile apps. While in-app ads, mobile commerce, frame rates, access to a RadBackend (or mBaas) may be important for consumer apps, the enterprise looks for value elsewhere.

For long enterprises have controlled the hardware and the software that is allowed within its premises for reasons of security, resource optimization and IT management. These days employees are getting their own mobile devices into the enterprise leading to a more heterogeneous environment.

A story that illustrates this is about an enterprise that adopted WiFi to make it easy for employees to work on their laptops anywhere in the building. The load was calculated keeping in mind the number of laptops in the organisation (a decent assumption). The infrastructure collapsed within a week of it launching. On investigation, the IT realized that the devices logging into the WiFi system were more than double of what was planned for. The sneaky addition was the mobile devices of the employees  (outnumbering the laptops easily)!

Now, let us look at the requirements that an enterprise or small & medium business might have of the mobility application platform that they may use:

Support for heterogeneous devices

The BYOD trend can saddle an enterprise with multiple platforms – Android, iOS, Windows Phone & BlackBerry. Add to it the complexity of different form factors for each platform. The mobile apps need to accommodate and embrace this heterogeneity.

Legacy Hardware Infrastructure

A lot of infrastructure is in production in an enterprise. This may include the LAN architecture and the servers in use. The enterprises will need to add WiFi infrastructure and provision for the additional load on the IT servers by the way of mobile.

With mobility, users will also want to access data from outside the corporate network. The organisation may need to revisit its IT policies to allow data access from outside corporate network.

Security

The enterprise first needs think about securing the mobile devices though policies (e.g. password, retention). An investment needs to be made in the device management software allowing for capabilities like platform upgrades, remote wipe/lockout.

The next step is to plan user authentication via the mobile apps. Mobile apps are thick clients and need a different authentication mechanism(s) than currently used. Extending LDAP or ADFS infrastructure becomes necessary here.

Apart from authentication, one needs to consider authorization in the mobile apps. Consider the nightmarish scenario of  HR deptt accessing sales apps and employees accessing executive dashboards.

Integration with Business Apps

image
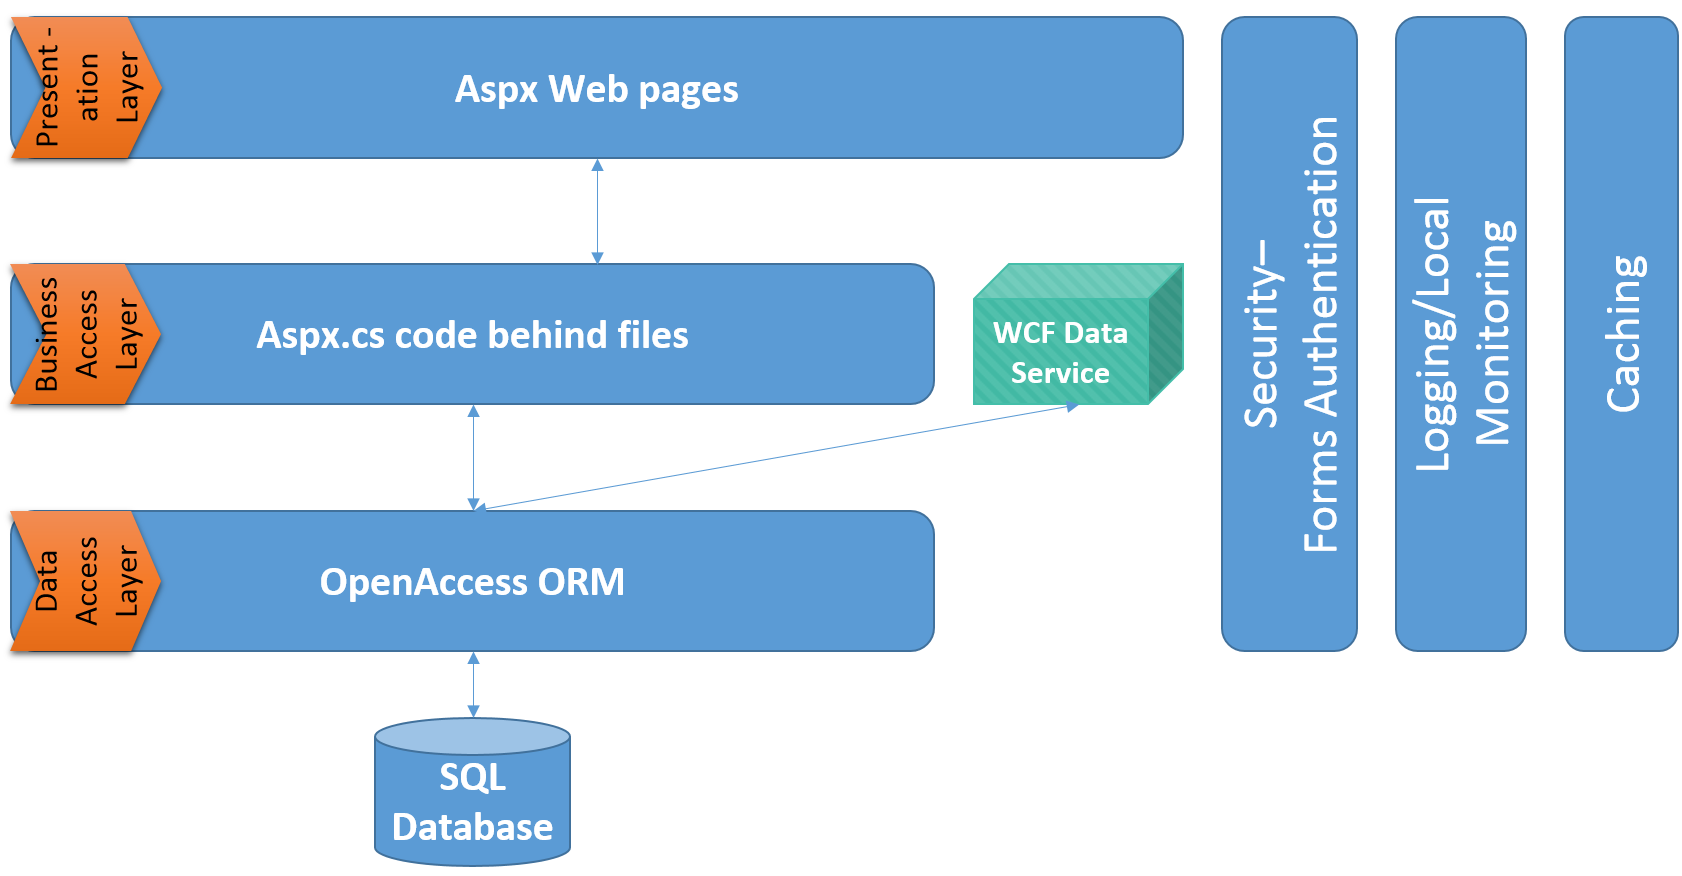
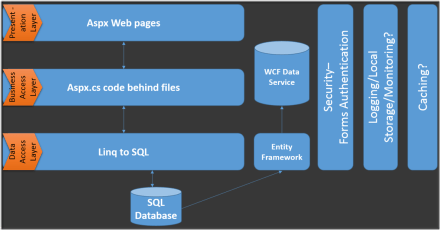
IT has become the backbone of the modern enterprise. Various business applications (e.g. SAP, Oracle, Salesforce, SharePoint) are driving the everyday business processes. Mobile devices require a different set of endpoints to be exposed (namely webservices). The enterprise needs to consider the extensibility of the apps to accommodate this requirement.

Enterprise App Stores

The mobile app ecosystems are tightly controlled by the platform vendors. The devices are only allowed to download apps from the “official” marketplaces of the devices. This leads to exposure of apps meant for the employees of the organisation to the masses. This risk can be mitigated by integrating secure login into the application.

Another option is to deploy an enterprise app store working with the platform vendors. This option may be more expensive and resource intensive (think registering devices in the app stores).

Development Choice

The enterprise needs to make a decision on the the development technology and the tool of choice. Today, the options exist between Native Development or Hybrid Development. Hybrid development offers a host of benefits including reuse of existing skills, cross platform development and lower hardware requirements for mobile app development.

I believe that today’s enterprise requirements are very well met with the Hybrid Mobile Development approach. In a recent report by reserach2guidance, they found the following:

“The majority of users say that CP (Cross Platform) Tools have saved them time compared to native app development. Almost 45% of the users estimate time-savings of 50% and more.”

Equally important things to consider would be requirements, configuration, bug and release management for the application development phase.

Mobile Testing

The mobile apps should perform as per expectations. Having a good quality team to whet the quality of the initial release is very important. Even more important is to have an automated process in place to verify each app release meets the quality bar of the organization.

App Analytics

This is an area that hasn’t been paid much attention to but would pay tremendously if included in the mobile app. Knowing the features of apps that are most widely used allows the enterprise on developing those features further. Also, knowing the detailed crash reports help to pinpoint the buggy sections of the code improving the reliability of the apps.

Synchronization/ Offline Capabilities

This is one non-functional requirement that takes special meaning in the mobile app scenarios. Since the mobile app works in the sometimes disconnected environment, it is important to have some offline way of caching data.

One needs to take care of the scenario where the server may not be available at intermediate times. Even at these times, the mobile app should provide some critical functionalities to the users.

Backend Services

While mBaaS services are in vogue today, they have limited value for the enterprises. The main challenge is that mBaaS are public cloud services. An enterprise may be reluctant to host its data in a public cloud due to security considerations. In addition to file and data storage, mBaaS services may also provide notification services, geolocation services, login services, digital wallets, audience segmentation and device management capabilities. The enterprise may consider mBaaS services if they require any of the above services.

Revamping Web Application: The UI changes

Read – Revamping Web Applications: Implementing RadAutoComplete

This post is a summary of the previous 12 blog posts where we have talked on how to upgrade our web application using the Telerik Ajax ASP.NET controls.We took an example of an Event Networking Application which is further explained in the first article. We started with testing the application to set a benchmark followed by implementing the Data Access Layer. Then we replaced almost all the controls with Rad controls. And in the end we have finally changed our interface to a new design. To do so we have used basic twitter bootstrap responsive css. To know more about implementing bootstrap click here.

Here we have elaborated on the following features of the application:

Directory
Sessions
MyScheduler
Messages
Edit Profile
Edit Profile (Mobile Version)

To see the difference in the User Interface changes  between the old and the new web application we have highlighted some of the major features.

At the DAL we can see a new layer being created in the form of a project named EventNetworking.Data.

image

Following from the above we have a new architecture for our application.

New Arch

A different UI can be seen as the bootstrap CSS has been implemented providing a responsive-UI. The visual changes can be seen as follows:

Directory

There is a new search criteria based on the Attendee name. Even the list can now be sorted only on the basis of the speakers.

image

image

Sessions

The basic UX has been modified to a RadGrid interface providing a better sorting, multiple-grouping as well as paging options.

image

image

MyScheduler

The scheduler where all the registered sessions were stored is now represented in a calendar form. Using RadScheduler the UI has turned very interactive and smooth.

image

image

Messages

The extensive vertical scrolling has been split into two pages namely inbox and outbox with almost a similar UI.

image

image

Edit Profile

The bootstrap CSS has made all the difference in this page.

image

image

Edit Profile (Mobile Version)

The following snippet displays the responsiveness of our application. Edit profile, when viewed in a mobile browser, we could experience the details have automatically shrunk to fit on the screen. This reduces the navigation to one dimension hence increasing the user experience.

Capture

The back-end does not really affect a user. What affects the user is the interface and the smooth performance of the Web Application. That is what we have tried to justify in our application. These are not all but the major features that have made difference in our application. Please comment on where else can we tweak the UI.

Revamping Web Application: Implement RadAutoCompleteBox

Read – Revamping Web Applications: Implementing RadScheduler

We have used this particular control in the admin page for adding or deleting tags attached to the sessions. We use two Open Access data source here. First to fetch the TagName and set the property to DataTextField and second we attach TagID to the DataValueField.

Following is the DataSource we are talking about:

<telerik:OpenAccessDataSource ID="tagLDS" runat="server" EnableDelete="False" EnableInsert="False"
EnableUpdate="False" ObjectContextProvider="EventNetworking.Data.NetworkingDataContext,
EventNetworking.Data" OrderBy="this.TagName" TypeName="EventNetworking.Data.Tag">
</telerik:OpenAccessDataSource>

Our RadAutoCompleteBox control looks like the following on the aspx page:

<telerik:RadAutoCompleteBox ID="TagsAutoCompleteBox" runat="server" DataSourceID="tagLDS"
DataTextField="TagName" DataValueField="TagID" Skin="Windows7" Width="500px"
DropDownWidth="150px" DropDownHeight="200px" OnEntryAdded="TagsAutoCompleteBox_EntryAdded"
OnEntryRemoved="TagsAutoCompleteBox_EntryRemoved" OnDataBound="TagsAutoCompleteBox_DataBound">
 </telerik:RadAutoCompleteBox>

As you can see we have 3 events being assigned to the control:

  1. Let us first talk about the DataBound control:
    This control adds the tags to the control which are already associated to the session we are dealing with.image

    protected void TagsAutoCompleteBox_DataBound(object sender, EventArgs e)
     {
     var sessionTagsX = (from st in ndx.SessionTags
     where st.SessionID == Convert.ToInt32(SessionID.Value)
     select st).ToList();
    
     for (int i = 0; i < sessionTagsX.Count; i++)
     {
     TagsAutoCompleteBox.Entries.Add(new AutoCompleteBoxEntry(sessionTagsX[i].Tag.TagName, sessionTagsX[i].TagID.ToString()));
     }
     }
    
    
  2. To add an entry we just start typing and the list would be populated automatically. We can either select from the list or just type in the whole tag. clip_image001
    protected void TagsAutoCompleteBox_EntryAdded(object sender, AutoCompleteEntryEventArgs e)
     {
     SessionTag sessionTagsX = new SessionTag();
     sessionTagsX.SessionID = Convert.ToInt32(SessionID.Value);
     sessionTagsX.TagID = Convert.ToInt32(e.Entry.Value);
     ndx.Add(sessionTagsX);
     ndx.SaveChanges();
     }
    
    
  3. To remove a specified tag we just click the cross symbol and the EntryRemoved code will get executed. Here we specify the session and the tag and it get removed from the sessionTags table.
    protected void TagsAutoCompleteBox_EntryRemoved(object sender, AutoCompleteEntryEventArgs e)
     {
     SessionTag sessionTagsX = (from st in ndx.SessionTags
     where st.SessionID == Convert.ToInt32(SessionID.Value) && st.TagID == Convert.ToInt32(e.Entry.Value)
     select st).FirstOrDefault();
     sessionTagsX.SessionID = Convert.ToInt32(SessionID.Value);
     sessionTagsX.TagID = Convert.ToInt32(e.Entry.Value);
     ndx.Delete(sessionTagsX);
     ndx.SaveChanges();
     }


This control is useful when few elements need to be selected from a huge list. We had the same scenario and hence we used the RadAutoCompleteBox.

Read – Revamping Web Application: The UI changes

Revamping Web Application: Implementing RadScheduler

Read – Revamping Web Applications: Proposed Enhancements

We have a page that displays already registered sessions. Currently, we are using Asp:ListView to represent the data and , the inbuilt features, we have used include,

  1. Removing the existing sessions,
  2. Redirecting to the session details,
  3. Navigate using the DataPager.

clip_image002

Now, we would represent the same data through the help of RadScheduler. The reason we have chosen Scheduler is because all the registered session/appointments would be visible in a calendar format. The timeline of this calendar, along with date view also provides the time view which provides a perfect solution for an end-user. Under Telerik AJAX Calendar and Scheduler Components (me using the 2013 Q1 for Net 45) select RadScheduler.

Programmatic

For the best explanation and indepth knowledge its better if we write code rather than using wizards. We open the code behind file and implement the following prerequisites:

Add the following headers:

using Telerik.Web.UI;
using EventNetworking.Data;

Under the class add NetworkingDataContext ndx = new NetworkingDataContext();
This creates a context for the data from our DAL (Data Access Layer).

Attach datasource to the RadScheduler first time the page is loaded.

if (!IsPostBack)
{
 // SECTION 1: Defining the data source
 var sessiontime = from st in ndx.SessionAttendees
 join ss in ndx.Sessions on st.SessionID equals ss.SessionID
 join sts in ndx.SessionTimeSlots on ss.TimeSlotID equals sts.TimeSlotID
 where st.UserID == Convert.ToInt32(userID.Value)
 orderby sts.FromTime
 select new
 {
 FromTime = sts.FromTime,
 Duration = sts.Durationinmins,
 EndTime = sts.FromTime.AddMinutes(Convert.ToDouble(sts.Durationinmins)),
 Title = ss.Title,
 SessionAttendeeUID = st.SessionAttendeeUID,
 SessionID = st.SessionID,
 UserID = st.UserID
 };

 // SECTION 2: Extracting the current user details
 int userid = (from m in ndx.UserProfiles
 where m.Username == User.Identity.Name
 select m.UserId).First();
 userID.Value = userid.ToString();

 // SECTION 3: Setting the RadScheduler Properties (necessary)
 sessionCartScheduler.DataKeyField = "SessionAttendeeUID";
 sessionCartScheduler.DataStartField = "FromTime";
 sessionCartScheduler.DataEndField = "EndTime";
 sessionCartScheduler.DataSubjectField = "Title";

// SECTION 3.1: Attach the newly created dataSource to the control
 sessionCartScheduler.DataSource = sessiontime.ToList();

// SECTION 4: Setting further properties of RadScheduler(optional)
 var minDate = from d in sessiontime
 orderby d.FromTime
 select d.FromTime;
 if (minDate.Count() != 0)
 sessionCartScheduler.SelectedDate = Convert.ToDateTime(minDate.FirstOrDefault());

// SECTION 5: Binding the control with the dataSource
 sessionCartScheduler.DataBind();
}

And your application is ready to run.

SECTION 1: We need an appropriate data to be represented in a Scheduler view. Hence, we have created a data source namely sessiontime. We plan to represent the user specified session. To do so, the join query is used to create a new view which includes the very important timing details, session title and session key.

SECTION 2: Detail of the current user is necessary because the cart functionality is specific to self.

SECTION 3: For RadScheduler to work we need to specify its DataKeyField, DataStartField, DataEndField, DataSubjectField and DataSource. DataSource property is where we attach the data to the control.

Property Details
DataSourceID Overridden. Gets or sets the ID property of the data source control that the RadScheduler should use to retrieve its data source.
DataKeyField Gets or sets the key field for appointments in the data source specified by the DataSourceID property.
DataStartField Gets or sets the start field for appointments in the data source specified by the DataSourceID property.
DataEndField Gets or sets the end field for appointments in the data source specified by the DataSourceID property.
DataSubjectField Gets or sets the subject field for appointments in the data source specified by the DataSourceID property.

Next, we tweak/explore some more features to improve our Scheduler. We don’t want our users to end up on a random date.

SECTION 4: We have set the date to the date when the first event takes place.

SECTION 5: We finally bind the data to the control.

Let us now add a click event to the session, such that the page is redirected to the session details once clicked.

protected void sessionCartScheduler_AppointmentClick(object sender, SchedulerEventArgs e)
 {
 int sessionIDvalue = (from sa in ndx.SessionAttendees
 where sa.SessionAttendeeUID == Convert.ToInt16(e.Appointment.ID)
 select sa.SessionID).FirstOrDefault();
 string sessionURL = "~/session/" + sessionIDvalue.ToString();
 Response.Redirect(sessionURL);
 }

Also, let us define what happens when a person clicks the cross symbol on the appointment.

protected void sessionCartScheduler_AppointmentDelete(object sender, AppointmentDeleteEventArgs e)
{
 //SECTION 1: Extracting the complete row of the selected tab and deleting it
 int uid = Convert.ToInt32(e.Appointment.ID);
 SessionAttendee sa = (from s in ndx.SessionAttendees
 where s.SessionAttendeeUID == uid
 select s).First() as SessionAttendee;
 ndx.Delete(sa);
 ndx.SaveChanges();

//SECTION 2: Refreshing the control
 var sessiontime = from st in ndx.SessionAttendees
 join ss in ndx.Sessions on st.SessionID equals ss.SessionID
 join sts in ndx.SessionTimeSlots on ss.TimeSlotID equals sts.TimeSlotID
 where st.UserID == Convert.ToInt32(userID.Value)
 orderby sts.FromTime
 select new
 {
 FromTime = sts.FromTime,
 Duration = sts.Durationinmins,
 EndTime = sts.FromTime.AddMinutes(Convert.ToDouble(sts.Durationinmins)),
 Title = ss.Title,
 SessionAttendeeUID = st.SessionAttendeeUID,
 SessionID = st.SessionID,
 UserID = st.UserID
 };

 sessionCartScheduler.DataSource = sessiontime.ToList();
 sessionCartScheduler.DataBind();

 e.Cancel = true;
}

SECTION 1: To delete the item from the table we first need to extract that row from the context. Once we have extracted the row we can easily remove the data using the CRUD Operations of OpenAccess ORM.

“e.Appointment.ID” is used to abstract the DataKeyField of the RadScheduler.

SECTION 2: Once the data is removed we need to rebind the data. To rebind the data, we need to refresh the data source. Hence, we create a data source and bind the control.

Until now we talked about how we can do things programmatically. Let us now focus on the wizard of the control.

Declarative

Click the smart tag and open Configuration Wizard.

A few which we have used are:

clip_image002[5]

Under the Day View tab- Check “Enable exact time rendering”

The XAMl code for RadScheduler looks like the following:

<telerik:RadScheduler ID="sessionCartScheduler" runat="server" AllowEdit="False" AllowInsert="False"
OnAppointmentClick="sessionCartScheduler_AppointmentClick" Height="500px"
OnAppointmentDelete="sessionCartScheduler_AppointmentDelete"
SelectedDate="2013-04-27" Skin="Windows7" EditFormTimeFormat="hh:mm" ShowFullTime="True">
<AdvancedForm TimeFormat="hh:mm" EnableTimeZonesEditing="True"></AdvancedForm>
<DayView EnableExactTimeRendering="True"></DayView>
</telerik:RadScheduler>

We are now done defining the control and our controls should look like the following:

image

image

image

If you have any trouble implementing, please post the difficulties in the comments.

Read- Revamping Web Application Part-11 : Implement RadAutoCompleteBox

Working with RadWindows & Converting GridView to RadGrid

Lets first talk about the Grid. Many developers face problem while implementing the GridView in the ASP.Net technology. Either the implementation of the design is too cumbersome or the display of the data as required is difficult. Hence, we replace GridView with RadGrid. Here, we have replaced the GridView of “Inbox” from our event networking application. Initially, the grid view look like the following:

image

A few controls needed to support the RadGrid are

1. RadAjaxManager

Here, we define the event where the loading symbol need to be popped as a modal window. For example, when you refresh your inbox. We need to define only one LoadingPanel which can be reused every-time we need one.

<telerik:RadAjaxManager ID="RadAjaxManager1" runat="server" OnAjaxRequest="RadAjaxManager1_AjaxRequest">
<AjaxSettings>
<telerik:AjaxSetting AjaxControlID="RadAjaxManager1">
<UpdatedControls>
<telerik:AjaxUpdatedControl ControlID="ReceivedMessagesGrid" LoadingPanelID="LoadingPanel"></telerik:AjaxUpdatedControl>
</UpdatedControls>
</telerik:AjaxSetting>
<telerik:AjaxSetting AjaxControlID="ReceivedMessagesGrid">
<UpdatedControls>
<telerik:AjaxUpdatedControl ControlID="ReceivedMessagesGrid" LoadingPanelID="LoadingPanel"></telerik:AjaxUpdatedControl>
</UpdatedControls>
</telerik:AjaxSetting>
</AjaxSettings>
</telerik:RadAjaxManager>

2. RadAjaxPanel

The rest of the rad controls are placed within the RadAjaxPanel which acts very similar to the Ajax Panel. Here, we have RadWindowManager, RadAjaxLoadingPanel, RadCodeBlock and RadGrid,

2.1 RadWindowsManager

RadWindow is used like a popup on the screen and the complete message is displayed in this window. We can either set the screen to be modal or not. This is called a child window the page which calls it is called a parent window. This windows will be called from the RadCodeBlock once the message row is selected/clicked.

<telerik:RadWindowManager ID="RadWindowManager1" runat="server" EnableShadow="true">
<Windows>
<telerik:RadWindow ID="DisplayRead" runat="server" Title="Read and Reply"
Left="150px" ReloadOnShow="true" ShowContentDuringLoad="true" AutoSize="true"
Modal="true">
</telerik:RadWindow>
</Windows>
</telerik:RadWindowManager>

2.2 RadAjaxLoadingPanel

This is where we define the loading panel which is explained in the RadAjaxManager.

<telerik:RadAjaxLoadingPanel ID="LoadingPanel" Skin="Windows7" runat="server"></telerik:RadAjaxLoadingPanel>

2.3 RadCodeBlock

RadCodeBlock helps define javascript which can be called from within a RadWindow or the parent window. It defines the functions with various parameters. Here we have DisplayReadReply function which opens the RadWindow with a different page defined as “ViewMessage.aspx” and a few parameters being sent through URL. The refreshGrid function is used to refresh the binding of grid so that the data gets updated.

<telerik:RadCodeBlock ID="CodeBlock" runat="server">
<script type="text/javascript">
//not used here...to be used by hyperlink
function DisplayReadReply(id, rowIndex) {
var grid = $find("<%=ReceivedMessagesGrid.ClientID%>");

var rowControl = grid.get_masterTableView().get_dataItems()[rowIndex].get_element();
grid.get_masterTableView().selectItem(rowControl, true);

window.radopen("ViewMessage.aspx?RequestID=" + id, "DisplayRead");
return false;
}

function refreshGrid(arg) {
if (!arg) {
$find("<%=RadAjaxManager1.ClientID %>").ajaxRequest("Rebind");
}
else {
$find("<%= RadAjaxManager1.ClientID %>").ajaxRequest("RebindAndNavigate");
}
}

function RowDblClick(sender, eventArgs) {
window.radopen("ViewMessage.aspx?RequestID=" + eventArgs.getDataKeyValue("ContactRequestID"), "DisplayRead");
}
</script>
</telerik:RadCodeBlock>

2.4 RadGrid

This is the actual control which is going to enhance your experience.

<telerik:RadGrid ID="ReceivedMessagesGrid" runat="server" CellSpacing="0" AutoGenerateColumns="false"
GridLines="None" AllowPaging="True" AllowSorting="True" PageSize="15" AllowMultiRowSelection="True" Skin="Windows7"
ShowGroupPanel="True" AllowFilteringByColumn="True" ViewStateMode="Enabled"
OnItemCommand="ReceivedMessagesGrid_ItemCommand" DataMember="Member">

<ClientSettings AllowDragToGroup="True" AllowColumnsReorder="True" ReorderColumnsOnClient="True">
<Selecting AllowRowSelect="True"></Selecting>
<ClientEvents OnRowClick="RowDblClick" />
</ClientSettings>

<PagerStyle Mode="NextPrevAndNumeric" />

<MasterTableView DataKeyNames="ContactRequestID" ClientDataKeyNames="ContactRequestID" DataMember="Member"
AllowMultiColumnSorting="true">
<RowIndicatorColumn FilterControlAltText="Filter RowIndicator column"></RowIndicatorColumn>
<ExpandCollapseColumn Visible="True" Created="True" FilterControlAltText="Filter ExpandColumn column" />
<GroupByExpressions>
<telerik:GridGroupByExpression>
<SelectFields>
<telerik:GridGroupByField FieldAlias="MessageStatus" FieldName="MessageStatus1.MessageStatusText"
HeaderValueSeparator=" : " />
</SelectFields>
<GroupByFields>
<telerik:GridGroupByField SortOrder="Descending" FieldName="MessageStatus1.MessageStatusText"
HeaderText="Header for Group" />
</GroupByFields>
</telerik:GridGroupByExpression>
</GroupByExpressions>
<Columns>
<telerik:GridTemplateColumn UniqueName="Sender" DataField="UserProfile.Username" Groupable="false"
HeaderText="From/ Subject" HeaderStyle-Width="300px" SortExpression="ContactRequestID">
<ItemTemplate>
<br />
<asp:Label CssClass="MailSubject" ID="abstractLabel" runat="server" Text='<%# String2Extract(String.Format("{0}{1}{2}",Eval("Message1"),"|",Eval("MessageType")))%>'></asp:Label>;
</ItemTemplate>
</telerik:GridTemplateColumn>
<telerik:GridBoundColumn HeaderStyle-Width="100px" UniqueName="Type" HeaderText="Type" DataField="MessageType1.MessageTypeDesc" SortExpression="MessageType"></telerik:GridBoundColumn>
<telerik:GridBoundColumn HeaderStyle-Width="100px" UniqueName="Status" HeaderText="Status" DataField="MessageStatus1.MessageStatusText" SortExpression="MessageStatus"></telerik:GridBoundColumn>
<telerik:GridBoundColumn HeaderStyle-Width="80px" ItemStyle-Width="60px" UniqueName="SentOn" HeaderText="Sent On" DataField="SentDate" SortExpression="SentDate" />
</Columns>
</MasterTableView>
</telerik:RadGrid>

Under RadGrid we have further defined the following:

2.4.1 ClientSettings

This defines all the client side events, if any. Here, we have defined OnRowClick event which is fired at the client side when we click any of the RadGrid row. This fires the function defined in the RadCodeBlock.

2.4.2 PagerStyle

This gives us an option for the type of paging. Types available are:

  1. Advanced
  2. NextPrev
  3. NextPrevAndNumeric
  4. NextPrevNumericAndAdvanced
  5. NumericPages
  6. Sliders
2.4.3 MasterTableView

This is where we define all the columns, their appearance and their sorting as well as grouping expressions. Few of the column types we have used are GridTemplateColumn and GridBoundColumn.
GridBoundColumn can directly be bound by specifying the column name of the table in the data field property.

Whereas, to implement a complex query, we use GridTemplateColumn. As the name suggests, we create a template and define our own values. Under grid template we have item template where we can have other ASP.Net controls like Label, Hyperlink, etc. We can even call a function from within a property like

Text='<%# String2Extract(String.Format("{0}{1}{2}",Eval("Message1"),"|",Eval("MessageType")))%>'

This String2Extract function is defined in the code behind. . The code above also explains how to call a function from code behind into a control and using some parameters.

3. Page_Load()

Prior to writing the page load event we include the Eventnetworking.Data and Telerik.Web.UI references in our code behind and then create a context NetworkingDataContext ndx = new NetworkingDataContext();

In the page load event we create a context for Sent messages, and then we bind the data with our RadGrid.

var InboxMessageDX = from im in ndx.Messages
where im.ReceiverUserId == Convert.ToInt32(UserIDValue.Value) && im.MessageStatus <= 4 && im.UserProfile1.Active== true
orderby im.SentDate descending
select im;

ReceivedMessagesGrid.DataSource = InboxMessageDX;
ReceivedMessagesGrid.DataBind();

4. String2Extract(string str)

This function is used to display the first 100 characters of the message as the subject in the list of the inbox.

protected string String2Extract(string str)
{
if (str != null)
{
string[] strArray = str.Split('|');
if (Convert.ToInt16(strArray[1]) == 1)
if (str.Length > 100)
return strArray[0].Substring(0, 100);   //.TrimEnd(';');
else
return strArray[0];
else return "";
}
else
return "";
}

5. Ajax Request

This event is fired each time the page is ajax-ified.
If there is an AjaxRequest calling either “Rebind” or “RebindAndNavigate”.

protected void RadAjaxManager1_AjaxRequest(object sender, AjaxRequestEventArgs e)
{
if (e.Argument == "Rebind")
{
ReceivedMessagesGrid.MasterTableView.SortExpressions.Clear();
ReceivedMessagesGrid.MasterTableView.GroupByExpressions.Clear();
ReceivedMessagesGrid.Rebind();
}
else if (e.Argument == "RebindAndNavigate")
{
ReceivedMessagesGrid.MasterTableView.SortExpressions.Clear();
ReceivedMessagesGrid.MasterTableView.GroupByExpressions.Clear();
ReceivedMessagesGrid.MasterTableView.CurrentPageIndex = ReceivedMessagesGrid.MasterTableView.PageCount - 1;
ReceivedMessagesGrid.Rebind();
}
}

After all we are done with all the changes, the new page looks like the following:

image

And once you click any of the message a child window open which displays the message and you have the option to respond to the message depending on the message type.

image

Read- Revamping Web Application Part-10 : Implementing RadScheduler

Revamping Web Applications: Upgrading to RadListView

We have finished the ORM deployment with our previous post. Now we are ready to start migrating the default controls to Telerik controls. In this post we will take a look at converting asp:ListView to telerik:RadListView and we would learn about telerik:RadDataPager which will replace the asp:DataPager.

Add RadListView

For this exercise we will take Directory page from our Event Networking application. Remove the existing ListView control and add a RadListView control from the Telerik AJAX Components.image

Note: After adding the control rename the ID property same as your asp:ListView ID property. We might see an error because the underlying type has changed. The error occurs because initially the same id was linked to asp:ListView. The error will eventually disappear. Again, we need to first remove the already existing methods defined for the ListView from the aspx.cs i.e. codebehind page. Now copy the rest of the properties from ListView. We need to add the property DataKeyNames to our RadListView. Now we copy all the templates from asp:ListView.

image

If you run the application RadListView should have been populated by the data, as the data binding has already been handled at the Page_Load event (explained in our previous blog <Hyperlink>).

Your data is now populated but currently there is no paging option. To provide paging add the property AllowPaging=”true” to RadListView.

Add Event Handler to RadListView

To add an event, type the name of the event and click <Create New Event>. So add an event handler for OnItemCreated. We are using this event to populate the pictures of each attendee.

We had the following code under asp:ListView event:

image

Lets tweak the existing code for the RadListView:

NOTE: Do not forget to add “using Telerik.Web.UI;” in your aspx.cs

protected void directoryListView_ItemCreated(object sender, RadListViewItemEventArgs e)
 {
var item = e.Item as RadListViewDataItem;
if (item != null)
{
var userId = item.GetDataKeyValue("UserId").ToString();
var u = (from x in uu
where x.UserID == int.Parse(userId)
select x);
if (u.Count() != 0)
{
((Image)e.Item.FindControl("ProfileImage")).ImageUrl = u.First().URL;
}
 }
 }

Add RadDataPager

If you use ASP pager, you only have the numeric option. But using RadDataPager gives you lot more option.
imageimage

The main aim is to get a better UX and hence we replace asp:DataPager with telerik:RadDataPager. We changed the following properties PagedControlID=”directoryListView” and PageSize=”15″. Next we add a field and within it we insert the <telerik:RadDataPagerSliderField /> . This provides us a natural gesture to slide through various pages.

To do it declaratively switch to Design view and select the RadDataPager. Then expand the smart-tag and change the PagedControlID and the Pager Mode to NextPrevNumericAndAdvanced. This would allow users to do more than just select the page numbers.

Error Explanation

But if we had copied the same code to our RadListView item created event it throws following error:

‘Telerik.Web.UI.RadListViewItem’ does not contain a definition for ‘DataItem’ and no extension method ‘DataItem’ accepting a first argument of type ‘Telerik.Web.UI.RadListViewItem’ could be found (are you missing a using directive or an assembly reference?)

This occurs because the “e” defines the event argument which at runtime has type RadListViewDataItem but has RadListViewItem at compile time. Hence we need to explicitly need to typecast it into RadListViewDataItem and then we can use it in a similar way.

Why Change it after all:

In case of customisation RadListView gives us far better UX and functionality.

The dataPager is static for ASP control whereas we have many more features and modes in which we can operate while using RadDataPager varying from just numeric pagers to smooth sliders gesture.

The following image gives us an overview of how the ASP control looked. And in the following image we can the great UX and the additional features available with us.

image

image

Read- Revamping Web Applications Part-9: Working with RadWindows & Converting GridView to RadGrid

Revamping Web Applications: Adding DAL (Data Access Layer) Part 2

Following the previous post – Revamping Web Applications part 5: Adding DAL (Data Access Layer)

After the Data Access Layer (DAL) has been implemented by moving the ORM into a new project, there would be further errors experienced in our web application. This happens because of two reasons:

  1. Initially, LINQ data source was used which is now no longer used.
  2. The ORM which we have implemented here is Open Access, and syntax to implement CRUD operations are different from that of LINQ.

Hence, we need to change all the LINQ CRUD operations, and the following snippets explains the same. The commented line was the LINQ operation and the non-commented part is the new Open Access syntax. For further knowledge on implementing Open Access CRUD operation click here. \

imageimage

After replacing the LINQ commands we still might see few more errors such as:

Error 1image

Then it has occurred because we have converted the Linq to SQL to Open Access ORM. Hence, the control LinqDataSource will not help us map it to the new ORM.image

Since we have removed the Linq Data Source so we have to also remove the existing LinqDataSource and create a new DataSource.

Solution #1

We can use an OpenAccess DataSource control replacing the LINQ DataSource and keep the same ID. Hence, no more effort is needed.

Solution #2

More preferred practice in the industry is to remove the DataSource control and do the following:

We added the following code under the Page_Load event. We created a DataTable and then linked the DataSource property of the DropDownList with the newly created DataTables.
This helps in insulating the data. We also need to remove the DataSource property from the controls where we had linked to the Linq DataSource.

if (User.Identity.IsAuthenticated)
{
if (!IsPostBack)
{
int userid = (from uid in ndx.UserProfiles
where uid.Username == User.Identity.Name
select uid.UserId).First();
// Storing the value of the userid in a hidden variable
loggedUserId.Value = userid.ToString();
}

MasterData.getMasterData();
ds = Context.Cache["masterdata"] as DataSet;
if (ds != null)
{
DataTable dtcity = ds.Tables["CityMaster"];
DataTable dtcountry = ds.Tables["CountryMaster"];

if (!IsPostBack)
{
citySearchDropDown.DataSource = dtcity;
citySearchDropDown.DataTextField = dtcity.Columns["CityName"].ColumnName;
citySearchDropDown.DataValueField = dtcity.Columns["CityID"].ColumnName;
citySearchDropDown.DataBind();

countryDropDown.DataSource = dtcountry;
countryDropDown.DataTextField = dtcountry.Columns["CountryName"].ColumnName;
countryDropDown.DataValueField = dtcountry.Columns["CountryID"].ColumnName;
countryDropDown.DataBind();
}
}

How to Add telerik:OpenAccessDataSource

    1. Drag the OpenAccessDataSource tool under the OpenAcces group.image
    2. You will have something like this in the design view.image
    3. Click on “Configure Data Source…”
      Here we are asked to save changes to our items. Click Yes.
    4. Choose the data context for your application and click next.image
    5. Choose the table you want to retrieve from the database and click finish.image
    6. We also rename the ID as same as the asp:LinqDataSource so that there is no name-conflict anywhere else in our application. Now your code will look like this.
<telerik:OpenAccessDataSource ID="badgeLDS" runat="server"
ObjectContextProvider="EventNetworking.Data.NetworkingDataContext, EventNetworking.Data"
TypeName="EventNetworking.Data.Badge">
</telerik:OpenAccessDataSource>

Where “Badge” is our table-name.

Note: We have not used OpenAccessDataSource anywhere because it takes direct dependency from the OpenAccess.

Error 2

Another Runtime error you may encounter is over the DataBind property.

This occurs because LINQ sends the data as a list but now since we are using OpenAccess the data returned is in the form of iEnumerable and hence we need to convert it to a List explicitly.

Solution

It can be solved by simply adding the ToList() property to the DataSource.

directoryListView.DataSource = users.ToList();

Read-Revamping Web Applications Part-8 : Upgrading to RadListView

Revamping Web Applications: Adding DAL (Data Access Layer)

Read – Revamping Web Applications part 5: Proposed Enhancements

As a part of following best practice we need to separate the data access from our existing project. Here, we talk about how we create an ORM (Object-Relational Mapping) and create a separate DAL.

Prerequisites

  1. Remove any Projects which might be unavailable.
  2. We must reconfigure our Connection String to the localhost within Web.Config file.
  3. Any connections to the TFS server shall be currently closed, because our development will be focused initially on local server.
  4. Build the Solution and execute it to check for any errors exist prior to the changes.

To begin with the process we add a class library to the existing EventNetworking (EN) web application.

  1. In the Solution Explorer tab, right click on ‘Solution’ and Add -> New Project
  2. Create a new ‘Class Library’ and name it “EventNetworking.Data”imageMake sure to change the target framework similar to the same version as the existing project. This is a very common mistake that a developer encounters.
  3. Right click on EventNetworking.Data->Properties. In our case we need to change the Target framework to 4.5Next we need to add an App.Config file and set the “ConnectionStrings”.
    We might get the following Output when adding the App.Config
    “Could not parse the configuration file. The error message is: ‘Could not find file ‘D:\Telerik\ZipFiles\EventNetworkCS\EventAdmin\Web.config’.’. Try editing the file manually and then saving it.”
    We should copy the connection string from Web.Config file of the existing project.
    Once we have done that, we again need to go to the Properties of new project and check the “Settings” tab to see if the connection string has been validated.
  4. Now we will transfer the existing data layer file to our new project. Transfer the “Networking.dbml” from “EventNetworking” project to EventNetworking.Data. DBML stands for DataBase Markup Language. The DBML file represents the data model for a LINQ to SQL project – it’s used to generate the C# code for the various entities. And build the “EventNetworking” project to get a list of errors. These errors have occurred because we have moved the DBML file to another project.
  5. To resolve the above errors, first we need to add a reference to the EN project.
    Right click the “EventNetworking” and Add Reference -> Projects -> Select “EventNetworking.Data”. image
    Next, we will have to refactor the code as all the data links have been shifted from its current location to a new project. clip_image001
    Select “using EventNetworking.Data;” for all such errors.
    Rebuild the project to remove errors depending on the above dependency.
  6. We create a new class within “EventNetworking.Data” named “ENData.cs” and copied all the dependent files from “Utilities.cs” within “EventNetworking”.
    We also have to add references in the project for the following assemblies:

    using System.Data.Services.Client;
    using System.Data.Entity;

    image

  7. Remove Utilities from the EN project. Don’t forget to build the project and check for silly errors. Shortcut to build the “current project” is Ctrl+Shift+B. We would still see some error. These errors are produced because there is a discrepancy between the TaskList as a class and a file. So wherever we get an error saying such an element does not exist. Append the using statements with:using EventNetworking.Data;
    using DataEntities = EventNetworking.Data;What these two lines would do is help differentiate between the TypeCollision caused by TaskList as file from the current project and TaskList as class from EventNetworking.Data. How to do that:
    Instead of

    TaskList[] tl = new TaskList[2];

    we alias

    DataEntities.TaskList[] tl = new DataEntities.TaskList[2];

    and make the above changes at all places where TaskList is being referred as class. Now we are left with around 20 errors and all of them having the same construct.
    We will have to make these changes in more than one aspx file.

  8. Finally, we have resolved all the build time errors. The build is a success but there is a runtime error which still lingers.image

This occurs because, we have moved the data access layer to a new project and modified the direct references. But we are still left with the most important reference which is mapping Linq to SQL.
To do so, change the property “ContextTypeName” from the “asp:LinqDataSource” control which is defined as:

ContextTypeName="EventNetworking.NetworkingDataContext"

to

ContextTypeName="EventNetworking.Data.NetworkingDataContext"

Make changes to all the LinqDataSource control in all the aspx files. Build the project and we should be left with neither compile time nor runtime errors.

Conclusion

We have managed to create a separate DAL (Data Access Layer) and reproduce it into a new project named “EventNetworking.Data”. This blog post explains the various errors we faced while we moved the data layer from one project to another and how to resolve these issues.

Read-Revamping Web Applications Part-7 : Adding DAL (Data Access Layer) Part 2

Revamping Web Applications: Proposed Enhancements

Read – Revamping Web Applications Part-4 Performance testing

Read – Revamping Web Applications Part-3 Software Architecture

Read – Revamping Web Applications Part-2 Features

Read – Revamping Web Applications Part-1 Overview

This post talks about enriching the Event-Networking web application. The enhancements have been categorised into following:

1. Improving UX (User Experience)

2. Improving Functions

3. Improving Performance

4. Multi-Platform

UX Improvements

From my point of view the current user experience is too voluminous. The css needs to be restructured to use latest standards. All the margins have to be changed from fixed to dynamic so that no space is left unused on the user screen, when the web application is shared amongst different devices. The webpage will be enhanced to Responsive Design.

The input controls like buttons, drop-down list and others need to be smartened and made noticeable. To be specific let’s begin page wise:

  • Directory
    1. The photos need to be of the same size for all the delegates. For people who do not set their pic will have different default image for men and women.
  • Session
    1. The data is currently being filtered in the ListView. We will replace this control with the RadListView which is a part of a bundled form of “RadControls for ASP.Net AJAX” toolkit.
    2. We will provide paging option in the list view.
  • Inbox
    1. Inbox will carry any updates and notifications for the events delegate has subscribed to.
    2. Add a link to Tasks so that contents of a message can be directly filled in the tasks and create an instant task for that.
  • Tasks
    1. Empower user to add priority to tasks with different symbols to give a better visual appeal.
    2. Modify the calendar controls for better presentable view.
  • My Profile
    1. Currently this page is too long with the options to “Add Your Blogs”, Personal details, etc. all in extended view. This page needs better layout.
  • Login and Signup
    1. The basic functionality of Forgot My Password needs to be added.
    2. While Signup, option of filling in your complete profile should be provided and whether the delegate wants to be displayed as public.

Functionality Improvements

This Event-Networking is presently made for just one event. We have to extend it for non-singular event. One of the major changes will be ajax-ifying the data controls. This would help us improve drastically on performance as now only partial-page rendering will happen.

  • Directory
    1. The aspect of social gaming in the web application is not fool-proof. A person can easily figure out the method of scoring. Thus it should be based on more general parameters and updates to each delegate should be fired only once a day.
  • Session
    1. Provide filtering on date, duration, title and venue columns. Currently, only sorting is possible.
    2. Add a pager index so that a user can track his movements. This can be implemented using Telerik AJAX Navigation Components.
  • Inbox
    1. Currently, there is no paging as expected. We should make it more intuitive. There are two ideas to remodel.
    First, to have a tab in the left and message being displayed in the right pane. Second, whichever message is selected, that will get expanded and a new control will be added to the existing list generated.
    2. We will put following in the navigation menu such as Message, Contact Request, Meeting Request, Sent and Draft as sub-menu added instead of clustering all of them in the inbox.
  • Tasks
    1. The task-list should have filtering and sorting capabilities and Add New Task should be another navigational tab under Tasks. This page has the maximum white space when you create a task.
  • My Profile
    1. We will provide tabs like View, Update, Remove and Change Password.
    2. Currently, we do not have “delete” option once you add links to your blogs. There is only an update option. This needs to be changed.

Improving Performance

We have already done the functional testing of our existing web application in our previous post. It defines the benchmark for our application. As we improve the UX and functionalities we keep comparing our modifications. This will help us explain whether we have improved just on user experience or also gained on time constraint. Two important features we are looking forward to implementing minification and bundling which would help the speeding.
– We will minify the style sheets and scripts. We will also bundle the style sheets and scripts.

  1. Object Relational Mapping (ORM).
    We are currently using Linq to SQL as our partial ORM. But it has a greater overhead. We will deploy OpenAccess ORM which will provide us a Data Application Layer (DAL).
  2. ORM Caching.
    Another improvement would be to cache static data. This can be achieved using L2-Caching which is a part of OpenAccess itself. It increases data fetch drastically.
  3. Caching.
    We will be using page caching or output caching as per the need.

Multi-Platform

We will generate companion hybrid app for different platforms. There is potential to generate Windows 8 and Windows Phone 8 application.

Conclusion

This post concentrates on improvements, enhancements and extensions for the Event-Networking web application. We will look at each one of these aspects and explore further.

Read-Revamping Web Applications Part-6 : Adding DAL (Data Access Layer)

Revamping Web Applications: Performance Test

Read – Revamping Web Applications Part-3 Software Architecture

Read – Revamping Web Applications Part-2 Features

Read – Revamping Web Applications Part-1 Overview

We are in a process of revamping the application. To understand whether we have developed a better application than already existing, we need to set benchmark on the functional aspect and performance of the application. To set the benchmark, we need to perform various kind of tests like functional test, performance test etc.

We will start with setting performance benchmark. For that we need to do PERFORMANCE TESTING of existing application. We are going to use Telerik Automated Testing tool “Test Studio “for this purpose.

Test studio can perform following types of testing

  1. Automated functional test of web application
  2. Performance test
  3. Load test
  4. WPF test

Learn more about Test Studio here

Using Test Studio Performance benchmark can be set in three steps

  1. Create a valid functional test
  2. Configure performance counter
  3. Execute performance test

Here is the screenshot of how the Test Studio defines it.

clip_image002

Step 1: Automated functional test of web application

In order to create valid functional test, we recorded the test on existing application as following,

1. Open Test Studio

2. Configure whether its trial and purchased.

3. Now let’s create a new project for our Event-Networking (EN) application
Go to File -> New
or just click Create New Project in the centre of the screen

4. New Project Pop-Up window would appear
specify the Project Name. Here we have named it “ENTest
specify the Location to store the Projects. Here we have chosen the default path which is “C:\Users\Shantanu\Documents\Test Studio Projects

clip_image002[6]

5. Getting started window would appear. To explore more about Test Studio click here.

6. Now we are under Project tab.
Right click the project node created by default and click Add New Test.

clip_image003

7. Next we are on Select Test Type window. We will select Web Test option because we are creating a performance testing module for testing of our web application. Here let’s name it “AttendeeProfile_IE&Chrome” as we will be doing the performance testing on both the browsers.

8. Once the Web Test has been added to Project, hover over it. This will show a menu with Record and Play button. Press Record button. This will open Internet Explorer. Here we enter the URL of our website needed for testing. Then perform all the tasks to be recorded and tested. Here we have taken the attendee-list which is the default page of the web-application.

clip_image004

clip_image006

9. After recording all the steps close the Internet Explorer and all events will be recorded and now we will enter the Test tab.

clip_image007

10. From the Quick Execution toolbar select a browser and Run the testing environment. This process will let you know whether all your event are being executed successfully in that particular browser. Here Internet Explorer browser is used.

11. Once the testing is done it will prompt you to save it. If all the events have passed, a check sign would appear left to all the events. If the process has terminated without completing then a cross sign will appear at the event where the execution has stopped and the rest of the events would have a negative sign depicting that part is untouched. To save the Web Test or not depend on the developer but I recommend saving it.

clip_image008

12. While recording, we sometimes need to simulate some of the events to be real, like clicking button, selecting options from drop-down lists, typing etc. We can do so by selecting SimulateRealTyping for texts and SimulateRealClick for buttons. These are the two simulations we have used in our current test.

clip_image009

Step 2: Configure Performance Counters

Within the Test Studio in the menu bar you will see the Performance tab. Here we need to configure the setup parameters and performance counters.

1. Click Configure button.

2. Give you settings a name. I have named it“My Computer”. Check the Gather Performance Data and click Add Computer. In the Computer section, enter the IP address of your website which you want to test and click connect. Here 127.0.0.1 is used because my web application is on the localhost. 127.0.0.1 which defines the IP of my own PC. You should get a confirmation in red, left to the button.

clip_image002[8]

The most important part is to select the parameters which is under the Performance Counters tab. The counters used in this project are shown below. You even have the functionality to calculate the Time To First Byte (TTFB).

clip_image004

Step 3: Execute Performance Test

1. The next and final step is to start the Performance testing by clicking the Quick Run button.

clip_image002[10]

Internet explorer will open again but this time you do not have to type or click anything as the Web Test is automated. Once the IE closes we will see the following window.

clip_image004[5]

This is an intermediate screen and will disappear in few seconds.

2. Next up is the actual overview of all the events. On execution we can see time taken by each test step or user actions. This view only shows the Total time taken at server and client side and the size of the packets of each event. To get the details of each event you can either click the Details button in the Ribbon categorized under Views or simply click the event to get individual data.

clip_image006[5]

clip_image008[5]
3. To see graph of all the event we need to click on Select All tab. We could also get performance over a range of restricted timeframe.

4. Here the performance testing is executed for all the functions from the application. The right-pane shows the performance counters. These parameters are plotted on X-Y (Red-Orange) axes graph with X being the ‘Seconds from beginning of the test’ and Y being “Percentage”. The plotted graph remains static on the screen whereas the function in the left-pane are scrollable. This will help depict the functions which are causing spikes by synchronizing the timeline with the graph; as X axis is same for both constraints.

5. Next we have a History tab which keeps a track of all the testing done till date and all the reports generated. Here, we can see different Test Time and a graph plotted with X-Y axis being Profile timeline and Test Time. This gives us a general idea of how our existing application is behaving.

We can also compare two Profiles at different times and look for the common loopholes to be solved.

We could set one of the profiles as the benchmark for all the other profiles just by clicking the hour-glass symbol on the left.

clip_image010

Conclusion

In this post we set a benchmark by executing Performance Testing of the web application and in the next blog we will talk about possible enhancements and extensions which can be made in the existing web application.

Read – Revamping Web Applications Part-5 Proposed Enhancements

Revamping Web Applications: Software Architecture

Read part one- Revamping Web Applications Part-1 Overview

Read part two- Revamping Web Applications Part-2 Features

We have talked about the Event Networking web application. To start revamping we need to understand the architecture of the existing web application.The current implementation does not follow any architectural patterns like Separation of Concerns, Single Responsibility, Layered approach etc. No planning was done before building the application. We can say that top down approach was followed to develop the current web application. Top down means that the features were added as and when the developer thought it was required. The current application is like a forest of tangled codes.

The current architecture of the application is shown below. The architecture may look like 3 tier in the beginning but really is a 2 tier due to the absence of the Business Objects.

clip_image002[5]

The layers are defines as follows:

1. Presentation Layer: A user can directly access this layer. It comprises of the ASP.Net Web Forms files i.e. aspx. The look and feel and user interface of the web application is also built here.

2. Business Access Layer: BAL encapsulates the business rules and data validation. All the code behind files which we have in our project along with the WCF Data Service are included in this layer. It comprises of the aspx.cs files.

3. Data Access Layer: DAL is the layer to access external data and interact with it. It executes as per the need of the BAL. This layer is the interface between the user and the real Data. The ORMs here include Entity Framework and Linq to SQL.

4. Data: The last layer represents the physical data with which the application interacts. We use SQL Database here. Both Linq and Entity Framework stores and retrieves the data from SQL.

A distinguishing feature of the application is the presence of the WCF Data Service. The Data Service serves to expose the application data to external clients e.g. mobile devices. The Data Service is a read only service and operates independently of the web application. However, it still uses the same database for its data.

The web application doesn’t have the critical functionality of logging, local storage, monitoring and caching.

Conclusion

In this post we have understood the existing architecture. Next, we will perform a web test and discuss various counters and results of the test.

Read- Revamping Web Applications Part-4 : Performance Test

Revamping Web Applications Part-2

Read part one here – Revamping Web Applications Part-1

The web application we have chosen is about social networking at events.

This post briefs about the existing features of the application.

clip_image002

1. Directory– Displays all members attending a particular event
2. Sessions- Displays various event-schedules and their track
3. Inbox- Displays messages and request you receive
4. Tasks- Displays all the tasks
5. My Profile- Displays personal information

Directory

clip_image004

All the delegates registered are visible in a list form. A specific genre of audience can be filtered on the basis of different parameters such as City, Country, Tag, Designation, Company, Role and experience.

You can view the profile of a delegate and connect to them. In their public profile you could see job description and links to their various social networks. Once you are connected to another delegate you will also have the privilege to see their personal details.

The web application has a feature of social gaming and the top five scorers are displayed on the home screen.

Sessions

clip_image006

All the events/talks/workshops along with their date, time, venue and track are shown. Further information about speakers and other attendees can be viewed based on individual talks.

You can explore an event and add it to your personal list of event. There is a sub-tab “Cart” under sessions’ tab which displays the events you have registered for. The Cart would help notify the attendees about last minute changes or pre-requirements for the event (if any).

Inbox

clip_image008

Other than receiving text-messages you interact with other delegates by sending meeting requests. Other types also include contact request.

The person can view sent items along with the timestamp if needed.

Tasks

clip_image010

The tasks are meant to create a list of jobs or reminders for self. A task can be categorised with options like task created, completed, cancelled or deferred. Task url specifies the micro formats.

My Profile

A person can view and update his profile. The profile includes name, DOB, address, designation, years of experience, personal contact details. You can change your account password. Set your url feeds for your blogs and social networking websites to connect with delegates.

clip_image012

You can also define tags which would help delegates find you easily based on various technologies. image

Conclusion

In this post we have discussed on the key features of the application. Next we are going to elaborate on the testing results and its architecture.

Read – Revamping Web Applications Part-3 Software Architecture

Revamping Web Applications Part-1

Web applications have been around for quite some time. Generally, developers have been handed applications to enhance and extend with new functionality. This series of blog posts aims to showcase revamping/enhancing an existing web application.

image

The web application that we are going to select is a simple application that has been used for creating ad hoc social networks at events. The application enhances the utility of an in person event by providing opportunities of structured networking amongst attendees. The application presents a searchable directory of attendees. Sessions being conducted at the event are listed for delegates to build their personalised schedules. Once an attendee logs-in the application with the verified credentials he can communicate with other attendees and setup meetings with them. The organisers can benefit by making last minute changes to the sessions/ speakers at the event. Aspects of social gaming are included in the application to make it more interesting for the attendees.

Enhancements to the application can be categorized as follows:

  1. Improving User Experience
  2. Improving Functionality
  3. Improving Performance
  4. Multi-platform Support

The enhancements to the website will be done over 4 months in the following phases:

Phase 1:
Preparing a local working copy of the web application with connectivity to the database
Document the web application with the current features
Propose enhancements and secure sign off on the same

Phase 2:
Select Tools to use for enhancements
Document the performance of web application by:

  • Application Profiling
  • Performance Testing

It will be important to select the correct metrics for the web application

Phase 3:
Implementing the modifications proposed in the previous phases

  1. Upgrading to RadListView
  2. Converting GridView to RadGrid
  3. Working With RadWindow
  4. Implement RadScheduler
  5. Implement RadAutoCompleteBox

Make sure that modifications don’t introduce new bugs in the applications

Phase 4:
Run test suites and remove bugs if any
Document the performance of the enhanced web application by:

  • Application Profiling
  • Performance Testing

Highlight the changes in the selected metrics.

By using this application, the attendees benefit from interacting with targeted audience and building their professional circle more effectively.

Conclusion

In this post we have seen objective of the application and in next part we will discuss the possible enhancements and new features which can be added.

Read – Revamping Web Applications Part-2 Features