
We have finished the ORM deployment with our previous post. Now we are ready to start migrating the default controls to Telerik controls. In this post we will take a look at converting asp:ListView to telerik:RadListView and we would learn about telerik:RadDataPager which will replace the asp:DataPager.
Add RadListView
For this exercise we will take Directory page from our Event Networking application. Remove the existing ListView control and add a RadListView control from the Telerik AJAX Components.
Note: After adding the control rename the ID property same as your asp:ListView ID property. We might see an error because the underlying type has changed. The error occurs because initially the same id was linked to asp:ListView. The error will eventually disappear. Again, we need to first remove the already existing methods defined for the ListView from the aspx.cs i.e. codebehind page. Now copy the rest of the properties from ListView. We need to add the property DataKeyNames to our RadListView. Now we copy all the templates from asp:ListView.

If you run the application RadListView should have been populated by the data, as the data binding has already been handled at the Page_Load event (explained in our previous blog <Hyperlink>).
Your data is now populated but currently there is no paging option. To provide paging add the property AllowPaging=”true” to RadListView.
Add Event Handler to RadListView
To add an event, type the name of the event and click <Create New Event>. So add an event handler for OnItemCreated. We are using this event to populate the pictures of each attendee.
We had the following code under asp:ListView event:

Lets tweak the existing code for the RadListView:
NOTE: Do not forget to add “using Telerik.Web.UI;” in your aspx.cs
protected void directoryListView_ItemCreated(object sender, RadListViewItemEventArgs e)
 {
var item = e.Item as RadListViewDataItem;
if (item != null)
{
var userId = item.GetDataKeyValue("UserId").ToString();
var u = (from x in uu
where x.UserID == int.Parse(userId)
select x);
if (u.Count() != 0)
{
((Image)e.Item.FindControl("ProfileImage")).ImageUrl = u.First().URL;
}
 }
 }
Add RadDataPager
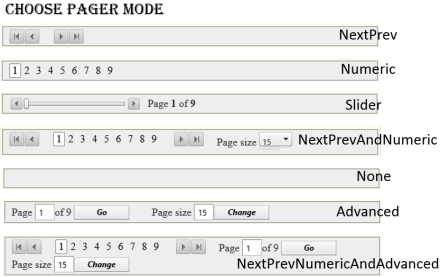
If you use ASP pager, you only have the numeric option. But using RadDataPager gives you lot more option.


The main aim is to get a better UX and hence we replace asp:DataPager with telerik:RadDataPager. We changed the following properties PagedControlID=”directoryListView” and PageSize=”15″. Next we add a field and within it we insert the <telerik:RadDataPagerSliderField /> . This provides us a natural gesture to slide through various pages.
To do it declaratively switch to Design view and select the RadDataPager. Then expand the smart-tag and change the PagedControlID and the Pager Mode to NextPrevNumericAndAdvanced. This would allow users to do more than just select the page numbers.
Error Explanation
But if we had copied the same code to our RadListView item created event it throws following error:
‘Telerik.Web.UI.RadListViewItem’ does not contain a definition for ‘DataItem’ and no extension method ‘DataItem’ accepting a first argument of type ‘Telerik.Web.UI.RadListViewItem’ could be found (are you missing a using directive or an assembly reference?)
This occurs because the “e” defines the event argument which at runtime has type RadListViewDataItem but has RadListViewItem at compile time. Hence we need to explicitly need to typecast it into RadListViewDataItem and then we can use it in a similar way.
Why Change it after all:
In case of customisation RadListView gives us far better UX and functionality.
The dataPager is static for ASP control whereas we have many more features and modes in which we can operate while using RadDataPager varying from just numeric pagers to smooth sliders gesture.
The following image gives us an overview of how the ASP control looked. And in the following image we can the great UX and the additional features available with us.


Read- Revamping Web Applications Part-9: Working with RadWindows & Converting GridView to RadGrid
