Codeless File Uploading to Everlive using Telerik’s Cloud Upload for ASP.NET AJAX

This content was originally posted on Telerik’s blogs here.

Overview:

Telerik’s ASP.NET AJAX Cloud Upload is a brand new control in the arsenal of ASP.NET controls which provides you the ability to support uploading of files to Cloud providers. What’s best about this control is, you don’t have to write any code i.e. this is codeless uploading of files. If this excites you, then read on.

About Cloud Upload for ASP.NET AJAX:

RadCloudUpload. is part of the RadControls for ASP.NET AJAX suite and at the moment supports the following cloud providers: Amazon S3, Azure Blob Storage and Everlive (Telerik’s Backend as a Service) .

In rest of the sections, we will see how to use Cloud Upload with Everlive.
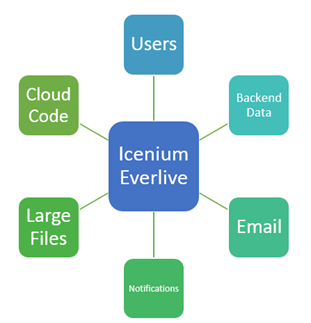
What is Everlive?

Everlive is Telerik’s Backend as a Service or BaaS. Everlive links your application to backend cloud storage and provides User management, push notifications, Social networking services integration etc. Some of the benefits are:

  • One portal to manager your entire app background
  • Data & file security
  • Target every mobile platform with ease
  • Frictionless login with social authentication services
  • Push, Email and SMS notifications

You can know more about Everlive at http://telerik.com/everlive

Creating Everlive Project to store files:

You can sign up for free and you get a developers account which gives you unlimited API calls, 10K push notifications, 100MB of DB space, 1GB of file storage and 5GB of bandwidth. Once you log into your Everlive account, you can create a new project. Click on “Create a Project” from the Everlive dashboard.

el1

In the “New Project” dialog, enter project name, description, select “Start from scratch” radio button and click on “Create Project” button.

el2

Here is the project dashboard once Everlive creates our new project:

el3

Notice that, Everlive has out of the box added Files, Users and Roles entity types. Files entity type is like container to which you can readily add files. Click on Files link on the left hand menu to look at Files screen:

el4

You can click on “Upload Files” to upload a new file from the portal itself.

API Keys for accessing Everlive:

In order to integrate with Everlive i.e. uploading to or reading files from Everlive from any application, you will need to have access keys. You can get access keys to your projects, by clicking on “API Keys” in your project dashboard. Note down the application name and the application key. We will need this information when we integrate with RadCloudUpload.

el5

Create a Web Application:

Fire up a Visual Studio 2013 and select File > New Project. In web templates select “RadControls Web Application”, give it a name, location and click Ok. Visual Studio will go ahead and create our project. By default a default.aspx page is already added to the project. We will use this page for the demo purpose.

Adding Everlive Client Library:

To integrate with Everlive Cloud Storage, we need to reference the assembly Telerik.Everlive.Sdk.Net35dll. You can download the files from here. Download the zip file, extract it and add reference to Telerik.Everlive.Sdk.Net35.dll in the web project. We also need Newtonsoft.Json.dll, so add a reference for that too.

Using the Cloud Upload control:

From the tool box drag and drop RadCloudUpload control on to Default.aspx page. Access the smart tag of the control and choose Everlive as the provider type. Then click on the “Open Everlive’s Configuration Wizard”.

el6

<telerik:RadCloudUpload ID="RadCloudUpload1" runat="server" ProviderType="Everlive" />

In Configuration Wizard dialog enter Everlive API Key.

el7

Specifying the Uncommitted Files Expiration Period (hours), you could easily configure the time, after which the unprocessed files will be removed from the storage.

This will add configuration setting in the web.config file:

<telerik.web.ui>
<radCloudUpload>
<storageProviders>
<add name="Everlive" type="Telerik.Web.UI.EverliveProvider" apiKey="<YOUR API KEY>" uncommitedFilesExpirationPeriod="1" />
</storageProviders>
</radCloudUpload>
</telerik.web.ui>

RadCloudUpload in Action:

We are all set now. Just run the application. You will see a select button. Click on the select button to select a file. As soon as a file is selected, the upload will start. Here is the snapshot of file being uploaded:

el8

And here is the snapshot of file upload being finished:

el9

At this point if we jump back in to Everlive project dashboard and Files section, you should see the file we just uploaded. Here is the screenshot of the Files on Everlive:

el10

Conclusion:

That’s it. We are done. I did not write single line of code but was able to upload files to Everlive file storage. That is as easy as it can get with Telerik’s Cloud Upload for ASP.NET AJAX. Give it a spin or check out the demos and let us know what you feel about this control.

How to do CRUD operation on Telerik Everlive data from .NET Application

Learn more about Telerik Everlive here

You can consider this post as second post of the series. In first post of this series we learnt about fetching data from Telerik Everlive in a .Net application.

How to fetch data from Telerik Everlive in a .NET Application

In previous post we touched upon following,

  • Creating client side representation of Everlive content type
  • Adding required assembly to work with Everlive in a .Net application
  • Fetching data from Everlive in .Net application.

To create an item also we need client side representation of Everlive content type. You can create a single item as following,


static async void CreateData(EverliveApp productApp)
 {
 var productToInsert = new Products
 {
 ProductName = "sugar",
 IsContinued = true ,
 Quantity = 100,
 UnitInStock = 23,
 UnitPrice = 20 ,

 };

await productApp.WorkWith().Data<Products>().Create(productToInsert).ExecuteAsync();
 Console.WriteLine("Product Inserted " + productToInsert.Id);
 }

In above code,

  • We are creating item to be inserted. This item is instance of client side representation (class) of Everlive content type. In this case we are creating object of Products. This will pass as parameter to Create function.
  • Asynchronously we are inserting an item by calling Create function. This function takes instance of Products as parameter. This instance will get inserted as an item to Telerik Eeverlive

So these simple steps you need to follow to insert an item from .Net application to Telerik Everlive content type.

Next you can update an item by first fetching it on basis of id or any other column. Once data is fetched at the client application , you can update that and using Update() function save data back to Everlive server.


static async void UpdateData(EverliveApp productApp)
 {

var productToUpdate = await productApp.WorkWith().Data<Products>().GetById("76a49eb0-67ad-11e3-8374-496a59d093be").ExecuteAsync();
 productToUpdate.ProductName = "Sugar and Salt";
 productToUpdate.IsContinued = true;
 await productApp.WorkWith().Data<Products>().Update(productToUpdate).ExecuteAsync();

}

In above code,

  • We are fetching an item to update
  • Updating required columns
  • Using Update function saving data back to Everlive

These simple steps are required to update an item from .Net application.

Deleting an item is simplest. You need to pass id of item to delete that. If you want you can delete an item on other projection as well. In further posts we will discuss about that. To keep it simple we can delete an item on basis of id as below,


static async void DeleteData(EverliveApp productApp)
 {

var idtoDelete = "76a49eb0-67ad-11e3-8374-496a59d093be";
 await productApp.WorkWith().Data<Products>().Delete(idtoDelete).ExecuteAsync();

}

These simple steps are required to perform CRUD operation from .Net application on Telerik Everlive data. I hope you find this post useful. Thanks for reading.

How to fetch data from Telerik Everlive in a .NET Application

Learn more about Telerik Everlive here

To start with and put in a single sentence Telerik Everlive in Backend as a Service offering from Telerik. In this post we will take a look on fetching data from Everlive in a .Net application. We will consider using .Net Console Application. However concept will be same for almost all other kind of .Net applications like WPF, Windows Apps.

To start with download .NET SDK from here . On download page make sure that you have selected .NET platform. Download and extract folder. You should get two dll. You need to add these dll in .Net project.

image

To add dll in project right click on Reference in project. From context menu select option of Add Reference. You need to add above two extracted dll in the project.

image

After adding required references next step is to create class which will represent Everlive content type in the client application. That class can be created as following ,


public class Products : DataItem
 {
 private string productName;
 public string ProductName
 {
 get
 {
 return this.productName;
 }

set
 {
 this.productName = value;
 this.OnPropertyChanged("ProductName");
 }
 }

private int unitPrice;
 public int UnitPrice
 {
 get
 {
 return this.unitPrice;
 }

set
 {
 this.unitPrice = value;
 this.OnPropertyChanged("UnitPrice");
 }
 }

private int quantity;
 public int Quantity
 {
 get
 {
 return this.quantity;
 }

set
 {
 this.quantity = value;
 this.OnPropertyChanged("Quantity");
 }
 }

private bool isContinued;
 public bool IsContinued
 {
 get
 {
 return this.isContinued;
 }

set
 {
 this.isContinued = value;
 this.OnPropertyChanged("IsContinued");
 }
 }
 private int unitInStock;
 public int UnitInStock
 {
 get
 {
 return this.unitInStock;
 }

set
 {
 this.unitInStock = value;
 this.OnPropertyChanged("UnitInStock");
 }
 }


}

There are couple of points you need to keep in mind,

  • Class name should be same as Content Type name
  • Class should inherit from DataItem. It is not a must condition though.
  • Properties name should be same as columns of Content Type

After creating client side class, you can either synchronously or asynchronously fetch items from Everlive. Items can be fetched asynchronously as below,


static async void FetchData(EverliveApp productApp)
 {
 var products = await productApp.WorkWith().Data<Products>().GetAll().ExecuteAsync();

 foreach (var item in products)
 {
 Console.WriteLine(item.ProductName + item.UnitPrice);

}
 }

Important point is that you need to pass client side type (class) in this case Product to fetch items. You need to make an instance of EverliveApp class passing your app key in the constructor.


static void Main(string[] args)
 {
 EverliveApp productApp = new EverliveApp("yourkey");
 FetchData(productApp);
 Console.ReadKey(true);
 }

This is all you need to do to fetch elements from Telerik Eeverlive in a .Net Console Application. I hope you like this post. Thanks for reading.

How to send Email using Telerik Everlive from Cross-Platform Mobile Application

Have you ever come across scenario in which you need to send an Email from your app? There are various ways you can do that. Some of them are as follows,

  1. Sending Email using PhoneGap API
  2. Sending Email using HTML5
  3. Delegate Send Email task to a server

In this post we will learn to send Email using Telerik Everlive. Everlive is a cloud based Backend as a Service. It provides you many functionalities using Email Services. You can send Email from your app using Telerik Everlive.

image

There are two components in Everlive Email Service.

  1. Email Template
  2. Send Email

Before sending Email, you need to create Email Template. You can create Email Template in two ways,

  1. Using code in your app
  2. At portal

You need id of Email Template to send Email. Okay so in this post we are going to create Email Template in portal. To create Email Template login to portal and you will get option to create Email Template.

image

As you see there are four default Email Templates already available in Telerik Everlive. To create new template click on Add an item and at right hand side you get option to create new Email Template. After successful creation of new Email Template you can view that in Template List. You need ID of the Email Template at code to send Email from App.

image

Make sure that you have copied API key and Account Key of application. You need this to send Email using code. You can get keys by clicking on API KEYS in left options.

Okay so we have done configuration at portal. We created Email Template. Next we need to send Email from app. We can send Email using REST API.

Very first you need to create recipients. You can create this as JavaScript object. In below code I am setting two Email addresses to send in TO.


var recipients = {
 "Recipients": [
 “Dhananjay.kumar@telerik.com”,
 “debugmode@outlook.com”
 ],
 "Context":{
 "SpecialOffer":"Happy New Year”
 }
 };

Once you have created recipients you need to make a AJAX post to send an Email using Telerik Email. You can send an Email using code below.


$.ajax({
 type: "POST",
 url: 'http://api.everlive.com/v1/Metadata/Applications/PUTYOURAPIKEY/EmailTemplates/PUTYOUREMAILTEMPLATEID/send',
 contentType: "application/json",
 headers: { "Authorization" : "Accountkey PUTYOURACCOUNTKEY" },
 data: JSON.stringify(recipients),
 success: function(data){
 alert("Email successfully sent.");
 },
 error: function(error){
 alert(JSON.stringify(error));
 }
});

Above code is very simple,

  • In URL you need to set API key and ID of Template
  • In headers put account key of application
  • In data set recipients
  • On success you can set a JavaScript function as callback
  • On error you can set a JavaScript function as callback

That’s it. You need to do only this much of work to send an Email using Telerik Everlive from Cross-platform application. I hope you find this post useful. Thanks for reading.

How to fetch Data from Telerik Everlive using REST API in a Web Application.

Learn more about Kendo UI here

Learn more about Icenium here

In this post we will take a look on fetching data from Telerik Everlive using REST API and use it in a web application. In web app we will be using Kendo UI DataSource to bind data to Kendo UI web ListView.

We are going to learn following,

  • Fetch data from Telerik Everlive using REST API
  • Create Kendo DataSource from returned data
  • Bind data to Kendo UI ListView

Okay so to keep it simple, I have created a simple Content Type Products in Everlive project as below. Permission of this Products content type is set as Public.

clip_image001

To fetch data from Telerik Everlive using REST API, Simply you can fetch data from Icenium Everlive using a AJAX call. You need to provide

  1. URL of the Everlive project with API key
  2. Content type name should be appended in URL. In this case we have appended Products (name of content type) in URL.
  3. Set type as GET
  4. You need to set two callback function. One Callback function will be called on success and another on error.

So data can be fetched using below code. You may want to notice that you need to replace yourapikey in URL with API key for your Everlive project.


$.ajax({
 url: 'http://api.everlive.com/v1/yourapikey/Products',
 type: "GET",
 headers: {
 "Authorization": "Bearer ${AccessToken}"
 },
 success: function (data) {
 BindDataToListView(data);
 },
 error: function (error) {
 alert(JSON.stringify(error));
 }
})

BindDataToListView is callback function and this function will be called on success fetching of data. In this function you need to create Kendo UI DataSource from returned data. Before we do that let us examine what value we get from Everlive server.

clip_image001[6]

You should get below output in browser console,

clip_image002

You can see that in output you are getting count and data in Result property of the returned Object. So you can create Kendo DataSource as follows,

function BindDataToListView(e)
{
 console.log(e);
 var dsource = new kendo.data.DataSource(
 {
 data: e.Result
 });

}

Again in Console log you can view that Kendo DataSource has been created from returned data.

clip_image001[8]

Next we need to create Kendo Template and Kendo ListView. We are going to create a very simple template as follows,


<script type="text/x-kendo-template" id="producttemplate">
 <div>
 <h2>#:ProductName# <br/>
 <h3>#=UnitInStock# #:UnitPrice#</h3>
 </div>
</script>

And to create Kendo ListView create a HTML div as follows,


<div id="listView"></div>

Again let us go back to callback function BindDataToListView() and convert div to Kendo ListView and bind already datasource

function BindDataToListView(e)
{
 console.log(e);
 var dsource = new kendo.data.DataSource(
 {
 data: e.Result
 });
 console.log(dsource);

$("#listView").kendoListView({
 dataSource: dsource,
 template: kendo.template($("#producttemplate").html())
 });

}

This is it. We are setting datasource and template after converting HTML div as Kendo ListView. When you run this web application you should get output as below,

clip_image002

In this way you can fetch data from Telerik Everlive using REST API and use in Kendo UI Web. I hope you find this post useful. Thanks for reading.

How to insert data in Icenium Everlive using KendoUI DataSource

Read about Icenium here

Read more about Kendo UI DataSource here

Icenium Everlive is Backend as a Service offering from Telerik. In this post we will take a look on how easily KendoUI DataSource can be used to fetch data from Icenium Everlive.

Read : How to fetch data from Icenium Everlive using KendoUI DataSource

To start with, in Everlive I have created a content type with name Session. In Everlive Content type represents a data type or loosely I can say it represents a table. I have created content type with name Sessions. Now we need to insert and item in Sessions content type using Kendo UI DataSource.

Very first we need to add reference of Everlive as below,


<script src="scripts/everlive.all.min.js"></script>

After adding reference create instance of Everlive as below. You need to pass Everlive application key as parameter while creating instance of Everlive. You will find application key on Everlive portal.


var el = new Everlive('W1286lVOH0DXYZ');

Now you will be amazed seeing how easily you can insert item in Session content type using Kendo UI DataSource. Before creating an item or inserting an item, create Kendo UI DataSource as following.


var sessionDataSource = new kendo.data.DataSource({
 type: 'everlive',
 transport: {
 typeName: 'Sessions'
 },
 schema: {
 model: { id: Everlive.idField }
 }

});

While creating Kendo UI Data Source, we need to set following

  • type as everlive
  • In transport typeName as content type name. You need to provide name of the content type which data items you want to fetch. In this case we want items of Sessions content type so typeName is Sessions

Once Kendo UI DataSource is created, you need to create item to be inserted in Everlive . So let us go ahead and create item for Sessions content type as following,


var sessionItemToAdd = {
 'Name': 'Cloud',
 'Time': '09:00-10:00',
 'Level': '300',
 'SpeakerName': 'dj',
 'HallName': 'A',
 'Date': '3rd Oct',
 'Day': 'Day 1'

};

Now you have item to be inserted. Next add this item to DataSource using Add method. After adding that call sync() method on DataSource. You can achieve adding and syncing with Everlive server as given in below code,


sessionDataSource.add(sessionItemToAdd );
 sessionDataSource.sync();
 console.log("data inserted");

Putting above discussion all together, below function will add an item in Sessions content type.


function addSessions() {
 console.log("Entering");
 var sessionDataSource = new kendo.data.DataSource({
 type: 'everlive',
 transport: {
 typeName: 'Sessions'
 },
 schema: {
 model: { id: Everlive.idField }
 }

});
 var sessionItemToAdd = {
 'Name': 'Cloud',
 'Time': '09:00-10:00',
 'Level': '300',
 'SpeakerName': 'dj',
 'HallName': 'A',
 'Date': '3rd Oct',
 'Day': 'Day 1'
 };

sessionDataSource.add(sessionItemToAdd);
 sessionDataSource.sync();
 console.log("data inserted");
 }


This is the way you can add an item in Everlive content type. I hope you find this post useful. Thanks for reading.

How to fetch data from Icenium Everlive using KendoUI DataSource

Read about Icenium here

Icenium Everlive is Backend as a Service offering from Telerik. In this post we will take a look on how easily KendoUI DataSource can be used to fetch data from Icenium Everlive.

Read more about Kendo UI DataSource here

To start with, in Everlive I have created a content type with name Session. In Everlive Content type represents a data type or loosely I can say a table. I have created content type with name Sessions. Now we need to fetch all the items from Sessions content type using Kendo UI DataSource.

Very first we need to add reference of Everlive as below,


<script src="scripts/everlive.all.min.js"></script>

After adding reference create instance of Everlive as below. You need to pass Everlive application key as parameter while creating instance of Everlive. You will find application key on Everlive portal.


var el = new Everlive('W1286lVOH0DXYZ');

Now you will be amazed seeing how easily you can fetch all the items from Session content type using Kendo UI DataSource. Only you need to provide type as everlive and in transport typeName as name of Everlive Content type.


var sessionDataSource = new kendo.data.DataSource({
 type: 'everlive',
 transport: {
 typeName: 'Sessions'
 },
 schema: {
 model: { id: Everlive.idField }
 }

});

While fetching data from Everlive using Kendo UI Data Source, we need to set following

  • type as everlive
  • In transport typeName as content type name. You need to provide name of the content type which data items you want to fetch. In this case we want items of Sessions content type so typeName is Sessions

You can verify in any debugger console that data is fetched from Everlive in Kendo UI DataSource.

clip_image002

Now once you have data at the client side you can use them as of your requirement. You can bind that ListView , GridView etc. I hope you find this post useful. Thanks for reading.

Push Notification on Android device using Icenium Everlive

Download sample used in this blog post from Github

Learn more about Icenium

In this post we will walkthrough working with Icenium Everlive Push Notification on an Android device. This post is divided in three parts from creating Google project to writing JavaScript code to enable notification on device.

Let us follow following steps to get it started with push notification on android devices

Step 1: Configure or Create Google Project

You need to start with creating Google Project. You need Google project ID to enable Push Notification.

  • Navigate to https://code.google.com/apis/console
  • In drop down you get an option to create a new project. From there create a new project
  • After creating project, you will get project number. There are two ways you can find project number, either in URL or on dashboard

image

After creating Google project, from left hand options select API Access. In that go ahead and click on Create a New Android Key. We need Android key at Everlive server side to enable Push Notification

image

After getting Android key next step you need to do to enable Service. To enable that click on Services in left and On Google Cloud Messaging for Android.

image

As of now we have created Google Project.

Step 2: Create and Configure project in Icenium Everlive

To create Icenium Everlive project, navigate to https://www.everlive.com/ . To create new project click on Create New Project on the home page. After successful creation of project go to Settings

image

In Settings select Push Notification from left menu options. We are going to enable Push Notification for Android, so check the check box of Android and provide Android Key created in previous step.

image

Step 3: Create Application

In this step we will create application to work with push notification. We will us EverLive JavaScript SDK. You can download sample Sample App from GitHub here

To start with you need following JavaScript files in your application. You can get these files from downloaded sample.

image

Now to start with, you need EverLive API key of your project and android project number. You will find API key on EverLive portal and android project number which you configured in step1 of this post.

image

As of now we have created environment in application to work with EverLive SDK for PushNotification. Next we need to create pushSettings for Android. You may notice that we are passing androidProjectNumber to create push setting for android.

image

Next you can enable notification on device by calling enableNotifications function and passing setting for push notification as input parameter in that. On successful enabling we are returning registration of device.

image

After enabling notification on device you need to register device in Everlive portal. To do this call register function on instance of current device.

image

These are two operations you need to perform to get push notification on android device from Everlive push notification. I have created two buttons on app view to enable notification on device and then register device to get push notification. View with buttons are as follows,

 <div data-role="view" id="pushview" data-tile="Push" data-model="app.pushService.viewModel" >
 <a id="initializeButton" data-role="button" data-bind="click: enablePushNotifications" class="btn-big">Enable Notifications</a>
 <a id="registerButton" data-role="button" data-bind="events: { click: registerInEverlive }" class="btn-big">Register</a>

 </div>

Below find full code to enable and register device for push notification.


(function (global) {
 var everliveApiKey = 'I1eE4AuOaWv0Vp5y';
 var androidProjectNumber = '1088191728786';
 var emulatorMode = false;

var pushViewModel = kendo.data.ObservableObject.extend({

el: new Everlive({
 apiKey: everliveApiKey
 }),

message: function () {
 alert("dhananjay");
 },

onAndroidPushReceived: function (args) {
 alert('Android notification received: ' + JSON.stringify(args));
 },
 enablePushNotifications: function () {
 // Push Setting for Android
 var pushSettings = {
 android: {
 senderID: androidProjectNumber
 },
 notificationCallbackAndroid: this.onAndroidPushReceived,

};
 // Setting the current device
 var currentDevice = this.el.push.currentDevice(this.emulatorMode);
 currentDevice.enableNotifications(pushSettings)
 .then(
 function (initResult) { return currentDevice.getRegistration();
 },
 function (err) {
 alert("ERROR!<br /><br />An error occured while initializing the device for push notifications.<br/><br/>" + err.message);
 }
 );

&nbsp;
 },
 registerInEverlive: function () {
 var currentDevice = this.el.push.currentDevice();

if (!currentDevice.pushToken) currentDevice.pushToken = "some token";
 this.el.push.currentDevice()
 .register({ Age: 15 })
 .then(
 this.onDeviceIsRegistered,
 function (err) {
 alert('REGISTER ERROR: ' + JSON.stringify(err));
 }
 );
 },
 onDeviceIsRegistered: function () {

alert("device registered");
 }

&nbsp;
 });

app.pushService = {
 viewModel: new pushViewModel()
 };

})(window);

&nbsp;

After successful operations on device, you will find device is registered in Everlive portal as below. All device registered for application will be listed here.

image

Now you can send push notification to device from portal. Device is enabled and registered to receive push notification from the Icenium Everlive server. We just witnessed that it is so easy working with push notification on Android devices from Icenium Everlive server. I hope you find this post useful. Thanks for reading.

Download sample used in this blog post from Github

Learn more about Icenium

Resources for Webinar “Cloud Based Enterprise Apps using Everlive”

On Jun 20th we conducted a webinar titled “Cloud Based Enterprise Apps using Everlive”. This is part of an ongoing webinar series we here at Telerik India are doing targeting APAC region. We call this the Telerik .NET Ninja Developer Webinar Series. You can take a look at the Jun-Jul schedule here: https://telerikhelper.net/2013/05/24/telerik-webcasts-june-july/

To get started with Icenium Everlive visit its Everlive portal here

clip_image001

Icenium Everlive is “Backend as a Service” and it provides following as service,

  • Backend Data
  • Large Files.
  • Users
  • Email
  • Notifications
  • Cloud Code

image

All the services can be accessed via REST API, JavaScript SDK or .NET SDK.

Slide Deck:

Here is the slide deck which I used for the webinar:


NET Ninja T-Shirt Giveaway:

We select 2 person from the webinar attendees and give away our .NET Ninja T-Shirt in each of our webinars. We have picked up 2 lucky persons in this webinar too. They are:

Soumya R

HC Suraj

Congratulations to the winners. We will be contacting you shortly and we will ship your t-shirts. Rest of the folks don’t worry – we still have loads of webinars lined up for this year. So do attend our future webinars without fail and try your luck to be the .NET Ninja.

To get started with Icenium Everlive visit its Everlive portal here

As App Developer Why I do care about Icenium Everlive?

To get started with Icenium Everlive visits its Everlive portal here

clip_image002

Before getting into discussion of “Why do I care about Icenium Everlive”, let us get into our developer shoes and understand few generic requirements of any application.

An Application may need,

  • Backend data which should be secure and scalable
  • User management. Various level of user authorizations and authentications
  • Email Services
  • Large files as BLOB at backend
  • Validation of data , users at backend
  • Various kind of notifications
  • Codes running at backend

Icenium Everlive helps to solve above listed requirements. It is Cloud Based Backend as a Service offering from Telerik. Any services of Icenium Everlive can be accessed via provided REST API.


To get started with Icenium Everlive visits its Everlive portal here

image

Icenium Everlive provides following as service,

  • Backend Data
  • Large Files.
  • Users
  • Email
  • Notifications
  • Cloud Code

image

It provides REST API, JavaScript SDK and .NET SDK to access above services.

image

Let is focus our discussion on problems Icenium Everlive helps us to solve. Below I am listing some of the problems and how Icenium Everlive helps to solve them.

Problem # 1: Creating and Managing Service Layer

If you want to work with backend data, probably you need to do following tasks

image

As you may be aware that working with Service layer may be quite complex and require lot of development time. If you are not coming from backend and service development background then learning curve is very sharp as well. In many of the cases you end up giving most of the time working with services and backend database than working on business requirement of application.

Icenium Everlive helps you solving this problem. It eliminates need of service layer from your application.

image

In few simple steps you can configure content types (backend data) and can use them in your application. Icenium Everlive provides you following options to work with backend data from application.

  • REST API
  • .Net SDK
  • JavaScript SDK

Essentially you can work with secure and scalable backend data without bothering about complexities of service layer.

Problem# 2 Working with Users and Roles

In any application User management is one of the most important task. Tasks like

  • Creating new users for application
  • Managing different Role for users
  • Authentication of Users
  • Different level of authorization
  • Notifications to Users

All above tasks can be complex to handle. Icenium Everlive provides you complete User Management over REST API. Along with REST API, JavaScript SDK and .NET SDK are available to work with Users. Essentially to create new user for application you need to do a function call. At the backend Users and Roles of your application are managed by Icenium Everlive.

image

So Icenium Everlive helps you to manage users of application.

Problem # 3: Sending Email notifications

Email notifications are essential part of any application. Working with Email may be complex, it requires setting up email servers, working with template etc.

Icenium Everlive gives you complete solution of Emails and Email notification. From backend Icenium Everlive can send email on behalf of your application. It can send notification email while registering new user to application and validate users email address as well. At any point of time application can send emails using Icenium Everlive using custom template. Everlive allows you to create and configure email template as well.

image

Problem # 4: Working with Large Files

High quality images, videos etc. are always integral part of certain kind of applications. Uploading and downloading large files are another complex tasks as an application developer you need to do. Icenium Everlive ease tasks of working around large files at the backend. It provides REST API along with JavaScript and .NET SDK to work with files.

Icenium Everlive helps,

image

Icenium Everlive provides backend services to speedup application development. As a developer we can clearly see that Icenium Everlive offers all back end functionality as service which we can leverage in different kind of applications. Certainly it is something we need to care about. In further posts I will get into other details of Icenium. Tune in for same. Thanks for reading.


To get started with Icenium Everlive visits its Everlive portal here