

The Javascript wars are raging! Are you with the purist Javascript nerds or on traditional jQuery’s side or would you prefer lean React or does Google’s AngularJS get your mojo? This post isn’t about this religious debate.
This three part series is going to introduce the React to developers. React was created by Facebook and is supported by them.
We start slow in this post but will end with a working example of React application. We are interested in building an enterprise application and would end up adding a Grid to the page in Part III of this post.
The one thing I love about React is that it is non-religious. It is ready to embrace any JavaScript technology that you can throw at React. React is a very light weight framework and only contains the capability of rendering the view. React makes no assumptions about the rest of the technology stack used and can plug in with any Model or Model View framework.
Surprisingly with all that versatility, React is very simple to learn and can be introduced incrementally into an existing project (part running React and part running jQuery).
Here are some concepts to be aware about:
- Virtual DOM: Virtual DOM is a shadow of the page DOM but is never updated. It is only destroyed and re-rendered for the specific components that have changed. This makes updates blazingly fast.
- One Way Databinding: Closely tied to the above, only inputs are accepted as change of state. Change in the property doesn’t trigger the update on the DOM automatically.
- JSX: This is a JavaScript extension that allows XML to be embedded within React components directly. Think of this as a light weight template library.
-
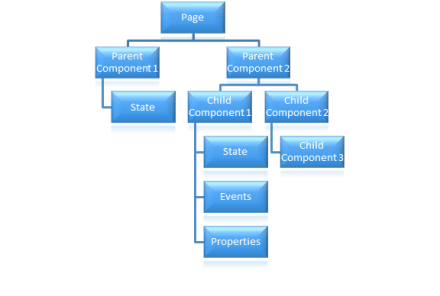
Classes/ Components: The heart of React. Everything rendered by React is a component. Components are composable and can be composed of additional components.
- Properties/ Props: React Components have properties that are used to accept input from other components and used to render the components directly.
- Events: Allows components to respond to various input activities.
- State: Components can maintain state that is only available to the specific component i.e. sort of a private data.
- References: One way binding constructs that allow inputs to be accessed from the backend.
- Developer Tools: React Developer Tools are available for Chrome and Firefox as a browser extension for React. It allows you to inspect the React component hierarchies in the virtual DOM.
React CLI
The easiest way to get started with React is through create-react-app CLI (the official React CLI). So, fire up your command line interface and get cracking..
First install the create-react-app:
npm install –g create-react-app
Then we can create a new app, and that bootstraps the entire application. We simply use “create-react-app my-app” and render it with npm start. Remember to browse to the root directory where you want to create your node application. I tend to keep my node projects in the “Documents\nodeprojects” directory.
create-react-app my-app
cd my-app
npm start
These commands just runs through a npm script to set up a server for us and kick off the app. You should see a screen as follows:

Note: It does take a while to install everything. Have patience as npm creates the first React app for you.
This was probably the fastest way to get started with node. In the next part, we will cover building a React application from scratch.
