
Couple of years ago, I created a video where I showcased how to use Telerik Reporting with WPF (Windows Presentation Foundation). WPF is a windows application development framework on Microsoft .NET stack. Telerik Reporting is a reporting solution which can be embedded in your ASP.NET/WinForms/WPF applications. You design reports, host it in your app and render within your apps. One of the question I got recently on that video was – “How to use Telerik Reporting with SQLite ?“. That’s an interesting question and probably one of the common scenarios you may face. In this post I will take a step by step approach on how to work with SQLite using Telerik Reporting Standalone Report Designer. Lets get started.
About Telerik Reporting:
According to our official documentation Telerik Reporting is described as below:
Telerik Reporting is a reporting solution for all .NET cloud, web, and desktop platforms that provides a full range of ready-to-use tools and services to help people throughout your organization create, deploy, and use reports quickly and easily.
With Telerik Reporting, you can retrieve data from relational, multidimensional, ORM or custom data layer based data sources; The ready reports can be viewed in various formats (including PDF, Microsoft Office Word and Excel and PowerPoint documents); and can be viewed with a dedicated viewer in a Web or .NET Desktop application. You can know more about Telerik Reporting product here. Telerik Reporting is available as a 30 day free trial. You can download it from here. I suggest you download the trial, install it now and follow along the rest of this post.
Standalone Report Designer:
When you install Telerik Reporting, we provide you with what we call as a Standalone Report Designer. This is a standalone windows tool powered by our Reporting engine. Using the standalone designer you can create, edit and share ad-hoc reports. This tool assists power users to create reports, analyze data on their machines itself, export and share the report documents. You will find the Report Designer in a folder called “Report Designer” inside the Telerik Reporting installation folder. You will find a executable named “Telerik.ReportDesigner.exe“. If you are on x86 machines there is a “Telerik.ReportDesigner.x86.exe” executable. Here is a screenshot of the Report Designer:

Fig 1. Telerik Report Designer
About SQLite:
Here is a definition of SQLite from official documentation:
SQLite is a self-contained, high-reliability, embedded, full-featured, public-domain, SQL database engine
What is of prime importance about SQLite is – it is embedded. You can embed a SQLite database within your applications and deploy it. The file extension of the database is “.db“. Just bundle & package the database and then deploy your app.
Next we will see how to use SQLite with Telerik Reporting.
Installing SQLite ADO.NET Data Provider:
As mentioned earlier, Telerik Reporting is a .NET based solution. In order to connect to any data store and create reports we will need a provider – specifically a .NET based provider. In this case SQLite ADO.NET Provider is what we need. SQLite provides an official ADO.NET Provider which needs to be downloaded and used in your application. Head over to downloads section of the SQLite official website here. Depending on your platform download the pre-compiled binaries for Windows. While writing this post i am on a 64 bit Windows machine and hence i have downloaded the sqlite-dll-win64-x64-3150200.zip file. Following is a screenshot of my installation folder:
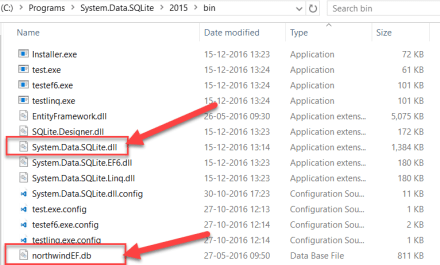
Fig 2. SQLite Installation Folder
The main DLL to use is System.Data.SQLite.dll. We also have a sample database called Northwind – northwindEF.db. We will use this database to create a report.
Setting up Report Designer to use SQLite:
In order to connect to SQLite from Report Designer, we need to copy the System.Data.SQLite.dll from its installation folder to that of Report Designer folder. Also lets copy the northwindEF.db to Report Designer folder.
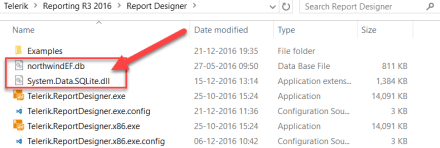
Fig 3. Report Designer Folder
Next, we will need to update the report designer executable config file to use SQLite. Open Telerik.ReportDesigner.exe.config and add the following segment:
| <system.data> | |
| <DbProviderFactories> | |
| <remove invariant="System.Data.SQLite" /> | |
| <add name="SQLite Data Provider" invariant="System.Data.SQLite" description=".NET Framework Data Provider for SQLite" | |
| type="System.Data.SQLite.SQLiteFactory, System.Data.SQLite, Version=1.0.104.0, Culture=neutral, PublicKeyToken=db937bc2d44ff139" /> | |
| </DbProviderFactories> | |
| </system.data> |
Next, lets see how to create a report using Report Designer.
Creating New Report:
Follow the below steps to create a report:
- Double click Telerik.ReportDesigner.exe.
- Select New > Table Wizard.
- Select a location to save the report.
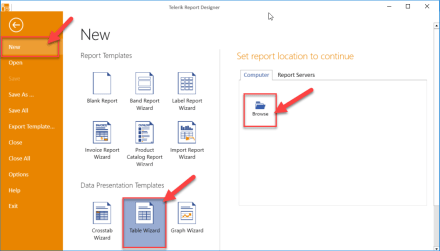
Fig 4. Telerik Reporting – New Report
- Next, in the Choose a Data Source dialog – click Add New Data Source
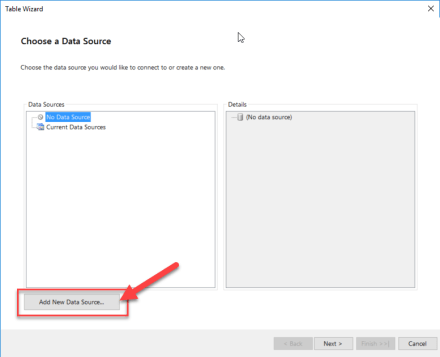
Fig 5. Choose Data Source Dialog
- In Create New Data Source dialog, select SQL Data Source, provide a name and click Ok.

Fig 6. Add New Data Source Dialog
- Next, in Choose Data Connection dialog, select Build new data connection radio button. Select SQLite Data Provider in the Data Provider dropdown. Then type the following string in Connection String text box: Data Source=northwindEF.db;Pooling=true;FailIfMissing=false. Click Next.
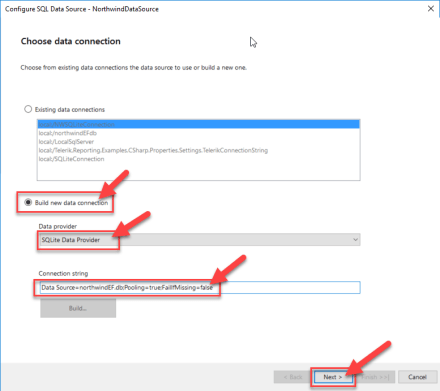
Fig 7. Data Connection Dialog
- In the Data connection options dialog, select Use as shared connection radio button and provide an Alias name for the connection. In my case i will provide the alias as NorthwindDBConnection. Click Next.
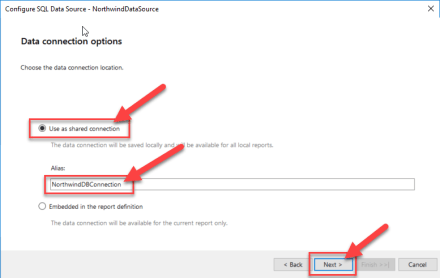
Fig 8. Data Connection Options
- Next, we will provide the query for our report. In the Configure data source command write the following query: SELECT * FROM Products. Click Next.

Fig 9. Data Source Command
- Next, we can preview the results of the query we wrote in previous step. Click Execute Query. Then click Finish.

Fig 10. Preview Results
- We will be then presented with Choose a Data Source dialog again. Click Next.
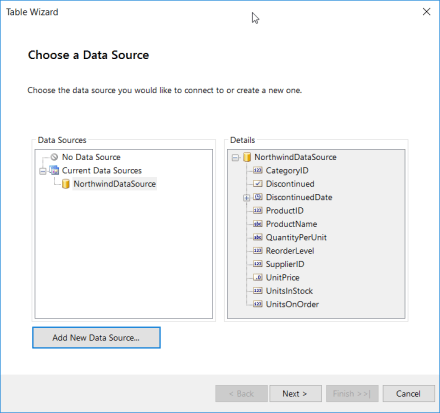
Fig 11. Data Source Details
- Next we will arrange the fields we need to show in the report. Select all the columns you need in the report and click the Plus sign. Finally click Next.
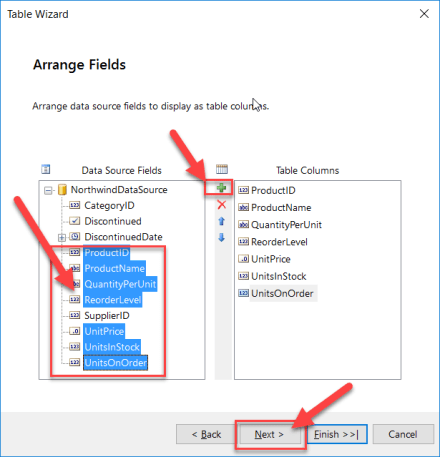
Fig 12. Arrange Fields
- Next we will choose a style for the Report. Out of the box, we provides you with 7 styles. I have selected Office style for my report. After selecting a style, click Finish.
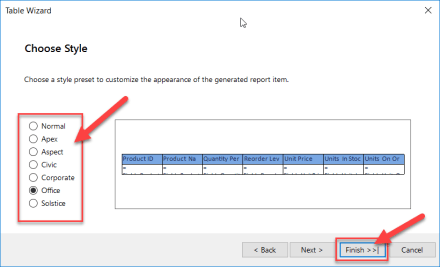
Fig 13. Report Style
If you now take a look at the designer surface, you will see our Report laid out with a header section, the body section and the footer section. In the body section you will see a table being placed with the columns we selected. Here is how the designer looks for me:

Fig 14. Report Designer with Generated Report
Next, click on Preview in the tool bar to view the report. Here is how the report renders on my machine:
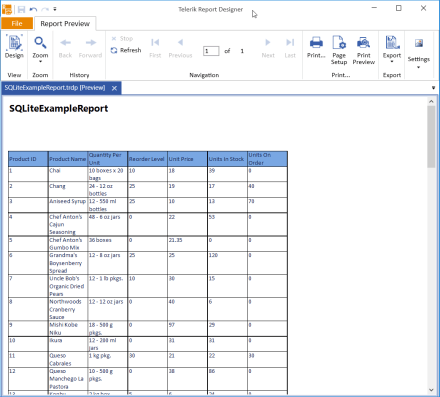
Fig 15. Report Preview
Summary:
Hope the above steps have given you an idea on how to work with SQLite data base within Telerik Reporting Standalone Designer. Its very easy to set up and very easy to create a report. Do download a trial if you have not done already and platy around with our reporting solution. We would love to hear any feedback/suggestion that you may have in the form of comments below.
Till next time – Happy Coding.

Pingback: Video: Use SQLite database in Telerik Reporting Standalone Report Designer | Telerik Helper - Helping Ninja Technologists