Hybrid Mobile Apps are one of the ways in which you can create a cross platform Mobile Applications using HTML/JavaScript/CSS technologies. The key here is Cross Platform. I want to write once and want to take my app to all platforms. One of the quickest ways is the Hybrid Way. Although Hybrid has its disadvantages when it comes to scenarios like high graphical UIs – it is a good choice when we have a simple data entry kind of scenario. In this blog post i will introduce you to Kendo UI Mobile templates we have done. These templates will speed up your Cordova based Hybrid Mobile App development. These templates make use of our Open Source Hybrid Mobile UI Framework called Kendo UI Mobile. Continue reading →
On Nov 13 2014, we conducted a webinar titled “Mobilizing Your SharePoint Data”. This is part of our regular webinars we do here at Telerik India. These webinars are scheduled on Thursdays of every month from 3PM to 4PM. You can look out for schedules that we announce in announcement category of this blog site.
Mobilizing your SharePoint data is a very common scenarios that most of the enterprises come across. We wanted to showcase how you can use Kendo UI Mobile to create cross platform adaptive rendering Hybrid Mobile Apps and connect to SharePoint using OData services that SP exposes. You can know more about Kendo UI here: www.telerik.com/kendo-ui
Slide Deck:
This was one of those webinar where i did not have a slide deck at all. That means there was no presentation and was all practicals in the webinar.
Video Recording:
Below is the video recording of this webinar. For those of you who missed attending live, you can go through the video at your leisure time and relive the webinar.
T-Shirt Giveaway:
As usual we have randomly picked 2 attendees from the webinar who will recieve our .NET Ninja T-Shirt. They are:
Ganesh Malireddy
Srinivas Panuganti
Congratulations to the winners. Rest of the folks dont worry. We still have a lot of t-shirts to give away. So keep watching our blog for webinar schedule, sign up and attend our future webinars.
This is a wrap up blog post for my series on mobilizing your SAP data with Kendo UI Mobile. So far I have written 4 parts on this series. Here are the links to the 4 parts of this series:
Here is a quick summary of what we have achieved so far with each part of the blog posts:
Part 1 – We took a look at the SAP demo system, got the credentials for the system and set up our environment to start work on Mobilizing SAP data.
Part 2 – We started out with building a mobile app using Telerik AppBuilder which is part of the Telerik Platform. We understood the project structure and created our first screen – Business Partners Listing.
Part 3 – In Part 2 we had built the listing of Business Partners. In Part 3 we went a step forward and built the Partner Details screen. When a Partner is clicked in the listing, we navigated to details screen.
Part 4 – we built a new screen to add new Business Partner to the system.
Things ahead:
I have provided you the basic structure of the mobile application so far. What you can do is to build upon the same techniques and add additional screens. For e.g. From a Partner details screen, we can navigate to his Orders. From Orders listing screen, we can then navigate to Order details. From Order details we can navigate to Order Item details screen. And in Item details screen we can list all the items in the order as a grid. I leave it up to you to try all this out.
Screen Shots:
Partners Listing
Partner Details
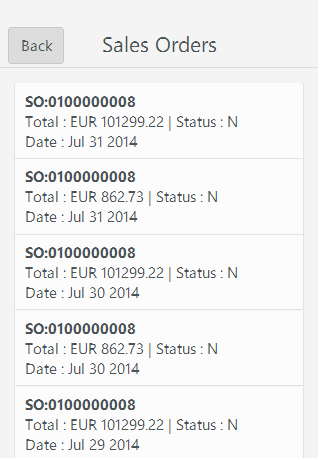
Orders Listing
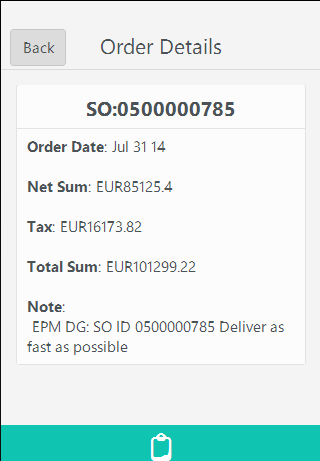
Order Details
Order Items Listing
Summary:
The primary goal of the 5 part blog series on “Mobilizing SAP Data with Kendo UI Mobile” was to showcase the power of Kendo UI Mobile and the ease with which you can mobilize your SAP data. One of the highlight of Kendo UI is its ability to consume and interact with OData Service endpoint out of the box. It does all the heavy lifting in terms of read, create, update and delete.
Hope this series helps you if you are trying to mobilize your SAP data. If you need further information or want to get in touch with us to help you out – feel free to reach out to me @ lohith.nagaraj@telerik.com.
On Jul 24 2014 we conducted yet another webinar titled “Build a Mobile Dashboard using HTML 5 and Telerik Platform”. This is part of the monthly webinars we do here in Telerik India. This blog post is a recap of the webinar with resource links and video recording of the webinar.
Kendo UI:
Kendo UI is a flagship product from Telerik which is a HTML5 based client side UI framework. It contains Kendo UI Web for web apps, Kendo UI DataViz for Data Visualization and Kendo UI Mobile for Hybrid Mobile Application Development.
Kendo UI
You can know more about Kendo UI here. Also the Kendo UI demos are all online and can be found here.
Video Recording:
We record all our webinars so that if there is anybody who missed attending live, they have another chance to go through the webinar. So here is the video recording of the webinar:
Q & A:
Q: how to contert telerik asp.net web application to mobile compactable?
A: If you are using Telerik ASP.NET WebForms controls it is Mobile ready. If you are developing ASP.NET MVC application, you can use Kendo UI which is HTMl5 based controls set and can run on Desktop Browser as well as Mobile Browsers.
Q: Where can we find kendo chart keywords used in JavaScript?
A: Please refer Kendo UI documentation here.
Q: Can you give me the URL to try App builder directly?
A: AppBuilder is part of our Telerik Platform. Please sign up for Telerik Platform here.
Q: What is the difference with singlepage app and a mobile app?
A: Single Page App or SPA as it is known as is just a pattern that many app developers utilize to build modern day web site/apps and Mobile Apps.
Q: How did u initiate simulator?
A: From the AppBuilder select Run > In Simulator to launch the simulator.
Q: What is the relation between Appbuilder and Kendo UI Mobile chart?
A: AppBuilder is the IDE for Hybrid Mobile App development. Kendo UI DataViz is the data visualization control set to be used in a mobile app.
Q: How we can implement offline behaviour of application using Kendo UI?
A: Kendo UI DataSource in future will provide the capability of offline caching of data. As of now you as a developer will need to take care of caching the data.
Q: Can the Kendo UI support access of Native component of os? like camera , media library etc?
A: Kendo UI is a UI control set and hence wont provide any device capability access. Where as you can use Cordova JavaScript library to access the device capability in your mobile apps.
T-Shirt Winners:
We usually pick 2 random attendees from the webinar and they receive our Telerik .NET Ninja T-Shirts. Following folks are the winners of the t-shirt for this webinar:
Ashok Rapaka
Ajithkumar Rai
Congratulations to the winners. We will contact you to get your address and ship the t-shirt.
This is 4th blog post in the series “Mobilizing Your SAP Data with Kendo UI”. So far we have seen how to set up the environment, create a mobile application and list business partners from the SAP Sales Order System and show a particular partners details. If you want to go through the first 3 part of this series, find the links below:
In this blog post we will be creating a screen to add a new partner to the business partner’s collection. So without much further ado, let’s get on with the business.
Home View Recap:
If you have been following the series, you will know by now that our home view is a listing of the Business Partners in the Sales Order system. In the footer of this view, we had created a tab in the tab strip with an add button. By clicking this add button we will navigate to “newPartnerview.html”. Here is the code snippet of home view:
This file contains hidden or bidirectional Unicode text that may be interpreted or compiled differently than what appears below. To review, open the file in an editor that reveals hidden Unicode characters. Learn more about bidirectional Unicode characters
The way we navigate to new partner view is just by pointing the href attribute of the anchor to “view/newPartnerView.html”. Kendo will do the navigation to the new screen by adding the default transition that is slide.
New Partner View:
Create a new HTML file in views folder and name it “newPartnerView.html”. We will create the form as below:
This file contains hidden or bidirectional Unicode text that may be interpreted or compiled differently than what appears below. To review, open the file in an editor that reveals hidden Unicode characters. Learn more about bidirectional Unicode characters
Notice that we use the Partner view model as the data model for new partner view. We have placed a save button in the header on the right hand side of the navbar. It is data bound to “add” method on the partner view model. The rest of the form is self-explanatory. Here is the code snippet of add method that we have added on the partner view model:
This file contains hidden or bidirectional Unicode text that may be interpreted or compiled differently than what appears below. To review, open the file in an editor that reveals hidden Unicode characters. Learn more about bidirectional Unicode characters
In add method, we build a JSON object and make use of Partners view model > partners datasource and call add on data source and tell the data source to sync the changes with the server. That’s all it is there to save a record if you use Kendo UI Data Source.
Update to Partners Data Source:
In part 2 of this series, we had created Partners view model and it had a partner’s data source. At that point we just had Read URL set up. But since we want to create a new record now, we set up Create URL on the data source. Here are the changes to the partners data source:
This file contains hidden or bidirectional Unicode text that may be interpreted or compiled differently than what appears below. To review, open the file in an editor that reveals hidden Unicode characters. Learn more about bidirectional Unicode characters
Notice the addition of create property to transport of Kendo UI data source. We also had to change the read property a little bit. If we have to send a create request to OData service, it is expecting a CSRF token. So, before we issue read instruction, we ask for CSRF token to be sent back to the client, and after read operation is completed, we fetch the token from the header and store it for further use. During create operation, we add the token to the header using the before send method of Kendo UI data source.
Running the App:
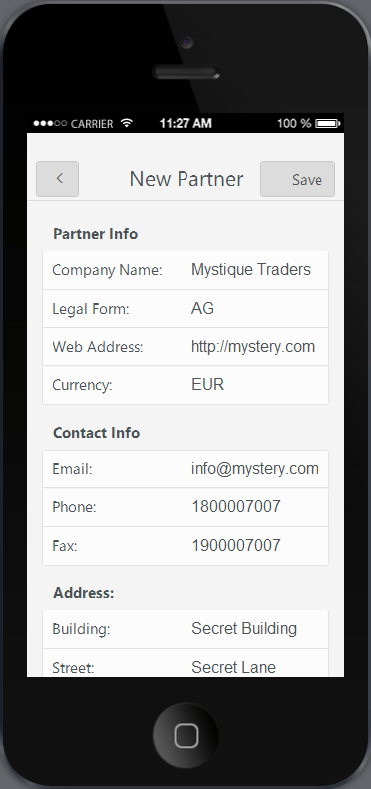
Now, our Create New Partner screen is complete. Time to run the app and see the output. Here is the screenshot of the new partner creation screen:
New Partner View
Summary:
In this blog post we saw an entity creation scenario. We created a data entry screen for adding a new business partner to the system. And we hardly wrote any code. With Kendo UI Data Source, handling CRUD scenarios is very easy as the data source does all the heavy lifting.
This blog post is a 3rd one in the series of “Mobilizing your SAP Data with Telerik Platform”. If you have not read my first 2 parts I suggest you take a look at those first. Here is the link to first 2 parts of this series:
In Part 1 I wrote about how to get started with SAP. In Part 2 I talked about building a mobile app using Kendo UI Mobile. We connected with the SAP data through the OData service that SAP Netweaver Gateway system provides. We were also able to build the first screen of the app namely the Partners listing screen. In this blog post we will look at how to build a screen that shows the details of the selected Partner. Let’s get started
Recap – Partner Item Template:
In the part 1 when we built the Partners listing screen, we used Kendo UI Mobile ListView to list the partners from the system. Each item in the ListView will be rendered by making use of an item template we provided. Just to recap that code, here is the code snippet of the item template:
This file contains hidden or bidirectional Unicode text that may be interpreted or compiled differently than what appears below. To review, open the file in an editor that reveals hidden Unicode characters. Learn more about bidirectional Unicode characters
Notice the usage of data-role=touch on the div and the data bind syntax where we trap the tap event and provide an event handler named “partnerSelected”. Here is the code snippet of the partnersViewModel where we have defined the partnerSelected event handler:
This file contains hidden or bidirectional Unicode text that may be interpreted or compiled differently than what appears below. To review, open the file in an editor that reveals hidden Unicode characters. Learn more about bidirectional Unicode characters
We saw that we have an event handler which handles the tap event of the partners listing listview. The code just navigates to a new view called partnerView. But the view name is not hard coded. It is coming from appsettings object which contains viewsettings and the value for partnerView. Also notice that we are passing the currently selected partner UID in the querystring. UID is the unique identifier that the Kendo UI Data Source maintains for each item in its data collection. We will use this information to get a single partner object from the collection using datasource method getbyid().
First let’s update the appsettings.js with viewsettings data. Here is the code snippet:
This file contains hidden or bidirectional Unicode text that may be interpreted or compiled differently than what appears below. To review, open the file in an editor that reveals hidden Unicode characters. Learn more about bidirectional Unicode characters
Notice that we have the URI of the new view set to “views/partnerView.html”. Let’s create a new folder under the root of the project by name “views” and create a new html file called “partnerView.html”.
Partner View Screen
When you add a new HTML file, the file content will have bare bone HTML code. Remove that basic HTML code as we don’t need that. Next we will create the partnerView UI.
Partner View UI:
As part of the partner view screen, we will just list out all the details of a partner like name, email, phone, address, etc. Here is the code snippet of the partner view:
This file contains hidden or bidirectional Unicode text that may be interpreted or compiled differently than what appears below. To review, open the file in an editor that reveals hidden Unicode characters. Learn more about bidirectional Unicode characters
Let’s go over the code once. It’s a simple div with its data role set to view. This is how Kendo UI knows that this is a page or screen in the app. We are trapping the show method of the view through data-show attribute and is bound to Partner object’s show() method. We will see the partner object in next section. Then we have spans to output different property of the partner and we have data bound different properties to the text property of the span. Next let’s take a look at the Partner JavaScript file.
Partner JavaScript Object:
In previous section we saw that the partner view screen is data bound to partner JavaScript object. Create a new JavaScript file named “partner.js” in scripts folder. And paste the following code in the script file:
This file contains hidden or bidirectional Unicode text that may be interpreted or compiled differently than what appears below. To review, open the file in an editor that reveals hidden Unicode characters. Learn more about bidirectional Unicode characters
Pay close attention to show() method. Remember that when we navigate from the partners listing screen, we had passed a querystring value which was the UID of the partner object. Here in partner view show method, we retrieve the UID and piggyback on app.Partners.partners data source and use the data source method getByUid() to retrieve the partner object. Once we get the object we use kendo.bind() method to data bind it to the view. With this the view at runtime get data bound with the partner object and the spans will show the appropriate data as they have the data-bind syntax.
Running the App:
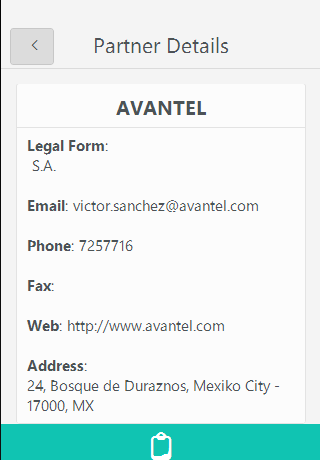
One last thing to do is adding a reference to partner.js. Add a script reference to partner.js in the script block of index.html. After adding the reference, select Run > In Simulator from the toolbar. Here is the screen shot of the partner view:
Partner Details Screen
Don’t question me on the UI – I am a design handicap when it comes to UX. But we now have 2 screens as part of the application itself. We now have the Partners Listing screen and Partner Details screen. And we are making progress.
Summary:
In this blog post we looked at how to create Partner details screen. We created a HTML page and a corresponding JavaScript file. With the concept of DataBinding we were able to bind different properties of a Partner object to different span on the view. In the next part of this blog series, we will take a look at how to create a new partner right from the mobile app itself. So stay tuned.
This is the second post in the series of “Mobilizing Your SAP Data with Kendo UI Mobile”. If you haven’t read my first post, it’s a good idea to read it now and can be found here. In the first post I talked about getting the environment ready. In this second post I will be writing about how to create a mobile application with Kendo UI Mobile for the SAP data. So if that’s sounds interesting to you, stay along with me for the rest of the blog post.
Get the tools of the trade:
As part of Telerik Platform, we offer a service called AppBuilder. AppBuilder is a complete IDE for building a Hybrid Mobile Application using Kendo UI Mobile. Using AppBuilder you can build iOS, Android and Windows Phone 8 hybrid mobile apps using a single pure HTML5, CSS & JavaScript codebase. Kendo UI Mobile is an adaptive rendering Mobile control set that will be used for the UI elements of the mobile app. You can know more about Kendo UI Mobile here. Visit the AppBuilder product overview page and sign up for a trial. You will have 30 days to try out AppBuilder and post that we will downgrade you to a starter tier. In starter tier you are allowed to build only 2 Mobile apps.
Telerik AppBuilder
IDE Choices:
AppBuilder provide 5 IDE choices and you can choose the one that suits you best. Here are the choices:
In-Browser Client – develop hybrid mobile apps on the go with a web client that runs on all browsers
Command-Line Interface – access AppBuilder capabilities from command line on Windows or OS X
For the sake of this blog post I will be using the Windows Client of AppBuilder. I already have signed up for Telerik Platform and I have created a workspace in the Platform and will create a new hybrid mobile app in that workspace. To know more about the Telerik platform, check our documentation here.
Create a Mobile App:
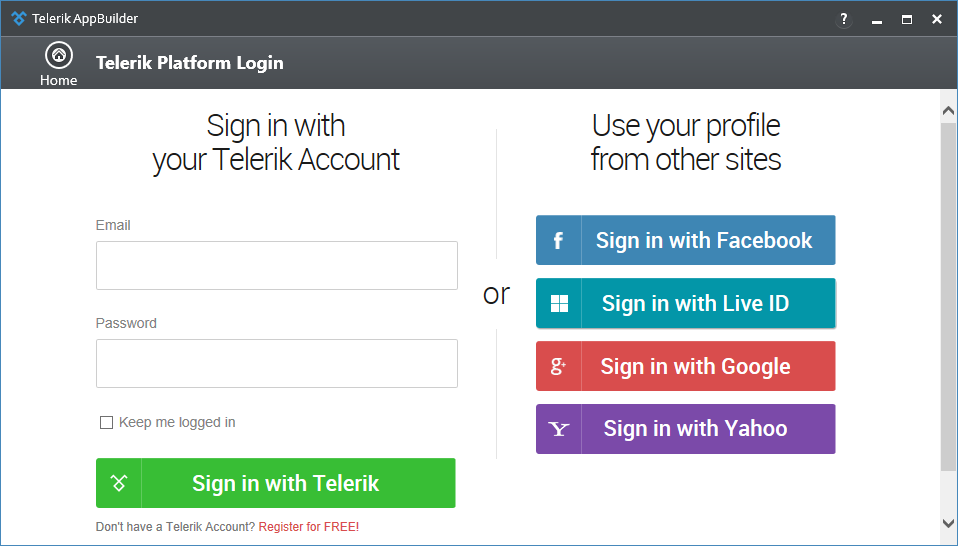
Now that we have the required tool for creating an app, lets get going. I am assuming at this point of time you have the AppBuilder Windows Client installer. Launch the AppBuilder windows client application. Since this is the first time, it will ask you for your Telerik Platform credentials.
Telerik Platform Credentials
Once you log in with your credentials, you will be presented with a “New” project creation dialog. From here you can select “Hybrid” > “Kendo UI Mobile App”. Provide a name for your mobile app and click create.
AppBuilder New Project Dialog
Here is the project structure that the IDE creates. Notice that Kendo UI Mobile control is added by default as we had selected Kendo UI Mobile App.
AppBuilder Project Structure
When you create a new project, IDE adds a dummy application out of the box. The app contains Home, Login, Location and Weather screen. In the scripts folder, you will find four scripts namely app.js, location.js, login.js and weather.js. The app.js contains the Kendo Mobile app creation code and other script files for the respective screens. At this moment if you just run the app by selecting Run > In Simulator or by pressing F5 in the IDE, you will see the following output:
Kendo UI Default Mobile App
We will clean up whatever default code has been created and start building our UI for Sales Order application.
Creating Mobile Application Layout:
Open the index.html and clear off everything that was added by default. Keep the reference to Kendo UI stylesheet, Cordova JavaScript file, jquery and app.js and remove rest of the things. The index.html, after the changes should look like below:
Cleaned Up Index Page
Now that we have a clean slate, let’s get started with our UI building process. First we will create a mobile layout that is required for our app.
This file contains hidden or bidirectional Unicode text that may be interpreted or compiled differently than what appears below. To review, open the file in an editor that reveals hidden Unicode characters. Learn more about bidirectional Unicode characters
Let’s go over the code. We have a div whose data role is set to layout and we have given it an identifier. Then we create a header div and place a navbar inside it. Navbar will contain a place holder for the title that will be shown for the current active screen. The keywords “layout”,”navbar” and “view-title” are Kendo UI specific and the Kendo UI Mobile app engine understand what needs to be done. Now that we are done with the markup for layout, we need to let Kendo UI mobile app engine know that it has to use this layout as a default layout for the app. Open app.js and replace the following code:
app.application = new kendo.mobile.Application(document.body, { layout: “tabstrip-layout” });
with
app.application = new kendo.mobile.Application(document.body, { layout: “applayout” });
Next we will create our first screen in the app which will list all the partners in the Sales Order system
Create Partners Listing Screen:
The Sales Order System that we are using for this demo app has a Business Partners endpoint and lists all the partners in the system. So our first screen would be to list all partners alphabetically as a mobile list view. So let’s start coding. First let’s create a view and within the view we will keep mobile list view. I will used MVVM pattern and create a view model for this screen. The Kendo UI Mobile Views provides a way to bind the view model to the view itself. Here is the markup for the view:
This file contains hidden or bidirectional Unicode text that may be interpreted or compiled differently than what appears below. To review, open the file in an editor that reveals hidden Unicode characters. Learn more about bidirectional Unicode characters
It’s a simple div with a data role set to “View” and data model set to “app.Partners”. We will create the Partners view model next. Then I have a header where I have the navbar with a title. Then I create a mobile list view with an unordered list. By setting the data role of <ul> as listview, Kendo UI engine will work its magic at runtime and convert the <ul> to a mobile list view. The mobile list view requires item template which we will have to create next. The data source to listview is set to “partners” property on the view model.
Partner Item Template:
For the list view to display each item, it needs a template to be provided. Here is a simple template I have created:
This file contains hidden or bidirectional Unicode text that may be interpreted or compiled differently than what appears below. To review, open the file in an editor that reveals hidden Unicode characters. Learn more about bidirectional Unicode characters
You will notice the usage of ${} syntax. It is Kendo UI template syntax where you are telling the rendering engine that at run time it has to get the value of the property of the currently bound data object and emit that into the template.
Partners View Model JavaScript File:
We will create a view model which exposes the business partner’s related functionality like listing and details of a business partner. Add a new JS file in the Scripts folder and name it Partners.js. Here is the code snippet for the view model:
This file contains hidden or bidirectional Unicode text that may be interpreted or compiled differently than what appears below. To review, open the file in an editor that reveals hidden Unicode characters. Learn more about bidirectional Unicode characters
As of now it’s a place holder and we will build the functionality as we proceed further.
Partner Data Model Object:
I will model the Business Partner entity that is exposed by the SalesOrder system as a JavaScript object in the partners.js file. Here is how my JavaScript object looks like:
This file contains hidden or bidirectional Unicode text that may be interpreted or compiled differently than what appears below. To review, open the file in an editor that reveals hidden Unicode characters. Learn more about bidirectional Unicode characters
Next we need to create a data source to connect to the OData service exposed by the Sales Order system. I am using Kendo UI Data source as my data source in the application. In order to read data from a service end point we need just set the URI on transport > read property of the data source. I will add this to partner data model itself. Here is the code snippet with the data source added:
This file contains hidden or bidirectional Unicode text that may be interpreted or compiled differently than what appears below. To review, open the file in an editor that reveals hidden Unicode characters. Learn more about bidirectional Unicode characters
Believe it or not, that data source is all you need to connect to any service which returns data in JSON format. Notice that for reading a service I am making use of a appSettings object. That is nothing but a simple JavaScript file with a bunch of settings. We will shortly take a look at that.
Partners View Model Object:
Now that we have the Partner Data Model and Data Source ready, we now create the partners view model which will expose a property called partners and partners is nothing but the instance of the kendo UI data source in the partner data model object. Here is the code snippet:
This file contains hidden or bidirectional Unicode text that may be interpreted or compiled differently than what appears below. To review, open the file in an editor that reveals hidden Unicode characters. Learn more about bidirectional Unicode characters
Here is the complete code listing of Partners.js we have implemented so far:
This file contains hidden or bidirectional Unicode text that may be interpreted or compiled differently than what appears below. To review, open the file in an editor that reveals hidden Unicode characters. Learn more about bidirectional Unicode characters
In the code snippet for data source, the URL to read data was got from data settings of appsettings object. I have created a new JavaScript file “settings.js” in the scripts folder. Here is the code snippet for the same:
This file contains hidden or bidirectional Unicode text that may be interpreted or compiled differently than what appears below. To review, open the file in an editor that reveals hidden Unicode characters. Learn more about bidirectional Unicode characters
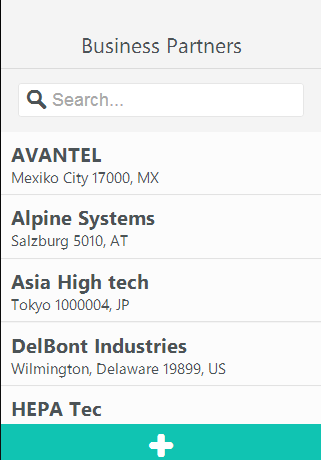
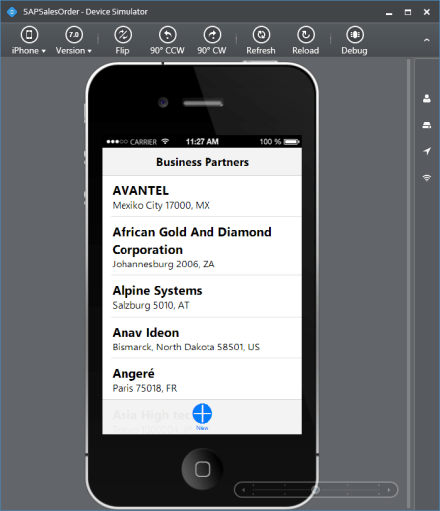
Now that we have finished creating the pieces of the application there is one last thing to do. We need to add reference to partner.js & settings.js in index.html. Once we add that, just press F5 on the IDE and the simulator will simulate the app we just built. Here is the screen shot of the app being simulated in iOS platform:
Business Partners Listing Screen
Wrap Up:
We have successfully created a mobile app which connects to a SAP backend and in particular a Sales Order system using Netweaver Gateway OData service and built a listing screen in the app. The listing screen is listing the business partners that are available in the system. One thing to note is how easy it was to create the app. The main point of this whole exercise is that of the Kendo UI Data Source which makes it super easy to connect to a service end point, invoke, retrieve data and bind it to the control. I didn’t sweat a lot to achieve this. So this is a good starting point. Next up we will create the Business Partner Details page. Stay tuned till my next blog post.
Over the last couple of years that I have been evangelizing for Telerik, I have met a lot of customers and in particular enterprise customers. Most of the big enterprises have SAP deployed in their organization. This gives them the flexibility of having point to point information with respect to their projects or revenue or even an employee. In short SAP is one of the widely used system in enterprises. But it comes with its own environment and applications. The number one question from enterprise customers for us has always been “how does your offering work with SAP?” A fair question especially when it comes to engaging with a third party vendor. This question was more of a high priority question when it came to Mobile teams in the enterprises. How soon can you go to market with an application and expose the SAP data.
The questions from the enterprises led me to write this 2 part series on how to mobilize your SAP data. This blog post is the first in this series and below is how I have planned out the 3 part series blog post:
Mobilizing Your SAP Data with Kendo UI Mobile – Get the Environment Ready – Part 1
Mobilizing Your SAP Data – Mobile App Development – Part 2
If you are as excited as I am, then be with me in this journey of 2 blog posts. So let’s get started.
What is SAP ERP?
According to the dictionary of the web i.e. Wikipedia, SAP ERP is defined as follows:
SAP ERP is an Enterprise Resource Planning software which provides an integrated solution that incorporates key business functions of an organization.
I will not be delving too much in to SAP as a software as that is not the intention of the blog post. Now that we know what is SAP let’s see how to expose data from SAP so that applications outside of SAP can consume them.
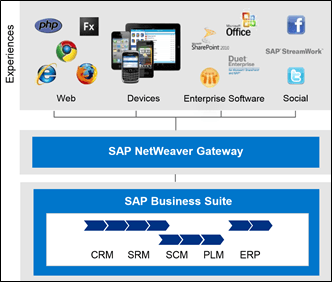
SAP Netweaver Gateway:
In order for the SAP data to be exposed to outside world you use a technology called SAP Netweaver Gateway to develop REST based ODATA services. According to SAP, Netweaver Gateway is defined as:
Technology that provides a simple way to connect devices, environments and platforms to SAP software based on market standards.
SAP Netweaver Gateway offers connectivity to SAP applications using any programming language and you do not need to have SAP knowledge. SAP Netweaver Gateway leverages the REST Services and OData/ATOM protocols for data exchange.
SAP Netweaver Gateway System
Again I won’t be getting into too much details as to how you do this. SAP Community Network (SCN) has tutorials on how to do this.
SalesOrders All the Sales Orders can be read using this collection
SalesOrderItems Items of a Sales Order can be read from this collection
Products Collection of products which can be purchased
BusinessPartners Collection of Partners with whom the company does transaction
Setting Up Reverse Proxy:
Services exposed by SAP Netweaver Gateway Demo system are all protected and need credentials to access them. In the previous section we talked about getting access to the demo system. During that process you would have used a username and password. You need the same credentials to authenticate against the demo system when querying for data.
In order for us to perform full CRUD on the demo system we will need to setup a reverse proxy in order to overcome the Same Origin policy restriction. A reverse proxy should be used for sending client HTTP requests designated to its domain to the correct server. Reverse proxy can be achieved in 2 ways. They are:
We can also create a simple reverse proxy using ASP.NET Web API.
Reverse Proxy using ASP.NET Web API:
A simple reverse proxy can be easily created using ASP.NET Web API. Idea is to create a Web API and pass the SAP URI we need query data as a query string parameter. The Web API will read the query string value and use that as a URI to connect to the SAP Service. Response from SAP Service will be relayed back to the client as JSON. Following code snippet shows the Web API Controller and in particular the Get action method:
public class ProxyController : ApiController
{
        string username = "<username>";
        string password = "<password>";
        // GET: api/Proxy
        public async Task<JsonResult<string>> Get(string url)
        {
            var sapUri = new Uri(url);
            using (var client = new HttpClient())
            {
                var base64String = GetBase64String(username, password);
                client.DefaultRequestHeaders.Add("Accept", "application/json");
                client.DefaultRequestHeaders.Add("Authorization", "Basic " + base64String);
                var response = await client.GetAsync(sapUri);
                HttpContext.Current.Response.StatusCode = (int)response.StatusCode;
                return Json(await response.Content.ReadAsStringAsync());
            }
        }
}
Instead of querying the SAP service directly from the mobile application, we will querying the proxy we just created above and pass the SAP service URL as a query string. Here is the usage:
Notice that we pass an Authorization header when making a request. SAP Services expect an authorization header and we pass the username:password string converted to base 64 and pass it as a request header. I have showed the example of a Read or Get. But on the similar grounds you can create the Create/Update/Delete actions also.
Summary:
With this blog post we start a journey to read data from SAP and use that data in a mobile application. As a first step we learnt that SAP data can be exposed to outside world using the SAP Netweaver Gateway system. We looked at various the demo services and picked the Sales Order system as a candidate to build the mobile app. In next post we will create a mobile application using Kendo UI Mobile framework and Telerik App Builder.
On Feb 13 2014 we conducted the webinar on “Kendo UI Mobile Tips and Tricks”. This blog post will provide you some of the resources from the webinar like Slide Deck, Video recording of the webinar.
Kendo UI Mobile
Kendo UI Mobile helps you to build Cross Platform Mobile or Hybrid Applications with pure JavaScript and HTML5.
You can access badge value with badge method. So if you need to read current badge value and print it in AddFunction JavaScript function then it can be done as follows.
function AddFunction()
{
 var badgeValue = parseInt(this.badge());

 alert(badgeValue);
}
We are reading badge value with badge() method. That returns a string value and before alerting that we are converting that to integer.
To write value of badge you need to pass a parameter in badge() method. So badge value can be written as below,
function AddFunction()
{
 var badgeValue = parseInt(this.badge());
 badgeValue++;
 this.badge(badgeValue);
 alert(badge);
}
You can remove badge from button by passing false to badge method. So you can remove badge as follows
function AddFunction()
{
 this.badge(false);
}
In this way you can work with badge in Kendo UI Mobile button. I hope you find this post useful. Thanks for reading.
As you see in above example on click of button Add , JavaScript function AddFunction will be called. Whereas on click of Home button user will be navigated to mobile View with id home.
By default you get buttons rendered as below,
You can put style of buttons as well. For example you can set background colour as below,
You will get buttons rendered on mobile view as below,
There could be scenario in which you need to render different colours of buttons for android and iOS. Let us say you want blue colour for Android and red for iOS. You can do that by setting button styles in CSS as below,
On Nov 28 2013 we conducted a webinar on the topic “Adaptive Rendering Mobile Web Apps using ASP.NET MVC”. In this blog post we will provide the resources from the webinar.
ASP.NET MVC has a fantastic feature which allows you to design web pages for traditional web browser or for a mobile browser. In order to support Mobile browsers, all you need to do is to create a page with “.mobile” in the file name i.e. if I have index.cshtml view just create a index.mobile.cshtml and ASP.NET MVC pipeline will serve this page when some body requests index view from a mobile browser.
Kendo UI Mobile is a flagship product from Telerik which is a HTML5 based cross platform adaptive rendering mobile controls. Kendo UI Mobile controls when uses will adapt to the platform they are running on and will give you the look and feel of that platform. So you write your application only once and deploy to platforms like Android, iOS, Windows Phone and Blackberry without any code changes.
Slide Deck:
One of the things I tried with this webinar was – Only Action No Theory. Well what I meant was I didn’t have a slide deck for this webinar. It was completely demo oriented.
Video Recording:
If you had missed attending the the live event or you want to go over it once again don’t worry we record every one of our webinars. So here is the video recording of the webinar:
Q&A:
As with every webinar, this webinar too had many questions from the attendees. We tried our best to address most of them during the webinar. With the lack of time, we might not have been able to answer every question. So we list them here with the answers.
Q: Is adaptive rendering same as responsive design? A: No. Responsive design is where you design a web page which reacts to different dimensions of the browser. For e.g. If you create a web page using Twitter’s bootstrap style sheets they have rules which make your page realign to different dimension. Where as adaptive rendering is about rendering controls which look native on the platform they run. For e.g. if you use a button, when the page is seen from a iOS browser, button should look the blue shade button or when it is seen from a Android browser, it should look like a black shade android button etc.
Q: How does kendo recognize the mobile or device in which app is running? A: Each browser will let you know information about the platform through user agent strings. So we rely on that.
Q: Can we override the native look and feel. Like if we have requirement to show app similar to android in IOS
A: Yes you can. We have a special skin or theme called Flat. If you use this flat theme the UI will be same across platforms. You can customize the Flat theme CSS to have your own color combination.
Q: Can we use Kendo UI without using Asp .net MVC? A: Yes you can. Kendo UI is a HTML5 powered Client Side UI framework. You can use Kendo UI Web Controls in a plain HTML page also. Kendo UI Mobile controls are used for developing Mobile Applications.
Q: Why there is a need to add Jquery mobile script file separately and why can’t we make it as part of kendo scripts ?
A: Kendo UI depends only on Jquery and nothing else. So its necessary to first add Jquery before referencing Kendo UI scripts.
Q: Is it possible to create iOS/Android apps like messaging, file sharing using KENDO UI? A: Yes you can.
Q: when you Customize/override the layout by making skin ‘Flat’ , the tabs were in the bottom in Android UI too, so it means Kendo UI will not work if we override or customize it?
A: When we use Flat skin, the UI looks consistent across platforms which includes the tab strip too. The tab strip will be at bottom. But if you want the tab strip to be on top for android or other platforms you can easily customize the flat theme CSS for a particular platform.
Q: I can build Mobile Web using such adaptive layout with Jquery mobile + ASP.net MVC , what are the key features for Kendo Web UI?
A: Kendo UI Mobile controls are adaptive in nature. i.e. you write once and deploy on different platforms, the controls will look like native UI. For more information visit: http://www.kendoui.com/mobile.aspx
Q: Does Kendo UI supports HTML5 features? A: Yes.
Q: how to convert mobile web app to hybrid app? A: You can just take the HTML/JS/CSS files, package it and deploy it to respective marketplace.
Q: What all kind of app we can develop using Kendo UI? A: kendo UI comes with 3 flavors. Kendo UI Web – used to develop HTML5 based web apps/sites, Kendo UI DataViz – used to develop data visualizations for web and mobile and Kendo UI Mobile – used for developing Hybrid Mobile Apps. For more information visit – www.KendoUI.com
T-Shirt Giveaway:
With every webinar we select 2 random attendees to receive a give away from our side. The give away is a .NET Ninja t-shirt from Telerik. So here are the 2 winners from this webinar:
Sivakumar SS
Mahesh Darga
For those of you who are feeling sad about not winning the t-shirt, don’t worry. We have a lot of webinars planned ahead. So keep looking out for our next webinar.
On September 5th we conducted a webinar on our Icenium extension for Visual Studio. The webinar was titled “Building iOS and Android apps using Visual Studio”. This is part of the ongoing webinar series we here at Telerik India have been doing almost every Thursday of the month. If you want to know our webinar schedule, take a look at this blog post: https://telerikhelper.net/2013/10/04/technology-to-keep-you-company-in-the-holiday-season/
About Icenium:
Icenium is a product from Telerik which makes cross platform mobile development simplified. Icenium enables you to use HTML5, CSS and JavaScript to develop, test, and publish applications that run natively on the Apple iOS and Google Android mobile platforms. It combines the convenience of a local coding environment with cloud-based services powered by the Apache Cordova framework. Icenium also provides the seamless creation of a backend for your apps with data storage, user management, and email and push notifications.
As promised, here is the video recording of the webinar:
Q & A:
We had a lot of questions asked during the webinar. Our team was able to answer as much as we can during the webinar. We normally do a recap of the questions and try to provide answers to all of them through this blog post. So here are the questions from the webinar along with the answers:
Q: Are these native apps we are talking about?
A: We are talking about a model of Mobile App development called Hybrid Application Model. In this model you develop app using HTML5/JavaScript/CSS. You package this and it runs on the device pretty muck like a native app.
Q: Can we use Express Edition to practice this? A: Sorry. This needs a non-Express VS edition
Q: Can we practice it on any other ide other than VS or is it only for it?
A: The webinar featured a extension we have for Visual Studio. But Icenium comes as a stand alone IDE also. We have Windows Client called Icenium Graphite or you can use Icenium on the browser itself. Currently supported only on Chrome.
Q: For android development with visual studio can we do it without any explicit plugin?
A: Yes. It depends mostly on your application feature and design. If you are building a simple data entry application which does not require any custom plugin you can do it easily with just a HTML markup and a JavaScript code to handle service calls.
Q: How difficult/easy it is to design my app once, and create ios application and android application PARALLELY?
A: With Icenium and Kendo UI Mobile controls, you write your code only once. Icenium lets you build packages for Android and iOS right within Icenium. Kendo UI Mobile controls provide you the adaptive rendering capability i.e. Kendo UI Mobile controls adapt to platform they are running on and give you native look and feel.
Q: what is Icenium?
A: Icenium – Mobile application development tool from Telerik. More details: http://www.icenium.com
Q: Can the jQuery version file be changed at any time?
A: Yes you can.
Q: Is Icenium different from Kendo control set ?
A: Icenium = Cloud IDE + Build Services + Simulators + Debug Capabilitie + Mobile BaaS + Kendo Mobile
Q: Will Icenium Support design and development of Web Services or the same will have to be developed seperately in .NET?
A: This will need to be developed separately. We have a Visual Studio addin avaialble to do the same called OpenAccess. http://www.telerik.com/products/orm.aspx
Q: Is Icenium an opensource? A: No. Icenium is licensed product. It is per developer subscription based.
Q: Since iOS 7 is released, how do we set the version to 7.0 in iOS simulator? A:. Work is under way. We will update the simulator once we are ready. In fact we already have a flat theme in Kendo UI Mobile control set from past year or so. So you already have a flat theme to apply to your apps.
Q: Which Visual Studio version we are going to discuss to achieve this?
A: Icenium Extension for Visual Studio supports only Visual Studio 2012 at the moment.
Q: Can we run tis apps on windows phone 8 also?
A: Yes. But Icenium cannot make the package for you. You will need to copy the complete source code. use Windows Phone project template for HTML5 and dump your code. Then create the XAP file and put it to market place.
Q: this will be compatible with all device of Android and iPhone? A: Yes. Icenium also provides adaptive rendering for individual platform.
Q: Only VS 2012 is enough or do we need to install any plugins?
A: You will need to install Icenium Extension for Visual Studio from Visual Studio Gallery.
Q: From where can we download Icenium Plugin? We already have a license of telerik, do we need to buy a separate one?
A: You can download the Icenium extension from Visual Studio Gallery. You can develop an app and test in Icenium simulator. But when it comes to packaging you will need to buy Icenium subscription which is per developer and on monthly basis.
Q: Can we deploy directly to physical phone if its connected ?
A: Yes, you will be able to. LiveSync enables immidiate sync to all devices attached to the machine.
Q: An application developed on Telerik Silverlight, can it be replicated to Icenium app
A: No direct migration from Silverlight to Icenium.
Q: Can we access hardware including Camera, GPS and other sensors?
A: Yes, via the cordova library. Part of Icenium.
Q: I have a Kendo app (browser app) can we migrate it to Icenium?
A: Kendo Browser Apps using Kendo UI Web controls which is meant for running on desktop browsers. For mobile, we recommend using Kendo UI Mobile controls.
Q: Can we use debugger on trial version of Icenium A: Yes, the trials are fully featured trials.
Q: Does Icenium support windows mobile A: WP is supported by a slightly different procedure. Please write to sales@telerikindia.com in case you would like to explore this further.
Q: Does the API has support to access device specific functionalities A: Yes, via the plugin architecture.
Q: Can we create system apps via Icenium A: Sorry, Icenium can only build mobile apps.
Q: Where is the div attributes coming from (like data-role, data-icon) A: There are known as “data-“ attributes in HTML5 specification. HTML 5 makes provision for it. Icenium makes it functional.
Q: Can we get a trial version of Icenium? A: Yes, one month trial of Icenium is available at: http://www.icenium.com
Q: The difference between Jquey Mobile / Cordova app & Kendo UI is nativeness A: Yes. In addition, we have SPA framework + MVVM framework + Client side DataSource + Templates and more
Q: We need to know how to use ListView and how to bind a data to listview practically? A: Please write to sales@telerikindia.com and we will help you specifically.
Q: Are you using any MVVM framework like backbone.js A: Kendo UI framework has its own MVVM framework. This further reduces the size of the application by removing the need for adding more frameworks like backbone.js
Q: Is this a stand-alone or web based Mobille App? A: This is being like a web based app. Upon compilation/ build it will become a stand alone app (apk/ipa) that can be put on respective app stores.
Q: Just to confirm the support for ODATA using these controls? A: Yes, ODATA is supported. Use DataSource to connect to Odata services and controls can bind to this datasource
Q: Will a single code will work for both IOs and Android? A: Yes, it will. that’s magical, isn’t it?
Q: Any ETA to remove this BETA ? A: Icenium is a live app (not in BETA). The VS plugins is in BETA.
Q: Can we use VS2012 to write Objective C code using Icenium? A: No. This is not possible.
Q: Will kendo ui mobile and jQuery mobile work together? A: There is nothing that prevents jQuery Mobile from working with Kendo UI. However, it is needless as most capabilities are available in Kendo UI.
Q: is it support local database ie sqllite etc ? A: Yes. Icenium has support for SQLite plugin which can be included in your project.
Q: How Icenium plugin is aligned with iphone/android/windowsPhone design elements ? A: Icenium is just the IDE for developing Hybrid Mobile Apps. It’s the Kendo UI Mobile control set which adheres to design principles of the Mobile Platform and render the controls accordingly.
Q: do you have icenium extention for Eclipse/JBuilder/IntelliJ.? A: Not immidiately. you can use the Windows client of Icenium: http://www.icenium.com/product/graphite
Q: How we can publish our app for iOS? A: Publishing for Apple Store is directly supported from Icenium. No need for a Mac.
Q: To publish a app in Apple store, I need a mac device & Xcode? A: You will be excited to know that Icenium supports deployment to Apple Store directly. so, you don’t need a Mac or XCode for publishing. You can develop and deploy completely without the need for a Mac.
Q: Who does the magic behind the scene from different phone sets? is it Kendo, which recognizes and builds the layout A: Yes, Kendo is the magic behind support for different platforms/ form factors.
Q: Can you name any application developed using kendo UI and deployed in different markets for iOS,Android and Microsoft
A: SafeBridge, DevReach. Check out our showcase apps: http://www.icenium.com/resources/showcase
Q: How abt symbian apps A: sorry not supported by Icenium.
Q: An important question: What is % degrade in performance using Kendo UI v/s native html/css apps ? A: It is quite the opposite. We have seen improvements of 200 – 300% in performance when using Kendo versus other HTML/ CSS apps (not native)
Q: we have to write all the codes in one single page i.e. index.html A: it is a Single Page app :). However, we support browsing to other pages and hence you can have code in another page as well.
Q: Did you develop the KENDO framework by your own? A: Yes, Telerik developed it by itself 🙂
Q: Where can I get the help related to Kendo UI? A: Extensive documentation available at: http://docs.kendoui.com
Q: Can We Use Web Services in Icenium? A: Yes, we support REST/ OData services.
Q: Can I create ASP.NET MVC4 project, where I build views using cshtml files, however use the Kendo UI controls on views ?
A: Absolutely. You can use Kendo UI Web controls for serving to desktop browsers. You can develop .mobile.cshtml files and use Kendo UI Mobile controls.
Q: As you told like look and feel vary between android and iOS devices .. but if I want to make theme consistant across all platform what I will have to do? A: You can use our Flat theme which gives consistent theme across all the platforms. Otherwise you can always use our Theme Builder and build your own theme.
Q: Can we write custom plugin to ICENIUM like we can do in Cordova? A: Yes. Icenium allows you to import custom plugins too.
Q: Instead of using emulators, can we test the app on real mobile w/o submitting it to store? A: Yes. it is fully supported. On Android the deployment is direct and on iOS you can use Icenium Ion: http://www.icenium.com/product/ion
Q: How we can use Kendo Ui for WP8 ? A: Quickly, you got to use the PhoneGap template in VS. Insert the Kendo UI files in WWW folder. Compile the project to get WP8 app.
Webinar Giveaway:
In each of our webinars we pick random 2 people from the attendee list and they get out cool .NET Ninja T-Shirt. This webinar, we have picked the following folks:
Ajay Negi
Jaish Mathews
Congratulations to the winners. Our office will contact you for your details and we will ship your t-shirts.
For those of you who are felling sad about not winning, well try your luck next time by attending our next webinar on Oct 31.
On 23rd May 2013, we at Telerik India hosted a webinar on “Building Windows Phone 8 Apps using Kendo UI Mobile”. This webinar received great response from audience and we had around 150 developers attending webinar. Participants were very active during webinar and there were a flood of questions around Windows Phone 8, Coredova and Kendo UI.
We discussed following topics in webinar,
What is Hybrid App
Why we need Hybrid App
Setting Visual Studio2012 to develop Wp8 apps using coredova
Setting WP8 App project to work with Kendo UI
In demo part we covered following topics,
Creating Kendo Datasource
Consuming OData and REST Srervice in Kendo Datasource
Working with Kendo Template
Working with Layout , Views
Working with dynamic navigation
We learnt and experienced that how easily a developer could work with all complexities such that consuming services, navigating between views, working with layouts rendering native to WP 8, adaptive rendering etc. using Kendo UI Mobile.
If you create a Hybrid App for Windows Phone 8 using KendoUI Mobile and Coredova then with minimal or zero effort you can publish same app as iPhone app and Android App.
You can watch recorded webinar below,
As you can see in recorded webinar that we focused on writing codes and shown you how easily and quickly a Marketplace ready Windows Phone 8 app can be created using Kendo UI.
We had promised that we will be giving away 2 .NET Ninja T-Shirts as a webinar give away.
We normally pick 2 people randomly from the audience and raffle it out. So, as part of this webinar we are happy to say that the following 2 people are winners of our .NET Ninja T-Shirts:
Ramu Naik
Ardhendusekhar Kanungo
Congratulations to the winners. We will be contacting you shortly as we need your postal address to ship your t-shirts. Rest of you folks, don’t worry you still have chance to win the t-shirt. Do attend our next webinar which is on May 30 titled – MVVM and Validation with Kendo UI Web. Register for that webinar here
Recently I was in one of the event and while doing demo one question came up. Question was How to place tabstrip at bottom of Android.
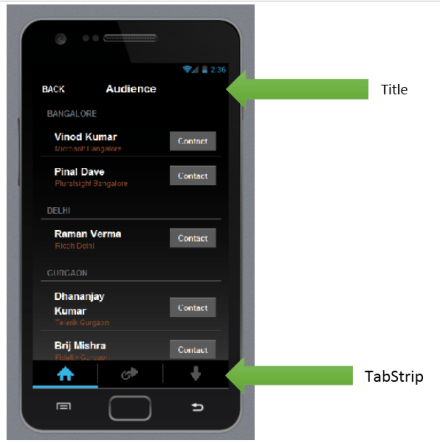
Let me first explain you question in detail. While creating a Cross-Platform Mobile Application using Kendo UI Mobile and Icenium you will notice following default behavior of tabstrip and Mobile View Title.
By default in IOS, View Title will be displayed at the top and tabstrip at bottom
By default in Android, View Title would not be visible and tabstrip will be displayed at the top.
Above Layout being created with View Title, tabstrip as following,
Now question was how to achieve same behavior of tabstrip and view title for both IOS and Android? They wanted to achieve same behavior in Android also as of IOS. This can be very easily done by modifying some CSS. In CSS we will override default design.
Above we are changing default tabstrip behavior for Android and forcing it to be in bottom. To display view-title we are setting visibility of view-title for android as true. Now on running application you will find tab-strip in bottom and view-title visible for android.
In this way you can place tabstrip at the bottom of Android. I hope you find this post useful. Thanks for reading.