
This is the second post in the series of “Mobilizing Your SAP Data with Kendo UI Mobile”. If you haven’t read my first post, it’s a good idea to read it now and can be found here. In the first post I talked about getting the environment ready. In this second post I will be writing about how to create a mobile application with Kendo UI Mobile for the SAP data. So if that’s sounds interesting to you, stay along with me for the rest of the blog post.
Get the tools of the trade:
As part of Telerik Platform, we offer a service called AppBuilder. AppBuilder is a complete IDE for building a Hybrid Mobile Application using Kendo UI Mobile. Using AppBuilder you can build iOS, Android and Windows Phone 8 hybrid mobile apps using a single pure HTML5, CSS & JavaScript codebase. Kendo UI Mobile is an adaptive rendering Mobile control set that will be used for the UI elements of the mobile app. You can know more about Kendo UI Mobile here. Visit the AppBuilder product overview page and sign up for a trial. You will have 30 days to try out AppBuilder and post that we will downgrade you to a starter tier. In starter tier you are allowed to build only 2 Mobile apps.

Telerik AppBuilder
IDE Choices:
AppBuilder provide 5 IDE choices and you can choose the one that suits you best. Here are the choices:
- In-Browser Client – develop hybrid mobile apps on the go with a web client that runs on all browsers
- Windows Client – Native windows application
- Visual Studio Extension – Extension for Visual Studio which provides all AppBuilder capabilities within VS
- Sublime Text Package – Package for Sublime Text Editor
- Command-Line Interface – access AppBuilder capabilities from command line on Windows or OS X
For the sake of this blog post I will be using the Windows Client of AppBuilder. I already have signed up for Telerik Platform and I have created a workspace in the Platform and will create a new hybrid mobile app in that workspace. To know more about the Telerik platform, check our documentation here.
Create a Mobile App:
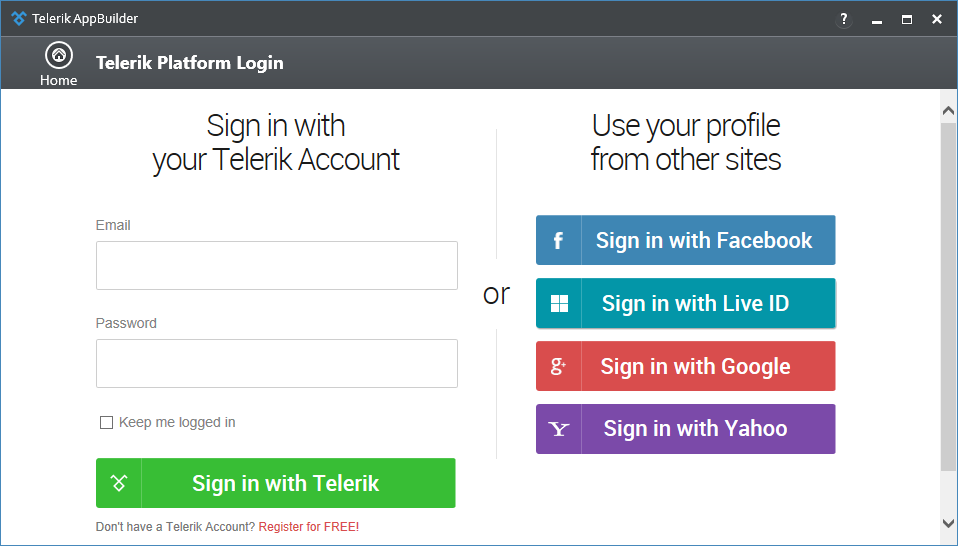
Now that we have the required tool for creating an app, lets get going. I am assuming at this point of time you have the AppBuilder Windows Client installer. Launch the AppBuilder windows client application. Since this is the first time, it will ask you for your Telerik Platform credentials.
Telerik Platform Credentials
Once you log in with your credentials, you will be presented with a “New” project creation dialog. From here you can select “Hybrid” > “Kendo UI Mobile App”. Provide a name for your mobile app and click create.

AppBuilder New Project Dialog
Here is the project structure that the IDE creates. Notice that Kendo UI Mobile control is added by default as we had selected Kendo UI Mobile App.

AppBuilder Project Structure
When you create a new project, IDE adds a dummy application out of the box. The app contains Home, Login, Location and Weather screen. In the scripts folder, you will find four scripts namely app.js, location.js, login.js and weather.js. The app.js contains the Kendo Mobile app creation code and other script files for the respective screens. At this moment if you just run the app by selecting Run > In Simulator or by pressing F5 in the IDE, you will see the following output:

Kendo UI Default Mobile App
We will clean up whatever default code has been created and start building our UI for Sales Order application.
Creating Mobile Application Layout:
Open the index.html and clear off everything that was added by default. Keep the reference to Kendo UI stylesheet, Cordova JavaScript file, jquery and app.js and remove rest of the things. The index.html, after the changes should look like below:

Cleaned Up Index Page
Now that we have a clean slate, let’s get started with our UI building process. First we will create a mobile layout that is required for our app.
This file contains hidden or bidirectional Unicode text that may be interpreted or compiled differently than what appears below. To review, open the file in an editor that reveals hidden Unicode characters.
Learn more about bidirectional Unicode characters
| <!–Layout–> | |
| <div data-role="layout" data-id="applayout"> | |
| <!–Header–> | |
| <div data-role="header"> | |
| <div data-role="navbar"> | |
| <span data-role="view-title"></span> | |
| </div> | |
| </div> | |
| </div> |
Let’s go over the code. We have a div whose data role is set to layout and we have given it an identifier. Then we create a header div and place a navbar inside it. Navbar will contain a place holder for the title that will be shown for the current active screen. The keywords “layout”,”navbar” and “view-title” are Kendo UI specific and the Kendo UI Mobile app engine understand what needs to be done. Now that we are done with the markup for layout, we need to let Kendo UI mobile app engine know that it has to use this layout as a default layout for the app. Open app.js and replace the following code:
app.application = new kendo.mobile.Application(document.body, { layout: “tabstrip-layout” });
with
app.application = new kendo.mobile.Application(document.body, { layout: “applayout” });
Next we will create our first screen in the app which will list all the partners in the Sales Order system
Create Partners Listing Screen:
The Sales Order System that we are using for this demo app has a Business Partners endpoint and lists all the partners in the system. So our first screen would be to list all partners alphabetically as a mobile list view. So let’s start coding. First let’s create a view and within the view we will keep mobile list view. I will used MVVM pattern and create a view model for this screen. The Kendo UI Mobile Views provides a way to bind the view model to the view itself. Here is the markup for the view:
This file contains hidden or bidirectional Unicode text that may be interpreted or compiled differently than what appears below. To review, open the file in an editor that reveals hidden Unicode characters.
Learn more about bidirectional Unicode characters
| <div id="homeView" data-role="view" data-model="app.Partners"> | |
| <header data-role="header"> | |
| <div data-role="navbar"> | |
| Business Partners | |
| </div> | |
| </header> | |
| <ul id="partners-listview" data-role="listview" | |
| data-template="partnerTemplate" | |
| data-bind="source: partners"></ul> | |
| <div data-role="footer"> | |
| <div data-role="tabstrip"> | |
| <a href="views/newPartnerView.html" data-icon="add">New</a> | |
| </div> | |
| </div> | |
| </div> |
It’s a simple div with a data role set to “View” and data model set to “app.Partners”. We will create the Partners view model next. Then I have a header where I have the navbar with a title. Then I create a mobile list view with an unordered list. By setting the data role of <ul> as listview, Kendo UI engine will work its magic at runtime and convert the <ul> to a mobile list view. The mobile list view requires item template which we will have to create next. The data source to listview is set to “partners” property on the view model.
Partner Item Template:
For the list view to display each item, it needs a template to be provided. Here is a simple template I have created:
This file contains hidden or bidirectional Unicode text that may be interpreted or compiled differently than what appears below. To review, open the file in an editor that reveals hidden Unicode characters.
Learn more about bidirectional Unicode characters
| <script type="text/x-kendo-template" id="partnerTemplate"> | |
| <div data-role="touch" data-bind="events: { tap: partnerSelected }"> | |
| <div style="font-size:20px;font-weight:bold"> | |
| <span>${Company}</span> | |
| </div> | |
| <div>${City} ${PostalCode}, ${Country}</div> | |
| </div> | |
| </script> |
You will notice the usage of ${} syntax. It is Kendo UI template syntax where you are telling the rendering engine that at run time it has to get the value of the property of the currently bound data object and emit that into the template.
Partners View Model JavaScript File:
We will create a view model which exposes the business partner’s related functionality like listing and details of a business partner. Add a new JS file in the Scripts folder and name it Partners.js. Here is the code snippet for the view model:
This file contains hidden or bidirectional Unicode text that may be interpreted or compiled differently than what appears below. To review, open the file in an editor that reveals hidden Unicode characters.
Learn more about bidirectional Unicode characters
| var app = app || {}; | |
| app.Partners=(function(){ | |
| 'use strict' | |
| //functionality here | |
| }()); |
As of now it’s a place holder and we will build the functionality as we proceed further.
Partner Data Model Object:
I will model the Business Partner entity that is exposed by the SalesOrder system as a JavaScript object in the partners.js file. Here is how my JavaScript object looks like:
This file contains hidden or bidirectional Unicode text that may be interpreted or compiled differently than what appears below. To review, open the file in an editor that reveals hidden Unicode characters.
Learn more about bidirectional Unicode characters
| var partnersModel=(function(){ | |
| //Data Model | |
| var partnerModel ={ | |
| id:"BusinessPartnerID", | |
| fields:{ | |
| Company:{field:'CompanyName'}, | |
| Email:{field:'EmailAddress'}, | |
| Phone:{field:'PhoneNumber'}, | |
| Fax:{field:'FaxNumber'}, | |
| Web:{field:'WebAddress'}, | |
| LegalForm:{field:'LegalForm'}, | |
| Currency:{field:'CurrencyCode'}, | |
| City:{field:'City'}, | |
| PostalCode:{field:'PostalCode'}, | |
| Street:{field:'Street'}, | |
| Building:{field:'Building'}, | |
| Country:{field:'Country'}, | |
| } | |
| }; | |
| //Data Source | |
| }()); |
Next we need to create a data source to connect to the OData service exposed by the Sales Order system. I am using Kendo UI Data source as my data source in the application. In order to read data from a service end point we need just set the URI on transport > read property of the data source. I will add this to partner data model itself. Here is the code snippet with the data source added:
This file contains hidden or bidirectional Unicode text that may be interpreted or compiled differently than what appears below. To review, open the file in an editor that reveals hidden Unicode characters.
Learn more about bidirectional Unicode characters
| var partnersModel=(function(){ | |
| var partnerModel ={ | |
| id:"BusinessPartnerID", | |
| fields:{ | |
| Company:{field:'CompanyName'}, | |
| Email:{field:'EmailAddress'}, | |
| Phone:{field:'PhoneNumber'}, | |
| Fax:{field:'FaxNumber'}, | |
| Web:{field:'WebAddress'}, | |
| LegalForm:{field:'LegalForm'}, | |
| Currency:{field:'CurrencyCode'}, | |
| City:{field:'City'}, | |
| PostalCode:{field:'PostalCode'}, | |
| Street:{field:'Street'}, | |
| Building:{field:'Building'}, | |
| Country:{field:'Country'}, | |
| } | |
| }; | |
| var partnersDataSource = new kendo.data.DataSource({ | |
| type:'odata', | |
| transport:{ | |
| read:{ | |
| url:function(){ | |
| return appSettings.dataSettings.partnersReadUrl; | |
| }, | |
| dataType:"json", | |
| }, | |
| }, | |
| sort: { | |
| field: "CompanyName", | |
| dir: "asc" | |
| }, | |
| schema: { | |
| model: partnerModel | |
| }, | |
| pageSize:50, | |
| serverPaging:true, | |
| serverSorting: true, | |
| }); | |
| return { | |
| partners: partnersDataSource | |
| } | |
| }()); |
Believe it or not, that data source is all you need to connect to any service which returns data in JSON format. Notice that for reading a service I am making use of a appSettings object. That is nothing but a simple JavaScript file with a bunch of settings. We will shortly take a look at that.
Partners View Model Object:
Now that we have the Partner Data Model and Data Source ready, we now create the partners view model which will expose a property called partners and partners is nothing but the instance of the kendo UI data source in the partner data model object. Here is the code snippet:
This file contains hidden or bidirectional Unicode text that may be interpreted or compiled differently than what appears below. To review, open the file in an editor that reveals hidden Unicode characters.
Learn more about bidirectional Unicode characters
| var partnersViewModel = (function(){ | |
| // Navigate to partner view When some partner is selected | |
| var partnerSelected = function (e) { | |
| app.application.navigate(appSettings.viewSettings.partnerView + '?uid=' + e.data.uid); | |
| }; | |
| return { | |
| partners: partnersModel.partners, | |
| partnerSelected: partnerSelected, | |
| }; | |
| }()); |
Here is the complete code listing of Partners.js we have implemented so far:
This file contains hidden or bidirectional Unicode text that may be interpreted or compiled differently than what appears below. To review, open the file in an editor that reveals hidden Unicode characters.
Learn more about bidirectional Unicode characters
| var app = app || {}; | |
| app.Partners=(function(){ | |
| 'use strict' | |
| var partnersModel=(function(){ | |
| var partnerModel ={ | |
| id:"BusinessPartnerID", | |
| fields:{ | |
| Company:{field:'CompanyName'}, | |
| Email:{field:'EmailAddress'}, | |
| Phone:{field:'PhoneNumber'}, | |
| Fax:{field:'FaxNumber'}, | |
| Web:{field:'WebAddress'}, | |
| LegalForm:{field:'LegalForm'}, | |
| Currency:{field:'CurrencyCode'}, | |
| City:{field:'City'}, | |
| PostalCode:{field:'PostalCode'}, | |
| Street:{field:'Street'}, | |
| Building:{field:'Building'}, | |
| Country:{field:'Country'}, | |
| } | |
| }; | |
| var partnersDataSource = new kendo.data.DataSource({ | |
| type:'odata', | |
| transport:{ | |
| read:{ | |
| url:function(){ | |
| return appSettings.dataSettings.partnersReadUrl; | |
| }, | |
| dataType:"json", | |
| }, | |
| }, | |
| sort: { | |
| field: "CompanyName", | |
| dir: "asc" | |
| }, | |
| schema: { | |
| model: partnerModel | |
| }, | |
| pageSize:50, | |
| serverPaging:true, | |
| serverSorting: true, | |
| }); | |
| return { | |
| partners: partnersDataSource | |
| } | |
| }()); | |
| var partnersViewModel = (function(){ | |
| // Navigate to partner view When some partner is selected | |
| var partnerSelected = function (e) { | |
| //TODO: implementation for screen navigation | |
| }; | |
| return { | |
| partners: partnersModel.partners, | |
| partnerSelected: partnerSelected, | |
| }; | |
| }()); | |
| return partnersViewModel; | |
| }()); |
App Settings:
In the code snippet for data source, the URL to read data was got from data settings of appsettings object. I have created a new JavaScript file “settings.js” in the scripts folder. Here is the code snippet for the same:
This file contains hidden or bidirectional Unicode text that may be interpreted or compiled differently than what appears below. To review, open the file in an editor that reveals hidden Unicode characters.
Learn more about bidirectional Unicode characters
| var appSettings = { | |
| dataSettings: | |
| { | |
| partnersReadUrl : "http://<your server>/sap/opu/odata/sap/ZGWSAMPLE_SRV/BusinessPartnerCollection", | |
| } | |
| }; |
Running the app:
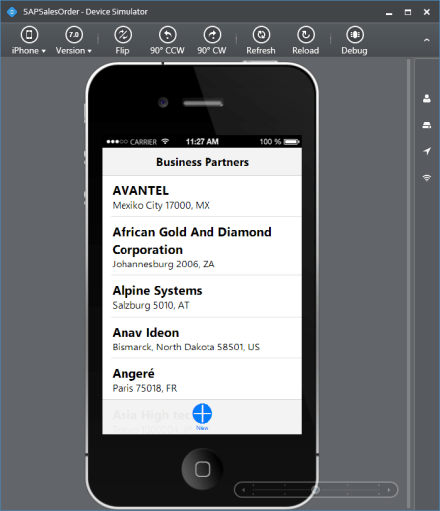
Now that we have finished creating the pieces of the application there is one last thing to do. We need to add reference to partner.js & settings.js in index.html. Once we add that, just press F5 on the IDE and the simulator will simulate the app we just built. Here is the screen shot of the app being simulated in iOS platform:

Business Partners Listing Screen
Wrap Up:
We have successfully created a mobile app which connects to a SAP backend and in particular a Sales Order system using Netweaver Gateway OData service and built a listing screen in the app. The listing screen is listing the business partners that are available in the system. One thing to note is how easy it was to create the app. The main point of this whole exercise is that of the Kendo UI Data Source which makes it super easy to connect to a service end point, invoke, retrieve data and bind it to the control. I didn’t sweat a lot to achieve this. So this is a good starting point. Next up we will create the Business Partner Details page. Stay tuned till my next blog post.

Pingback: Mobilizing your SAP Data with Kendo UI Mobile – Implementing Partner Details Screen – Part 3 | telerik helper
Pingback: Mobilizing your SAP Data with Kendo UI Mobile – New Partner Screen – Part 4 | telerik helper
Pingback: Mobilizing your SAP Data with Kendo UI Mobile – Wrap Up – Part 5 | telerik helper