This is a wrap up blog post for my series on mobilizing your SAP data with Kendo UI Mobile. So far I have written 4 parts on this series. Here are the links to the 4 parts of this series:
Here is a quick summary of what we have achieved so far with each part of the blog posts:
Part 1 – We took a look at the SAP demo system, got the credentials for the system and set up our environment to start work on Mobilizing SAP data.
Part 2 – We started out with building a mobile app using Telerik AppBuilder which is part of the Telerik Platform. We understood the project structure and created our first screen – Business Partners Listing.
Part 3 – In Part 2 we had built the listing of Business Partners. In Part 3 we went a step forward and built the Partner Details screen. When a Partner is clicked in the listing, we navigated to details screen.
Part 4 – we built a new screen to add new Business Partner to the system.
Things ahead:
I have provided you the basic structure of the mobile application so far. What you can do is to build upon the same techniques and add additional screens. For e.g. From a Partner details screen, we can navigate to his Orders. From Orders listing screen, we can then navigate to Order details. From Order details we can navigate to Order Item details screen. And in Item details screen we can list all the items in the order as a grid. I leave it up to you to try all this out.
Screen Shots:
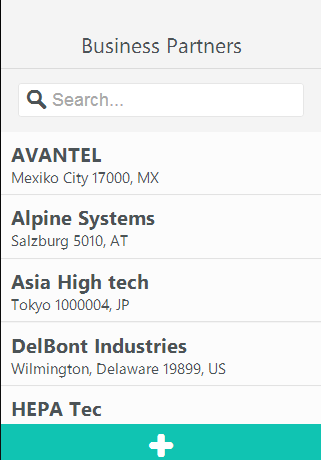
Partners Listing
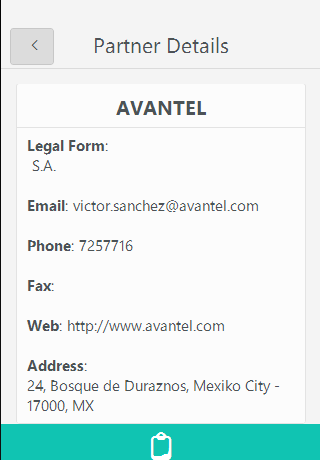
Partner Details
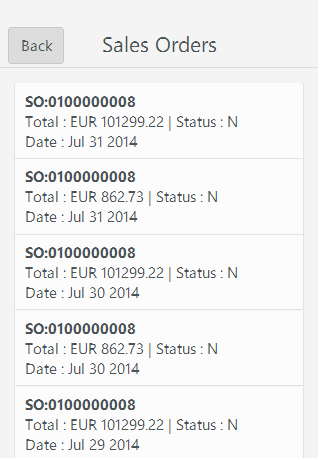
Orders Listing
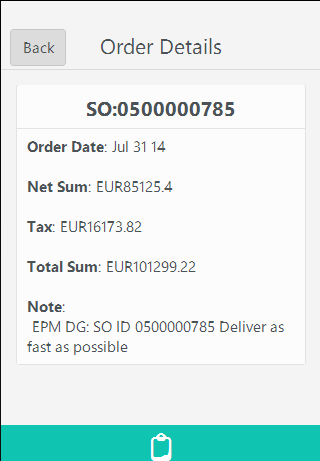
Order Details
Order Items Listing
Summary:
The primary goal of the 5 part blog series on “Mobilizing SAP Data with Kendo UI Mobile” was to showcase the power of Kendo UI Mobile and the ease with which you can mobilize your SAP data. One of the highlight of Kendo UI is its ability to consume and interact with OData Service endpoint out of the box. It does all the heavy lifting in terms of read, create, update and delete.
Hope this series helps you if you are trying to mobilize your SAP data. If you need further information or want to get in touch with us to help you out – feel free to reach out to me @ lohith.nagaraj@telerik.com.
This is 4th blog post in the series “Mobilizing Your SAP Data with Kendo UI”. So far we have seen how to set up the environment, create a mobile application and list business partners from the SAP Sales Order System and show a particular partners details. If you want to go through the first 3 part of this series, find the links below:
In this blog post we will be creating a screen to add a new partner to the business partner’s collection. So without much further ado, let’s get on with the business.
Home View Recap:
If you have been following the series, you will know by now that our home view is a listing of the Business Partners in the Sales Order system. In the footer of this view, we had created a tab in the tab strip with an add button. By clicking this add button we will navigate to “newPartnerview.html”. Here is the code snippet of home view:
This file contains hidden or bidirectional Unicode text that may be interpreted or compiled differently than what appears below. To review, open the file in an editor that reveals hidden Unicode characters. Learn more about bidirectional Unicode characters
The way we navigate to new partner view is just by pointing the href attribute of the anchor to “view/newPartnerView.html”. Kendo will do the navigation to the new screen by adding the default transition that is slide.
New Partner View:
Create a new HTML file in views folder and name it “newPartnerView.html”. We will create the form as below:
This file contains hidden or bidirectional Unicode text that may be interpreted or compiled differently than what appears below. To review, open the file in an editor that reveals hidden Unicode characters. Learn more about bidirectional Unicode characters
Notice that we use the Partner view model as the data model for new partner view. We have placed a save button in the header on the right hand side of the navbar. It is data bound to “add” method on the partner view model. The rest of the form is self-explanatory. Here is the code snippet of add method that we have added on the partner view model:
This file contains hidden or bidirectional Unicode text that may be interpreted or compiled differently than what appears below. To review, open the file in an editor that reveals hidden Unicode characters. Learn more about bidirectional Unicode characters
In add method, we build a JSON object and make use of Partners view model > partners datasource and call add on data source and tell the data source to sync the changes with the server. That’s all it is there to save a record if you use Kendo UI Data Source.
Update to Partners Data Source:
In part 2 of this series, we had created Partners view model and it had a partner’s data source. At that point we just had Read URL set up. But since we want to create a new record now, we set up Create URL on the data source. Here are the changes to the partners data source:
This file contains hidden or bidirectional Unicode text that may be interpreted or compiled differently than what appears below. To review, open the file in an editor that reveals hidden Unicode characters. Learn more about bidirectional Unicode characters
Notice the addition of create property to transport of Kendo UI data source. We also had to change the read property a little bit. If we have to send a create request to OData service, it is expecting a CSRF token. So, before we issue read instruction, we ask for CSRF token to be sent back to the client, and after read operation is completed, we fetch the token from the header and store it for further use. During create operation, we add the token to the header using the before send method of Kendo UI data source.
Running the App:
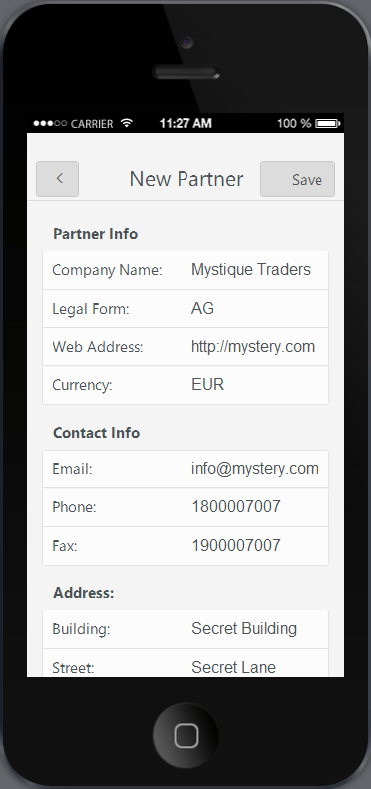
Now, our Create New Partner screen is complete. Time to run the app and see the output. Here is the screenshot of the new partner creation screen:
New Partner View
Summary:
In this blog post we saw an entity creation scenario. We created a data entry screen for adding a new business partner to the system. And we hardly wrote any code. With Kendo UI Data Source, handling CRUD scenarios is very easy as the data source does all the heavy lifting.
This blog post is a 3rd one in the series of “Mobilizing your SAP Data with Telerik Platform”. If you have not read my first 2 parts I suggest you take a look at those first. Here is the link to first 2 parts of this series:
In Part 1 I wrote about how to get started with SAP. In Part 2 I talked about building a mobile app using Kendo UI Mobile. We connected with the SAP data through the OData service that SAP Netweaver Gateway system provides. We were also able to build the first screen of the app namely the Partners listing screen. In this blog post we will look at how to build a screen that shows the details of the selected Partner. Let’s get started
Recap – Partner Item Template:
In the part 1 when we built the Partners listing screen, we used Kendo UI Mobile ListView to list the partners from the system. Each item in the ListView will be rendered by making use of an item template we provided. Just to recap that code, here is the code snippet of the item template:
This file contains hidden or bidirectional Unicode text that may be interpreted or compiled differently than what appears below. To review, open the file in an editor that reveals hidden Unicode characters. Learn more about bidirectional Unicode characters
Notice the usage of data-role=touch on the div and the data bind syntax where we trap the tap event and provide an event handler named “partnerSelected”. Here is the code snippet of the partnersViewModel where we have defined the partnerSelected event handler:
This file contains hidden or bidirectional Unicode text that may be interpreted or compiled differently than what appears below. To review, open the file in an editor that reveals hidden Unicode characters. Learn more about bidirectional Unicode characters
We saw that we have an event handler which handles the tap event of the partners listing listview. The code just navigates to a new view called partnerView. But the view name is not hard coded. It is coming from appsettings object which contains viewsettings and the value for partnerView. Also notice that we are passing the currently selected partner UID in the querystring. UID is the unique identifier that the Kendo UI Data Source maintains for each item in its data collection. We will use this information to get a single partner object from the collection using datasource method getbyid().
First let’s update the appsettings.js with viewsettings data. Here is the code snippet:
This file contains hidden or bidirectional Unicode text that may be interpreted or compiled differently than what appears below. To review, open the file in an editor that reveals hidden Unicode characters. Learn more about bidirectional Unicode characters
Notice that we have the URI of the new view set to “views/partnerView.html”. Let’s create a new folder under the root of the project by name “views” and create a new html file called “partnerView.html”.
Partner View Screen
When you add a new HTML file, the file content will have bare bone HTML code. Remove that basic HTML code as we don’t need that. Next we will create the partnerView UI.
Partner View UI:
As part of the partner view screen, we will just list out all the details of a partner like name, email, phone, address, etc. Here is the code snippet of the partner view:
This file contains hidden or bidirectional Unicode text that may be interpreted or compiled differently than what appears below. To review, open the file in an editor that reveals hidden Unicode characters. Learn more about bidirectional Unicode characters
Let’s go over the code once. It’s a simple div with its data role set to view. This is how Kendo UI knows that this is a page or screen in the app. We are trapping the show method of the view through data-show attribute and is bound to Partner object’s show() method. We will see the partner object in next section. Then we have spans to output different property of the partner and we have data bound different properties to the text property of the span. Next let’s take a look at the Partner JavaScript file.
Partner JavaScript Object:
In previous section we saw that the partner view screen is data bound to partner JavaScript object. Create a new JavaScript file named “partner.js” in scripts folder. And paste the following code in the script file:
This file contains hidden or bidirectional Unicode text that may be interpreted or compiled differently than what appears below. To review, open the file in an editor that reveals hidden Unicode characters. Learn more about bidirectional Unicode characters
Pay close attention to show() method. Remember that when we navigate from the partners listing screen, we had passed a querystring value which was the UID of the partner object. Here in partner view show method, we retrieve the UID and piggyback on app.Partners.partners data source and use the data source method getByUid() to retrieve the partner object. Once we get the object we use kendo.bind() method to data bind it to the view. With this the view at runtime get data bound with the partner object and the spans will show the appropriate data as they have the data-bind syntax.
Running the App:
One last thing to do is adding a reference to partner.js. Add a script reference to partner.js in the script block of index.html. After adding the reference, select Run > In Simulator from the toolbar. Here is the screen shot of the partner view:
Partner Details Screen
Don’t question me on the UI – I am a design handicap when it comes to UX. But we now have 2 screens as part of the application itself. We now have the Partners Listing screen and Partner Details screen. And we are making progress.
Summary:
In this blog post we looked at how to create Partner details screen. We created a HTML page and a corresponding JavaScript file. With the concept of DataBinding we were able to bind different properties of a Partner object to different span on the view. In the next part of this blog series, we will take a look at how to create a new partner right from the mobile app itself. So stay tuned.
This is the second post in the series of “Mobilizing Your SAP Data with Kendo UI Mobile”. If you haven’t read my first post, it’s a good idea to read it now and can be found here. In the first post I talked about getting the environment ready. In this second post I will be writing about how to create a mobile application with Kendo UI Mobile for the SAP data. So if that’s sounds interesting to you, stay along with me for the rest of the blog post.
Get the tools of the trade:
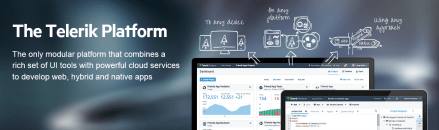
As part of Telerik Platform, we offer a service called AppBuilder. AppBuilder is a complete IDE for building a Hybrid Mobile Application using Kendo UI Mobile. Using AppBuilder you can build iOS, Android and Windows Phone 8 hybrid mobile apps using a single pure HTML5, CSS & JavaScript codebase. Kendo UI Mobile is an adaptive rendering Mobile control set that will be used for the UI elements of the mobile app. You can know more about Kendo UI Mobile here. Visit the AppBuilder product overview page and sign up for a trial. You will have 30 days to try out AppBuilder and post that we will downgrade you to a starter tier. In starter tier you are allowed to build only 2 Mobile apps.
Telerik AppBuilder
IDE Choices:
AppBuilder provide 5 IDE choices and you can choose the one that suits you best. Here are the choices:
In-Browser Client – develop hybrid mobile apps on the go with a web client that runs on all browsers
Command-Line Interface – access AppBuilder capabilities from command line on Windows or OS X
For the sake of this blog post I will be using the Windows Client of AppBuilder. I already have signed up for Telerik Platform and I have created a workspace in the Platform and will create a new hybrid mobile app in that workspace. To know more about the Telerik platform, check our documentation here.
Create a Mobile App:
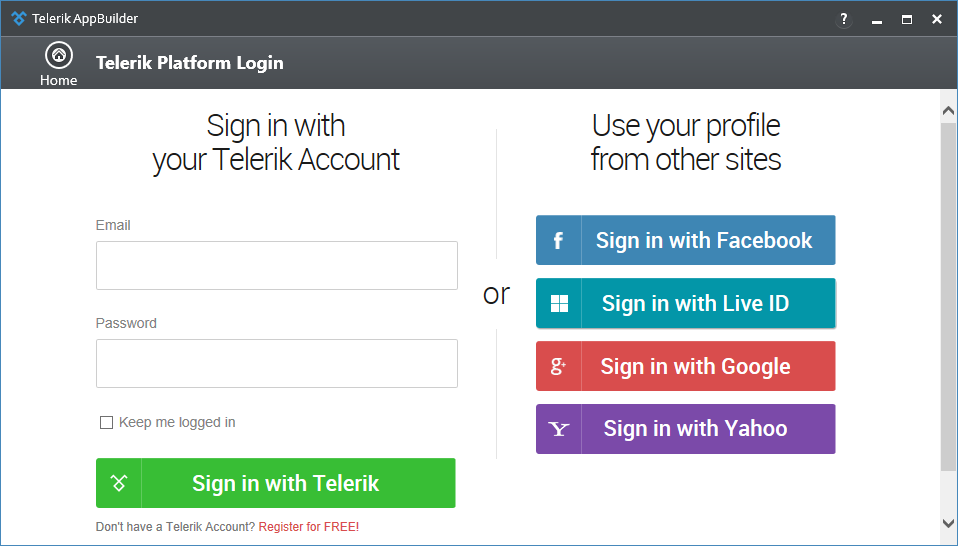
Now that we have the required tool for creating an app, lets get going. I am assuming at this point of time you have the AppBuilder Windows Client installer. Launch the AppBuilder windows client application. Since this is the first time, it will ask you for your Telerik Platform credentials.
Telerik Platform Credentials
Once you log in with your credentials, you will be presented with a “New” project creation dialog. From here you can select “Hybrid” > “Kendo UI Mobile App”. Provide a name for your mobile app and click create.
AppBuilder New Project Dialog
Here is the project structure that the IDE creates. Notice that Kendo UI Mobile control is added by default as we had selected Kendo UI Mobile App.
AppBuilder Project Structure
When you create a new project, IDE adds a dummy application out of the box. The app contains Home, Login, Location and Weather screen. In the scripts folder, you will find four scripts namely app.js, location.js, login.js and weather.js. The app.js contains the Kendo Mobile app creation code and other script files for the respective screens. At this moment if you just run the app by selecting Run > In Simulator or by pressing F5 in the IDE, you will see the following output:
Kendo UI Default Mobile App
We will clean up whatever default code has been created and start building our UI for Sales Order application.
Creating Mobile Application Layout:
Open the index.html and clear off everything that was added by default. Keep the reference to Kendo UI stylesheet, Cordova JavaScript file, jquery and app.js and remove rest of the things. The index.html, after the changes should look like below:
Cleaned Up Index Page
Now that we have a clean slate, let’s get started with our UI building process. First we will create a mobile layout that is required for our app.
This file contains hidden or bidirectional Unicode text that may be interpreted or compiled differently than what appears below. To review, open the file in an editor that reveals hidden Unicode characters. Learn more about bidirectional Unicode characters
Let’s go over the code. We have a div whose data role is set to layout and we have given it an identifier. Then we create a header div and place a navbar inside it. Navbar will contain a place holder for the title that will be shown for the current active screen. The keywords “layout”,”navbar” and “view-title” are Kendo UI specific and the Kendo UI Mobile app engine understand what needs to be done. Now that we are done with the markup for layout, we need to let Kendo UI mobile app engine know that it has to use this layout as a default layout for the app. Open app.js and replace the following code:
app.application = new kendo.mobile.Application(document.body, { layout: “tabstrip-layout” });
with
app.application = new kendo.mobile.Application(document.body, { layout: “applayout” });
Next we will create our first screen in the app which will list all the partners in the Sales Order system
Create Partners Listing Screen:
The Sales Order System that we are using for this demo app has a Business Partners endpoint and lists all the partners in the system. So our first screen would be to list all partners alphabetically as a mobile list view. So let’s start coding. First let’s create a view and within the view we will keep mobile list view. I will used MVVM pattern and create a view model for this screen. The Kendo UI Mobile Views provides a way to bind the view model to the view itself. Here is the markup for the view:
This file contains hidden or bidirectional Unicode text that may be interpreted or compiled differently than what appears below. To review, open the file in an editor that reveals hidden Unicode characters. Learn more about bidirectional Unicode characters
It’s a simple div with a data role set to “View” and data model set to “app.Partners”. We will create the Partners view model next. Then I have a header where I have the navbar with a title. Then I create a mobile list view with an unordered list. By setting the data role of <ul> as listview, Kendo UI engine will work its magic at runtime and convert the <ul> to a mobile list view. The mobile list view requires item template which we will have to create next. The data source to listview is set to “partners” property on the view model.
Partner Item Template:
For the list view to display each item, it needs a template to be provided. Here is a simple template I have created:
This file contains hidden or bidirectional Unicode text that may be interpreted or compiled differently than what appears below. To review, open the file in an editor that reveals hidden Unicode characters. Learn more about bidirectional Unicode characters
You will notice the usage of ${} syntax. It is Kendo UI template syntax where you are telling the rendering engine that at run time it has to get the value of the property of the currently bound data object and emit that into the template.
Partners View Model JavaScript File:
We will create a view model which exposes the business partner’s related functionality like listing and details of a business partner. Add a new JS file in the Scripts folder and name it Partners.js. Here is the code snippet for the view model:
This file contains hidden or bidirectional Unicode text that may be interpreted or compiled differently than what appears below. To review, open the file in an editor that reveals hidden Unicode characters. Learn more about bidirectional Unicode characters
As of now it’s a place holder and we will build the functionality as we proceed further.
Partner Data Model Object:
I will model the Business Partner entity that is exposed by the SalesOrder system as a JavaScript object in the partners.js file. Here is how my JavaScript object looks like:
This file contains hidden or bidirectional Unicode text that may be interpreted or compiled differently than what appears below. To review, open the file in an editor that reveals hidden Unicode characters. Learn more about bidirectional Unicode characters
Next we need to create a data source to connect to the OData service exposed by the Sales Order system. I am using Kendo UI Data source as my data source in the application. In order to read data from a service end point we need just set the URI on transport > read property of the data source. I will add this to partner data model itself. Here is the code snippet with the data source added:
This file contains hidden or bidirectional Unicode text that may be interpreted or compiled differently than what appears below. To review, open the file in an editor that reveals hidden Unicode characters. Learn more about bidirectional Unicode characters
Believe it or not, that data source is all you need to connect to any service which returns data in JSON format. Notice that for reading a service I am making use of a appSettings object. That is nothing but a simple JavaScript file with a bunch of settings. We will shortly take a look at that.
Partners View Model Object:
Now that we have the Partner Data Model and Data Source ready, we now create the partners view model which will expose a property called partners and partners is nothing but the instance of the kendo UI data source in the partner data model object. Here is the code snippet:
This file contains hidden or bidirectional Unicode text that may be interpreted or compiled differently than what appears below. To review, open the file in an editor that reveals hidden Unicode characters. Learn more about bidirectional Unicode characters
Here is the complete code listing of Partners.js we have implemented so far:
This file contains hidden or bidirectional Unicode text that may be interpreted or compiled differently than what appears below. To review, open the file in an editor that reveals hidden Unicode characters. Learn more about bidirectional Unicode characters
In the code snippet for data source, the URL to read data was got from data settings of appsettings object. I have created a new JavaScript file “settings.js” in the scripts folder. Here is the code snippet for the same:
This file contains hidden or bidirectional Unicode text that may be interpreted or compiled differently than what appears below. To review, open the file in an editor that reveals hidden Unicode characters. Learn more about bidirectional Unicode characters
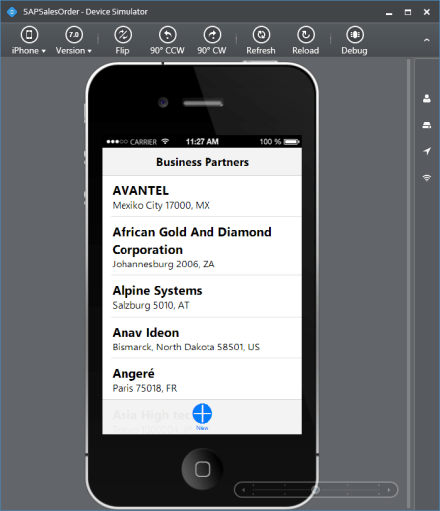
Now that we have finished creating the pieces of the application there is one last thing to do. We need to add reference to partner.js & settings.js in index.html. Once we add that, just press F5 on the IDE and the simulator will simulate the app we just built. Here is the screen shot of the app being simulated in iOS platform:
Business Partners Listing Screen
Wrap Up:
We have successfully created a mobile app which connects to a SAP backend and in particular a Sales Order system using Netweaver Gateway OData service and built a listing screen in the app. The listing screen is listing the business partners that are available in the system. One thing to note is how easy it was to create the app. The main point of this whole exercise is that of the Kendo UI Data Source which makes it super easy to connect to a service end point, invoke, retrieve data and bind it to the control. I didn’t sweat a lot to achieve this. So this is a good starting point. Next up we will create the Business Partner Details page. Stay tuned till my next blog post.
On Jun 26 2014, we presented a webinar titled “Mobilizing Your SAP Data with Telerik Platform”. This was part of our regular webinars we do here in Telerik India. This is a recap of that webinar. You will find the slide deck that was used in the webinar and the video recording of the webinar.
This webinar we focused on a enterprise story. Most of the enterprises today have SAP rolled out in their organization. As you all know SAP is a enterprise software to manage business operations and customer relations. One of the challenges that enterprises face is – how to mobilize the SAP data. You may want to expose the SAP data and make that data available through a Mobile Application so that people on the field can use it.
In this webinar I explain how you can expose data from SAP and use Kendo UI Mobile controls which are part of Telerik Platform to create a Hybrid Mobile App and target it to any mobile platform.
Telerik Platform
Slidedeck:
Here is the slide deck that was used in the webinar:
Video Recording:
Here is the video recording of the webinar:
T-Shirt Giveaway:
As with any other webinars of ours, we have 2 lucky audience selected to receive our .NET Ninja t-shirt. Here are the 2 attendees who have been choosen:
Eknath Pawar
Ujjwal Kumar
Congratulations to the winners. We will contact you and ship your t-shirt. Others don’t worry as we still have a lot of webinars lined up. We look forward to your presence in our future webinars.
Over the last couple of years that I have been evangelizing for Telerik, I have met a lot of customers and in particular enterprise customers. Most of the big enterprises have SAP deployed in their organization. This gives them the flexibility of having point to point information with respect to their projects or revenue or even an employee. In short SAP is one of the widely used system in enterprises. But it comes with its own environment and applications. The number one question from enterprise customers for us has always been “how does your offering work with SAP?” A fair question especially when it comes to engaging with a third party vendor. This question was more of a high priority question when it came to Mobile teams in the enterprises. How soon can you go to market with an application and expose the SAP data.
The questions from the enterprises led me to write this 2 part series on how to mobilize your SAP data. This blog post is the first in this series and below is how I have planned out the 3 part series blog post:
Mobilizing Your SAP Data with Kendo UI Mobile – Get the Environment Ready – Part 1
Mobilizing Your SAP Data – Mobile App Development – Part 2
If you are as excited as I am, then be with me in this journey of 2 blog posts. So let’s get started.
What is SAP ERP?
According to the dictionary of the web i.e. Wikipedia, SAP ERP is defined as follows:
SAP ERP is an Enterprise Resource Planning software which provides an integrated solution that incorporates key business functions of an organization.
I will not be delving too much in to SAP as a software as that is not the intention of the blog post. Now that we know what is SAP let’s see how to expose data from SAP so that applications outside of SAP can consume them.
SAP Netweaver Gateway:
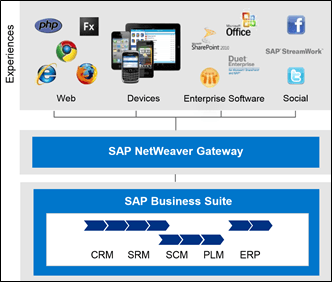
In order for the SAP data to be exposed to outside world you use a technology called SAP Netweaver Gateway to develop REST based ODATA services. According to SAP, Netweaver Gateway is defined as:
Technology that provides a simple way to connect devices, environments and platforms to SAP software based on market standards.
SAP Netweaver Gateway offers connectivity to SAP applications using any programming language and you do not need to have SAP knowledge. SAP Netweaver Gateway leverages the REST Services and OData/ATOM protocols for data exchange.
SAP Netweaver Gateway System
Again I won’t be getting into too much details as to how you do this. SAP Community Network (SCN) has tutorials on how to do this.
SalesOrders All the Sales Orders can be read using this collection
SalesOrderItems Items of a Sales Order can be read from this collection
Products Collection of products which can be purchased
BusinessPartners Collection of Partners with whom the company does transaction
Setting Up Reverse Proxy:
Services exposed by SAP Netweaver Gateway Demo system are all protected and need credentials to access them. In the previous section we talked about getting access to the demo system. During that process you would have used a username and password. You need the same credentials to authenticate against the demo system when querying for data.
In order for us to perform full CRUD on the demo system we will need to setup a reverse proxy in order to overcome the Same Origin policy restriction. A reverse proxy should be used for sending client HTTP requests designated to its domain to the correct server. Reverse proxy can be achieved in 2 ways. They are:
We can also create a simple reverse proxy using ASP.NET Web API.
Reverse Proxy using ASP.NET Web API:
A simple reverse proxy can be easily created using ASP.NET Web API. Idea is to create a Web API and pass the SAP URI we need query data as a query string parameter. The Web API will read the query string value and use that as a URI to connect to the SAP Service. Response from SAP Service will be relayed back to the client as JSON. Following code snippet shows the Web API Controller and in particular the Get action method:
public class ProxyController : ApiController
{
        string username = "<username>";
        string password = "<password>";
        // GET: api/Proxy
        public async Task<JsonResult<string>> Get(string url)
        {
            var sapUri = new Uri(url);
            using (var client = new HttpClient())
            {
                var base64String = GetBase64String(username, password);
                client.DefaultRequestHeaders.Add("Accept", "application/json");
                client.DefaultRequestHeaders.Add("Authorization", "Basic " + base64String);
                var response = await client.GetAsync(sapUri);
                HttpContext.Current.Response.StatusCode = (int)response.StatusCode;
                return Json(await response.Content.ReadAsStringAsync());
            }
        }
}
Instead of querying the SAP service directly from the mobile application, we will querying the proxy we just created above and pass the SAP service URL as a query string. Here is the usage:
Notice that we pass an Authorization header when making a request. SAP Services expect an authorization header and we pass the username:password string converted to base 64 and pass it as a request header. I have showed the example of a Read or Get. But on the similar grounds you can create the Create/Update/Delete actions also.
Summary:
With this blog post we start a journey to read data from SAP and use that data in a mobile application. As a first step we learnt that SAP data can be exposed to outside world using the SAP Netweaver Gateway system. We looked at various the demo services and picked the Sales Order system as a candidate to build the mobile app. In next post we will create a mobile application using Kendo UI Mobile framework and Telerik App Builder.