
Read – Revamping Web Applications: Proposed Enhancements
We have a page that displays already registered sessions. Currently, we are using Asp:ListView to represent the data and , the inbuilt features, we have used include,
- Removing the existing sessions,
- Redirecting to the session details,
- Navigate using the DataPager.

Now, we would represent the same data through the help of RadScheduler. The reason we have chosen Scheduler is because all the registered session/appointments would be visible in a calendar format. The timeline of this calendar, along with date view also provides the time view which provides a perfect solution for an end-user. Under Telerik AJAX Calendar and Scheduler Components (me using the 2013 Q1 for Net 45) select RadScheduler.
Programmatic
For the best explanation and indepth knowledge its better if we write code rather than using wizards. We open the code behind file and implement the following prerequisites:
Add the following headers:
using Telerik.Web.UI;
using EventNetworking.Data;
Under the class add NetworkingDataContext ndx = new NetworkingDataContext();
This creates a context for the data from our DAL (Data Access Layer).
Attach datasource to the RadScheduler first time the page is loaded.
if (!IsPostBack)
{
 // SECTION 1: Defining the data source
 var sessiontime = from st in ndx.SessionAttendees
 join ss in ndx.Sessions on st.SessionID equals ss.SessionID
 join sts in ndx.SessionTimeSlots on ss.TimeSlotID equals sts.TimeSlotID
 where st.UserID == Convert.ToInt32(userID.Value)
 orderby sts.FromTime
 select new
 {
 FromTime = sts.FromTime,
 Duration = sts.Durationinmins,
 EndTime = sts.FromTime.AddMinutes(Convert.ToDouble(sts.Durationinmins)),
 Title = ss.Title,
 SessionAttendeeUID = st.SessionAttendeeUID,
 SessionID = st.SessionID,
 UserID = st.UserID
 };

 // SECTION 2: Extracting the current user details
 int userid = (from m in ndx.UserProfiles
 where m.Username == User.Identity.Name
 select m.UserId).First();
 userID.Value = userid.ToString();

 // SECTION 3: Setting the RadScheduler Properties (necessary)
 sessionCartScheduler.DataKeyField = "SessionAttendeeUID";
 sessionCartScheduler.DataStartField = "FromTime";
 sessionCartScheduler.DataEndField = "EndTime";
 sessionCartScheduler.DataSubjectField = "Title";

// SECTION 3.1: Attach the newly created dataSource to the control
 sessionCartScheduler.DataSource = sessiontime.ToList();

// SECTION 4: Setting further properties of RadScheduler(optional)
 var minDate = from d in sessiontime
 orderby d.FromTime
 select d.FromTime;
 if (minDate.Count() != 0)
 sessionCartScheduler.SelectedDate = Convert.ToDateTime(minDate.FirstOrDefault());

// SECTION 5: Binding the control with the dataSource
 sessionCartScheduler.DataBind();
}
And your application is ready to run.
SECTION 1: We need an appropriate data to be represented in a Scheduler view. Hence, we have created a data source namely sessiontime. We plan to represent the user specified session. To do so, the join query is used to create a new view which includes the very important timing details, session title and session key.
SECTION 2: Detail of the current user is necessary because the cart functionality is specific to self.
SECTION 3: For RadScheduler to work we need to specify its DataKeyField, DataStartField, DataEndField, DataSubjectField and DataSource. DataSource property is where we attach the data to the control.
| Property | Details |
| DataSourceID | Overridden. Gets or sets the ID property of the data source control that the RadScheduler should use to retrieve its data source. |
| DataKeyField | Gets or sets the key field for appointments in the data source specified by the DataSourceID property. |
| DataStartField | Gets or sets the start field for appointments in the data source specified by the DataSourceID property. |
| DataEndField | Gets or sets the end field for appointments in the data source specified by the DataSourceID property. |
| DataSubjectField | Gets or sets the subject field for appointments in the data source specified by the DataSourceID property. |
Next, we tweak/explore some more features to improve our Scheduler. We don’t want our users to end up on a random date.
SECTION 4: We have set the date to the date when the first event takes place.
SECTION 5: We finally bind the data to the control.
Let us now add a click event to the session, such that the page is redirected to the session details once clicked.
protected void sessionCartScheduler_AppointmentClick(object sender, SchedulerEventArgs e)
 {
 int sessionIDvalue = (from sa in ndx.SessionAttendees
 where sa.SessionAttendeeUID == Convert.ToInt16(e.Appointment.ID)
 select sa.SessionID).FirstOrDefault();
 string sessionURL = "~/session/" + sessionIDvalue.ToString();
 Response.Redirect(sessionURL);
 }
Also, let us define what happens when a person clicks the cross symbol on the appointment.
protected void sessionCartScheduler_AppointmentDelete(object sender, AppointmentDeleteEventArgs e)
{
 //SECTION 1: Extracting the complete row of the selected tab and deleting it
 int uid = Convert.ToInt32(e.Appointment.ID);
 SessionAttendee sa = (from s in ndx.SessionAttendees
 where s.SessionAttendeeUID == uid
 select s).First() as SessionAttendee;
 ndx.Delete(sa);
 ndx.SaveChanges();

//SECTION 2: Refreshing the control
 var sessiontime = from st in ndx.SessionAttendees
 join ss in ndx.Sessions on st.SessionID equals ss.SessionID
 join sts in ndx.SessionTimeSlots on ss.TimeSlotID equals sts.TimeSlotID
 where st.UserID == Convert.ToInt32(userID.Value)
 orderby sts.FromTime
 select new
 {
 FromTime = sts.FromTime,
 Duration = sts.Durationinmins,
 EndTime = sts.FromTime.AddMinutes(Convert.ToDouble(sts.Durationinmins)),
 Title = ss.Title,
 SessionAttendeeUID = st.SessionAttendeeUID,
 SessionID = st.SessionID,
 UserID = st.UserID
 };

 sessionCartScheduler.DataSource = sessiontime.ToList();
 sessionCartScheduler.DataBind();

 e.Cancel = true;
}
SECTION 1: To delete the item from the table we first need to extract that row from the context. Once we have extracted the row we can easily remove the data using the CRUD Operations of OpenAccess ORM.
“e.Appointment.ID” is used to abstract the DataKeyField of the RadScheduler.
SECTION 2: Once the data is removed we need to rebind the data. To rebind the data, we need to refresh the data source. Hence, we create a data source and bind the control.
Until now we talked about how we can do things programmatically. Let us now focus on the wizard of the control.
Declarative
Click the smart tag and open Configuration Wizard.
A few which we have used are:
![clip_image002[5]](https://telerikhelper.net/wp-content/uploads/2013/05/clip_image0025.jpg "clip_image002[5]")
Under the Day View tab- Check “Enable exact time rendering”
The XAMl code for RadScheduler looks like the following:
<telerik:RadScheduler ID="sessionCartScheduler" runat="server" AllowEdit="False" AllowInsert="False"
OnAppointmentClick="sessionCartScheduler_AppointmentClick" Height="500px"
OnAppointmentDelete="sessionCartScheduler_AppointmentDelete"
SelectedDate="2013-04-27" Skin="Windows7" EditFormTimeFormat="hh:mm" ShowFullTime="True">
<AdvancedForm TimeFormat="hh:mm" EnableTimeZonesEditing="True"></AdvancedForm>
<DayView EnableExactTimeRendering="True"></DayView>
</telerik:RadScheduler>
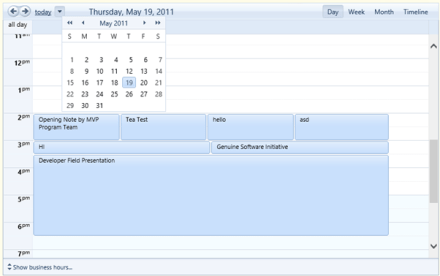
We are now done defining the control and our controls should look like the following:


If you have any trouble implementing, please post the difficulties in the comments.
Read- Revamping Web Application Part-11 : Implement RadAutoCompleteBox

Pingback: Revamping Web Application: Implement RadAutoCompleteBox | Telerik Helper
Pingback: Working with RadWindows & Converting GridView to RadGrid | Telerik Helper
Pingback: Revamping Web Applications Part-1 | Telerik Helper