
In this post we will take a step by step look on creating Android app using Visual Studio. To create Android or iPhone app you need Icenium Extension for Visual Studio.
Let us start step by step from installation to creating Android APK package. Follow the steps below,
Step1: Download and Installation
Very first you need to install Icenium Extension for Visual Studio from here . After successful download close all running instances of Visual Studio and install Icenium Extension for Visual Studio.

After successful installation launch Visual Studio and you will get Icenium tab. There you can choose any project template as per your requirement.

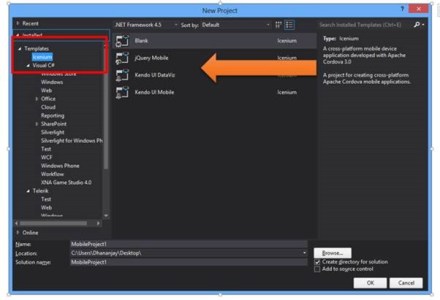
Step2: Create project
After successful download and installation go ahead and create project for Cross Platform Mobile Application. You have four options to create application depending on library you want to use.
For example if you want to use your own library then go ahead and select Blank Project Template and start adding your own library to create apps.
To create app using jQuery Mobile select jQuery Mobile project template.
To create app using Kendo UI Mobile select Kendo UI Mobile project template. In this scenario I am going to create app using Kendo UI Mobile.
Here I have created a project selecting Kendo UI Mobile. On successful creation of project, you get a reference project created for you. You can use this as reference to build your app further. Project structure in solution explorer will look like following,

In this post I am not going into much details of programming aspect so let us consider that we want to publish default created app to Google Play.
Step 3: Build and Test in Simulator
We are going to build default reference app got created. In menu you will find an option Icenium.
![clip_image002[6]](https://telerikhelper.net/wp-content/uploads/2013/09/clip_image0026.jpg "clip_image002[6]")
To test application in simulator select Run in Simulator option. You will get application running in simulator. Icenium supports iPhone, iPad, Android, Android tab simulator. In Android phone simulator default created app will look like as given in below image,

We will talk in detail about simulator in later posts.
Next we need to build app for Android. You can do that by selecting Build App in Cloud option from Icenium menu in visual studio.

Here select Android Build option. After successful build you will get two options to run Android app on device.

Option one is to scan the QR code and option two is that you will find apk package in project’s bin->debug->android folder.
![clip_image002[8]](https://telerikhelper.net/wp-content/uploads/2013/09/clip_image0028.jpg "clip_image002[8]")
You need to upload apk package in Google Play to publish your android app to Google Play.
We just learnt it is super easy to create Android app in Visual Studio using Icenium extension.

sir where apk file is save and where code is write for button press
Pingback: Mobile App Studio | goodbusinessblogger
Its Free?