How to work with Images in RadDataGrid in XAML based Windows Store Application

Learn more about Rad Controls for Windows 8 here

Before you start with this post I recommend you to read following blog posts to get it started with RadDataGrid.

Video: Getting started with RadDataGrid in XAML based Windows Store Application

Three Steps to work with RadDataGrid in XAML based Windows Store Application

In this post we will take a look on working with Images as column value in RadDataGrid. As we discussed in this post that there are two types of columns in RadDataGrid.

image

To work with images we need to work with TemplateColumns. TemplateColumn uses DataTemplate to define content of column. To start with let us create business class Product. We will display collection of Products in RadDataGrid. Product class is defined as following. Along with other properties there is a property of Product Image. ProductImage property will hold URL of Image to be displayed for each Products.


public class Product
 {
 public string ProductName { get; set; }
 public double ProductPrice { get; set; }
 public string ProductType { get; set; }
 public BitmapImage ProuctImage { get; set; }
 }

Next let us create collection of Products locally. GetProducts function will return list of Products. We will bind this function as ItemSource of RadDataGrid.


private List<Product> GetProducts()
 {
 List<Product> lstProduct = new List<Product>()
 {
 new Product
 {
 ProductName = "Pen",
 ProductPrice = 100,
 ProductType = "Education",
 ProuctImage = new BitmapImage(new Uri("/ProductImages/Pen.jpg",UriKind.Relative))
 },
 new Product
 {
 ProductName ="Pencil",
 ProductPrice = 50,
 ProductType = "Education",
 ProuctImage = new BitmapImage(new Uri("/ProductImages/Pencil.jpg",UriKind.Relative))

 },
 new Product
 {
 ProductName ="Math Book",
 ProductPrice = 345,
 ProductType = "Education",
 ProuctImage = new BitmapImage(new Uri("/ProductImages/Mathbook.jpg",UriKind.Relative))

 },
 new Product
 {
 ProductName ="Ball",
 ProductPrice = 23,
 ProductType = "Sports",
 ProuctImage = new BitmapImage(new Uri("/ProductImages/Ball.jpg",UriKind.Relative))

 },
 new Product
 {
 ProductName ="Cricket Bat",
 ProductPrice = 560,
 ProductType = "Sports",
 ProuctImage = new BitmapImage(new Uri("/ProductImages/Cricketbat.jpg",UriKind.Relative))

 },
 new Product
 {
 ProductName ="Baseball Bat",
 ProductPrice = 550,
 ProductType = "Sports",
 ProuctImage = new BitmapImage(new Uri("/ProductImages/Baseballbat.jpg",UriKind.Relative))

 },
 };
 return lstProduct;
 }

As of now we have data source in place. Next we need to create RadDataGrid. After creating RadDataGrid we will create DataGridTemplateColumn with DataTemplate. To create RadDataGrid with image as one of the column value we need to follow following steps inside RadDataGrid.

Step 1: Create DataGridTemplateColumn

Step 2: Create DataGridTemplateColumn.CellContentTemplate

Step 3: Create DataTemplate and put Image inside this

We can create RadDataGrid Column with Image in column value as following,

image

We can create columns for each properties in the same way we created for ProductImage property. Final RadDataGrid with columns can be created as following,


<Page
 x:Class="RadDataGridProductDemo.MainPage"
 xmlns="http://schemas.microsoft.com/winfx/2006/xaml/presentation"
 xmlns:x="http://schemas.microsoft.com/winfx/2006/xaml"
 xmlns:local="using:RadDataGridProductDemo"
 xmlns:d="http://schemas.microsoft.com/expression/blend/2008"
 xmlns:mc="http://schemas.openxmlformats.org/markup-compatibility/2006"
 xmlns:telerik="using:Telerik.UI.Xaml.Controls.Grid"
 mc:Ignorable="d">

<Grid Background="{StaticResource ApplicationPageBackgroundThemeBrush}">
 <telerik:RadDataGrid x:Name="ProductGrid" AutoGenerateColumns="False">
 <telerik:RadDataGrid.Columns>
 <telerik:DataGridTemplateColumn Header="Name" >
 <telerik:DataGridTemplateColumn.CellContentTemplate>
 <DataTemplate>
 <TextBlock Text="{Binding ProductName}"
 VerticalAlignment="Center"
 HorizontalAlignment="Center"/>
 </DataTemplate>
 </telerik:DataGridTemplateColumn.CellContentTemplate>
 </telerik:DataGridTemplateColumn>
 <telerik:DataGridTemplateColumn Header="Photo" >
 <telerik:DataGridTemplateColumn.CellContentTemplate>
 <DataTemplate>
 <StackPanel>
 <Image Source="{Binding ProductImage}"
 Height="100"
 Width="100" />
 </StackPanel>
 </DataTemplate>
 </telerik:DataGridTemplateColumn.CellContentTemplate>
 </telerik:DataGridTemplateColumn>
 <telerik:DataGridTemplateColumn Header="Price" >
 <telerik:DataGridTemplateColumn.CellContentTemplate>
 <DataTemplate>
 <TextBlock Text="{Binding ProductPrice}"
 VerticalAlignment="Center"
 HorizontalAlignment="Center"/>
 </DataTemplate>
 </telerik:DataGridTemplateColumn.CellContentTemplate>
 </telerik:DataGridTemplateColumn>
 <telerik:DataGridTemplateColumn Header="Type" >
 <telerik:DataGridTemplateColumn.CellContentTemplate>
 <DataTemplate>
 <TextBlock Text="{Binding ProductType}"
 VerticalAlignment="Center"
 HorizontalAlignment="Center"/>
 </DataTemplate>
 </telerik:DataGridTemplateColumn.CellContentTemplate>
 </telerik:DataGridTemplateColumn>

 </telerik:RadDataGrid.Columns>
 </telerik:RadDataGrid>
 </Grid>
</Page>

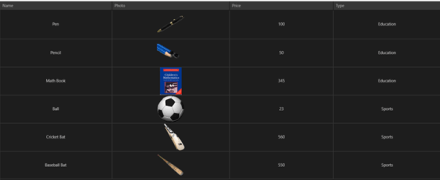
Now go ahead and run application. You will find Product Images as one of the column value.

image

In this way you can work with Images as column value in RadDataGrid. I hope you find this post useful. Thanks for reading.

Learn more about Rad Controls for Windows 8 here

Advertisement

Three Steps to work with RadDataGrid in XAML based Windows Store Application

Recently I was talking to Windows Store App Developers. When I show them demo of RadDataGrid , all they got very excited. One of the manager asked me to show working with RadDataGrid in simplest steps. In this post we will take a look on working with RadDataGrid in three simple steps.

Learn more about Rad Controls for Windows 8 here

Step 1: Add Rad Controls for Windows 8 reference

Go ahead launch Visual Studio and create a new Windows Store Application. Select Blank App project template to create application. After project being created add Rad Controls for Windows 8 reference in the project. To add reference right click on Reference in project and select Add Reference.

image

After adding reference on XAML add namespace to work with RadDataGrid


xmlns:telerik="using:Telerik.UI.Xaml.Controls.Grid"

Step 2: Create Business object

Next step you need to create business object. Let us create business objects for Product


public class Product
 {

 public string ProductName { get; set; }
 public double ProductPrice { get; set; }
 public string ProductType { get; set; }
 public bool InStock { get; set; }
 }

We will display Products in RadDataGrid. In real time scenario List of Products will be fetched from Services. For purpose of this post let us create List of Products as collection locally.


private List<Product> GetProducts()
 {
 List<Product> lstProduct = new List<Product>
 {
 new Product
 {
 ProductName ="Pen",
 ProductPrice = 100,
 ProductType = "Education",
 InStock = true
 },
 new Product
 {
 ProductName ="Pencil",
 ProductPrice = 50,
 ProductType = "Education",
 InStock = false
 },
 new Product
 {
 ProductName ="Math Book",
 ProductPrice = 345,
 ProductType = "Education",
 InStock = true
 },
 new Product
 {
 ProductName ="Ball",
 ProductPrice = 23,
 ProductType = "Sports",
 InStock = true
 },
 new Product
 {
 ProductName ="Cricket Bat",
 ProductPrice = 560,
 ProductType = "Sports",
 InStock = true
 },
 new Product
 {
 ProductName ="Baseball Bat",
 ProductPrice = 550,
 ProductType = "Sports",
 InStock = false
 },
 };

return lstProduct;
 }

Step 3: Create RadDataGrid and bind with the datasource

In last step you need to put RadDataGrid on XAML and bind it to data source. RadDataGrid can be created as following


<telerik:RadDataGrid x:Name="ProductGrid" />

Next you need to bind RadDataGrid to List of Products. You can do that as following


this.ProductGrid.ItemsSource = GetProducts();

Run Application

On running application you will find RadDataGrid. You will notice that by default RadDataGrid supports sorting on columns

image

In these 3 simple steps you can start working with RadDataGrid in XAML based Windows Store Application. In further posts we will get into deeper concepts of RadDataGrid. I hope you find this post useful. Thanks for reading.

Learn more about Rad Controls for Windows 8 here

Complex Object and RadAutoCompleteBox in XAML based Windows Store Application

Learn more about Rad Controls for Windows 8 here

In this post we will take a look on working with Complex Business object and RadAutoCompleteBox in XAML based Windows Store Application. To start with make sure that you have added RadControls for Windows 8 reference in project. To add reference right click on project and from Extensions tab select RadControls for Windows8.

image

After adding reference of RadControls for Windows 8 you need to create business object. Let us assume, we are going to work with Employee object. You need to create Employee class is as follows,

public class Employee
 {
 public string FirstName { get; set; }
 public string LastName { get; set; }
 public string Department { get; set; }

}
}

As of now you have created Employee class. Next you need to create or rather populate Employee data. There are many ways Employee data can be populated in application. Some of them are as follows,

  • From WCF SOAP Service
  • From WCF REST based Service returning either JSON or XML.
  • From OData Service etc

For purpose of this post we are going to populate data locally. Let us create a function returns collection of Employee

private List<Employee> GetEmployees()
 {
 List<Employee> lstEmployee = new List<Employee>
 {
 new Employee
 {
 FirstName = "Dhananjay",
 LastName = "Kumar",
 Department = "Team1"
 },
 new Employee
 {
 FirstName = "Dhananjay",
 LastName = "Kumar",
 Department = "Team1"
 },
 new Employee
 {
 FirstName = "Deepak",
 LastName = "Chwala",
 Department = "Team2"
 },
 new Employee
 {
 FirstName = "Amit",
 LastName = "Chawla",
 Department = "Team1"
 },
 new Employee
 {
 FirstName = "Arun",
 LastName = "Narayn",
 Department = "Team2"
 },
 new Employee
 {
 FirstName = "Bunty",
 LastName = "Goyel",
 Department = "Team1"
 },
 new Employee
 {
 FirstName = "Boman",
 LastName = "Irani",
 Department = "Team2"
 },
 new Employee
 {
 FirstName = "Charu",
 LastName = "Sharma",
 Department = "Team2"
 },
 new Employee
 {
 FirstName = "Depanker",
 LastName = "Banerjee",
 Department = "Team1"
 },
 new Employee
 {
 FirstName = "Ashok",
 LastName = "Singhal",
 Department = "Team2"
 },
 new Employee
 {
 FirstName = "Chabhi",
 LastName = "Rastogi",
 Department = "Team1"
 },

};

return lstEmployee;
 }

As of now you have collection of business object with you. Now you need to create RadAutoCompleteBox. Very first on XAML add following namespace


xmlns:tinput="using:Telerik.UI.Xaml.Controls.Input"

After adding namespace you need to add RadAutoCompleteBox on XAML a follows,


<tinput:RadAutoCompleteBox
 Height="70"
 Width="200"
 x:Name="autocompleteEmployee"
 DisplayMemberPath="FirstName">

 </tinput:RadAutoCompleteBox>

You can set one of the property of complex object as suggestion term. Above we are setting FirstName property as suggestion term.

In last step you need to set ItemSource of RadAutoCompleteBox. This can be set as following

protected override void OnNavigatedTo(NavigationEventArgs e)
 {
 autocompleteEmployee.ItemsSource = GetEmployees();

 }

Now on running application you will find RadAutoCompleteBox bind with complex object.

image

In this way you can work with complex object as RadAutoCompleteBox in XAML based Windows Store Application. I hope you find this post useful. Thanks for reading.