
Learn more about Kendo UI here
Find sample used in this blog on JSFiddle
Yes I know you love Kendo UI and you love MVVM as well. There are many libraries out there like Knockouts to help you creating HTML5 Apps adhering to MVVM pattern. In this post we will learn to create a simple application using MVVM.
Step 1: Create View Model
ViewModel can be created using Kendo.observable. Object of Kendo.observable will notify any changes to view. Let us create a studentViewModel as below.
var studentViewModel = kendo.observable({
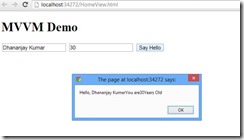
name: "Dhananjay Kumar",
age : 30 ,
sayHello: function () {
var name = this.get("name");
var age = this.get("age");
alert("Hello, " + name + "You are" + age + "Years Old") ;
}
});
studentViewModel contains two properties and one method sayHello.
Step 2: Create View
In second step let us go ahead and create View. You need to bind ViewModel to view.
<div id="studentview">
          <input data-bind="value: name" />
          <input data-bind="value: age" />
          <button data-bind="click: sayHello">Say Hello</button>
 </div>
Above in studentview , we are binding value of input types and click of button. There are many other HTML properties can be bind using Kendo UI MVVM like Text , Value , Visible , Html etc.
As you see we are using data-bind property to perform binding.
Step 3: Binding View and ViewModel
Third and final step you need to do is to bind View and ViewModel. Either you can bind ViewModel to a particular view (in this case div with id studentview) or you can bind ViewModel to any DOM element using body. Binding can be done as follows,
kendo.bind($("#studentview"), studentViewModel);
This is all what you need to do to start creating HTML 5 Apps adhering MVVM pattern using Kendo UI. When you run app, you shall get expected output as below,

Last but not least do not forget to add references of KendoUI library in your project.
Find sample used in this blog on JSFiddle
I hope you find this post useful. Thanks for reading.

Thank you. Simple and neat. However, I wonder how I would create the MVVM classes using my traditional class files (.cs) then tie that back to the view. Forgive me, I am coming from a XAML/c# MVVM world, please bare with me