
Learn more about Rad Controls for Windows 8 here
RadDataGrid is most important RadControl to create enterprise based Windows Store Application. Currently I have been writing on RadDataGrid and you can read previous two posts at below link,
Part 1: Three Steps to work with RadDataGrid in XAML based Windows Store Application
Part 2: Working with Columns width in RadDataGrid in XAML based Windows Store Application
In this post we will take a look on setting Column Header Style. You can set column header style by configuring value of
![]()
To start with first you need to add following references on XAML.
xmlns:telerik="using:Telerik.UI.Xaml.Controls.Grid"
xmlns:telerikgridrimitives="using:Telerik.UI.Xaml.Controls.Grid.Primitives"
After adding reference Create RadDataGrid as following. Make sure AutoGenerateColumns property is set to false
<telerik:RadDataGrid
 x:Name="ProductGrid"
 AutoGenerateColumns="False"
 Width="500">
</telerik:RadDataGrid>
After this you need to manually create columns. Create RadDataGrid.Columns inside RadDataGrid.

After creating RadaDataGrid.Columns you need to create RadDataGrid.Columns. In columns you can set
- Header : Set value of header text
- Width : Fixed width of the column
- PropertyName : Set this as property name of business object you want to display in this column.

In DataGridTextColumn you need to set HeaderStyle. That can be done as following. In below code we are setting
- Header Background
- Header Fontstyle
- Header Fontsize

So putting all together you can create RadDataGrid with customized column header as following
<telerik:RadDataGrid
 x:Name="ProductGrid"
 AutoGenerateColumns="False"
 Width="500">
 <telerik:RadDataGrid.Columns>

<telerik:DataGridTextColumn
 PropertyName="ProductName"
 Header="Name"
 Width="200">
 <telerik:DataGridTextColumn.HeaderStyle>
 <Style
 TargetType="telerikgridrimitives:DataGridColumnHeader">
 <Setter Property="Background" Value="SaddleBrown"/>
 <Setter Property="FontStyle" Value="Italic"/>
 <Setter Property="FontSize" Value="20"/>
 </Style>
 </telerik:DataGridTextColumn.HeaderStyle>
 </telerik:DataGridTextColumn>

 <telerik:DataGridTextColumn

 PropertyName="ProductPrice"
 Header="Price"
 Width="50"/>
 <telerik:DataGridTextColumn
 PropertyName="ProductType"
 Header="Type"
 Width="150"/>
 <telerik:DataGridTextColumn
 PropertyName="InStock"
 Header="In Stock"
 Width="100">
 <telerik:DataGridTextColumn.HeaderStyle>
 <Style
 TargetType="telerikgridrimitives:DataGridColumnHeader">
 <Setter Property="Background" Value="Blue"/>
 <Setter Property="FontStyle" Value="Oblique"/>
 <Setter Property="FontSize" Value="20"/>
 </Style>
 </telerik:DataGridTextColumn.HeaderStyle>
 </telerik:DataGridTextColumn>

</telerik:RadDataGrid.Columns>
 </telerik:RadDataGrid>
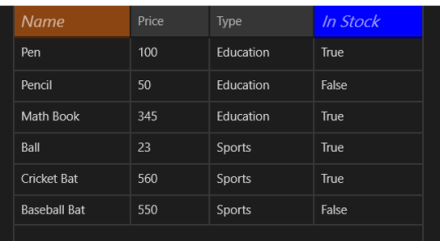
On running application you will get RadDataGrid with styled column header as following

In this post we used some of the discussion from last post so did not discuss about binding and Product class in earlier part of this post. However For your reference find definition of business class Product below
public class Product
 {

 public string ProductName { get; set; }
 public double ProductPrice { get; set; }
 public string ProductType { get; set; }
 public bool InStock { get; set; }
 }
ItemSource of RadDataGrid is set as below,
protected override void OnNavigatedTo(NavigationEventArgs e)
 {

this.ProductGrid.ItemsSource = GetProducts();
 }
GetProducts() class is defined as below,
private List<Product> GetProducts()
 {
 List<Product> lstProduct = new List<Product>
 {
 new Product
 {
 ProductName ="Pen",
 ProductPrice = 100,
 ProductType = "Education",
 InStock = true
 },
 new Product
 {
 ProductName ="Pencil",
 ProductPrice = 50,
 ProductType = "Education",
 InStock = false
 },
 new Product
 {
 ProductName ="Math Book",
 ProductPrice = 345,
 ProductType = "Education",
 InStock = true
 },
 new Product
 {
 ProductName ="Ball",
 ProductPrice = 23,
 ProductType = "Sports",
 InStock = true
 },
 new Product
 {
 ProductName ="Cricket Bat",
 ProductPrice = 560,
 ProductType = "Sports",
 InStock = true
 },
 new Product
 {
 ProductName ="Baseball Bat",
 ProductPrice = 550,
 ProductType = "Sports",
 InStock = false
 },
 };

return lstProduct;
 }
In this way you can work with column header style. I hope you find this post useful. Thanks for reading.
