Few Queries on Test Studio : Answered

Recently I was giving demo on Test Studio. While demo there were few questions popped up . In this blog I am consolidating those questions such that it would be useful for all Test Studio users.

image

Does it work with Telerik SL CONTROLS

Yes Test Studio support SL controls. For demo, please see Telerik TV and look at the videos listed under the Silverlight tag:

http://tv.telerik.com/products/automated-testing-tools?FilterByTags=Silverlight

How would it integrate into a CI ENVIRONMENT

You can find more details about CI integration at

http://www.telerik.com/automated-testing-tools/support/documentation/user-guide/command-line-test-execution.aspx

How Test Studio works with MS LAB

We don’t have anything specific with how we integrate with the TFS/VS lab environment.

How does it run tests? Does it require agents to installed

If you want the tests run via the scheduler or remotely then you do need an agent installed. You can find more details here

http://www.telerik.com/automated-testing-tools/support/documentation/user-guide/scheduling-test-runs.aspx

Does it support SL 4 +

Yes Test Studio supports Silverlight 4+

Does it support mobile platforms like Windows Phone, Android and iPhone

Test Studio supports IOS but as a separate product. Currently Test Studio do not support Windows Phone and Android

Can Test Studio Framework API can be used from MS TEST

Yes it can be used with MS Test.  You can find more details at

http://www.telerik.com/automated-testing-tools/support/documentation/user-guide/command-line-test-execution/mstest.aspx

http://www.telerik.com/automated-testing-tools/support/documentation/user-guide/write-tests-in-code/intermediate-topics/settings-and-configuration/settings-class.aspx

I hope you find this post useful. Thanks for reading.

Testing Multiple Alerts Dialog in Test Studio

Recently I was at a customer place and there was a question popped up. Question was “How Test Studio handles multiple Alerts” or rather question was “Can Test Studio handles multiple Alerts? “. Answer is yes, Test Studio can handle Multiple Alerts very smoothly.

To demonstrate this I have created a simple application. This application is having one button and on click event of the button we are generating 10 alerts.


<!DOCTYPE html>
<html>
<head>
<title>Demo Multiple Alerts</title>
<link href="demo.css" rel="stylesheet" />
<script type="text/javascript" >
function GenerateMultipleAlerts(e)
{

for (var i = 1 ; i <= 10 ; i++) {

var displayMessage = "Alert Message " + i;
alert(displayMessage);

}

}
</script>
</head>
<body>
<h1>Multiple Alerts Testing</h1>

<button id="addbutton" onclick="GenerateMultipleAlerts()">  Generate Multiple Alerts </button>
</body>
</html>

Let us record testing steps of this web application. After recording you will find that all the 10 alerts handle has been recorded.

clip_image002

After recording the test, execute it in browser of your choice. You will find all alerts handle has been passed successfully.

clip_image003

We can conclude this post by saying Test Studio handles multiple alerts very gracefully. Thanks for reading this post.

How to document Test Script in Test Studio

In this post we will take a look on documentation of Test Steps in Test Studio. On selection of a Test in project, you can see all the steps of the Test.

clip_image002

To create documentation of Test, select Test and from the ribbon select Storyboard

clip_image004

In Storyboard you can see screen short of all the test steps.

clip_image006

In Storyboard on the top you get option to “Export Storyboard as HTML documentation

clip_image008

You will be asked to select path to save extracted document.

clip_image009

After successful extraction, Test Studio will prompt you to view the exported test.

clip_image010

In this way you can create document of a Test in Test Studio. I hope you find this post useful. Thanks for reading.

How to work with If-Else logical steps in Test Studio

In this post we will take a look on working with logical steps in Test Studio.

clip_image001

We will understand working with Logical Steps in Test Studio using a Test Scenario. Let us suppose you have a Web Application as following. User will enter numbers in text input and click on the Add Numbers button to get the summation of two numbers. Summation of numbers are displayed in a span.

clip_image002

Now suppose we have a test scenario stated as below,

“If output contains 89 then navigate to Google (or perform any other tasks) else navigate to Bing (or perform other tasks)

We are going to walkthrough, how this could be achieved.

Start recording the test.

Step 1

Navigate to application. In this example test application is on local host and can be accessed at URL http://localhost:55391/demoifelseteststudio.html

Step 2

Enter numbers in both input text boxes

Step 3

Click on the Add Numbers button

Step 4

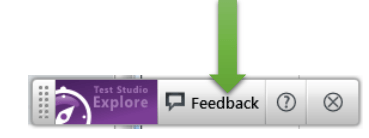
From docked Test Studio panel, select option of Enable or Disable hover over highlighting

clip_image003

And select output span to put a verification step,

clip_image004

Select the option of Build Verifications. Here create a verification step by clicking on Content then choosing contains from drop down.

clip_image006

Now minimize the browser and go back to Test Studio to verify that all test steps got created as expected or not. Make sure that you are minimizing Test Studio not closing it.

Step 5

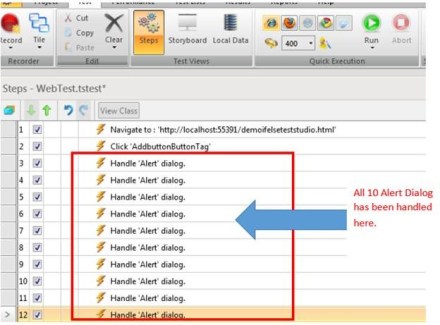
In Test Studio you will find all the recorded steps so far,

clip_image008

Now from the ribbon click on Logic and select If-Else

clip_image001[1]

After selecting if-else, you will find two steps has been added. Hover over step contains if statement. You will get a green add button.

clip_image009

Click on the green add button to add a verification step as condition of if statement. Next you will find that a green add button next to the verification step (in this case InnerText Contains 89 of outputspan). Click on the green add button to select that verification. After that you will notice that that verification step has been added as condition of if statement.

clip_image011

Step 6

Maximize the browser in which we were recording the testing steps. And browse to http://www.google.co.in/ . Again minimize the browser and come back to Test Studio.

Step 7

You will find a step has been added.

clip_image013

Drag this step and drop on if condition step.

Step 8

Maximize the browser in which we were recording the testing steps. And browse to http://www.bing.com/ . This time close the browser to stop the recording.

Step 9

You will find a step has been added.

clip_image014

Drag this step and drop on else condition step.

Now you have successfully added if-else logical step in the Test. Go ahead and execute the test and you will find all the test steps has been passed with if statement

clip_image015

If you change verification step form contains to not contains then steps of else condition will get executed.

clip_image017

In this way you can work with if-else logical condition in Test Studio. I hope you find this post useful. Thanks for reading.

How to do CSS verification of HTML Elements in Test Studio

In this post, we will take a look on doing CSS Verification of HTML element in Test Studio. You can put verification on CSS while recording the test. Let us say on following page you want to do CSS verification on highlighted element.

image

While recording the test click on Enable or Disable Hover.

image

After selecting that select element and click on blue bubble. Select “Build Verification

image


In DOM Explorer, select HTML element and click on Style.

image

In Style, you have option to select

  1. Computed Style
  2. Inline Style

You can create verification step by choosing different options from the drop down.

image

Let us say you want to create a verification step “Font size of element is 2em”. You can do that selecting Font and Size from drop down.

image

After selecting value from drop downs click on Validation Rules. You will get a message that “Validation Passed”

image

After closing DOM Explorer and stopping the recording, you will find a CSS verification step has been added to the Test Steps.

image

In this way you can do CSS verification on HTML elements. I hope you find this post useful. Thanks for reading.

How to do Exploratory Testing in Test Studio

Using Telerik Test Studio Exploratory Testing tool you can

  • Submit and send and idea
  • Submit and send Important information
  • Submit a bug to Team Pulse or TFS


Directly from your browser. In this post we will learn how we can perform Exploratory Testing. To do exploratory testing click on Telerik Exploratory Testing Extension in the browser (Chrome is being used here}


clip_image002

Not able to launch Exploratory Testing Tool? Read here

You will get Test Studio Exploratory toolbar open. Click on Feedback button to perform exploration testing

clip_image003


Next click on Capture button to capture a screenshot

clip_image005


Now you can capture any screen short from the page. Annotate a particular element as following. Like in following case we are saying “Change the font of Welcome element.

clip_image007


In the left side you get Feeback panel. Here you can provide Title, Description and tag the annotation.


clip_image008

You can tag either as Important or Idea. After providing all the information you can send this by clicking on send button in bottom.

clip_image009


You can either export to

  • Word
  • HTML

Or can send in Email. You can submit it as bug as well. You can submit to Team Pulse or TFS.


clip_image010


If you want to export to HTML click on HTML option. You will be asked to provide name of the file and choose the location to save the file.

clip_image012


You will get a confirmation message that Feedback is saved to the given location.


clip_image013


If you open file you will get all the information of the feedback submitted.


clip_image015

In this way you can perform Exploratory Testing right in your browser using Telerik Test Studio.

. I hope you find this post useful. Thanks for reading.

Not able to launch Exploratory Testing Tool in Test Studio?

You might have come across following error when you try to open Telerik Test Studio Exploratory Tool in browser

clip_image002 

If you open exploratory tool in Internet Explorer, you will get more specific error message as following

clip_image003

You can solve this problem in two steps,

Step 1:

Browse to folder C:\Program Files (x86)\Telerik\Test Studio\Bin\Feedback

clip_image004


Step 2:

locate for file Telerik.TestStudio.Feedback.Listener.exe . Right click on the file and click Run as Administrator

After running this service go back to browser and open exploratory tool, you should able to launch it successfully.

I hope you find this post useful. Thanks for reading

How to encrypt information while testing in Test Studio?

Let us assume that you are doing automated test of login functionality. While executing the test you want to encrypt the Password information provided by the user to authenticate. Test Studio allows you to encrypt the vital information in the test steps.

Suppose you have recorded a login test as following. If you see in step 4 password is displayed in the plain text.

image


If you want to encrypt this information select the step and open the property. Open the property window for enter password step and navigate to Behavior tab. At the top of property window you can verify that for which step property is open. You see that Encrypt behavior value is set to false.


clip_image003

To encrypt the password you need to change value of Encrypt to true.

clip_image004

After changing this value when you navigate back to test steps, you will find password has been encrypted

clip_image005

So in this way you can encrypt vital information while executing the test. I hope you find this post useful. Thanks for reading.

How to Submit a Bug to TeamPulse from Test Studio

In this post we will see, “How could we submit a bug from Test Studio to TeamPulse?

Let us assume that we executed an automated functional test and we got the following result. Step 6 in the test failed.

image

We need to submit this bug to Team Pulse. To submit bug to Team Pulse double click on Red Cross and you will get Step Failure Details dialog box as shown in following image.

image

Click on the Submit Bug. If Team Pulse is not configured then you will get dialog box to set up Team Pulse. In this dialog box click on Set this up now

image

If you have already configured TeamPulse or TFS in any of the other Test Project then Test Studio remember that and prompt you that whether you want to import previous setting or you want to go with New Setup. Let us go ahead with New Setup for that click on New Setup.

image

After clicking on New Setup now you will get below dialog box. Select TeamPulse Server and click on Configure Selected.

image

In next dialog box, provide

  1. Url of TeamPulse
  2. Username and Password to authenticate to Team Pulse.

image

After providing credential you need to click on the Connect button. After successful authentication you will get Project to select. Select Project, Severity and Status from drop down. At last click on Done button.

image

If you have successful connected to Team Pulse, you will get Green Right icon next to TeamPulse. Check on check box to make it default and click on Donebutton.

image

Next you will be prompted to dialog box to submit the bug.

image

Before submitting bug, you can Edit Title and Description of the Bug. If you want to submit files related to Failure details then check the check box Attach Failure details. To submit the bug, click on Submit button.

You will get successful message on successful submission of bug from Test Studio to TeamPulse

image

In this way you can submit bug to TeamPulse from Test Studio. I hope you find this post useful. Thanks for reading

What are Performance Testing and Load Testing?

See How Telerik Test Studio helps in Load Testing

See How Telerik Test Studio helps in Performance Testing

image

Performance Testing

Performance Testing is being performed to measure smoothness and readiness of the application. While creating an application the vital factors should be kept in mind are as follows

  • Speed of the application at any given condition
  • Response time of the application
  • How much resources being used by the application
  • How stable is the application at given time
  • Throughput of the application
  • For web application times spent in making HTTP calls at server and client etc.

Performance Testing is type of testing that test application on above listed criteria.

image

Performance Testing measures performance of the application. After measuring performance of the application it sets the base line for further testing. Performance testing is very important since cooperate prestige of the application or decision on the final release of application based on the analysis of the results produced by this test. Performance testing does not find any defect in the application. Often, we perform Performance testing on a stable system.

Performance Test finds performance issue in the

  • Database access
  • Network latency like time spent on the network
  • Time spent on reading or writing files on the disc
  • Time spent on making HTTP calls etc.

So we can summarize Performance testing

image

Load Testing

Load Testing determines user experience when application is under load. In Load Testing, we test application with maximum number of users or with the expected number of users in the production environment.

image


Load Testing determines upper limit of the application. Load testing simulates expected number of users from the production environment and tests the application with that number of users. When we exceed number of users to test the application much beyond expected number of users from production environment then we call testing as STRESS TESTING. In majority of the time we consider Stress Testing as Load Testing.

Purpose of Load Testing is to find defect in the application when application is running under maximum load. Some of the defects could be as follows

  • Memory leak
  • Buffer Overflow
  • Server failure
  • Network failure
  • Input devices reading failure
  • Writing on output device failure etc.

We can summarize that Load Testing tests application behavior and sustainability with the maximum number of user inputs.

Setting up environment for Load Testing in Test Studio

In this post we will follow step by step approach to setup environment for Load Testing in Test Studio. Very first go to Program ->Telerik ->Test Execution and open Configure Load Test Services

clip_image001

Next you will get dialog box to configure the services.

clip_image002

In this dialog box you need to make sure that all the services are started and most importantly make sure that you have given correct database instance name in the Reporter Database Connection setting

clip_image003

In above case kumar is the database server name running on my machine. So I provided instance name kumar\sqlexpress. You do not need to create TestStudioReportingDB database manually. Test Studio will create this database in given database server. After making sure all the information is provided correctly click on Ok to restart all the services.

Next open Test Studio and create a test of type Load Test. Very first you will get following screen

clip_image005

Click on Okay and from the ribbon click on Manage

clip_image006

Here you got an option to Add Controller and manage the number of Virtual users. To Add Controller click on Add Controller button

clip_image007

In Add Controller dialog box give the name of the computer or IP of the computer you want to set as controller and click on Test Connection. After successful connection click on the Add button to add a controller

clip_image008

On the successful adding of controller you need to set the number of Virtual Users for the Controller as following. We have added 258 virtual users in this controller

clip_image009

Next we need to set Controller and Reporter. Select the computer from drop down and click on the connect button.

clip_image010

After successful connect you can see green signals beside Controllers, Reporters and Agents.

clip_image011

All three green signals imply that environment for load testing in Test Studio has setup successfully. Now you can go to design and create ass cases to perform Load Testing

Adding and Removing Data Binding in a Web Test


In this post we will learn the way to add and remove Data Binding from a Web Test in Test Studio. Before binding data on a test, we need to have DataSource added in the project. We can add DataSource as following.

Step 1:

Select the Project tab and from Data Sources group, click on the Add menu button

image

Step 2:

Choose the type of data source you are interested in adding. After choosing data source browse to file location to select the data source. Click on Ok button to add data source in the Test project.

image

Step 3:

After adding data source verify in Data Sources that data source being added. In this case we have added an Excel File as data source with name searchdata.

image

Once data source is added in the project we need to follow below steps to bind a data source to a test.

Step 1:

Right click on the Test and click on DataBind

image

Step 2:

Bind test to data source window will get prompted to you. Here you need to select the data source.

image

Step 3:

In drop down you will get the entire data source added to the project. You need to choose one to create data binding for the test.

image

Step 4:

After selecting data source you need to select the table or sheet in case of excel.

image

Step 5:

Once you select the sheet data will get displayed for the preview. Click on OK button to add the data binding.

image

In this way you can add a data binding to a test. Once data is bind to the test, you can see the database icon beside the test. In below image you can see bingtest has been bind with the test.

image

To remove data bind from the test, right click on the test and click on Remove Data Binding.

image

In this way you can add and remove data binding from a Test. I hope this post is useful. Thanks for reading.