Create QR Code for Windows Phone 8 Apps using Telerik RadBarcodeQR Control

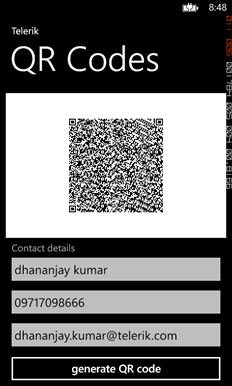
In this post we will take a look on creating QR Code in Windows Phone 8 Applications. We will use Telerik RadBarcodeQR control to create QR code. We will follow step by step approach to achieve this. At the end of this post we will create application as following,

image

Let us follow following steps to work with QR codes.

Step 1

In Windows Phone Application project we need to add Telerik Rad Controls for Windows Phone dll as reference. After adding that add following namespace on XAML.


xmlns:telerikPrimitives="clr-namespace:Telerik.Windows.Controls;assembly=Telerik.Windows.Controls.Primitives"
 xmlns:telerikDataViz="clr-namespace:Telerik.Windows.Controls;assembly=Telerik.Windows.Controls.DataVisualization

Step 2

After we have added reference we can simple create QR code with hard coded information as follows. We can create QR code using RadBarcodeQR control.

<telerikDataViz:RadBarcodeQR x:Name="qrContact"
 Opacity="1" Version="20"
 ErrorCorrectionLevel="H"
 Mode="Byte"
 ECI="ISO8859_1"
 FNC1="FNC1SecondPosition"
 Text="your data"
 ApplicationIndicator="00"/>

At this point on running application we will get QR code generated with hard coded data. We will get application running as following,

clip_image002

As we can see that following properties of QR code is configurable.

image

Step 3

As of now we have created QR code with hardcoded data. Let us go ahead and take user input as data and then create QR code of that data.

In XAML, divide content grid in two rows. In first row we will put QR code and in second row RadTextBox to enter user input. On click event of the button we will create QR code

Let us put following XAML to take user input


<StackPanel Orientation="Vertical" Grid.Row="1">
 <TextBlock Text="Contact details"
 Foreground="{StaticResource PhoneSubtleBrush}"
 Margin="12, 6, 12, -6"/>

<telerikPrimitives:RadTextBox Watermark="First and last name"
 Margin="0, -6, 0, 0"
 x:Name="nameTextBox"/>
 <telerikPrimitives:RadTextBox Watermark="Phone number"
 InputScope="TelephoneNumber"
 Margin="0, -12, 0, 0"
 x:Name="phoneTextBox"/>
 <telerikPrimitives:RadTextBox Watermark="Email"
 InputScope="EmailNameOrAddress"
 Margin="0, -12, 0, -2"
 x:Name="mailTextBox"/>

<Button Content="generate QR code"
 x:Name="btngenerateCode"
 />
 </StackPanel>

&nbsp;

Now on click event of the button we will set text property of QR code. We need to make sure that we have not set text property declaratively in XAML.


<telerikDataViz:RadBarcodeQR x:Name="qrContact"
 Opacity="0" Version="20"
 ErrorCorrectionLevel="H"
 Mode="Byte"
 ECI="ISO8859_1"
 FNC1="FNC1SecondPosition"
 ApplicationIndicator="00"/>

On click event of the button we need to set text property. That can be done as following. In below code we are doing concatenation of name, phone number and email as single string and then setting that as text property of QR code.


void btngenerateCode_Click(object sender, RoutedEventArgs e)
 {

 string qrdata = nameTextBox.Text + " " + mailTextBox.Text + " " + phoneTextBox.Text;
 qrContact.Text = qrdata;
 qrContact.Opacity = 1;
 }

On running application we can create QR code from use provided information.

clip_image002[6]

In this very simple we can create QR code using Telerik RadBarcodeQR control. I hope you find this post useful. Thanks for reading.

Step by Step working with Telerik Charts in Windows Phone 8

In this post we will take a look on working RadCharts in Windows Phone 8 Applications. I shall follow simplistic step by step approach for better learning of yours. At the end of this post we will complete creating a chart application as below.

Learn more Rad Controls for Windows Phone here

image

Step1: Create a Windows Phone 8 Application

Start with creating a Windows Phone 8 Application. To create Windows Phone Application choose Windows Phone App project template from Windows Phone tab.

clip_image002

Choose Windows Phone 0S 8.0 as Target Windows Phone OS version.

clip_image003

Next we need to add following references in the project to work with RadChart. To add references right click on the project and from context menu select Add Reference. After adding reference we are all set to work with RadCharts in Windows 8 project.

clip_image004

Step2: Add namespace on XAML

To work with chart now we need to add required references on XAML.


xmlns:chart="clr-namespace:Telerik.Windows.Controls;assembly=Telerik.Windows.Controls.Chart"
xmlns:chartEngine="clr-namespace:Telerik.Charting;assembly=Telerik.Windows.Controls.Chart"

After adding namespace we can put Chart on Xaml. A Chart can be created with following mark-up.


<chart:RadCartesianChart x:Name="chart">

 </chart:RadCartesianChart>

At this point if we go ahead and run application, we will find message that HorizontalAxis not set VerticalAxis not set.

image

Step3: Add VertialAxis and HorizontalAxis

Next step we need to add VerticalAxis and HorizontalAxis to chart. We can add axis as following,


<chart:RadCartesianChart x:Name="chart">
 <chart:RadCartesianChart.HorizontalAxis>
 <chart:CategoricalAxis/>
 </chart:RadCartesianChart.HorizontalAxis>
 <chart:RadCartesianChart.VerticalAxis>
 <chart:LinearAxis Maximum="100"/>
 </chart:RadCartesianChart.VerticalAxis>

</chart:RadCartesianChart>

There are different kind of Axes available. We will not get into details of each type in this post. However different kind of axes are as follows,

image

We are using Linear Axis for Vertical Axis and Cateogrical Axis as Horizontle axis in this example. At on running application we will get chart with two axis. However there will be no data rendered on chart. We are getting message that No Series added.

image

Step 4: Add Series to the Chart

In this step we will add Series to chart. We can add series to chart as following ,


<chart:RadCartesianChart.Series>
 <chart:LineSeries Stroke="Orange" StrokeThickness="2"></chart:LineSeries>
 </chart:RadCartesianChart.Series>

Likely Axis there are different kind of series is also available . We will talk about different series in later post. However different kind of series is as follows

image

At this point if we run application we will get message that there is no datapoint added in the chart. We will get expected output as following ,

image

Step 4: Add Data Point to Chart

We can add Data Point as following in the chart. We are adding data point in XAML here. In real time scenario we will have to fetch data from services and bind data point to chart at runtime. We can achieve that using data binding.

<chart:RadCartesianChart.Series>
 <chart:LineSeries Stroke="Orange" StrokeThickness="2">
 <chart:LineSeries.DataPoints>
 <chartEngine:CategoricalDataPoint Value="20"/>
 <chartEngine:CategoricalDataPoint Value="40"/>
 <chartEngine:CategoricalDataPoint Value="35"/>
 <chartEngine:CategoricalDataPoint Value="40"/>
 <chartEngine:CategoricalDataPoint Value="30"/>
 <chartEngine:CategoricalDataPoint Value="50"/>
 </chart:LineSeries.DataPoints>
 </chart:LineSeries>
</chart:RadCartesianChart.Series>

At this point on running application we should get chart as following,

clip_image002

If we want we can add one more series to Chart as following

 <chart:RadCartesianChart.Series>
 <chart:LineSeries Stroke="Orange" StrokeThickness="2">
 <chart:LineSeries.DataPoints>
 <chartEngine:CategoricalDataPoint Value="20"/>
 <chartEngine:CategoricalDataPoint Value="40"/>
 <chartEngine:CategoricalDataPoint Value="35"/>
 <chartEngine:CategoricalDataPoint Value="40"/>
 <chartEngine:CategoricalDataPoint Value="30"/>
 <chartEngine:CategoricalDataPoint Value="50"/>
 </chart:LineSeries.DataPoints>
 </chart:LineSeries>
 <chart:LineSeries Stroke="Red" StrokeThickness="2">
 <chart:LineSeries.DataPoints>
 <chartEngine:CategoricalDataPoint Value="10"/>
 <chartEngine:CategoricalDataPoint Value="20"/>
 <chartEngine:CategoricalDataPoint Value="45"/>
 <chartEngine:CategoricalDataPoint Value="60"/>
 <chartEngine:CategoricalDataPoint Value="50"/>
 <chartEngine:CategoricalDataPoint Value="40"/>
 </chart:LineSeries.DataPoints>
 </chart:LineSeries>

&nbsp;

After adding two series application should render Chart like following,

clip_image002[5]

Step 5: Add Data Point to Chart from Code behind

In previous steps we added Data Points in XAML. We can very much add Data Points at run time. To add data point from code behind let us go ahead and delete data point from XAML. We can add that in code behind as following,

this.chart.Series[0].ItemsSource = new double[] { 20, 30, 50, 10, 60, 40, 20, 80 };
 this.chart.Series[1].ItemsSource = new double[] {10,30,40,60,34,59,20,75 };

In this way we can work with Charts in Windows Phone 8. I hope you find this post useful. Thanks for reading.


Join me for the webinar: Developing Applications for Nokia Lumia using Telerik Controls

We are conducting webinar for Windows Phone Developers on 7th March 2013 at 3PM to 4PM IST.

Register for the Webinar here

Learn more about Rad Controls for Windows Phone

clip_image002

Windows Phone application development or creating application for Nokia Lumia devices is keeping a lot of developers very busy. Developers have the envious task of creating quality Windows Phone Application in short span of time. Telerik RadControls for Windows Phone provide the set of controls that significantly speed up the Windows Phone App Development process.

In this webinar we will start with Rad Controls for Windows Phone. We will explore various Rad Controls. We will keep webinar demo oriented and we will more focus on writing and understanding codes. RadControls for Windows Phone provides you different controls and building blocks to cut your development time. These controls are designed to shorten your app development time.

Register for the Webinar here

Learn more about Rad Controls for Windows Phone

See you there in the webinar.

Telerik conducted Cross Platform Mobile Application Development workshop for students in India office

View Photos from Workshop here

Download Icenium from here

Cross Platform Mobile Application Development or Hybrid Application development is gaining huge popularity among mobile application developers. Seeing popularity of this paradigm we at Telerik decided to educate about Hybrid App Development to college students. We conducted 8 hrs. Regress training session for 13 students on 2nd March 2013 in our India office.

image

To select students we asked them two simple questions,

  1. Where is head office of Telerik ?
  2. Why we should select you for the workshop ?

There were more than 80 students who shown interest in attending workshop. We chosen 13 out of them. Event started at 11 am . Workshop was scheduled till 6 pm but seeing high energy and enthuse of students , we extended workshop by 2 hrs more. Workshop got over at 8pm.

Students learnt mainly on following topics and created two hybrid apps titled “Twitter Search “ and “Indian States”

  • Icenium IDE
  • Kendo UI Mobile
  • Difference between Native Apps and Hybrid Apps
  • Design guidelines for Hybrid App

image

Day started with keynote session by Telerik Country manger Abhishek Kant. He did set up dais for the day . Students got charged and motivated for day long coding after interaction with him.

image

As day progressed students learnt about various aspect of Hybrid App development paradigm. They created app using Icenium and Kendo UI Mobile.

All 13 students created these two Hybrid Apps

  1. Twitter Search Application
  2. Indian State App

In order to create these two apps students learnt about ,

  • Working with Kendo UI data source
  • Working with Kendo UI Mobile ListView
  • Working with Kendo UI Template
  • Understanding Icenium IDE
  • Building and packaging app using Icenium
  • Certificate management in Icenium
  • Creating APK package using Icenium.

It was a learning day for young students with lot of fun. There was visible happiness on each face when they installed APK package on their Android devices. They were on blue sky seeing app created by them running on their devices.

image

For us it was great day intercating and tecahing young students on latest of the mobile app development paradigm. We are excited for more of these types of events.

View Photos from Workshop here

Download Icenium from here

How to work on Icenium using Facebook account

In this post we will take a look on working on Icenium Graphite using Facebook account. We will start from downloading then installation. After successful installation we will create a Hybrid Application project using Facebook credentials.

Follow the steps given below,

Step 1

To start installing first navigate to http://icenium.com and click on Try now Free until May!

clip_image001

Step 2

You will be provided with three options. Go ahead and select ICENIUM Graphite. Check on Term and Condition and click on Launch App. You will find set would have been started downloading.

clip_image003

Step 3

Navigate to folder in which setup got downloaded. Click on Icenium Graphite setup to start installation.

clip_image004

On installation you will find Graphite is being downloaded.

clip_image005

Step 4

After successful installation of Icenium Graphite you will get dashboard. You can login to Icenium with any of the options provide. Let us login with Facebook credential.

clip_image007

After successful login on dashboard you will find different options to create New Cross-Platform Device Application.

clip_image009

In this way you can download, install Icenium Graphite and start creating Hybrid Applications using your Facebook credentials. I hope you find this post useful. Thanks for reading.

How to iterate all the data in Kendo UI Data Source

In this post we will take a look on how could we iterate all the data of Kendo UI Data Source? Let us say we have a JavaScript array as given below,


var speakers = [
 {
 SpeakerName: "Chris Sells",
 SpeakerTitle: "Author, Ex- Microsoft and ardent community contributor"

},
 {

SpeakerName: "Steve Smith",
 SpeakerTitle: "Speaker, Author, Microsoft Regional Director and MVP"

},
 {

SpeakerName: "Dr.Michelle Smith",
 SpeakerTitle: "Enterprise Consultant"

},
 {

SpeakerName: "Gaurav Mantri",
 SpeakerTitle: "Founder Cerebrata & Windows Azure MVP"
 }

];

We will create a Kendo Datasource reading speakers array. Very simply we can create data source as following,


var yourdatasource = new kendo.data.DataSource({

data: speakers
 });

Now we will see how we could iterate each data of data source. We can do that by calling data() function on Kendo UI Data source. data() function is used to get and set data of the Kendo data source.

image

So we can read data from data source as following. We are alerting length of data source below.


var datasourcedata = yourdatasource.data()
alert(datasourcedata.length);

Finally we can iterate through data source as following,

yourdatasource.fetch();
 var datasourcedata = yourdatasource.data()

 for (var i = 0; i < datasourcedata.length; i++) {
 var dataitem = datasourcedata[i].SpeakerName;
 alert(dataitem);
 }

As output in alert we will get entire speakername. In this way you can iterate through data of Kendo datasource. I hope you find this post useful. Thanks for reading.

Download Slides and Source Code of Webinar Create Hybrid Mobile Application in 1 hour

Download Presentation and Source Code from here

Read more about Icenium here

Read more about Kendo UI here

View recorded webinar below:

Thank you so much for attending the webinar on Create Hybrid Mobile Application in 1 hour . I had great time presenting and interacting with each one of you. I hope webinar was useful and worth your time.

In the webinar we covered:

  • What is a Hybrid Mobile Application?
  • How it is different from Native Applications?
  • Working with Icenium
  • Understanding different project templates of Icenium
  • Understating the project structure of an Icenium project
  • Working with Application Layout
  • Working with Views
  • Working with Kendo DataSource
  • Working with Kendo Templates
  • Working with Kendo ListView
  • How to insert records in a database from a Hybrid Application
  • Working with OData in a Hybrid Application

If after attending the webinar you are still excited for Hybrid Application development, then Download Icenium from here – it is completely free till May. You can learn more about Kendo UI here

Download Presentation and Source Code from here

Question and Answers from Webinar

How will we connect our local development database to build these apps using Icenium

Icenium is cloud based IDE and it cannot directly connect to SQL Server or any other database. You have three options

  1. Create a service layer over database and work with service in Icenium
  2. Expose data as OData and can work with OData in Icenium.
  3. Icenium allows you to work with HTML5 storage directly.

Does Icenium support Windows Phone?

As of now Icenium does not support Windows Phone. But it is in Roadmap. Read more here

Does Icenium support Enterprise Application Development?

Icenium only allows you to create Cross Platform device applications at this time.

What other datasource can be used other than SQL?

In Hybrid Applications you can use any database. However, you will have to expose operations on database as service. Essentially, you will be consuming Services in the Hybrid Application.

Can we use jQuery mobile instead of Kendo UI Mobile in Icenium?

Yes, you can use jQuery Mobile instead of Kendo UI Mobile in Icenium. To work with jQuery Mobile choose the second project template while creating a new project in Icenium.

Can you show a Login Screen implementation in Icenium ?

You can implement it in the same way you implement Login in any HTML5 based web application. You have two options to authenticate a user:

  • Call a authentication service
  • You can authenticate user from data stored from local storage as well.

Can we use ASP.NET WEB API in a Hybrid Application?

Yes you can use Web Api in the same way you consume a WCF REST Service.

How does Icenium Cost?

Until 1st May Icenium is completely free. Find more pricing details here

What is role of PhoneGap Here?

Icenium uses Phonegap (aka Apache Cordova) to build and package applications for various platforms.

Can we use SharePoint as Datasource ?

In SharePoint 2010 and onwards you get OData feed of SharePoint lists. You can use them to create Kendo Data source.

Can we work collaboratively on Icenium?

Yes, you can. You can invite collaborators by right -clicking on project and choosing the option for Version Control.

Can we directly deploy on device?

Yes, you can directly deploy on multiple devices.

Can we use Camera in Icenium ?

Yes, you can access camera on Icenium using Phonegap API to access Camera.

Once again, I thank you for attending the webinar. If you have any question feel free to reach me at Dhananjay.kumar@telerik.com . For update follow @icenium and @kendoui on twitter.

How to Activate Test Studio Installation

In this post we will take a look on Activation process of Test Studio. After successful installation of Test Studio, you will be prompted to activate the installation.

clip_image002

Either you can activate the purchase license or activate as trial. To activate the purchase license select first option and click on Next to proceed further.

clip_image004

Again you have two options to activate. Either you can activate online which is recommended or offline using license key. You can find license key for Test Studio under Manage Product section of your Telerik Account. To activate online select online option and click on Next to proceed further.

clip_image006

Here you need to provide your Telerik credential. After providing Telerik Credential click on Activate to activate Test Studio.

clip_image008

After successful activation you will get above message. If you are running Test Studio as trial then you can activate it later as well. To activate it later launch Test Studio and click on the Help menu. In Help menu select View from About tab.

clip_image010

If you Test Studio installation is already activated then you will get license information as following image.

clip_image011

If you are running trial version then you will get an option to activate license.

clip_image012

In this way you can activate Test Studio. I hope you find this post useful. Thanks for reading.

From where to download Test Studio Run Time

In this post we will take a look on downloading Test Studio Run Time. To download browse to http://www.telerik.com/ . After successful login click on the Product Families and from bottom select Your Account.

clip_image002

Now choose Manage Products and select Test Studio.

clip_image004

Next click on the Download Installer and other resources

clip_image006

You will get option to download Test Studio run time as below.

clip_image007

In this way you can download Test Studio Run Time. I hope you find this post useful. Thanks for reading.

Create Hybrid Mobile Application in 1 hour: Join the webinar on 21st February at 3pm IST

Register Here for the Webinar

Telerik India is conducting a webinar on “Hybrid Mobile Application Development “on 21st February 2013 from 3pm to 4 pm IST.

Register Here for the Webinar

image

Would you like to create a mobile application that can run on most of the mobile application platforms? From the same codebase?

Gone are the days when one had to write different codes in different languages for different mobile platforms. Now a days developers are more inclined to write Cross Platform Mobile Applications or Hybrid Mobile Application. An application written using web technologies like HTML, JavaScript and deployed on multiple platforms without changing any codebase is known as Hybrid Mobile Application.

Register Here for the Webinar

clip_image002

Webinar details are here,

Title: Hybrid Mobile Application Development

Date: 21st February 2013

Time: 3pm to 4 pm

Presenter: Dhananjay Kumar

Register Here for the Webinar

This session will focus on various development aspects of Hybrid Mobile Application development. Session will follow step by step approach to create Hybrid Mobile Application. This will be a demo oriented session. In Session demo will be on creating Hybrid Applications like Netflix Movie Explorer and Twitter Search using Telerik JavaScript Hybrid Mobile Application development framework Kendo UI Mobile in Icenium . This session will also touch upon various complexities of building and packaging a hybrid application along with their solution.

Come and learn with us of this amazing capability with the skills you already possess. We will go from nothing to a fully functional mobile app ready for the app store in an hour.

Register Here for the Webinar

How to create Data Model of SQL Azure database using Telerik Open Access ORM

In this post we will take a look on creating data model using Open Access ORM from a data base in SQL Azure.

image

To create data model add new item to project and select Telerik Open Access Domain Model from Data tab.

clip_image002

Next select option Populate from database and from drop down choose Microsoft SQL Azure. If you want you can change the model name and then click on the Next.

clip_image004

Telerik Open Access ORM does not provide you to create a connection in case of SQL Azure. You will have to manually copy and paste connection string of SQL Azure database to create Domain Model. You can find connection string of SQL Azure database in Windows Azure portal.

clip_image006

In the quick glance click on the Show Connection strings to see the connection string. Choose ADO.NET connection string. Do not forget to change the password with the real password.

clip_image007

Copy this connection string of ADO.NET and paste it to Set Connection Manually section and click on the Next.

clip_image009

Next you need to choose Schemas, Tables, Views, Stored Procedure to create data model. Let us say we are choosing only one table to create data model. After choosing items click on the next.

clip_image011

Now you can define naming rules of Classes, Fields and Properties if required. Let us leave to default and click on next to proceed further. In last step you can configure Code Generation Settings. Let us leave settings to default and click on Finish to generate data model.

Once Data Model is created you will find *.rlinq file added in the project. Click on *.rlinq file to view the data model.

clip_image012

In this way you can create a data model using Telerik Open Access ORM from a SQL Azure database. I hope you find this post useful. Thanks for reading.

How to get Device information in Icenium

In this post we will take a look on fetching device information in Icenium. Internally Icenium usage PhoneGap to build the application. We will use PhoneGap API to fetch device information. It is always good idea to read device information when device is being ready. Device information can be fetched with reading values of following properties.

image

So in Icenium device information on device ready can be read as given in below code snippet,


document.addEventListener("deviceready", onDeviceReady, false);

// PhoneGap is ready
function onDeviceReady() {

var deviceName = device.name;
var deviceId = device.uuid;
var deviceOs = device.platform;
var deviceOsVersion = device.version;

//Use device information as required

console.log("devicename : " + deviceName + " deviceId: " + deviceId + " deviceOs: " + deviceOs + " deviceosversion : " + deviceOsVersion);

}

On running application in Graphite simulator you will find device information.

image

In this way device information can be fetched in Icenium. I hope you find this post useful. Thanks for reading.

Inserting Record in Database from Kendo UI DataSource using OData

While creating hybrid mobile application or a web application, we always come across requirement when we need to insert a record or create a record in the database. In this post we will take a look on creating a record from Kendo UI DataSource. Kendo DataSource will make a call to OData Service to insert a record. Essentially structure we are assuming in the post is as given in below diagram,

image

Let us follow step by step approach to perform insertion. Very first let us make variables to holding URLS to create and read data from OData service. In your case these URL values will be as per your service

image

Now we need to create Kendo DataSource. While creating Kendo data source we can configure it for reading and creating records.

To read values in the transport of data source set the value of read property with READ_URL. In below image you will notice that we are setting type of data source as odata because we are interacting with database via OData service. To read data you need to set following attribute of Kendo datasource.

image

We want to configure Kendo datasource for creating record also. For that we need to configure create property of Kendo datasource. In create property is a JSON object and essentially it takes following parameters

  1. url: OData url to created record.
  2. type : to create a record type should be POST
  3. datatype : this should be set to json or xml.
  4. contentType : This attribute is set for the content type

image

For OData version 2.0 contentType should be set to application/json .However in case of OData version 3.0 it should be set to application/json;odata=verbose.

image

After configuring Kendo datasource to create record, we need to set the schema of the kendo datasource. We must set schema of data source to successfully perform create record operation. In the schema, we need to create model defining different fields or columns. We need to provide type of the columns. Other types can be number, date, and string. Make sure you are setting total property of schema with count.

image

After setting all the required properties code to create Kendo data source is as following,


var READ_URL = "http://localhost:62272/SudentModelService.svc/Peoples";
var CREATE_URL = "http://localhost:62272/SudentModelService.svc/Peoples";
var dataSource = new kendo.data.DataSource({
type: "odata",
transport: {
read: {
url: READ_URL
},
create: {
url: CREATE_URL,
type: "POST",
dataType: "json",
contentType: "application/json;odata=verbose"

}
},
schema: {
total: "count",
model: {
id: "PersonID",
fields: {
PersonID: {

type: "number"
},
LastName: {
type: "string"
},
FirstName: {
type: "string"
}

}
}
}

});

As of now we have created data source to perform read and create operation. Now to create a record we need to create an item. Item can be created from reading values from the view. After creating item call add function on data source. Last step is to sync data with the server. This can be done by callinf sync function on the datasource.


var item = {
FirstName: $("#txtFirstName").val(),
LastName: $("#txtLastName").val()
}

dataSource.add(item);
dataSource.sync();
console.log("done");

In this way we can create or insert a record in database from Kendo UI data source using OData service. I hope you find this post useful. Thanks for reading.

Step by Step Creating WCF Data Service using Telerik Open Access ORM

In this post we will learn step by step to create WCF Data Service using Telerik Open Access ORM. We will create data model of data from SQL Server and further exposed that as WCF Data Service using Telerik Open Access ORM.

Learn more about Open Access ORM here

We are going to follow step by step approach. To create WCF Data Service follow the steps given below,

Step 1: Create Telerik Web Access Web Application project

After installation of Telerik Open Access ORM you will get Telerik Web Access Web Application project template while creating a new project. Go ahead and create a project selecting Telerik Web Access Web Application project template from Web group

image

Step 2: Create Domain Model

Next you will be prompted to create Domain Model. Open Access ORM allows you to create domain model from any of the following type of database. If required you can create Empty Domain Model as well.

image

Let us go ahead and create data model from Microsoft SQL Server. Choose Microsoft SQL Server from drop down and click on the Next.

Step 3: Setup Database connection

In this step you need to set up Database connection. Either you can provide Connection String manually or can create a New Connection. To create new connection click on Add New Connection. You will get window to add new connection. In this window provide database server name and choose database from the dropdown. To test the connection click on Test Connection and after successful testing click on Ok to add a new connection.

image

Step 4: Setup Database Connection

In this step you need to setup database connection. If you want you can change connection string name. Let us leave it to default and click on the Next.

Step 5: Choose Database Items

In this step you need to choose

  • Schemas
  • Tables
  • Views
  • Stored Procedure to create data model.

Let us say we are choosing only one table to create data model. After choosing items click on the next .

image


Step 6: Define Naming Rules

In this step you can define naming rules of Classes, Fields and Properties if required. Let us leave to default and click on next to proceed further

Step 7: Code Generation Settings

In this step you can configure Code Generation Settings. Let us leave settings to default and click on Finish to generate data model.

Once Data Model is created you will find *.rlinq file added in the project. Click on *.rlinq file to view the data model.

image

Step 8: Add Open Access Service

By step 7 you have created data model. Now let us go ahead and add WCF Data Service on the created Data Model. For this right click on the project and select Add Open Acccess Service. You will be prompted with Add Open Access Service Wizard. Before adding Open Access Service make sure that once you have built the project.

You need to choose

  • Context : Select Context from the drop down
  • Project : Use the existing project

image

Click on the Next after selecting Context and Project.

Step 9: Select Service Type

In this step you need to choose type of Service you want to create. Since we want to create WCF Data Service, let us choose that from the option and click on the next.

image

Step 10: Choose Entity to expose a part of the Service

In this step we need to choose entity to expose as part of service. Since there is only one entity choose that and click on the Next

image

In last step you can preview various References being added and changes to config files. Click on Finish to create Service. After WCF Data Service being created you can test that in browser. Run the application and browse to *.svc to test the service in browser.

You should get data of People in browser as below after successful creation of the service.

image

Conclusion

In this post we learnt to create WCF Data Service using Open Access ORM. I hope you find this post useful. Thanks for reading.

How to apply filter in creating Kendo UI Data Source from OData

I was working on an application and there was a requirement in which I had to apply filter while fetching data from the server using ODATA. I had two choice to achieve this

  1. Construct ODATA URL with filter applied
  2. Apply filter in Kendo UI Data Source

In this post we will discuss how we could apply filter while creating Kendo UI DataSource reading OData feed.

We can create data source reading ODATA feed as following. Below we are creating data source reading ODATA feed of Netflix


var movieTitleData;
movieTitleData = new kendo.data.DataSource(
{
type: "odata",
endlessScroll: true,
batch: false,
transport: {
read: {
url: "http://odata.netflix.com/Catalog/Titles?$select=Id,ShortName,BoxArt&$top=10",
dataType: "jsonp",

data: {
Accept: "application/json"
}
}
}

});

On inspecting request URL you will find that URL to fetch data is getting constructed as following. We are fetching top 10 movies title from Netflix

image

Now assume there is a requirement to fetch information of a particular movie with given Id. We can do that by applying filter while creating the KendoUI DataSource. We can apply filter to fetch movie of particular id as given below.

image

While applying filter we need to make sure that serverFiltering is set to true.

image

In Filter,

  1. Id is the column on which filter is being applied
  2. eq is operator to apply filter
  3. value is filter value

Kendo UI data source with filter applied can be created as following.


var moviedetailData = new kendo.data.DataSource(
{
type: "odata",
endlessScroll: true,
serverFiltering: true,
transport: {
read: {
url: "http://odata.netflix.com/Catalog/Titles?$select=Id,ShortName,BoxArt,AverageRating,ReleaseYear,Synopsis",
dataType: "jsonp",

data: {
Accept: "application/json"
}

}
},
filter: { filters: [{ field: "Id", operator: "eq", value: query }] }

});

While creating above KendoUI data source

  1. Data is fetched from Odata feed of Netflix
  2. Filter is applied on Id column of Netflix data source
  3. To apply filter at server side serverFiltering attribute is set to true

On inspecting request URL you will find that URL to fetch selected movie is getting constructed as following. We are fetching a particular movie on given id of the movie.

image

You will find that URL being constructed to fetch Odata feed is containing the filter query. In this way we can apply filter while creating Kendo UI DataSource reading an OData feed. I hope you find this post useful. Thanks for reading.