How to set up Icenium project from Github repository

In this post we will take a look on setting up project in Icenium from Github repository. Let us assume you have a github repository as given in below image. You need to set up project in Icenium based on this repository.

image

First step is, launch Icenium and click on Clone

image

After clicking on Clone, select Repository option and give Git repository URL here. By default Icenium will give you project name and you can change project name if required.

image

You will get message Cloning remote repository.

image

After successful cloning you will find project in project navigator of Icenium.

image

In this way you can clone a GIT repository as Icenium project. I hope you find this post useful. Thanks for reading.

Advertisement

How to work on Icenium using Facebook account

In this post we will take a look on working on Icenium Graphite using Facebook account. We will start from downloading then installation. After successful installation we will create a Hybrid Application project using Facebook credentials.

Follow the steps given below,

Step 1

To start installing first navigate to http://icenium.com and click on Try now Free until May!

clip_image001

Step 2

You will be provided with three options. Go ahead and select ICENIUM Graphite. Check on Term and Condition and click on Launch App. You will find set would have been started downloading.

clip_image003

Step 3

Navigate to folder in which setup got downloaded. Click on Icenium Graphite setup to start installation.

clip_image004

On installation you will find Graphite is being downloaded.

clip_image005

Step 4

After successful installation of Icenium Graphite you will get dashboard. You can login to Icenium with any of the options provide. Let us login with Facebook credential.

clip_image007

After successful login on dashboard you will find different options to create New Cross-Platform Device Application.

clip_image009

In this way you can download, install Icenium Graphite and start creating Hybrid Applications using your Facebook credentials. I hope you find this post useful. Thanks for reading.

How to get Device information in Icenium

In this post we will take a look on fetching device information in Icenium. Internally Icenium usage PhoneGap to build the application. We will use PhoneGap API to fetch device information. It is always good idea to read device information when device is being ready. Device information can be fetched with reading values of following properties.

image

So in Icenium device information on device ready can be read as given in below code snippet,


document.addEventListener("deviceready", onDeviceReady, false);

// PhoneGap is ready
function onDeviceReady() {

var deviceName = device.name;
var deviceId = device.uuid;
var deviceOs = device.platform;
var deviceOsVersion = device.version;

//Use device information as required

console.log("devicename : " + deviceName + " deviceId: " + deviceId + " deviceOs: " + deviceOs + " deviceosversion : " + deviceOsVersion);

}

On running application in Graphite simulator you will find device information.

image

In this way device information can be fetched in Icenium. I hope you find this post useful. Thanks for reading.

Inserting Record in Database from Kendo UI DataSource using OData

While creating hybrid mobile application or a web application, we always come across requirement when we need to insert a record or create a record in the database. In this post we will take a look on creating a record from Kendo UI DataSource. Kendo DataSource will make a call to OData Service to insert a record. Essentially structure we are assuming in the post is as given in below diagram,

image

Let us follow step by step approach to perform insertion. Very first let us make variables to holding URLS to create and read data from OData service. In your case these URL values will be as per your service

image

Now we need to create Kendo DataSource. While creating Kendo data source we can configure it for reading and creating records.

To read values in the transport of data source set the value of read property with READ_URL. In below image you will notice that we are setting type of data source as odata because we are interacting with database via OData service. To read data you need to set following attribute of Kendo datasource.

image

We want to configure Kendo datasource for creating record also. For that we need to configure create property of Kendo datasource. In create property is a JSON object and essentially it takes following parameters

  1. url: OData url to created record.
  2. type : to create a record type should be POST
  3. datatype : this should be set to json or xml.
  4. contentType : This attribute is set for the content type

image

For OData version 2.0 contentType should be set to application/json .However in case of OData version 3.0 it should be set to application/json;odata=verbose.

image

After configuring Kendo datasource to create record, we need to set the schema of the kendo datasource. We must set schema of data source to successfully perform create record operation. In the schema, we need to create model defining different fields or columns. We need to provide type of the columns. Other types can be number, date, and string. Make sure you are setting total property of schema with count.

image

After setting all the required properties code to create Kendo data source is as following,


var READ_URL = "http://localhost:62272/SudentModelService.svc/Peoples";
var CREATE_URL = "http://localhost:62272/SudentModelService.svc/Peoples";
var dataSource = new kendo.data.DataSource({
type: "odata",
transport: {
read: {
url: READ_URL
},
create: {
url: CREATE_URL,
type: "POST",
dataType: "json",
contentType: "application/json;odata=verbose"

}
},
schema: {
total: "count",
model: {
id: "PersonID",
fields: {
PersonID: {

type: "number"
},
LastName: {
type: "string"
},
FirstName: {
type: "string"
}

}
}
}

});

As of now we have created data source to perform read and create operation. Now to create a record we need to create an item. Item can be created from reading values from the view. After creating item call add function on data source. Last step is to sync data with the server. This can be done by callinf sync function on the datasource.


var item = {
FirstName: $("#txtFirstName").val(),
LastName: $("#txtLastName").val()
}

dataSource.add(item);
dataSource.sync();
console.log("done");

In this way we can create or insert a record in database from Kendo UI data source using OData service. I hope you find this post useful. Thanks for reading.

How to show current location on Google Map in Icenium

In this post we will take a look on working with Google map in Icenium. We will display Google map pinned with current location in a mobile view.

image

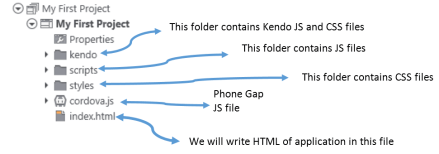
On creating Cross-Platform mobile application (Kendo UI Mobile) in Icenium, you will find by default references to work with Google map added in the project.

clip_image002

Next we need to create a view. In this view map will be rendered,


<div data-role="view" id="map" data-title="Map" data-show="showMap" data-stretch="true">
<div>
<div id="map_canvas" style="width: 100%; height: 100%; position: absolute;">
</div>

</div>
</div>

There are certain points worth discussing about the view.

  • showMap function will be called whenever user is navigating to view.
  • Style of map-canvas div is set to 100% width and height such that map will be displayed in whole view.

Now we need to write showMap function. In this function we will call PhoneGap navigatior.geolocation.getCurrentPosition function to get the longitude and latitude of current location of the user.


function showMap() {

navigator.geolocation.getCurrentPosition(
onSuccessShowMap,
onErrorShowMap
);

}

navigatior.geolocation.getCurrentPosition will call onSuccessShowMap function on success and onErrorShowMap on any exception in finding users current location. In onSuccessShowMap function we will render Google map in the view created previously.

Rendering of Google map can be done in three steps,

Very first we need to find longitude and latitude of the current location and that can be done as following,

image

Once longitude and latitude has been determined next we want to create the map option. You can read more about Google map options in Google map API documentation. So we are creating map option as following,

image

After creating map option we need to create the map. It takes two parameters. First HTML element on which you want to render the map and then map options. We have created a div with id map-canvas in map mobile view to render the map and in previous step, we created the map option.

image

At the last step we need to set the marker on the map with the current location. That can be done as following,

image

To render map you need to consolidate all the steps discussed above in onSuccessShowMap(position) function. After consolidating function should look like below,


function onSuccessShowMap(position) {

var latlng = new google.maps.LatLng(
position.coords.latitude,
position.coords.longitude);

var mapOptions = {

sensor: true,
center: latlng,
panControl: false,
zoomControl: true,
zoom: 16,
mapTypeId: google.maps.MapTypeId.ROADMAP,
streetViewControl: false,
mapTypeControl: true,

};

var map = new google.maps.Map(
document.getElementById('map_canvas'),
mapOptions
);

var marker = new google.maps.Marker({
position: latlng,
map: map
});
console.log(marker);
console.log("map rendering");
}
</script>

In last we need to write onErrorShowMap function. In this function handle all the errors may encounter while reading current location of the user. I am leaving function like following


function onErrorShowMap(error) {

alert("error");
}

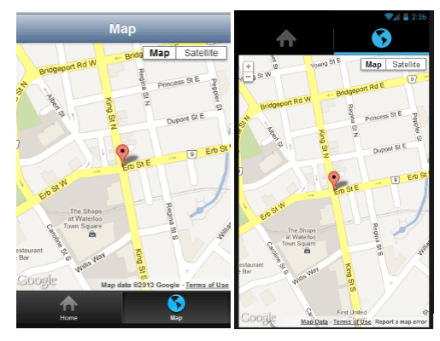
Now when you run application you should get map with user current location in the map view.

image

I hope you find this post useful. Thank for reading.

Create APK package for Google Play using Icenium Graphite

In this post we will take a look on creating APK package for submission to Google Play using Icenium. Let us follow following walkthrough to create APK package,

To create package, Right click on the project and select Publish to create APK package,

clip_image001

In the next window click on Google Play. You will get an error message that there is no certificate or Code Sign Identity found for Google Play Signing.

image

To solve this issue click on the option in Icenium Graphite IDE.

image

In Users Option window select General tab and then Certificate Management option.

image

In Certificate Management option you will get an option to create New Certificate. Click on Create New to create new certificate. You can either use

  1. Self-signed identity
  2. Request for the Certificate

Let us go ahead and request for the Self-signed identity. In Self-signed identity window you need to provide following vital information,

  • Country
  • Type of the self-signed identity. In this choose Google Play as option. Other option available is Generic.
  • Configure Start Date and End Date

image

After creating Self-signed identity you can find them in Cryptographic Identities section. Below you can see that I have created three self-signed identity.

image

After creating Self-signed identity right click on the project and select properties in the properties windows, select Android tab. Here you can set various application properties for android platform.

image

From the Code Signing Identity drop down, select any existing certificate to associate it with the application.

image

You can set icons, application permissions for Google Play here. After associating self-signed identity again right click on the project and select publish option. You will get Application Validation Status message as OK.

image

Next click on the Build button to create the package. Icenuim will build the application in cloud and ask you to give a name of the apk package and save it locally.

image

In this case we saved APK with name tearchapp. Now you can submit the APK file to Google Play to publish application. I hope you find this post useful. Thanks for reading.

Make a Call on Icenium using PhoneGap

In this post we will take a look on making a call using PhoneGap in a Hybrid application creating using Icenium. Let us create a view like following to make a call,

image

Above view can be created using following code snippet,


<div data-role="view" id="callview" data-title="Make a Call">
<h1>Call this number!</h1>
<div id='Div1'>
<label for="txtName" style="display: inline-block;">Enter Phone Number to Call:</label>
<input type="text" id="Text1" value="" />
</div>
<div>
<a id="A1" data-role="button" data-click="callfunction" data-icon="action">Make A Call</a>
</div>
</div>

On click of Make a Call button a call can be done as following,


function callfunction() {

var phntocall = document.getElementById('txtPhoneNumber1').value;
window.location.href = "tel:" + phntocall;

}

In above code snippet we are reading phone number. After that using tel: to make a call. It will open native Call application with configured phone number to make a call.

I hope you find this post useful. Thanks for reading.

Send SMS on Icenium using PhoneGap

In this post we will take a look on sending SMS using PhoneGap in a Hybrid application creating using Icenium. Let us create a view like following to send SMS,

image

Above view can be created using following code snippet,


<div data-role="view" id="messageview" data-title="Send SMS">
<h1>Send Messages!</h1>
<div id='helloWorldInput'>
<label for="txtName" style="display: inline-block;">Enter Phone Number to send message:</label>
<input type="text" id="txtPhoneNumber1" value="" />
<input type="text" id="txtPhoneNumber2" value="" />
</div>
<div>
<a id="submitButton" data-role="button" data-click="sayMessage" data-icon="compose">Send Message</a>
</div>
</div>

On click of Send Message button a SMS can be send as following,


function sayMessage() {
var phn1 = document.getElementById('txtPhoneNumber1').value;
var phn2 = document.getElementById('txtPhoneNumber2').value;
var phonenumbers = phn1 + "," + phn2
window.location.href = "sms:" + phonenumbers + "?body=" + "hello test message";
}

In above code snippet we are reading two phone numbers and concat them with comma. After that using sms: to send the message. It will open native Message application with configured phone numbers and message body.

I hope you find this post useful. Thanks for reading.

Working with Github and Icenium

Cloud based IDE Icenium allows you to develop cross platform mobile applications. When you create a project in Icenium IDE , it saves that project in cloud and allow you to do version control. Aprat from cloud integration , Icenium allows you to push and pull your project with Github Repositiry as well.

image

To integrate project from Icenium to Github repository, first create a repository in guthib. You can create that on Github site by clicking on New Repository link button

image

To create new repository, you need to provide following information. I am symbolically providing information here to create a new repository.

image


Once repository got created, you will get a URL to work with that repository.

image

As of now you have created a repository in Github. Now let us switch to Icenium IDE. Right click on the project then select Version Control. In Version Control select the option of Configure Remote Repository

image

Next you need to provide URL of Github repository.

image

Next again right click on the project and from Version Control select the option of Pull

image

You will see that you have pulled the repository.

image  

Now to push the project to github repository right click on project and select version control then Push option

image

When you start pushing you need to authorize yourself to the repository.

image

On successful completion of the push, you will get a message at bottom of IDE as following    

image


So in this way you can integrate project from Icenium to Github repository.  I hope this post was useful. Thanks for reading.

My favorite 5 Icenium features

Icenium Cloud based IDE got launched and I found this “one stop solution” to create Hybrid applications or Cross-platform application very impressive. While playing around Icenium, I liked almost every features in this Cloud based IDE. However below I am listing my favorite 5 features. In further post, I will discuss more features and step by step explanation to work with them.


image


Code Editor

Being a hybrid application developer, we need to write lot of HTML, JavaScript and CSS. Code Editor in Icenium is clean and elegant editor. It allows us to write codes without much distraction.

image

Just Code is integrated with Code Editor. In Code Editor, we can perform tasks like

  1. Refactoring
  2. Navigation
  3. Code Commands

image


We can perform Code Commands like

  • Formatting of Code
  • Expand selection
  • Duplicate a text
  • Put a block comment


image


The best part is, there is short cut for all the operation. In Navigation we can perform tasks like

  • Go To File
  • Go To Member
  • Go to Symbol


image

So my one of my favorite feature in Icenium is its elegant Code Editor.


Certificate Management

If you have created any Android application then you may be knowing that you need to have a certificate to create apk file. Icenium allows us to create and mange certificate right from the IDE.


image

Icenium provides two options to create a certificate,

  • Request for a certificate
  • Create self-signed certificate


image

Creating certificate right from the IDE is one of the cool feature.

Version Control

Icenuim provides complete version control solution for application development. We can work locally and can perform following tasks in Icenium

  • Compare the changes in between local and latest versions from the server
  • Commit the changes
  • Revert the changes
  • View the history log in the repository


image


We can compare changes, navigate from one change to another as shown in the below image.


image

We can view the

  • history
  • change sets
  • Conflict etc. as shown in the following image,

image


Icenium allows us to commit or revert the changes. While committing we need to provide comment for that particular change. We can commit as shown in below image,


image

Version control is one of the cool feature I got impressed while playing with Icenium.

Integration with github Repository

Yes you read it corectly , right from the IDE you can push and pull yor project to github repository. Icenium allows us to

  • Configure the repository
  • Pull from the repository
  • Push into the repository
  • Invite the Collaborators

image

The best part is that right from the IDE we can Invite Collaboratoes . Before pushing to github we need to commit the changes to resposiory . Commit comment will be displayed next in the github respository comment


image


Code sign ,Permissions and Publish of application


Right from Icenium IDE ,we can sign the code , configure the permissions and set the icons of the application.


image


In Icenium with a right click on the project , we can publish the application.

image

I hope you like these fetaure and you are all set to play around Icenium. Thanks for reading this post and I am looking very forward to share more learning on Icenium with you in furher post.

Creating First Cross-Platform Application using Kendo UI Mobile and Icenium


Learn and explore more about Icenium here

Learn more about Kendo UI Mobile here

Yes as you see in below image that I am developing an application for IPhone on my Windows Machine and this is possible using Icenium.

Being an application developer I am very much excited with the launch of ICENIUM .Icenium is Cloud Based IDE to create Hybrid Application. If you are new to Hybrid Application then you may want to read what is a Hybrid Mobile App? And you may want to read As a Developer why should I worry about Hybrid Application Development?

Learn and explore more about Icenium here

Icenium provides you two different types of IDE.


In this post we are going to use Icenium Graphite to create our first Cross-platform application. To start with launch Icenium Graphite IDE. You will be asked to Login to Icenium. You can login using any of the following as given in the image below.

Let us choose Telerik ID to login into Icenium IDE.


After successful login you will get a Project dashboard. On project dashboard you can perform following three tasks

Create New Project
Browse existing Projects
Clone a project

In below image you can see list of existing projects. To create new project click on New.

There are three project templates as following

  • Blank
  • Using jQuery
  • Using Kendo UI Mobile

Let us go ahead and create a cross-platform device application using Kendo UI Mobile.


Give name of the project. You will notice that you are not asked to select a location to save the project. Since Icenium is a cloud IDE, it saves the project in the cloud rather than saving it locally. Click ok to create the application.

Let us go ahead and explore Project Navigator. You will find project structure as given in following image,


On opening of index.html, you will find some prior code there for reference. As you see in below image that to create Hybrid application using Kendo UI Mobile, you need minimum following references.


There are three default files you will be working on. However you are free to give any name to files.


Let us go ahead and run the default application got created by choosing Kendo project template.


There are two ways you can run the application. You can run application either

  1. On Device
  2. In Simulator

On running you get application running in iPhone simulator.


There are four simulator supported in Icenium.


If you want to run the application in Android Simulator change the Device simulator and you are done

There are many other options available in Device Simulator. We will discuss them in detail in further blog posts.


In this way you can create, test and deploy a truly cross-platform application using Kendo UI Mobile and Icenium. I hope you find this post useful. Looking forward to share more learning on Icxenium and Kendo UI Mobile with you in further blog posts.