In this post we will take a look on how to read values NotificationTemplate controls in RadHubTile. Let us say, you are working with RadHubTile and you have set the NotificationTemplate as following,
<telerik:RadHubTile x:Name="rdRunsHubTiles"
 Title="Score"
 Message="India/Eng Score"
 ImageSource="/Assets/indengmatchlogo.JPG"
 BackContent="Score of India England first Test"
 Margin="93,209,0,388">
 <telerik:RadHubTile.NotificationTemplate>
 <DataTemplate>
 <StackPanel Orientation="Horizontal" >
 <TextBlock Text="{Binding Runs}" />
 <TextBlock Text="{Binding Country}" />
 </StackPanel>
 </DataTemplate>
 </telerik:RadHubTile.NotificationTemplate>
 </telerik:RadHubTile>
There are two TextBlock Controls inside the NotificationTemplate. Both TextBlock are data bind. RadHubTile DataCoontext is set as following
protected override void OnNavigatedTo(NavigationEventArgs e)
 {
 rdRunsHubTiles.DataContext = GetRun();

 }

Data GetRun()
 {
 return new Data ()
 {
 Runs = 200,
 Country = "India"
 };

 }
And Data class is defined as following,
public class Data
 {
 public int Runs { get; set; }
 public string Country { get; set; }
 }
Now when user tapd RadHubTile you need to read values of NotficationTemplate TextBlocks. To do this you need to handle tap event. Register tap event to RadHubTile as following ,
public MainPage()
 {
 this.InitializeComponent();
 rdRunsHubTiles.Tapped += rdRunsHubTiles_Tapped;

 }
Now in the Tap event we can read controls values as following,
void rdRunsHubTiles_Tapped(object sender, TappedRoutedEventArgs e)
 {

Data valueOfNotification = (sender as RadHubTile).DataContext as Data ;
 var runsettocontrol = valueOfNotification.Runs;
 var countrysettocontrol = valueOfNotification.Country;
 }
In above code we are
1. Typecasting sender as RadHubTile
2. Reading DataContext of RadHubTile as Data
3. Reading set values as property
So in this way we can read NotificationTemplate controls value. I hope you find this post useful. Thanks for reading.
In this post we will take a look on working with RadHubTile in XAML based Windows Store Application. RadHubTile gives you same immersive experience as you see on the home screen of Windows 8. You can display message, notification, title and message on flipping of tile using RadHubTiles. RadHubTile gives you experience like below image.
To start working with RadHubTile let us start with Creating Application for Windows Store. To create this choose Blank App from Windows Store project tab. After creating project you need to add reference Of Rad Control for Windows 8 in the project. To do that right click on the reference and select Add Reference. From the Reference Manager Dialog box select Rad Control for Windows8.
After adding reference in the project, you need to add namespace on the XAML page. You can do that as following,
You can create a HubTile on XAML as following ,
Since you have not set any propery of RadHubTile like Message , Title etc , so as output you will get a simple rectangular tile as below,
Some of the important properties of RadHubTiles are as following ,
Now let us go ahead and set properties of RadHubTiles ,
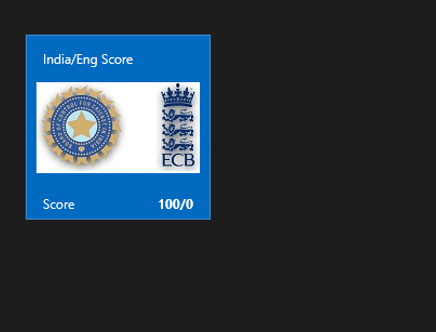
 <telerik:RadHubTile Title="Score"
 Message="India/Eng Score"
 ImageSource="/Assets/indengmatchlogo.JPG"
 Notification="100/0"
 BackContent="Score of India England first Test"
 >

 </telerik:RadHubTile>
Above we have set several properties of RadHubTiles . Now let us go ahead and run the application to see the output
Now let is go ahead and create template for BackContent. We crate template to show information in back of the RadHubTile as we want. Let us say , we want to display Image and Title in the back of the RadHubTile. We can do that by creating a DataTemplate and then setting that as value of BackContentTemplate. We can do that as following ,
You see that in above code we have created DataTemplate . There is StackPanel and one Image control along with TextBlock have put vertically in the StackPanel. When you run the application , you will get RadHubTile back content as following ,
For your reference full code with BackContent Template is given below,
 <telerik:RadHubTile Title="Score"
 Message="India/Eng Score"
 ImageSource="/Assets/indengmatchlogo.JPG"
 Notification="100/0"
 BackContent="Score of India England first Test"
 Margin="93,209,0,388">
 <telerik:RadHubTile.BackContentTemplate>
 <DataTemplate>
 <StackPanel Orientation="Vertical">
 <TextBlock Text="India England Test Series" />
 <Image Source="/Assets/indengmatchlogo.JPG" />
 </StackPanel>
 </DataTemplate>
 </telerik:RadHubTile.BackContentTemplate>

</telerik:RadHubTile>
As we set BackContentTemplate , we can set
NotificationTemplate
MessageTemplate
As well. Let us go ahead and create the NotificationTemplate. We will bind controls in NotificationTemplate with the data coming from the background. Let us say there is function returning Data. In this case I am hard coding the data value, however in real time scenario you will like to fetch data from a remote service.
 Data GetRun()
 {
 // Put code here to fetch data from remote service
 return new Data ()
 {
 Runs = 200,
 Country = "India"
 };

 }
Data class is defined as following,
namespace HubTilesXaml
{
 public class Data
 {
 public int Runs { get; set; }
 public string Country { get; set; }
 }
}
We need to set DataContext of RadHubTile as given below,
Now let us go ahead and create NotificationTemplate . NotficationTemplate can be created as following.
We are creating a DataTemplate and setting it as value of NotificationTemplate property of RadHubTile. For your reference full code with BackContentTemplate and NotficationTemplate for RadHubTile is given below,
<telerik:RadHubTile x:Name="rdRunsHubTiles"
 Title="Score"
 Message="India/Eng Score"
 ImageSource="/Assets/indengmatchlogo.JPG"

 BackContent="Score of India England first Test"
 DataContext=""
 Margin="93,209,0,388">
 <telerik:RadHubTile.BackContentTemplate>
 <DataTemplate>
 <StackPanel Orientation="Vertical">
 <TextBlock Text="India England Test Series" />
 <Image Source="/Assets/indengmatchlogo.JPG" />
 </StackPanel>
 </DataTemplate>
 </telerik:RadHubTile.BackContentTemplate>
 <telerik:RadHubTile.NotificationTemplate>
 <DataTemplate>
 <StackPanel Orientation="Horizontal" >
 <TextBlock Text="{Binding Runs}" />
 <TextBlock Text="{Binding Country}" />
 </StackPanel>
 </DataTemplate>
 </telerik:RadHubTile.NotificationTemplate>

</telerik:RadHubTile>
At this point if you run the application you should get a RadHubTile with BackContentTemplate , NotficationTemplate , Message and Image.
We can get all the information from RadHubTile in code behind and can use them. For example let us say when user is tapping on the RadHubTile , we want to display the NotificationCount. We can do that as following,
void rdRunsHubTiles_Tapped(object sender, TappedRoutedEventArgs e)
 {

var runset = (sender as RadHubTile).Notification;
 }
In this way we can work with RadHubTile in Application for Windows Store. I hope you find this post useful. Thanks for reading.
Recently while working with Kendo UI Mobile, I had to navigate from one view to other view inside if else condition. I had scenario, something like following
To achieve this, first I tried something like following,
In above approach, I was able to navigate to views. However after navigating views were not adhering to the layout set for the application because I was creating new instance of the Application. So certainly this approach was not a suitable solution to go ahead with.
To solve this, you need to navigate on instance which you already created while initializing the html for mobile application. You create something like this on HTML.
To navigate conditionally just call navigate function on app. essentially you do not need to recreate instance of application. So if we modify above solution, you do not need first line of the code. Point to be noted here is that app is the variable name we are using while initializing the application on the html.
In this way you can navigate to different views from JavScript in KendoUI Mobile. I hope you find this post useful. Thanks for reading.
In this post we will take a look on, how to find which button is selected in KendoUI Mobile ButtonGroup . Let us suppose we have a ButtonGroup like following,
ButtonGroup will look like following
In JavaScript we can find index of selected button as following.
buttonsearchgroupis the id of the ButtonGroup. We can check for the selected index in if condition to perform a task according to the selected button in ButtonGroup. This can be done as following,
Launch of Windows 8 has brought enormous enthusiasm among developers along with normal users. Developers are aspired to write fascinating killer apps and want to reach maximum Windows 8 users. If you are one of those aspired developer then this webinar is for you. In this webinar we will talk and learn about Rad Controls for Windows 8. Rad Controls for Windows 8 allows you to write fascinating touch enabled Windows 8 Application which your users will love. It helps you to shorten development time, quickly take application to market and get better ranking. There are 15+ native controls available for you to use in your application. You can use controls natively in your application regardless you are developing in XAML or HTML.
In this post we will take a look on working with RadNumericBox. If first time you are working with RadControls in JavaScript based Windows 8 Application, I recommend you to read this post .
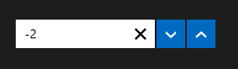
To work with RadNumericBox simply set data-win-control property of a div or span as Telerik.UI.RadNumericBox
You will get RadNumericBox configured with default values as following,
You can work with RadNumericBox from JavaScript as well.
Here agebox is id of span.
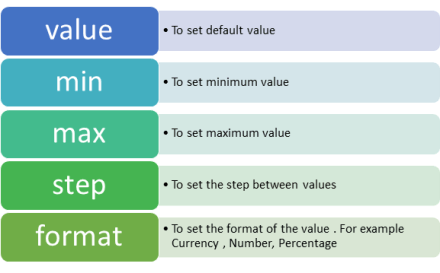
You can set different options for RadNumericBox. Some of those options are as following,
Options can be set as following,
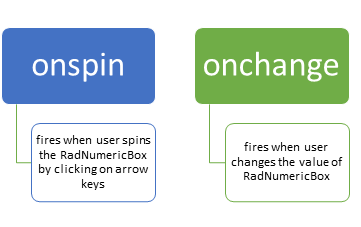
Now when you run the application, you should get RadNumericBox configured with default value 40, minimum value 0, maximum value 255 and step as 10. While working with RadNumericBox there are two important events,
In code behind you can attach event to RadNumericBox as following,
if (args.detail.kind === activation.ActivationKind.launch) {
 if (args.detail.previousExecutionState !== activation.ApplicationExecutionState.terminated) {
 // TODO: This application has been newly launched. Initialize
 // your application here.
 } else {
 // TODO: This application has been reactivated from suspension.
 // Restore application state here.
 }
 args.setPromise(WinJS.UI.processAll());
 var nbage = document.getElementById("agebox").winControl;
 nbage.addEventListener("spin", showmessage);
 nbage.addEventListener("change", function (e) {
 document.getElementById("output").innerText = "You have selected" + nbage.value;
 });
 }
 };

 function showmessage(e) {

document.getElementById("output").innerText = "You have selected" + e.target.value;
 }
I hope you find this post useful. Thanks for reading.
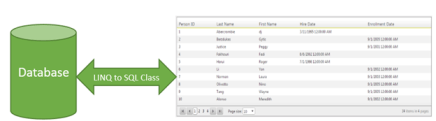
In this post we will take a look on working with RadGrid and LINQ to SQL Class. We will display data in RadGrid using LINQ to SQL Class from SQL Server database.
Very first let us create DataSource to be used with RadGrid. We will use LINQ to SQL class to create data model here. To create data model using LINQ to SQL class right click on the project and select Add then New Item. From Data tab, choose LINQ to SQL Classes
If you want you can change name of the LINQ to SQL class, however I am leaving default name and clicking on the Add button. Choose Server Explorer on the design surface to create data classes.
In Server Explorer right click on the Data Connection and Add Connection. In Add Connection dialog box provide database server name and choose the database to create data model. Click on Ok to add a new Data Connection in Server Explorer.
On successfully adding of data connection , you can see that in server explorer
Next drag and drop Tables, Views , Stored Procedures and Functions from Server Explorer on dbml design surface to make a part of data model. In this case , I am going ahead with only one table Person. Now you can see that Person is added on dbml file.
As of now we have added the data model in the project. Now let us go ahead and add a RadGrid on the page. To add RadGrid on the page drag and drop it from Toolbox on the page. If you don’t find RadControls in toolbox then right click on the General tab in tool box and select Add Tab
Give name of the tab . Right click on newly created tab and selecte Choose Items. Then browse to
C:\Program Files (x86)\Telerik\RadControls for ASP.NET AJAX Q1 2012 SP1\Bin40
and choose Telerik.Web.UI.dll and after selecting dll click on Ok button to add the controls in toolbox.
In toolbox you can see that RadControls are successfully added.
Next from the Telerik AJAX Data Component tab , drag and drop RadGrid on the page.
As of now we have added RadGrid on the page . Next we need to create data source from the data model and bind to the RadGrid. Below is the function returning List of Person.
In function we are creating instance of DataContext class and returning list of person on that. Now we need to bind data returning from this function to RadGrid. We can do that as following
using System;
using System.Collections.Generic;
using System.Linq;
using System.Web.UI;

namespace GridSample
{
public partial class _Default : Page
{
protected void Page_Load(object sender, EventArgs e)
{
RadGrid1.AllowPaging = true;
RadGrid1.NeedDataSource += RadGrid1_NeedDataSource;


}

void RadGrid1_NeedDataSource(object sender, Telerik.Web.UI.GridNeedDataSourceEventArgs e)
{
RadGrid1.DataSource = GetStudents();
}


private List<Person> GetStudents()
{
DataClasses1DataContext context = new DataClasses1DataContext();
// return context.Persons.SortBy("FirstName").ToList();
return context.Persons.ToList();
}
}
}
Now when you press F5 to run the application , you should get data in RadGrid using LINQ to SQL class.
In this way you can pull data from database using LINQ to SQL class and bind to a RadGrid. I hope you find this post useful. Thanks for reading.
In this post we will take a look at how a report designed in Standalone End User Report Designer, can be rendered from your applications – be it WPF, WinForms, SilverLight or ASP.NET. One of the customer I was working with had this requirement of end users to design the report and that report should be rendered within the application. The end users who design the report will have the flexibility to upload the designed report to the application. The application had to render the uploaded report in a reporting module. So we will see how to achieve this. If this requirement has excited you, then read through rest of this post.
Pre Requisites:
In order to design reports using the standalone end user report designer, you will need to first download the Telerik Reporting solution. This is available as a free 30 day trial download. Here is the download link:
in order to mimic the scenario of End User connecting to a staging DB and designing the report on their desktop – I will be making use of 2 Databases. So you will need a RDBMS product of your choice. In my example I will be using SQL Server 2012.
Creating Staging and Production DB:
For the sake of the demo, I will create 2 database and name them as StagingDB and ProductionDB respectively. The database will have only one table named Contacts. It will have 2 columns an Id and Name. Here is the code snippet for the table:
This file contains hidden or bidirectional Unicode text that may be interpreted or compiled differently than what appears below. To review, open the file in an editor that reveals hidden Unicode characters.
Learn more about bidirectional Unicode characters
So at his time, if you are following along, you should have created 2 databases – StagingDB and ProductionDB and in both the DB you should have 1 table named Contacts. In staging DB contacts table I will fill some dummy data and it looks like below:
Similarly in the Contacts table of production DB, I have inserted the following data:
We will mimic a scenario where in the end users will connect to the StagingDB->Contacts table and design the report using the Standalone Report Designer. After designing it they will upload to the application. And application will connect to production DB and render the report.
Designing the report:
when you install the Telerik Reporting suite, we will also install the Standalone report designer for end users. This is an executable which can be run on any system. It can be in a folder named Report Designer at the root of Telerik Reporting installation folder. When you launch the ReportDesigner,exe, you will see the following interface:
Click on New Report, give a name for the report and select a path to save the report.
Next, we will be presented with a Report Wizard. In the “Choose Data Source” dialog, create a new data source and connect to the Staging DB we have created earlier. In order to connect to our SQL Server database, select SQL Data Source in the data source selection dialog and give it a name.
In the data connection selection page, configure the connection settings to your Staging DB.
Next we configure the command i.e. the select query to fetch the report data. For this demo it’s a simple statement – “Select * from Contacts”. Next you can preview the results of the query
Click on finish to finish the connection settings configuration.
Now you will see that we have set up a data source for the report and following dialog shows the details:
Click next to select the report type. I have select a standard report type
Next we will configure the data layout of the report, In this example, we have only two columns in the table and I will show both the column in the body of the report.
Next select the report layout i.e. is the report a stepped report or outline or left aligned. I have selected Stepped report i.e. items are arranges in columns and they don’t overlap vertically.
Next you can select a report style and finish the wizard.
At this point we have successfully designed a report using the report designer. In order to preview the report, click the Preview button on the Home tab. The report will be executed and shown as below:
As you can see we have connected to our staging db and pulling data from the contacts table.I have named the report as DemoReport and is saved as DemoReport.trdx. The TRDX is a custom file format that Telerik Reporting uses. It stands for Telerik Reporting Definition XML. Next we will see how we can upload this file to a application and render the report inside the application.
Building a WPF client:
In order to mimic a production application, I have built the following WPF app.
Although I have selected WPF app for this demo, it can be anything in real world – ASP.NET Web App, WinForms or SL. Here is the work flow of this app:
An end user uploads the .TRDX report file he designed using the Standalone Report Designer, in the app.
The app saves the file in the application folder.
App will list the uploaded report file in a list box.
When the report is selected in the list box, the report will be rendered in the report viewer.
For the sake of the time, I will not be describing the portion of the app which allows us to browse and select a .TRDX file, Saves the uploaded .TRDX file in one of the application folder and listing of the uploaded report in list box. Those are pretty straight forward code that you will be familiar with. We will pay our attention to how do we render the .TRDX file inside the Report Viewer in the coming sections.
TRDX Report Rendering using URI:
The report viewer has the capability to just take a URI of a .TRDX file and render it. The ReportViewer exposes a property called ReportSource. One of the supported report source is UriReportSource. As the name goes, we are supposed to create an instance of UriReportSource and set the URI to the .TRDX file. Be it a WPF app as the one we are dealing with now or a web scenario – you just need to get the complete URI of the .TRDX file. Here is the code snippet to achieve this:
This file contains hidden or bidirectional Unicode text that may be interpreted or compiled differently than what appears below. To review, open the file in an editor that reveals hidden Unicode characters.
Learn more about bidirectional Unicode characters
In previous section we saw UriReportSource as the report source for the report viewer. The report viewer also supports XML as a report source. We can pretty much give a XML literal string which confronts to Teelrik Reporting Definition XML schema and the report viewer will be able to parse and render the same. The .TRDX report file is nothing but a XML in itself. Here is the content of the DemoReport we designed in its XML form:
This file contains hidden or bidirectional Unicode text that may be interpreted or compiled differently than what appears below. To review, open the file in an editor that reveals hidden Unicode characters.
Learn more about bidirectional Unicode characters
Here is the code snippet to prepare the XmlReportSource and bind that to ReportViewer ReportSource.
This file contains hidden or bidirectional Unicode text that may be interpreted or compiled differently than what appears below. To review, open the file in an editor that reveals hidden Unicode characters.
Learn more about bidirectional Unicode characters
Well, if you followed the post so far, you will probably be getting this question for sure. Well remember that when we designed the report using Standalone Report Designer we did set up a data source and a connection string. But that points to our staging database. Meaning the schema of the staging db and the production db are the same but they will be two different environments when it comes to reality. You will never allow somebody to work with a production environment for design. Instead you will allow people to play around in the staging or local setup and finally deploy the code to production. So when we rendered the report using the URI Report Source or XML Report Source – the report does contain the data source object embed within the report and will use that when executing in the production. Remember that the connection string set up during design points to our staging or local setup. So when the report is rendered in the production, report viewer will search for the connection string name given during the design. It may be there or may not be there – whatever it is, this is not ideal scenario to support. So how can we overcome this. In the next section, we will see what is the solution for this.
Report Xml Serializer:
when we looked at XmlReportSource, we understood the .TRDX file is nothing but a XML content. It is nothing but the report definition. The Telerik Reporting solution comes with a ready made XmlSerializer which can read this XML definition and gives us an instance of Telerik.Reporting.Report – an object representation of the Report we designed. The Report class exposes the Data Source we set up and the Connection String on that data source. So the solution to render a .TRDX file in production environment will be as follows:
Read the content of the .TRDX file as XML string
Use ReportXmlSerializer to serialize the XML to Report object
On the report object, get the SqlDataSource and change the connection string of the data source to match your production. You can either provide the complete connection string itself or the name of the connection string element from your configuration file.
Here is the code snippet on how to use the Report Xml Serializer:
This file contains hidden or bidirectional Unicode text that may be interpreted or compiled differently than what appears below. To review, open the file in an editor that reveals hidden Unicode characters.
Learn more about bidirectional Unicode characters
Standalone Report Designer is a great tool for end users who just create reports and are not technical people. Telerik Reporting Solution has provisions to use the designed report i.e. .TRDX file and render that inside the report viewer. Since it supports both URI Report Source and XML Report Source, you can decide the way you want to store the report i.e. either store it as a physical file in your app in a separate folder or store the content of the .TRDX file in a database column. In both the cases you will be able to use the Report XML Serializer to serialize the XML as a Report instance, update the connection string to match your production and set it to the report viewer.
With Telerik Reporting Solution, you now have the power in your apps to let the end user design adhoc reports, upload it in your app and render the same in a report viewer. Hope this post gave you some insights into Telerik Reporting capabilities.
Once you have done with downloading and installing Rad Control for Windows 8, create a new JavaScript based Windows Store project
Right click on the reference in solution explorer and add a new reference. Choose Windows Library for JavaScript and add to the project.
After adding references, verify in solution explorer that you have successfully added the references
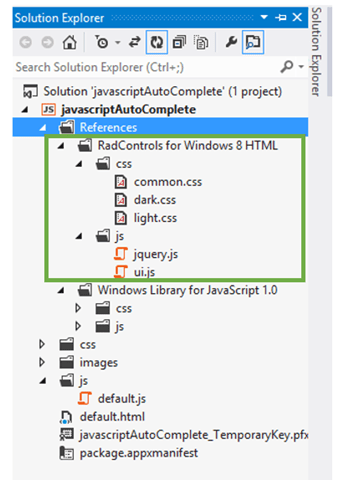
Once references are successfully added in the project, you need to add references of Rad Control JS files and CSS files on the HTML page. You can refer them as following listing,
Now you are all set to use RadControls for Windows 8 in your application. To test that whether we have added all the references correctly or not ,let us put a RadSlider control on HTML
Now when you run the application you should get a RadSlider control on the page successfully.
In this way you can get it started with Rad Controls for Windows 8 in JavaScript based application for Windows Store. I hope you find this post useful. Thanks for reading.
In a recent gathering of many tech enthusiasts on mobile devices, the discussion steered towards Nokia (how could it not?). People tended to like the new Lumia phones due to its colourful interface, wireless charging and deep social networking integration. The next question was on how to develop mobile apps for these devices? Nokia has come up with new new programs that enable developers to make the most of the new devices coming out of Nokia. They are:
Nokia Ad Exchange
Nokia Premium Developer Program
The Nokia Ad Exchange (NAX) is a simple way of generating revenue from the in app advertising (banners, full-screen ads, text etc). From one of the my Nokia developer friends, this is the most lucrative way of generating the revenue for mobile developers. The NAX is not a single network but aggregates over 120 advertising networks worldwide with options to choose the type of ads that you want to receive in your app. You will also be able to monitor the stats (e.g. CTR, impressions) for your app. The best of it all is that the same NAX can be used on various platforms (i.e. including Series 40 and Symbian, iOS, Android and Blackberry).
I say that every Nokia Lumia developer needs to be on the Nokia Premium Developer Program. The subscription will set you back by USD 99 or approx INR 5200. As we will see,the value far outweighs the cost of this program. This program is focused on providing the Nokia developers the tools to make their app stand out in the marketplace. So, what are the tools included in the toolkit that are going to make your app pop?
Yearly subscription to Microsoft Developer Center. This $99 subscription is quintessential in case you want to put up your application in the Windows Phone marketplace (duh!). This falls in the category of MUST Have.
Telerik RadControls for Windows Phone. The real win for you is in the user experience of your application. RadControls gives you wonderful user experience widgets that will make your app standout in the crowded marketplace. Not only are RadControls good for user experience but also they give you the enhanced capabilities with least amount of code. Extensive learning resources are available that would get you to a flying start.
And in case you get stuck at anything, Telerik support staff would answer it within 24 hrs. Raise a support ticket if you face any issue (via your telerik.com account).
12 months subscription to Buddy Cloud APIs. If you want to integrate functionalities like global user accounts, photo albums, messaging, friends/groups functionality, push notifications Buddy cloud quickly gets you started with it. Developers are advised to watch for the no. of API calls that they make. Over 1,000,000 calls/ month will be charged.
2 Nokia support tickets. For those difficult days when things are not going quite right
If you are a Nokia Developer, you can now make truly world class application with the resources available to you. In addition, if you are in India and have an issue getting started with the Telerik RadControls for Nokia Lumia, you can call us on +91-124-4300987 and speak to Dhananjay on ext 201. He already has a video ready for you on this.
In the meantime, I am off to hunt for a Lumia 920 in India.
Cloud based IDE Icenium allows you to develop cross platform mobile applications. When you create a project in Icenium IDE , it saves that project in cloud and allow you to do version control. Aprat from cloud integration , Icenium allows you to push and pull your project with Github Repositiry as well.
To integrate project from Icenium to Github repository, first create a repository in guthib. You can create that on Github site by clicking on New Repository link button
To create new repository, you need to provide following information. I am symbolically providing information here to create a new repository.
Once repository got created, you will get a URL to work with that repository.
As of now you have created a repository in Github. Now let us switch to Icenium IDE. Right click on the project then select Version Control. In Version Control select the option of Configure Remote Repository
Next you need to provide URL of Github repository.
Next again right click on the project and from Version Control select the option of Pull
You will see that you have pulled the repository.
Now to push the project to github repository right click on project and select version control then Push option
When you start pushing you need to authorize yourself to the repository.
On successful completion of the push, you will get a message at bottom of IDE as following
So in this way you can integrate project from Icenium to Github repository. I hope this post was useful. Thanks for reading.
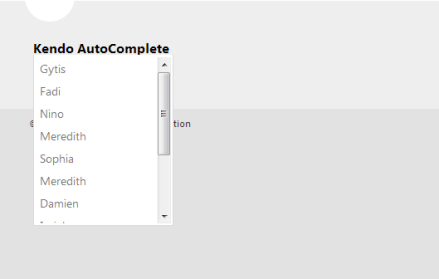
In this post, we will see how we could work with Kendo AutoComplete in ASP.Net MVC. We will fetch data from SQL Server table in Kendo AutoComplete using LINQ to Sql class
We have created the Model, now we need to fetch data using Model in the Controller. I am going to use default created HomeController and Action Index. Go ahead and in HomeController.cs file modify the Action Index.
Here we need to create instance of model and pass the data to view. That can be done as following
Adding Kendo AutoComplete on View
We are passing data from Index action, so we need to put Kendo AutoComplete in IndexView. Go to View and Home folder and open Index.cshtml
Very first you need to make View as strongly typed. You can make a View strongly typed as following
Next add Kendo UI AutoComplete. Make sure that you are providing the name attribute. In DataTextField pass the name of the column on which you want to filter the data.
On Oct 17 2012, we did a release of our Telerik DevCraft bundle known as Q3 2012 release. As part of the release our UI suites have got couple of new controls added to the bundle. In this blog post we will look at what new controls have been added to our UI suites namely – RadControls for ASP.NET AJAX, RadControls for Silverlight, RadControls for WPF, RadControls for WinForms, Windows 8 Controls and RadControls for Windows Phone. So lets go over them one by one.
RadControls for ASP.NET AJAX:
ASP.NET AJAX suite gets the following new controls added to the family of already existing 70+ controls. They are:
Gauge:
This is a high performing HTML5 based radial and linear gauge control which can be used to show certain values in a scale.
PivotGrid is a control used to show pivoted data in a tabular or outline or in a compact layout. We bring the power of Pivot to Web with the introduction of this control. This control supports aggregates, drag and drop and a field list control panel.
As the name goes – this is a auto completion textbox. It auto suggests filtered list with options based on user input and supports multiple item selection. This was one of the highly requested control for ASP.NET AJAX
GanttView is a control designed for managing and visualizing complex planning data and tasks. Often used in project planning and management scenarios. Using this control it is easier to understand and analyze the data.
Download free trial of RadControls for Silverlight and evaluate them for your needs.
RadControls for WPF:
New controls introduced for WPF suite are as follows:
PivotGrid (Beta):
GanttView:
AutoCompleteBox:
HeatMap:
Download free trial of RadControls for WPF and evaluate them for your projects.
RadControls for WinForms:
There was one control added to the WinForms family. That is RadPivitGrid and released as a Beta control in this release.
You can download thirty day free trial of RadControls for WinForms with dedicated support during trial period.
RadControls for Windows Phone:
Five new controls got added to the Windows Phone controls family. They are as follows:
TimeSpanPicker:
TimeSpanPicker control provides full control over time and duration in any app where users set duration. This control allows users to define duration of certain action.
Expander:
Expander control allows users to expand or collapse conversations. Fits well in applications that rely on interaction and messaging.
PasswordBox:
As the name goes this is a ready made password input text box for Windows Phone scenario. Using this control in a registration form will automatically display the typical dots in place of the actual password being typed.
DataForm:
DataForm control provides with out of the box data forms that can be simply configured to work with business logic of your application. It also provides out of the box validation, styling and other customization mechanisms.
InputPrompt:
This control allows you to create prompts where you can ask users to enter important details such as Phone number, email, etc.
You can download a free trial of RadControls for Windows Phone to evaluate the controls.
RadControls for Windows 8:
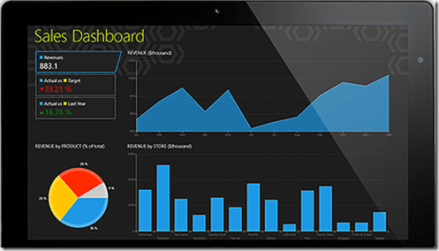
This is a brand new suite as far as the RadControls family is concerned. This suite contains some of the controls which are not found in the SDK of Windows 8 development like date and time pickers. These controls have been built from ground up and provide you with the same UI and UX as that of Windows 8 look and feel. Currently following 15+ controls are released and many more will be added to the suite over time. At this moment we are offering this suite at an introductory price of $99 and you will receive all the new components and updates that will be added to the suite in the next year.
Hope this blog post excites you in terms of the new control offerings from our UI control suites. If you feel like trying out them go ahead and download our free 20 day trials and evaluate them. Note that during the trial period you will get dedicated support meaning you can raise support tickets and a dedicated support team will be responding to you. Give it a try and let us know how you feel about our UI controls.
You can download Demo Applications exploring the controls from here
After downloading, follow the Telerik Installer Wizard.
Make sure that Windows8 is selected. Click on OK.LET’S DO THIS. Configure installation folder , accept license terms and click on Go to Next Step
Provide credential and click on Install to start the installation.
After successful installation, you will get following message
By this step, you have successfully installed Rad Controls for Windows 8. Now go ahead and launch Visual Studio and create an Application for Windows Store. Let us choose Blank Application from the XAML Windows Store template.
Once the project is created in Solution Explorer right click on the Reference and select Add Reference
In the dialog box make sure that you have selected Extension and select Rad Controls for Windows 8.
After adding rerefence in solution explorer verify that refence of Rad Controls has been added successfully.
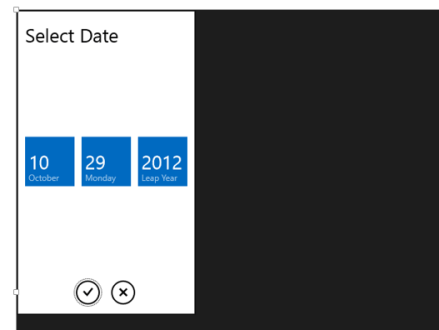
By this step you have succesfully created the project and added the required refrence. Now you are all set to use Rad Controls for Windows 8 in your application. Let us go ahead and add RadDatePicker control on the MainePage.xaml. Before using any Rad Control , you need to add namespace. Add namespace as following
After adding namespace put RadDatePicker control as following
Now press F5 and run the application. You should able to get RadDatePicker control
In this way you can start working with Rad Controls for Windows 8. In further posts we will explore each controls individually. I hope you find this post useful. Thanks for reading.
In this post we will see, how we could work with Kendo Grid in ASP.Net MVC. We will display data from SQL Server table in Kendo Grid using LINQ to Sql class. Pictorially we can represent it as follows
Before you start with this post, I strongly recommend you to read
Once you are done with setting up environment go ahead and add a model. We are going to use LINQ TO SQL Class as model. To add model right click on model folder and select New Item. Select Data tab and choose LINQ to SQL Classes to add as model. Give any name to model, I am leaving the default name.
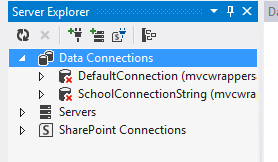
Next on the design surface choose Server Explorer
If in the Server Explorer, you do not find Data Connection you want to use then go ahead and right click on the Data Connection and select Add New Connection
In Add Connection dialog box provide server name and from drop down choose desired database.
Click on Ok to add a new connection. Next from Server Explorer drag and drop the tables on dbml file to create the model. I am choosing only Person class from School database.
In Solution explorer you can see a dbml file has been added.
Adding Controller
We have created the Model, now we need to fetch data using Model in the Controller. I am going to use default created HomeController and Action Index. Go ahead and in HomeController.cs file modify the Action Index.
Here we need to create instance of model and pass the data to view. That can be done as following
Adding Kendo Grid on View
We are passing data from Index action, so we need to put Kendo Grid in IndexView. Go to View and Home folder and open Index.cshtml
Very first you need to make View as strongly typed. You can make a View strongly typed as following
Next we can bind data from Model to Kendo Grid as following. Make sure you provide name of the Kendo Grid. This is mandatory because name act as id attribute of the Grid element.


 The Nokia Ad Exchange (NAX) is a simple way of generating revenue from the in app advertising (banners, full-screen ads, text etc). From one of the my Nokia developer friends, this is the most lucrative way of generating the revenue for mobile developers. The NAX is not a single network but aggregates over 120 advertising networks worldwide with options to choose the type of ads that you want to receive in your app. You will also be able to monitor the stats (e.g. CTR, impressions) for your app. The best of it all is that the same NAX can be used on various platforms (i.e. including Series 40 and Symbian, iOS, Android and Blackberry).