Learn more about Rad Controls for Windows 8 here
Before you start with this post I recommend you to read following blog posts to get it started with RadDataGrid.
Video: Getting started with RadDataGrid in XAML based Windows Store Application
Three Steps to work with RadDataGrid in XAML based Windows Store Application
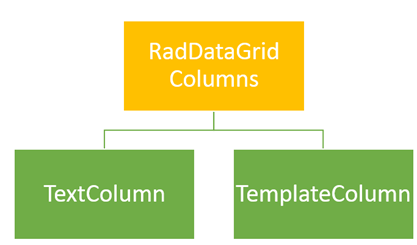
In this post we will take a look on working with Images as column value in RadDataGrid. As we discussed in this post that there are two types of columns in RadDataGrid.
To work with images we need to work with TemplateColumns. TemplateColumn uses DataTemplate to define content of column. To start with let us create business class Product. We will display collection of Products in RadDataGrid. Product class is defined as following. Along with other properties there is a property of Product Image. ProductImage property will hold URL of Image to be displayed for each Products.
public class Product
 {
 public string ProductName { get; set; }
 public double ProductPrice { get; set; }
 public string ProductType { get; set; }
 public BitmapImage ProuctImage { get; set; }
 }
Next let us create collection of Products locally. GetProducts function will return list of Products. We will bind this function as ItemSource of RadDataGrid.
private List<Product> GetProducts()
 {
 List<Product> lstProduct = new List<Product>()
 {
 new Product
 {
 ProductName = "Pen",
 ProductPrice = 100,
 ProductType = "Education",
 ProuctImage = new BitmapImage(new Uri("/ProductImages/Pen.jpg",UriKind.Relative))
 },
 new Product
 {
 ProductName ="Pencil",
 ProductPrice = 50,
 ProductType = "Education",
 ProuctImage = new BitmapImage(new Uri("/ProductImages/Pencil.jpg",UriKind.Relative))

 },
 new Product
 {
 ProductName ="Math Book",
 ProductPrice = 345,
 ProductType = "Education",
 ProuctImage = new BitmapImage(new Uri("/ProductImages/Mathbook.jpg",UriKind.Relative))

 },
 new Product
 {
 ProductName ="Ball",
 ProductPrice = 23,
 ProductType = "Sports",
 ProuctImage = new BitmapImage(new Uri("/ProductImages/Ball.jpg",UriKind.Relative))

 },
 new Product
 {
 ProductName ="Cricket Bat",
 ProductPrice = 560,
 ProductType = "Sports",
 ProuctImage = new BitmapImage(new Uri("/ProductImages/Cricketbat.jpg",UriKind.Relative))

 },
 new Product
 {
 ProductName ="Baseball Bat",
 ProductPrice = 550,
 ProductType = "Sports",
 ProuctImage = new BitmapImage(new Uri("/ProductImages/Baseballbat.jpg",UriKind.Relative))

 },
 };
 return lstProduct;
 }
As of now we have data source in place. Next we need to create RadDataGrid. After creating RadDataGrid we will create DataGridTemplateColumn with DataTemplate. To create RadDataGrid with image as one of the column value we need to follow following steps inside RadDataGrid.
Step 1: Create DataGridTemplateColumn
Step 2: Create DataGridTemplateColumn.CellContentTemplate
Step 3: Create DataTemplate and put Image inside this
We can create RadDataGrid Column with Image in column value as following,
We can create columns for each properties in the same way we created for ProductImage property. Final RadDataGrid with columns can be created as following,
<Page
 x:Class="RadDataGridProductDemo.MainPage"
 xmlns="http://schemas.microsoft.com/winfx/2006/xaml/presentation"
 xmlns:x="http://schemas.microsoft.com/winfx/2006/xaml"
 xmlns:local="using:RadDataGridProductDemo"
 xmlns:d="http://schemas.microsoft.com/expression/blend/2008"
 xmlns:mc="http://schemas.openxmlformats.org/markup-compatibility/2006"
 xmlns:telerik="using:Telerik.UI.Xaml.Controls.Grid"
 mc:Ignorable="d">

<Grid Background="{StaticResource ApplicationPageBackgroundThemeBrush}">
 <telerik:RadDataGrid x:Name="ProductGrid" AutoGenerateColumns="False">
 <telerik:RadDataGrid.Columns>
 <telerik:DataGridTemplateColumn Header="Name" >
 <telerik:DataGridTemplateColumn.CellContentTemplate>
 <DataTemplate>
 <TextBlock Text="{Binding ProductName}"
 VerticalAlignment="Center"
 HorizontalAlignment="Center"/>
 </DataTemplate>
 </telerik:DataGridTemplateColumn.CellContentTemplate>
 </telerik:DataGridTemplateColumn>
 <telerik:DataGridTemplateColumn Header="Photo" >
 <telerik:DataGridTemplateColumn.CellContentTemplate>
 <DataTemplate>
 <StackPanel>
 <Image Source="{Binding ProductImage}"
 Height="100"
 Width="100" />
 </StackPanel>
 </DataTemplate>
 </telerik:DataGridTemplateColumn.CellContentTemplate>
 </telerik:DataGridTemplateColumn>
 <telerik:DataGridTemplateColumn Header="Price" >
 <telerik:DataGridTemplateColumn.CellContentTemplate>
 <DataTemplate>
 <TextBlock Text="{Binding ProductPrice}"
 VerticalAlignment="Center"
 HorizontalAlignment="Center"/>
 </DataTemplate>
 </telerik:DataGridTemplateColumn.CellContentTemplate>
 </telerik:DataGridTemplateColumn>
 <telerik:DataGridTemplateColumn Header="Type" >
 <telerik:DataGridTemplateColumn.CellContentTemplate>
 <DataTemplate>
 <TextBlock Text="{Binding ProductType}"
 VerticalAlignment="Center"
 HorizontalAlignment="Center"/>
 </DataTemplate>
 </telerik:DataGridTemplateColumn.CellContentTemplate>
 </telerik:DataGridTemplateColumn>

 </telerik:RadDataGrid.Columns>
 </telerik:RadDataGrid>
 </Grid>
</Page>
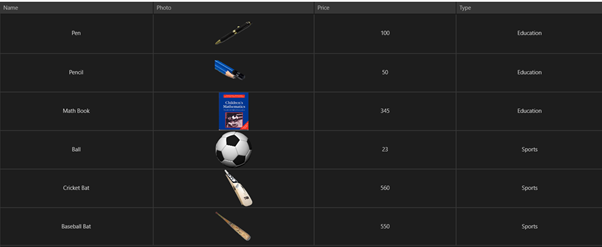
Now go ahead and run application. You will find Product Images as one of the column value.
In this way you can work with Images as column value in RadDataGrid. I hope you find this post useful. Thanks for reading.


