Recap of webinar: Building Windows Phone 8 Apps using Kendo UI

Download Source Code and Slides from here

clip_image001

On 23rd May 2013, we at Telerik India hosted a webinar on “Building Windows Phone 8 Apps using Kendo UI Mobile”. This webinar received great response from audience and we had around 150 developers attending webinar. Participants were very active during webinar and there were a flood of questions around Windows Phone 8, Coredova and Kendo UI.

We discussed following topics in webinar,

  • What is Hybrid App
  • Why we need Hybrid App
  • Setting Visual Studio2012 to develop Wp8 apps using coredova
  • Setting WP8 App project to work with Kendo UI

In demo part we covered following topics,

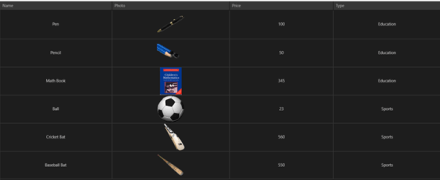
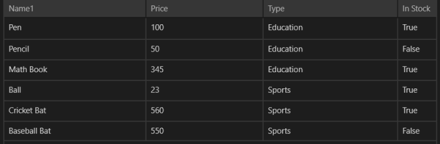
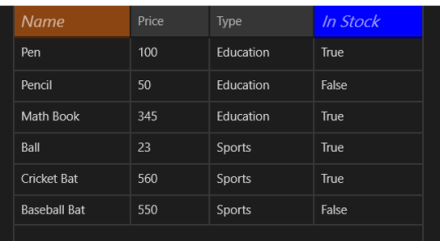
  • Creating Kendo Datasource
  • Consuming OData and REST Srervice in Kendo Datasource
  • Working with Kendo Template
  • Working with Layout , Views
  • Working with dynamic navigation

We learnt and experienced that how easily a developer could work with all complexities such that consuming services, navigating between views, working with layouts rendering native to WP 8, adaptive rendering etc. using Kendo UI Mobile.

If you create a Hybrid App for Windows Phone 8 using KendoUI Mobile and Coredova then with minimal or zero effort you can publish same app as iPhone app and Android App.

image

You can watch recorded webinar below,

As you can see in recorded webinar that we focused on writing codes and shown you how easily and quickly a Marketplace ready Windows Phone 8 app can be created using Kendo UI.

Download Source Code and Slides from here

You can revisit presentation of webinar below,

If you want us to do webinar on a particular topic related to Telerik products then feel free to send is mail at Dhananjay.kumar@telerik.com

Download Source Code and Slides from here

We had promised that we will be giving away 2 .NET Ninja T-Shirts as a webinar give away.

image

We normally pick 2 people randomly from the audience and raffle it out. So, as part of this webinar we are happy to say that the following 2 people are winners of our .NET Ninja T-Shirts:

  1. Ramu Naik
  2. Ardhendusekhar Kanungo

Congratulations to the winners. We will be contacting you shortly as we need your postal address to ship your t-shirts. Rest of you folks, don’t worry you still have chance to win the t-shirt. Do attend our next webinar which is on May 30 titled – MVVM and Validation with Kendo UI Web. Register for that webinar here

Download Source Code and Slides from here

clip_image001

How to add .NET Assembly or Reference in Test Studio standalone version

Recently I was demonstrating Test Studio to a group of Test Studio professionals. While working with Coded Step I had to add a .NET Assembly Reference. Adding reference in Visual Studio plugin is quite simple. However adding that in Test Studio standalone version requires certain steps.

In this post we will have a look on adding assembly reference in Test Studio standalone version. Follow following steps,

Select Project option in top menu

image

Click on Show Settings in project tab

image

On clicking on Show Settings you will get Project Settings dialog box. In dialog box click on Script Options. To add assembly reference click on Add Reference.

image

When you clock on Add Reference Test Studio will open File Chooser dialog box. In that browse .NET Assembly Reference location in file system and select that to add as reference in current Test project. I hope you find this post useful. Thanks for reading.

image

Webinar Recap: Create faster Windows Store Enterprise Apps

image

On April 25th we had full house in webinar Create faster Enterprise Apps for Windows 8 . It was very overwhelming exciting discussion with attendees. In webinar we focused on DataGrid and Chart.

Download Demo Codes of Webinar

Learn more about RadControls for Windows 8

Download Trial version

In webinar we discussed

  • Different Windows 8 development paradigm
  • Setting up project to work with RadControls
  • Working with Charts in JavaScript based Apps
  • Working with DataGrid in Xamls based Apps

Here is the slide deck of webinar

During this webinar we had a lot of questions and I am trying to address them here:

Full form of WinRT?

WinRT stands for Windows RunTime

WinRT is common for both Windows 8 & Windows 8 Phone?

No WinRT is not common for both Windows 8 and Windows Phone 8. WinRT is part of Windows 8 Operating System.

Can existing .NET apps built on win xp or win 7 can we executed in win 8

Yes existing .NET apps can run on Windows 8 as desktop applications. There are two kinds of apps run on Windows 8. They are Metro/Windows Store Apps and Desktop apps. Any existing .NET apps from earlier version of Windows runs as desktop app on Windows 8

Is Silverlight supported on Windows 8 IE browsers?

No Silverlight is not supported on metro version of IE on Windows 8

Which Framework of .NET do we need for RadControls for Windows 8

RadControls for Windows 8 are supported on version 4.5

Can we use RadControls for Windows 8 in MVVM architecture?

Yes you can use them in App creating using MVVM architecture.

Can we sort the column in RadDataGrid control?

Yes sorting is implemented by default. On clicking column headers you can sort a column

In case we purchase rad controls today for $599, after august will we be eligible to get addition controls.if yes, do we need to pay more?

If you buy now you need to pay $599 and you will get all controls getting added till August. You do not need to pay anything extra then

Does grid support combobox, checkbox at cell level?

Yes you can add them. You can add any controls in TemplateColumns.

Is it possible to retrieve data from Windows Azure and result will display in Chart Rad Controls?

Yes you can retrieve data from Windows Azure. There are many options by which you can connect with Windows Azure

  • Creating a Service layer and accessing Windows Azure Services via Service
  • Using Windows Azure Mobile Services
  • Windows Azure SDK for Windows 8

Can we use ado.net or asp.net web api instead of wcf for linking to database?

Yes you can use ASP.NET Web API but you cannot use ADO.Net directly in Windows Store apps

Also, we had promised to attentive members from the audience will get our Telerik Ninja t-shirt. Well here are 2 winners we picked:

  1. Jaffar A
  2. Pramod Gupta

Congratulations to the winners and we will be getting in touch with you soon. Hope you liked this webinar and we hope to see you back in our future webinars.

Download Demo Codes of Webinar

Learn more about RadControls for Windows 8

Download Trial version

image

Visit Telerik booth at GIDS 2013 and win tablets

image

We are excited to share that Telerik India will be present at Great Indian Developer Conference. We will be around for all three days. We request you to visit our booth.

image

Along with technical presentations and discussions, we will give away 1 Micromax tablet in raffle daily.

image

Do not forget to visit our booth,

  • To gain knowledge on various technology trends
  • To know and learn more about various Telerik products
  • To get cool Ninja T-Shirts
  • To get a chance to win one Micromax tablet

We are helping GIDS by creating apps for the event as well. We have created apps for iPhone and Android devices.

Download apps for iPhone from here

Download apps for Android devices from here

We are excited to see you at GIDS.

Windows Azure Mobile Services Data and Telerik RadDataGrid: Two good things together

Learn more about Rad Controls for Windows 8 here

Recently I was in a Windows Azure event for local user group. Attendees were very excited about Windows Azure Mobile Services. When I discussed with them how more immersive and user friendly it could be working with data from Windows Azure Mobile Service Table in Telerik RadDataGrid, they got more excited. In this post we will go very basic and learn basic required steps to fetch data from Mobile Service Data Table in RadDataGrid.

image

If you are new to Mobile Services and Windows Store App development then before you proceed in this post, I recommend you to read these two posts

Step by Step working with Windows Azure Mobile Service Data in XAML based Windows Store Apps

Three Steps to work with RadDataGrid in XAML based Windows Store Application

Video: Getting started with RadDataGrid in XAML based Windows Store Application

Mobile Service Data Table

You can view all Windows Azure Mobile Services and tables by login to Windows Azure Management Portal.

We are going to display data from techbloggers table. I have created this table in Windows Azure Mobile Service as shown below. There are three columns in table. We will display content from techbloggers Mobile Service table in RadDataGrid.

image

We need App URL and key. You need key and application URL to work with Mobile Services from Windows Store application. You will find key and application URL at the portal.

image

Creating Windows Store App

Very first you need to install Windows Azure SDK for Windows 8. You can download that from here . After installing make sure that you have installed RadControls for Windows 8. You can download trial from here

Now go ahead and create a Windows Store App by choosing Blank App project template from Windows Store project tab. After project being created add Rad Controls for Windows 8 reference and Windows Azure Mobile Services Managed Client reference in the project. To add reference right click on Reference in project and select Add Reference.

image

After adding reference on XAML add namespace on MainPage.xaml to work with RadDataGrid


xmlns:telerik="using:Telerik.UI.Xaml.Controls.Grid"

Next add following namespaces on MainPage.xaml.cs to work with Mobile Services client.


using Microsoft.WindowsAzure.MobileServices;
using System.Runtime.Serialization;

Next you need to create entity class representing table from the Windows Azure Mobile Service. Let us create entity class as following. We are creating entity class TechBloggers.


public class TechBloggers
 {
 public int id { get; set; }
 [DataMember(Name = "name")]
 public string Name { get; set; }
 [DataMember(Name = "technology")]
 public string Technology { get; set; }

}

After creating entity class go ahead and add following global variables.


MobileServiceClient client;
IMobileServiceTable<TechBloggers> bloggerstable;

Once global variable is defined in the constructor of page you need to create instance of MobileServiceClient and MobileServiceTable. Let us go ahead and create that in constructor of the page.


public MainPage()
 {

 this.InitializeComponent();
 MobileServiceClient client = new MobileServiceClient("https://youappurl", "appkey");
 bloggerstable = client.GetTable<TechBloggers>();
 }

Next you need to put RadDataGrid on XAML and bind it to data source. RadDataGrid can be created as following


<telerik:RadDataGrid x:Name="BloggerGrid" />

Next you need to bind RadDataGrid to List of Bloggers. List of Bloggers will be fetched from Mobile Service data table. You can do this as following.


protected async override void OnNavigatedTo(NavigationEventArgs e)
 {
 var items = await bloggerstable.ToListAsync();
 this.BloggerGrid.ItemsSource = items;
 }

Next go ahead and run application. You will get records from Mobile Service table bind to RadDataGrid.

image

These are basic steps to fetch data from Windows Azure Mobile Services Table Data and display in RadDataGrid. In further posts we will get into further details of working with these two together. I hope you find this post useful. Thanks for reading.

Learn more about Rad Controls for Windows 8 here

You love us now please vote for Telerik Products in GIDS 2013

image_thumb[2]

I am very happy and excited to share with you that Telerik Products have been nominated in different categories in GIDS 2013 . We have been nominated in 7 different categories.

Vote Here

Telerik Products are nominated as follows, Please browse to question numbers as given below tp vote for your beloved Telerik Products. Navigate here to vote

Telerik TeamPulse is nominated under Collaboration Solution category. To vote for this select this option in Question number 2.

clip_image001_thumb[2]


Telerik Sitefinity CMS is registered under Content Management category. To vote for this select this option in Question number 3.

clip_image003_thumb[2]

Telerik TeamPulse is nominated under Change and Configuration Management category. To vote for this select this option in Question number 5.

clip_image005_thumb[2]


Telerik TestStudio is nominated under Testing category. To vote for this select this option in Question number 6.

clip_image006_thumb[2]

Telerik KendoUI is nominated under Web Development category. To vote for this select this option in Question number 8.

clip_image007_thumb[2]


Telerik Icenium is nominated under Mobile Development category. To vote for this select this option in Question number 9.

clip_image009_thumb[2]


Telerik Devcraft is nominated under Framework category. To vote for this select this option in Question number 10.

clip_image010_thumb[2]

Your love and support will help us to build better products. Take few minutes out and Navigate here to vote.

We are committed to help you in “Delivering More Than Expected “. You may have further query feel free to reach me at dhananjay.kumar@telerik.com

Join me for webinar on 25th April 2013: Create faster Enterprise Apps for Windows 8 and win Telerik Ninja T-shirt

Learn more about Rad Controls for Windows 8 here

If you are a Windows Store App developer and want to quickly create Enterprise App then this webinar is for you.

Register here to attend webinar

image

You will learn to create Enterprise App harnessing goodness of DataGrid in this webinar.

image

We will follow following agenda in webinar ,

  • Introduction of RadControls for Windows 8
  • First look of all RadControls
  • Setting up environment to work with RadControls for Windows 8.
  • Getting started with RadDataGrid
  • Working with different kinds of columns in RadDataGrid
  • Working with Services in RadDataGrid
  • Charts in RadDataGrid
  • Grouping and Filtering in RadDataGrid.

Register here to attend webinar

In this webinar we will focus on Data Grid along with other controls. During webinar we will be selecting two active participants from the webinar and sending them the much in demand Telerik Ninja T-Shirt. You will be coming, right?

image

Register here to attend webinar

Learn more about Rad Controls for Windows 8 here

See you in webinar, If you have any query reach me at dhananjay.kumar@telerik.com

How to work with Images in RadDataGrid in XAML based Windows Store Application

Learn more about Rad Controls for Windows 8 here

Before you start with this post I recommend you to read following blog posts to get it started with RadDataGrid.

Video: Getting started with RadDataGrid in XAML based Windows Store Application

Three Steps to work with RadDataGrid in XAML based Windows Store Application

In this post we will take a look on working with Images as column value in RadDataGrid. As we discussed in this post that there are two types of columns in RadDataGrid.

image

To work with images we need to work with TemplateColumns. TemplateColumn uses DataTemplate to define content of column. To start with let us create business class Product. We will display collection of Products in RadDataGrid. Product class is defined as following. Along with other properties there is a property of Product Image. ProductImage property will hold URL of Image to be displayed for each Products.


public class Product
 {
 public string ProductName { get; set; }
 public double ProductPrice { get; set; }
 public string ProductType { get; set; }
 public BitmapImage ProuctImage { get; set; }
 }

Next let us create collection of Products locally. GetProducts function will return list of Products. We will bind this function as ItemSource of RadDataGrid.


private List<Product> GetProducts()
 {
 List<Product> lstProduct = new List<Product>()
 {
 new Product
 {
 ProductName = "Pen",
 ProductPrice = 100,
 ProductType = "Education",
 ProuctImage = new BitmapImage(new Uri("/ProductImages/Pen.jpg",UriKind.Relative))
 },
 new Product
 {
 ProductName ="Pencil",
 ProductPrice = 50,
 ProductType = "Education",
 ProuctImage = new BitmapImage(new Uri("/ProductImages/Pencil.jpg",UriKind.Relative))

 },
 new Product
 {
 ProductName ="Math Book",
 ProductPrice = 345,
 ProductType = "Education",
 ProuctImage = new BitmapImage(new Uri("/ProductImages/Mathbook.jpg",UriKind.Relative))

 },
 new Product
 {
 ProductName ="Ball",
 ProductPrice = 23,
 ProductType = "Sports",
 ProuctImage = new BitmapImage(new Uri("/ProductImages/Ball.jpg",UriKind.Relative))

 },
 new Product
 {
 ProductName ="Cricket Bat",
 ProductPrice = 560,
 ProductType = "Sports",
 ProuctImage = new BitmapImage(new Uri("/ProductImages/Cricketbat.jpg",UriKind.Relative))

 },
 new Product
 {
 ProductName ="Baseball Bat",
 ProductPrice = 550,
 ProductType = "Sports",
 ProuctImage = new BitmapImage(new Uri("/ProductImages/Baseballbat.jpg",UriKind.Relative))

 },
 };
 return lstProduct;
 }

As of now we have data source in place. Next we need to create RadDataGrid. After creating RadDataGrid we will create DataGridTemplateColumn with DataTemplate. To create RadDataGrid with image as one of the column value we need to follow following steps inside RadDataGrid.

Step 1: Create DataGridTemplateColumn

Step 2: Create DataGridTemplateColumn.CellContentTemplate

Step 3: Create DataTemplate and put Image inside this

We can create RadDataGrid Column with Image in column value as following,

image

We can create columns for each properties in the same way we created for ProductImage property. Final RadDataGrid with columns can be created as following,


<Page
 x:Class="RadDataGridProductDemo.MainPage"
 xmlns="http://schemas.microsoft.com/winfx/2006/xaml/presentation"
 xmlns:x="http://schemas.microsoft.com/winfx/2006/xaml"
 xmlns:local="using:RadDataGridProductDemo"
 xmlns:d="http://schemas.microsoft.com/expression/blend/2008"
 xmlns:mc="http://schemas.openxmlformats.org/markup-compatibility/2006"
 xmlns:telerik="using:Telerik.UI.Xaml.Controls.Grid"
 mc:Ignorable="d">

<Grid Background="{StaticResource ApplicationPageBackgroundThemeBrush}">
 <telerik:RadDataGrid x:Name="ProductGrid" AutoGenerateColumns="False">
 <telerik:RadDataGrid.Columns>
 <telerik:DataGridTemplateColumn Header="Name" >
 <telerik:DataGridTemplateColumn.CellContentTemplate>
 <DataTemplate>
 <TextBlock Text="{Binding ProductName}"
 VerticalAlignment="Center"
 HorizontalAlignment="Center"/>
 </DataTemplate>
 </telerik:DataGridTemplateColumn.CellContentTemplate>
 </telerik:DataGridTemplateColumn>
 <telerik:DataGridTemplateColumn Header="Photo" >
 <telerik:DataGridTemplateColumn.CellContentTemplate>
 <DataTemplate>
 <StackPanel>
 <Image Source="{Binding ProductImage}"
 Height="100"
 Width="100" />
 </StackPanel>
 </DataTemplate>
 </telerik:DataGridTemplateColumn.CellContentTemplate>
 </telerik:DataGridTemplateColumn>
 <telerik:DataGridTemplateColumn Header="Price" >
 <telerik:DataGridTemplateColumn.CellContentTemplate>
 <DataTemplate>
 <TextBlock Text="{Binding ProductPrice}"
 VerticalAlignment="Center"
 HorizontalAlignment="Center"/>
 </DataTemplate>
 </telerik:DataGridTemplateColumn.CellContentTemplate>
 </telerik:DataGridTemplateColumn>
 <telerik:DataGridTemplateColumn Header="Type" >
 <telerik:DataGridTemplateColumn.CellContentTemplate>
 <DataTemplate>
 <TextBlock Text="{Binding ProductType}"
 VerticalAlignment="Center"
 HorizontalAlignment="Center"/>
 </DataTemplate>
 </telerik:DataGridTemplateColumn.CellContentTemplate>
 </telerik:DataGridTemplateColumn>

 </telerik:RadDataGrid.Columns>
 </telerik:RadDataGrid>
 </Grid>
</Page>

Now go ahead and run application. You will find Product Images as one of the column value.

image

In this way you can work with Images as column value in RadDataGrid. I hope you find this post useful. Thanks for reading.

Learn more about Rad Controls for Windows 8 here

How to set Column Header Style of RadDataGrid in XAML based Windows Store Application

Learn more about Rad Controls for Windows 8 here

RadDataGrid is most important RadControl to create enterprise based Windows Store Application. Currently I have been writing on RadDataGrid and you can read previous two posts at below link,

Part 1: Three Steps to work with RadDataGrid in XAML based Windows Store Application

Part 2: Working with Columns width in RadDataGrid in XAML based Windows Store Application

In this post we will take a look on setting Column Header Style. You can set column header style by configuring value of

image

To start with first you need to add following references on XAML.


xmlns:telerik="using:Telerik.UI.Xaml.Controls.Grid"
xmlns:telerikgridrimitives="using:Telerik.UI.Xaml.Controls.Grid.Primitives"

After adding reference Create RadDataGrid as following. Make sure AutoGenerateColumns property is set to false


<telerik:RadDataGrid
 x:Name="ProductGrid"
 AutoGenerateColumns="False"
 Width="500">
</telerik:RadDataGrid>

After this you need to manually create columns. Create RadDataGrid.Columns inside RadDataGrid.

image

After creating RadaDataGrid.Columns you need to create RadDataGrid.Columns. In columns you can set

  1. Header : Set value of header text
  2. Width : Fixed width of the column
  3. PropertyName : Set this as property name of business object you want to display in this column.

image

In DataGridTextColumn you need to set HeaderStyle. That can be done as following. In below code we are setting

  1. Header Background
  2. Header Fontstyle
  3. Header Fontsize

image

So putting all together you can create RadDataGrid with customized column header as following


<telerik:RadDataGrid
 x:Name="ProductGrid"
 AutoGenerateColumns="False"
 Width="500">
 <telerik:RadDataGrid.Columns>

<telerik:DataGridTextColumn
 PropertyName="ProductName"
 Header="Name"
 Width="200">
 <telerik:DataGridTextColumn.HeaderStyle>
 <Style
 TargetType="telerikgridrimitives:DataGridColumnHeader">
 <Setter Property="Background" Value="SaddleBrown"/>
 <Setter Property="FontStyle" Value="Italic"/>
 <Setter Property="FontSize" Value="20"/>
 </Style>
 </telerik:DataGridTextColumn.HeaderStyle>
 </telerik:DataGridTextColumn>

 <telerik:DataGridTextColumn

 PropertyName="ProductPrice"
 Header="Price"
 Width="50"/>
 <telerik:DataGridTextColumn
 PropertyName="ProductType"
 Header="Type"
 Width="150"/>
 <telerik:DataGridTextColumn
 PropertyName="InStock"
 Header="In Stock"
 Width="100">
 <telerik:DataGridTextColumn.HeaderStyle>
 <Style
 TargetType="telerikgridrimitives:DataGridColumnHeader">
 <Setter Property="Background" Value="Blue"/>
 <Setter Property="FontStyle" Value="Oblique"/>
 <Setter Property="FontSize" Value="20"/>
 </Style>
 </telerik:DataGridTextColumn.HeaderStyle>
 </telerik:DataGridTextColumn>

</telerik:RadDataGrid.Columns>
 </telerik:RadDataGrid>

On running application you will get RadDataGrid with styled column header as following

image

In this post we used some of the discussion from last post so did not discuss about binding and Product class in earlier part of this post. However For your reference find definition of business class Product below


public class Product
 {

 public string ProductName { get; set; }
 public double ProductPrice { get; set; }
 public string ProductType { get; set; }
 public bool InStock { get; set; }
 }

ItemSource of RadDataGrid is set as below,


protected override void OnNavigatedTo(NavigationEventArgs e)
 {

this.ProductGrid.ItemsSource = GetProducts();
 }

GetProducts() class is defined as below,


private List<Product> GetProducts()
 {
 List<Product> lstProduct = new List<Product>
 {
 new Product
 {
 ProductName ="Pen",
 ProductPrice = 100,
 ProductType = "Education",
 InStock = true
 },
 new Product
 {
 ProductName ="Pencil",
 ProductPrice = 50,
 ProductType = "Education",
 InStock = false
 },
 new Product
 {
 ProductName ="Math Book",
 ProductPrice = 345,
 ProductType = "Education",
 InStock = true
 },
 new Product
 {
 ProductName ="Ball",
 ProductPrice = 23,
 ProductType = "Sports",
 InStock = true
 },
 new Product
 {
 ProductName ="Cricket Bat",
 ProductPrice = 560,
 ProductType = "Sports",
 InStock = true
 },
 new Product
 {
 ProductName ="Baseball Bat",
 ProductPrice = 550,
 ProductType = "Sports",
 InStock = false
 },
 };

return lstProduct;
 }

In this way you can work with column header style. I hope you find this post useful. Thanks for reading.

Learn more about Rad Controls for Windows 8 here

Working with Columns width in RadDataGrid in XAML based Windows Store Application

Learn more about Rad Controls for Windows 8 here

In last blog post we learnt to work with RadDataGrid in three simple steps. In this post let us have a look on how we could work with Columns in RadDataGrid. Before we move ahead and understand how to work with columns width and columns header, let us have some understanding on columns in RadDataGrid. There are two kinds of columns in RadDataGrid.

image

TextColumn renders each cell value as System.String object whereas TemplateColumn renders as DataTemplate. In this post we will focus our discussion on TextColumn. It inherits DataGridColumn.

It got following important properties

  1. Header
  2. HeaderStyle
  3. SizeMode
  4. Width
  5. SortDirection

image

We will use Product business object from LAST POST . You will notice in output of last post that RadDataGrid columns were taking default width. Width of column was stretched to maximum. We got output as following

image

Now if you want to set width of each columns you need to follow following steps

Make sure AutoGenerateColumns property is set to false

image

After this you need to manually create columns. In column creation you need to set width of the column. Create RadDataGrid.Columns inside RadDataGrid.

image

After creating RadaDataGrid.Columns you need to create RadDataGrid.Columns. In columns you can set

  1. Header : Set value of header text
  2. Width : Fixed width of the column
  3. PropertyName : Set this as property name of business object you want to display in this column.

image

So putting all together you can create fixed width text column in RadDataGrid as following. We have XAML from previous post. Modified XAML with fixed column width is as following


<Grid Background="{StaticResource ApplicationPageBackgroundThemeBrush}">
 <telerik:RadDataGrid
 x:Name="ProductGrid"
 AutoGenerateColumns="False"
 Width="500">
 <telerik:RadDataGrid.Columns>

<telerik:DataGridTextColumn
 PropertyName="ProductName"
 Header="Name"
 Width="200"/>
 <telerik:DataGridTextColumn
 PropertyName="ProductPrice"
 Header="Price"
 Width="50"/>
 <telerik:DataGridTextColumn
 PropertyName="ProductType"
 Header="Type"
 Width="150"/>
 <telerik:DataGridTextColumn
 PropertyName="InStock"
 Header="In Stock"
 Width="100"/>
 </telerik:RadDataGrid.Columns>
 </telerik:RadDataGrid>
 </Grid>

On running application you will get RadDataGrid with fixed column width as following

image

Other important property of column is SizeMode. This property can be set with following three values

image

  1. Width property takes effect only when SizeMode is set to Fixed.
  2. If SizeMode is set to Auto then column takes only width which is required. It overrides value of width.
  3. If SizeMode is set to Strech then column will override width value and stretch to all available space.

image

If you modify above RadDataGrid with setting SizeMode property of fourth column as Auto then RadDataGrid will render as following

image

In this post we used some of the discussion from last post so did not discuss about binding and Product class in earlier part of this post. However For your reference find definition of business class Product below


public class Product
 {

 public string ProductName { get; set; }
 public double ProductPrice { get; set; }
 public string ProductType { get; set; }
 public bool InStock { get; set; }
 }

ItemSource of RadDataGrid is set as below,


protected override void OnNavigatedTo(NavigationEventArgs e)
 {

this.ProductGrid.ItemsSource = GetProducts();
 }

GetProducts() class is defined as below,

private List<Product> GetProducts()
 {
 List<Product> lstProduct = new List<Product>
 {
 new Product
 {
 ProductName ="Pen",
 ProductPrice = 100,
 ProductType = "Education",
 InStock = true
 },
 new Product
 {
 ProductName ="Pencil",
 ProductPrice = 50,
 ProductType = "Education",
 InStock = false
 },
 new Product
 {
 ProductName ="Math Book",
 ProductPrice = 345,
 ProductType = "Education",
 InStock = true
 },
 new Product
 {
 ProductName ="Ball",
 ProductPrice = 23,
 ProductType = "Sports",
 InStock = true
 },
 new Product
 {
 ProductName ="Cricket Bat",
 ProductPrice = 560,
 ProductType = "Sports",
 InStock = true
 },
 new Product
 {
 ProductName ="Baseball Bat",
 ProductPrice = 550,
 ProductType = "Sports",
 InStock = false
 },
 };

return lstProduct;
 }

In this way you can work with column width. I hope you find this post useful. Thanks for reading.

Learn more about Rad Controls for Windows 8 here

Three Steps to work with RadDataGrid in XAML based Windows Store Application

Recently I was talking to Windows Store App Developers. When I show them demo of RadDataGrid , all they got very excited. One of the manager asked me to show working with RadDataGrid in simplest steps. In this post we will take a look on working with RadDataGrid in three simple steps.

Learn more about Rad Controls for Windows 8 here

Step 1: Add Rad Controls for Windows 8 reference

Go ahead launch Visual Studio and create a new Windows Store Application. Select Blank App project template to create application. After project being created add Rad Controls for Windows 8 reference in the project. To add reference right click on Reference in project and select Add Reference.

image

After adding reference on XAML add namespace to work with RadDataGrid


xmlns:telerik="using:Telerik.UI.Xaml.Controls.Grid"

Step 2: Create Business object

Next step you need to create business object. Let us create business objects for Product


public class Product
 {

 public string ProductName { get; set; }
 public double ProductPrice { get; set; }
 public string ProductType { get; set; }
 public bool InStock { get; set; }
 }

We will display Products in RadDataGrid. In real time scenario List of Products will be fetched from Services. For purpose of this post let us create List of Products as collection locally.


private List<Product> GetProducts()
 {
 List<Product> lstProduct = new List<Product>
 {
 new Product
 {
 ProductName ="Pen",
 ProductPrice = 100,
 ProductType = "Education",
 InStock = true
 },
 new Product
 {
 ProductName ="Pencil",
 ProductPrice = 50,
 ProductType = "Education",
 InStock = false
 },
 new Product
 {
 ProductName ="Math Book",
 ProductPrice = 345,
 ProductType = "Education",
 InStock = true
 },
 new Product
 {
 ProductName ="Ball",
 ProductPrice = 23,
 ProductType = "Sports",
 InStock = true
 },
 new Product
 {
 ProductName ="Cricket Bat",
 ProductPrice = 560,
 ProductType = "Sports",
 InStock = true
 },
 new Product
 {
 ProductName ="Baseball Bat",
 ProductPrice = 550,
 ProductType = "Sports",
 InStock = false
 },
 };

return lstProduct;
 }

Step 3: Create RadDataGrid and bind with the datasource

In last step you need to put RadDataGrid on XAML and bind it to data source. RadDataGrid can be created as following


<telerik:RadDataGrid x:Name="ProductGrid" />

Next you need to bind RadDataGrid to List of Products. You can do that as following


this.ProductGrid.ItemsSource = GetProducts();

Run Application

On running application you will find RadDataGrid. You will notice that by default RadDataGrid supports sorting on columns

image

In these 3 simple steps you can start working with RadDataGrid in XAML based Windows Store Application. In further posts we will get into deeper concepts of RadDataGrid. I hope you find this post useful. Thanks for reading.

Learn more about Rad Controls for Windows 8 here

What is Test Oracle

Test oracle determine that whether a test executed as expected or not. Essentially you can say test oracle is a mechanism to determine whether program, software or application got executed as expected for a particular Test Case or not? A test oracle may be either manual or automated.

Let us understand test oracle with an example. You are automating test of File Download Functionality. Downloading of file may take following steps

  • User will click on a Button
  • On click of button Operating System File Download dialog will open
  • User will select download location
  • File download will start

In above test case to verify successful download of file you may want to create a test oracle which will verify size of downloaded file on the file system. Hence in this case,

image

Test Oracle is very specific to a business scenario and probably tool may not able to automate this. Test Oracle can be written as Coded Step.

We can summarize Test Oracle as parameter which verify that whether application passed a test for a particular test case or not.

What is Document Object Model?

While automating a test understating of DOM is very essential. Any tool read DOM to automate test. In this post we will try to understand what DOM is in simplest words. Tool sees whole page you are doing automation testing as DOM and searches, finds elements in DOM.

As of W3C definition: DOM stands for Document Object Model and it is a programming interface to manipulate a well formed HTML or a valid XML document. Here we will discuss DOM in context of HTML.

Technically, browsers create DOM after parsing the HTML. All browsers follow the specification given here to create the DOM. DOM created by Browsers can be accessed and manipulated by programming languages like JavaScript. Essentially, you can say that DOM connects web pages to programming languages.

image

DOM expose everything of the web page as objects to programming languages like JavaScript. Whether it is elements, events, styles etc. all are exposed as objects to JavaScript. Let us consider following HTML,


DOM will expose all the HTML elements as objects. These objects can be manipulated and updated by JavaScript.

image

In other words we can say that DOM is Application Programming Interface (API) which exposes HTML or XML as structured document to programming languages. This structure document can be manipulated by the languages like JavaScript. Above listed HTML can be exposed as following structured document by DOM.

image

DOM see a HTML document as tree. All elements can be seen as nodes of the tree. Attributes and value of elements can be seen as leaf of the tree.

Browsers generates DOM when it parses the HTML. For example, when you browse above HTML in browser it will parse the HTML and create DOM. You can view created DOM by pressing F12 in any mostly used browser.

image

I hope now you have descent understanding of DOM. You need understanding of DOM to automate test. I hope you find this post useful. Thanks for reading.

Why we need Coded Steps

image

Coded steps are the test steps which contain scripts or codes. In coded steps you write codes or scripts. Codes of coded steps will get executed as part of test execution. Coded steps can be very useful to automate testing of a complex unique business requirement which cannot be automated by tool. A good automated test should contain minimal numbers of coded steps.

Why we need coded steps

While automating test there may be many complex scenario which cannot be constructed using tool’s verification builder. In that scenario you may need to write codes to construct complex verification. This code will be executed with overall test as coded step. You may need to write coded steps in following scenario

  • Automating a complex verification which cannot be constructed by tool.
  • Writing Cleanup Steps. For example you may want to clean or delete all the temporary test files before or after executing test. It may be chances that tool might not able automate cleanup task. In this case you may have to write coded step for cleanup task.
  • Setting up Test Environment. You may need to set up test environment before executing test. Setting up environment may contain loading external test data, connecting to a dedicated server, loading user profile etc. It may be chances that tool might not able to set up environment for various testing scenario. In this case you may have to write coded step to set up test environment.
  • There may be complex test scenario like verifying that whether a particular file got downloaded successfully on file system or not. These types of tests are very tough to be automated by a particular tool. In this case you may have to write coded step to verify file size on file system.
  • There may be test scenario in which you need to create test data from multiple data sources. It may be chances that tool might not able to gather or mash up data from various data source. In this case you may have to write coded step to create test data.

Like above there could be many complex test scenarios which cannot be automated by tool. To automate those test scenario you will have to write codes steps.