In this post we will take a look on working with RadHubTile in XAML based Windows Store Application. RadHubTile gives you same immersive experience as you see on the home screen of Windows 8. You can display message, notification, title and message on flipping of tile using RadHubTiles. RadHubTile gives you experience like below image.
To start working with RadHubTile let us start with Creating Application for Windows Store. To create this choose Blank App from Windows Store project tab. After creating project you need to add reference Of Rad Control for Windows 8 in the project. To do that right click on the reference and select Add Reference. From the Reference Manager Dialog box select Rad Control for Windows8.
After adding reference in the project, you need to add namespace on the XAML page. You can do that as following,
You can create a HubTile on XAML as following ,
Since you have not set any propery of RadHubTile like Message , Title etc , so as output you will get a simple rectangular tile as below,
Some of the important properties of RadHubTiles are as following ,
Now let us go ahead and set properties of RadHubTiles ,
 <telerik:RadHubTile Title="Score"
 Message="India/Eng Score"
 ImageSource="/Assets/indengmatchlogo.JPG"
 Notification="100/0"
 BackContent="Score of India England first Test"
 >

 </telerik:RadHubTile>
Above we have set several properties of RadHubTiles . Now let us go ahead and run the application to see the output
Now let is go ahead and create template for BackContent. We crate template to show information in back of the RadHubTile as we want. Let us say , we want to display Image and Title in the back of the RadHubTile. We can do that by creating a DataTemplate and then setting that as value of BackContentTemplate. We can do that as following ,
You see that in above code we have created DataTemplate . There is StackPanel and one Image control along with TextBlock have put vertically in the StackPanel. When you run the application , you will get RadHubTile back content as following ,
For your reference full code with BackContent Template is given below,
 <telerik:RadHubTile Title="Score"
 Message="India/Eng Score"
 ImageSource="/Assets/indengmatchlogo.JPG"
 Notification="100/0"
 BackContent="Score of India England first Test"
 Margin="93,209,0,388">
 <telerik:RadHubTile.BackContentTemplate>
 <DataTemplate>
 <StackPanel Orientation="Vertical">
 <TextBlock Text="India England Test Series" />
 <Image Source="/Assets/indengmatchlogo.JPG" />
 </StackPanel>
 </DataTemplate>
 </telerik:RadHubTile.BackContentTemplate>

</telerik:RadHubTile>
As we set BackContentTemplate , we can set
NotificationTemplate
MessageTemplate
As well. Let us go ahead and create the NotificationTemplate. We will bind controls in NotificationTemplate with the data coming from the background. Let us say there is function returning Data. In this case I am hard coding the data value, however in real time scenario you will like to fetch data from a remote service.
 Data GetRun()
 {
 // Put code here to fetch data from remote service
 return new Data ()
 {
 Runs = 200,
 Country = "India"
 };

 }
Data class is defined as following,
namespace HubTilesXaml
{
 public class Data
 {
 public int Runs { get; set; }
 public string Country { get; set; }
 }
}
We need to set DataContext of RadHubTile as given below,
Now let us go ahead and create NotificationTemplate . NotficationTemplate can be created as following.
We are creating a DataTemplate and setting it as value of NotificationTemplate property of RadHubTile. For your reference full code with BackContentTemplate and NotficationTemplate for RadHubTile is given below,
<telerik:RadHubTile x:Name="rdRunsHubTiles"
 Title="Score"
 Message="India/Eng Score"
 ImageSource="/Assets/indengmatchlogo.JPG"

 BackContent="Score of India England first Test"
 DataContext=""
 Margin="93,209,0,388">
 <telerik:RadHubTile.BackContentTemplate>
 <DataTemplate>
 <StackPanel Orientation="Vertical">
 <TextBlock Text="India England Test Series" />
 <Image Source="/Assets/indengmatchlogo.JPG" />
 </StackPanel>
 </DataTemplate>
 </telerik:RadHubTile.BackContentTemplate>
 <telerik:RadHubTile.NotificationTemplate>
 <DataTemplate>
 <StackPanel Orientation="Horizontal" >
 <TextBlock Text="{Binding Runs}" />
 <TextBlock Text="{Binding Country}" />
 </StackPanel>
 </DataTemplate>
 </telerik:RadHubTile.NotificationTemplate>

</telerik:RadHubTile>
At this point if you run the application you should get a RadHubTile with BackContentTemplate , NotficationTemplate , Message and Image.
We can get all the information from RadHubTile in code behind and can use them. For example let us say when user is tapping on the RadHubTile , we want to display the NotificationCount. We can do that as following,
void rdRunsHubTiles_Tapped(object sender, TappedRoutedEventArgs e)
 {

var runset = (sender as RadHubTile).Notification;
 }
In this way we can work with RadHubTile in Application for Windows Store. I hope you find this post useful. Thanks for reading.
In this post we will take a look on working with RadNumericBox. If first time you are working with RadControls in JavaScript based Windows 8 Application, I recommend you to read this post .
To work with RadNumericBox simply set data-win-control property of a div or span as Telerik.UI.RadNumericBox
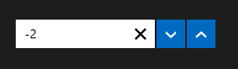
You will get RadNumericBox configured with default values as following,
You can work with RadNumericBox from JavaScript as well.
Here agebox is id of span.
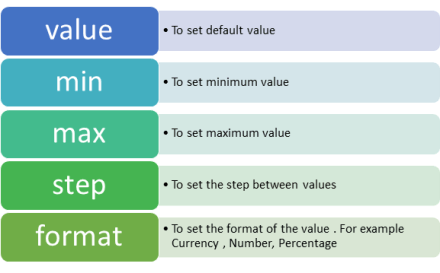
You can set different options for RadNumericBox. Some of those options are as following,
Options can be set as following,
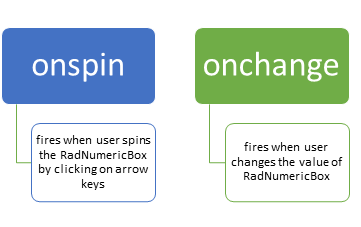
Now when you run the application, you should get RadNumericBox configured with default value 40, minimum value 0, maximum value 255 and step as 10. While working with RadNumericBox there are two important events,
In code behind you can attach event to RadNumericBox as following,
if (args.detail.kind === activation.ActivationKind.launch) {
 if (args.detail.previousExecutionState !== activation.ApplicationExecutionState.terminated) {
 // TODO: This application has been newly launched. Initialize
 // your application here.
 } else {
 // TODO: This application has been reactivated from suspension.
 // Restore application state here.
 }
 args.setPromise(WinJS.UI.processAll());
 var nbage = document.getElementById("agebox").winControl;
 nbage.addEventListener("spin", showmessage);
 nbage.addEventListener("change", function (e) {
 document.getElementById("output").innerText = "You have selected" + nbage.value;
 });
 }
 };

 function showmessage(e) {

document.getElementById("output").innerText = "You have selected" + e.target.value;
 }
I hope you find this post useful. Thanks for reading.
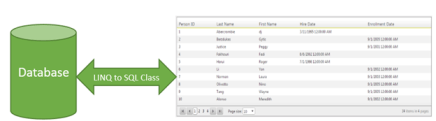
In this post we will take a look on working with RadGrid and LINQ to SQL Class. We will display data in RadGrid using LINQ to SQL Class from SQL Server database.
Very first let us create DataSource to be used with RadGrid. We will use LINQ to SQL class to create data model here. To create data model using LINQ to SQL class right click on the project and select Add then New Item. From Data tab, choose LINQ to SQL Classes
If you want you can change name of the LINQ to SQL class, however I am leaving default name and clicking on the Add button. Choose Server Explorer on the design surface to create data classes.
In Server Explorer right click on the Data Connection and Add Connection. In Add Connection dialog box provide database server name and choose the database to create data model. Click on Ok to add a new Data Connection in Server Explorer.
On successfully adding of data connection , you can see that in server explorer
Next drag and drop Tables, Views , Stored Procedures and Functions from Server Explorer on dbml design surface to make a part of data model. In this case , I am going ahead with only one table Person. Now you can see that Person is added on dbml file.
As of now we have added the data model in the project. Now let us go ahead and add a RadGrid on the page. To add RadGrid on the page drag and drop it from Toolbox on the page. If you don’t find RadControls in toolbox then right click on the General tab in tool box and select Add Tab
Give name of the tab . Right click on newly created tab and selecte Choose Items. Then browse to
C:\Program Files (x86)\Telerik\RadControls for ASP.NET AJAX Q1 2012 SP1\Bin40
and choose Telerik.Web.UI.dll and after selecting dll click on Ok button to add the controls in toolbox.
In toolbox you can see that RadControls are successfully added.
Next from the Telerik AJAX Data Component tab , drag and drop RadGrid on the page.
As of now we have added RadGrid on the page . Next we need to create data source from the data model and bind to the RadGrid. Below is the function returning List of Person.
In function we are creating instance of DataContext class and returning list of person on that. Now we need to bind data returning from this function to RadGrid. We can do that as following
using System;
using System.Collections.Generic;
using System.Linq;
using System.Web.UI;

namespace GridSample
{
public partial class _Default : Page
{
protected void Page_Load(object sender, EventArgs e)
{
RadGrid1.AllowPaging = true;
RadGrid1.NeedDataSource += RadGrid1_NeedDataSource;


}

void RadGrid1_NeedDataSource(object sender, Telerik.Web.UI.GridNeedDataSourceEventArgs e)
{
RadGrid1.DataSource = GetStudents();
}


private List<Person> GetStudents()
{
DataClasses1DataContext context = new DataClasses1DataContext();
// return context.Persons.SortBy("FirstName").ToList();
return context.Persons.ToList();
}
}
}
Now when you press F5 to run the application , you should get data in RadGrid using LINQ to SQL class.
In this way you can pull data from database using LINQ to SQL class and bind to a RadGrid. I hope you find this post useful. Thanks for reading.
In this post we will take a look at how a report designed in Standalone End User Report Designer, can be rendered from your applications – be it WPF, WinForms, SilverLight or ASP.NET. One of the customer I was working with had this requirement of end users to design the report and that report should be rendered within the application. The end users who design the report will have the flexibility to upload the designed report to the application. The application had to render the uploaded report in a reporting module. So we will see how to achieve this. If this requirement has excited you, then read through rest of this post.
Pre Requisites:
In order to design reports using the standalone end user report designer, you will need to first download the Telerik Reporting solution. This is available as a free 30 day trial download. Here is the download link:
in order to mimic the scenario of End User connecting to a staging DB and designing the report on their desktop – I will be making use of 2 Databases. So you will need a RDBMS product of your choice. In my example I will be using SQL Server 2012.
Creating Staging and Production DB:
For the sake of the demo, I will create 2 database and name them as StagingDB and ProductionDB respectively. The database will have only one table named Contacts. It will have 2 columns an Id and Name. Here is the code snippet for the table:
This file contains hidden or bidirectional Unicode text that may be interpreted or compiled differently than what appears below. To review, open the file in an editor that reveals hidden Unicode characters.
Learn more about bidirectional Unicode characters
So at his time, if you are following along, you should have created 2 databases – StagingDB and ProductionDB and in both the DB you should have 1 table named Contacts. In staging DB contacts table I will fill some dummy data and it looks like below:
Similarly in the Contacts table of production DB, I have inserted the following data:
We will mimic a scenario where in the end users will connect to the StagingDB->Contacts table and design the report using the Standalone Report Designer. After designing it they will upload to the application. And application will connect to production DB and render the report.
Designing the report:
when you install the Telerik Reporting suite, we will also install the Standalone report designer for end users. This is an executable which can be run on any system. It can be in a folder named Report Designer at the root of Telerik Reporting installation folder. When you launch the ReportDesigner,exe, you will see the following interface:
Click on New Report, give a name for the report and select a path to save the report.
Next, we will be presented with a Report Wizard. In the “Choose Data Source” dialog, create a new data source and connect to the Staging DB we have created earlier. In order to connect to our SQL Server database, select SQL Data Source in the data source selection dialog and give it a name.
In the data connection selection page, configure the connection settings to your Staging DB.
Next we configure the command i.e. the select query to fetch the report data. For this demo it’s a simple statement – “Select * from Contacts”. Next you can preview the results of the query
Click on finish to finish the connection settings configuration.
Now you will see that we have set up a data source for the report and following dialog shows the details:
Click next to select the report type. I have select a standard report type
Next we will configure the data layout of the report, In this example, we have only two columns in the table and I will show both the column in the body of the report.
Next select the report layout i.e. is the report a stepped report or outline or left aligned. I have selected Stepped report i.e. items are arranges in columns and they don’t overlap vertically.
Next you can select a report style and finish the wizard.
At this point we have successfully designed a report using the report designer. In order to preview the report, click the Preview button on the Home tab. The report will be executed and shown as below:
As you can see we have connected to our staging db and pulling data from the contacts table.I have named the report as DemoReport and is saved as DemoReport.trdx. The TRDX is a custom file format that Telerik Reporting uses. It stands for Telerik Reporting Definition XML. Next we will see how we can upload this file to a application and render the report inside the application.
Building a WPF client:
In order to mimic a production application, I have built the following WPF app.
Although I have selected WPF app for this demo, it can be anything in real world – ASP.NET Web App, WinForms or SL. Here is the work flow of this app:
An end user uploads the .TRDX report file he designed using the Standalone Report Designer, in the app.
The app saves the file in the application folder.
App will list the uploaded report file in a list box.
When the report is selected in the list box, the report will be rendered in the report viewer.
For the sake of the time, I will not be describing the portion of the app which allows us to browse and select a .TRDX file, Saves the uploaded .TRDX file in one of the application folder and listing of the uploaded report in list box. Those are pretty straight forward code that you will be familiar with. We will pay our attention to how do we render the .TRDX file inside the Report Viewer in the coming sections.
TRDX Report Rendering using URI:
The report viewer has the capability to just take a URI of a .TRDX file and render it. The ReportViewer exposes a property called ReportSource. One of the supported report source is UriReportSource. As the name goes, we are supposed to create an instance of UriReportSource and set the URI to the .TRDX file. Be it a WPF app as the one we are dealing with now or a web scenario – you just need to get the complete URI of the .TRDX file. Here is the code snippet to achieve this:
This file contains hidden or bidirectional Unicode text that may be interpreted or compiled differently than what appears below. To review, open the file in an editor that reveals hidden Unicode characters.
Learn more about bidirectional Unicode characters
In previous section we saw UriReportSource as the report source for the report viewer. The report viewer also supports XML as a report source. We can pretty much give a XML literal string which confronts to Teelrik Reporting Definition XML schema and the report viewer will be able to parse and render the same. The .TRDX report file is nothing but a XML in itself. Here is the content of the DemoReport we designed in its XML form:
This file contains hidden or bidirectional Unicode text that may be interpreted or compiled differently than what appears below. To review, open the file in an editor that reveals hidden Unicode characters.
Learn more about bidirectional Unicode characters
Here is the code snippet to prepare the XmlReportSource and bind that to ReportViewer ReportSource.
This file contains hidden or bidirectional Unicode text that may be interpreted or compiled differently than what appears below. To review, open the file in an editor that reveals hidden Unicode characters.
Learn more about bidirectional Unicode characters
Well, if you followed the post so far, you will probably be getting this question for sure. Well remember that when we designed the report using Standalone Report Designer we did set up a data source and a connection string. But that points to our staging database. Meaning the schema of the staging db and the production db are the same but they will be two different environments when it comes to reality. You will never allow somebody to work with a production environment for design. Instead you will allow people to play around in the staging or local setup and finally deploy the code to production. So when we rendered the report using the URI Report Source or XML Report Source – the report does contain the data source object embed within the report and will use that when executing in the production. Remember that the connection string set up during design points to our staging or local setup. So when the report is rendered in the production, report viewer will search for the connection string name given during the design. It may be there or may not be there – whatever it is, this is not ideal scenario to support. So how can we overcome this. In the next section, we will see what is the solution for this.
Report Xml Serializer:
when we looked at XmlReportSource, we understood the .TRDX file is nothing but a XML content. It is nothing but the report definition. The Telerik Reporting solution comes with a ready made XmlSerializer which can read this XML definition and gives us an instance of Telerik.Reporting.Report – an object representation of the Report we designed. The Report class exposes the Data Source we set up and the Connection String on that data source. So the solution to render a .TRDX file in production environment will be as follows:
Read the content of the .TRDX file as XML string
Use ReportXmlSerializer to serialize the XML to Report object
On the report object, get the SqlDataSource and change the connection string of the data source to match your production. You can either provide the complete connection string itself or the name of the connection string element from your configuration file.
Here is the code snippet on how to use the Report Xml Serializer:
This file contains hidden or bidirectional Unicode text that may be interpreted or compiled differently than what appears below. To review, open the file in an editor that reveals hidden Unicode characters.
Learn more about bidirectional Unicode characters
Standalone Report Designer is a great tool for end users who just create reports and are not technical people. Telerik Reporting Solution has provisions to use the designed report i.e. .TRDX file and render that inside the report viewer. Since it supports both URI Report Source and XML Report Source, you can decide the way you want to store the report i.e. either store it as a physical file in your app in a separate folder or store the content of the .TRDX file in a database column. In both the cases you will be able to use the Report XML Serializer to serialize the XML as a Report instance, update the connection string to match your production and set it to the report viewer.
With Telerik Reporting Solution, you now have the power in your apps to let the end user design adhoc reports, upload it in your app and render the same in a report viewer. Hope this post gave you some insights into Telerik Reporting capabilities.
Telerik India in a new initiative has started a series of webinars known as “Telerik tools for the Ninja Developer – The Series”. We have already completed 3 webinars as part of the series which includes Kendo UI, Just Code and Test Studio.
Continuing the series we are hosting a webinar on Aug 29 for Asia region. Here is the details of the webinar:
(Note: click on the title above to get to the registration link)
Do you avoid running your unit tests for fear they will never be complete? Do you wish for a better way? Well, look no further! With Telerik JustMock, you can make sure your code works as intended and be out of the office in time for happy hour. In this session, you will learn how to separate dependencies to make your tests run faster with JustMock Lite. You will then learn how the full edition of JustMock is used to tackle those hard-to-reach bits of code. Whether you’re new to unit testing, new to mocking, or just looking for a better way, this webinar is for you!
JustMock is an easy, fast, feature rich framework for creating unit tests. This complete mocking tool allows for mocking of non-virtual methods, non-public members, sealed classes and static methods and classes – all within one simple API. JustMock is the easy and fun way to test your code – anyone can mock with JustMock!
So join me as I take you through a tour of Just Mock and Unit Testing. Hope you will be there and will enjoy the ride. So what you waiting for – book a seat for yourself now. Register here.
There are three groups of Code Templates available
Iteration
Surrounding
Conditional or basic statements
To insert code template you need to press ALT+END . You will get below popup
From popup you can choose code template to insert. If you are choosing
Now pressing tab will give you next variables to choose. In this way you can insert any code template by choosing it from popup.
You can insert a snippet using their acronym also. After the acronym press Shift+Space to insert code template.
You can also define your own code template. To create a code template click on JustCode->Option->CodeTemplate option from menu. Then click Add to add a new Code Template.
Basic syntax to create a template is as below,
$number[=function]$
Number is any natural number and function is any existing template function. If you want to create a basic template for If statement you can create it as below. I am giving acronym name as DJ.
In code after typing DJ when I press Shift and Space I get below code generated
In this way you can work with Code Template using Telerik Just Code. I hope this post is useful. Thanks for reading
JustCode do on the fly analysis of the code. It does code analysis when you type the code and reports you and error or warning without any further delay.
To have high lever perspective on Telerik JustCode, I have just console application and put no code so far.
JustCode does the analysis along with the visual studio inspection. It performs analysis using some custom inspection.
On the fly you can fix any error reported by pressing Alt+Enter. For example below Method2 is trying to pass parameter to Method1 whereas Method1 is defines without any input parameter. At the time of calling of Method1, on pressing Alt+Enter ,JustCode will suggest you the possible fixes.
JustCode performs below inspection on the Code,
For C#
Identical if and else clauses
Obsolete casts
Empty statements
Assignments with no effect
Unused private members
Unused parameters
Unused variables
Unused namespaces
Unreachable statements
For XAML
Missing object element type
Missing type of an attached property
Missing property that an attached property is referring to
Not found event handlers
Ambiguous property that an attached property is referring to
By default JustCode reports error in color red and warning in green.
Error in Red
If you want to change default color of reporting you can do it by navigating to
Tools->Options->Environment
I have changed error reporting color to blue and now error is reported in blue color as below,
Inspection of the code can be done in fours ways
Via a tooltip over a highlighted expression
Via a info popup
Via a tooltip in the Marker Bar
In the Error list Window
In this way you can perform analysis of code and fixing of any error reported using Telerik JustCode. I hope this post is useful. Thanks for reading
Simply I cannot work without Telerik Just Code .It boost my productivity to next level. In this post, I am going to discuss on Code Navigation and Search feature of this amazing product. You may want to have a look on my previous post Error Inspection using Telerik Just Code
Advantages
Quickly navigate to different parts of code
Easily find definitions, errors, types, members etc.
Easily highlight found errors, types, members etc.
Quick navigation via Find Result Windows.
Camel case search : This searches capital letters of compound names
Go To options
There are four Go To Options available
In my sample console application I have created a class called Product. If I want to search that type (class in this case) then I can search like below,
Search Windows gives you information that class is internal class and its namespace name. if you press enter you will navigate to class definition.
Find Usage is another powerful feature . This can boost up productivity. This helps to navigate and search to different
Classes
Namespaces
Local variables
Methods
Fields
In Find Result windows you can see the usage of definitions or keywords. All different usage term would be open in different tabs. In below case type product and namespace usage is open.
In this way you can explore many other navigate options given by Telerik Just code option. I am very looking forward to explore more features of this amazing product. I will share my learning on the same