Azure AD Login for your SPA using React Hooks

In this tutorial we are implementing Microsoft Azure Ad Login in React single-page app and retrieve user information using @azure/msal-browser.

The MSAL library for JavaScript enables client-side JavaScript applications to authenticate users using Azure AD work and school accounts (AAD), Microsoft personal accounts (MSA) and social identity providers like Facebook, Google, LinkedIn, Microsoft accounts, etc. through Azure AD B2C service. It also enables your app to get tokens to access Microsoft Cloud services such as Microsoft Graph.

Azure application registration

You can register you web app using  Microsoft tutorial.

In the below App.js file code we are using Context and Reducer for managing the login state. useReducer allows functional components in React access to reducer functions from your state management

First we initialize the initial values for reducer,
Reducers are functions that take the current state and an action as arguments, and return a new state result. In other words, (state, action) => newState

You can see the code form 17 line where we created reducer with using switch case “LOGIN” and “LOGOUT”. and from Line 58 we use the context that defined in line 6 and passing the reducer values to it.

And In a line 66 : we are checking the state.isAuthenticated or not , if it’s not the page redirect to the home page and if it’s Authenticated it will be redirected to the admin dashboard home page.

App.Js

import React, { useReducer } from "react";
import { createBrowserHistory } from "history";
import { Router, Route, Switch, Redirect } from "react-router-dom";
import AdminLayout from "layouts/Admin.js";
import HomeLayout from "layouts/Home.js";
export const AuthContext = React.createContext();
const hist = createBrowserHistory();


const initialState = {
    isAuthenticated: false,
    user: null,
    token: null,
    
};

export const reducer = (state, action) => {
    switch (action.type) {
        case "LOGIN":
            localStorage.setItem("user", action.payload.user);
            localStorage.setItem("token", action.payload.token);
            return {
                ...state,
                isAuthenticated: true,
                user: action.payload.user,
                token: action.payload.token
            };
        case "LOGOUT":
            localStorage.clear();
            return {
                ...state,
                isAuthenticated: false,
                user: null
            };
        default:
            return state;
    }
};

function App() {
    const [state, dispatch] = useReducer(reducer, initialState);

    React.useEffect(() => {
        const user = localStorage.getItem('user') || null;
        const token = localStorage.getItem('token') || null;

        if (user && token) {
            dispatch({
                type: 'LOGIN',
                payload: {
                    user,
                    token
                }
            })
        }
    }, [])
    return (
        <AuthContext.Provider
            value={{
                state,
                dispatch
            }}
        >
            <Router history={hist}>
                <Switch>
                    <div className="App">{!state.isAuthenticated ?
                        <>
                            <Route path="/home" render={(props) => <HomeLayout {...props} />} />
                            <Redirect to="/home" /> </> :
                        <><Route path="/admin" render={(props) => <AdminLayout {...props} />} />
                            <Redirect to="/admin/dashboard" /></>}</div>
                </Switch>
            </Router>
        </AuthContext.Provider>
    );
}

export default App;

Now we are coming the the Login Component with Azure Ad using with @azure/msal-browser

In a below code we are importing AuthContext from App.js and PublicClientApplication from @azure/msal-browser.

and In a 7th line we created constant variable “dispatch” with providing the reference of AuthContext then we created the msalInstandce variable using the PublicClientApplication and providing the clientId, authority and redirectUri in auth block.

In a line 22 we created the startlogin function then we created the loginRequest variable and providing the scope for login.

and In a line 31 we use the msalInstance.loginPopup(loginRequest) for getting pop up window for login and in a “loginRespone” variable save the login response. then we are fetching the username and token form loginRespone. dispatch to the AuthContext (see line 41).

And In a line 56 we created a button it’s call the startLogin function on click event.

Login.cs

import React from "react";

import { AuthContext } from "App";
import {  PublicClientApplication } from '@azure/msal-browser';

export const Login = () => {
  const { dispatch } = React.useContext(AuthContext);

  const msalInstance = new PublicClientApplication({

    auth: {
      clientId: "65395645-90dd-4436-84a4-47d7c0e961fc",
      authority: "https://login.microsoftonline.com/common",
      redirectUri: "https://localhost:3000",
    },
    cache: {
      cacheLocation: "sessionStorage",
      storeAuthStateInCookie: true,
           }
  });

  const startLogin = async (e) => {
    e.preventDefault();
   
    var loginRequest = {
      scopes: ["65395645-90dd-4436-84a4-47d7c0e961fc/.default"] // optional Array<string>
    };
   
    try {
      
      const loginResponse = msalInstance.loginPopup(loginRequest);
      
      const username = (await loginResponse).account.username;
      const token = (await loginResponse).accessToken;

      const resJson = {
        token: token,
        user: username
      };

      dispatch({
        type: "LOGIN",
        payload: resJson
      })
      console.log("Login successfully");
    } catch (err) {

      console.log("Authentication Failed.....");
      console.log(err);
    }
  }
 
  return (
    <div>

      <button className="btn btn-sm btn-outline-success my-2 my-sm-0" data-toggle="button" onClick={(e) => { startLogin(e) }}>Login</button>

    </div>

  );
};

export default Login;

Above you see we used the reducer and context in App.js file and crated a Login Component.

Conclusion

Now we can import the Login component anywhere in a project where we want to login button that uses the Azure AD for Authentication.

Azure AD Authentication in ASP.NET Core Web API

The next step to building an API is to protect it from anonymous users. Azure Active Directory (AD) serves as an identity platform that can be used to secure our APIs from anonymous users. After the authentication is enabled, users will need to provide a OAuth 2.0/ JST token to gain access to our API.

Let us begin to implement Azure AD Authentication in ASP.NET Core 5.0 Web API.

I will be creating ASP.NET Core 5.0 project and show you step by step how to enable authentication on it using Azure AD Authentication. We will be doing it using the MSAL package from nuget.

Prerequisites

Before you start to follow steps given in this article, you will need an Azure Account, and Visual Studio 2019 with .NET 5.0 development environment step.

Creating ASP.NET Core 5.0 web application

Open visual studio and click on Create a new project in the right and select “Asp.net core web app” as shown in below image and click next.

In the configure your new project section enter name and location of your project as shown in below image and click next

In the additional information step, select .NET 5.0 in the target framework, Authentication Type to none and check Configure HTTPS checkbox and click on create.

Configuring ASP.NET Core 5.0 App for Azure AD Authentication

Open appsettings.json of your web api and add following lines of code.

"AzureAd": {
    "Instance": "https://login.microsoftonline.com/",
    "Domain": "gtmcatalyst.com",  "qualified.domain.name",
    "ClientId": "your-client-id",
    "TenantId": "your-tenant-id"
  }

Replace your-client-id and your-tenant-id with the actual values that you copied while doing app registration in azure ad

Next, add package manager console and add following two package references to your web application.

using Microsoft.AspNetCore.Authentication.JwtBearer;
using Microsoft.Identity.Web;

Next, open startup.cs in your project and paste following code in the ConfigureServices method

   services.AddAuthentication(JwtBearerDefaults.AuthenticationScheme)
               .AddMicrosoftIdentityWebApi(Configuration.GetSection("AzureAd"));

Next, in the Startup.cs, go to Configure method and add app.UseAuthentication(); line before app.UseAuthorization(); line.

Next, open any Controller and add [Authorize] attribute:

    [Authorize]
    [Route("[controller]")]
    [ApiController]
    public class SupportController : ControllerBase
    {

    }

Save all files and run your project.

You will notice that once you run the project, and try to access any method in support controller from the browser you will get return the HTTP ERROR 401 ( Unauthorized client error).

Conclusion

Our API is no longer available for anonymous access. It is now protected by Azure AD Authentication.

Handling a peculiar DATETIME issue in Telerik Reporting

We got a request from our customer wanting to use a CSV file as Data Source in Telerik Report Designer to generate the report. They were unable to parse DateTime column to DateTime data type in Telerik Report Designer because the CSV returns the column with double quotes for example (“4/14/2021 12:42:25PM”).

Values can be easily cast to DateTime in Telerik Reporting during the datasource definition. The issue here was the quotes that came in the datasource.

In this blog post, we will explore how we can work with this scenario using Expressions provided by Telerik Report Designer..

First, we need to Add Data Source so click on Data in Menu then select the CSV Data Source and select and then click on Next button as below :

check the checkbox if CSV file has headers then click on NEXT button.

Now we the screen appear for Map columns to type and you can see the StartTime column below with double quotes:

Now we try to change the type of StartTime column string to DateTime. Now need to provide Date format in our case like yyyy-mm-dd hh:ss but in our case it will not work and the column will show blank.

Cause of blank again we need the change DateTime to String and Click on NEXT Button and Finish.

Now to the Data Source is connected with the report. the customer want the report with the parameter of data. So we need to convert StartTime(string) to StartTime(DateTime) using expression.

First we need to remove double quotes from StartTime using Replace function.

//Syntax of Replace function
=Replace(text, old substirng, new substring)

In a below code we take a text from Fields.StartTime and provide old substring that to be remove is double quotes in single quotes. and new substring is blank. 

=Replace(Fields.StartTime,'"',"")

We got a StartTime in string without double quotes. so now we need to convert String to DateTime using CDate(value) Funciton. In a CDate function we provide the above Replace function that returning the StartTime without double qoutes.

= CDate(Replace(Fields.StartTime,'"',""))

Now we got the StartTime with the type of DateTime. and the above Expression we can use any where we want like filter the data and making parameter range with StartTime.

How to use Word Template with Telerik Document Processing Library using ASP.NET Core

We get frequent requests from customers wanting to build a document using a template with header and footer and just including text in the Word document using ASP.NET Core.

We can achieve this using the Telerik WordsProcessing library. In this blog post, we will explore how.

You can do this by importing the document template with the DocxFormatProvider (if the template is a DOCX document or with any other of the supported by the WordsProcessing format providers) into a RadFlowDocument, edit its content using the RadFlowDocumentEditor and export it with the appropriate format provider. 

First, you need to to install Telerik.Documents.Flow NuGet package see below picture where I am using Trial version of Telerik.

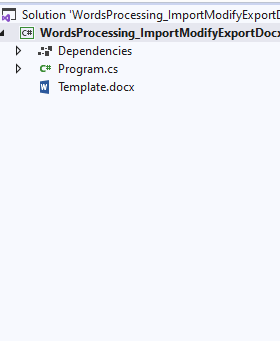
Add Template.docx file in root directory with header and footer.

In Program.cs file

Step 1 : Add below mentioned namespaces :

using System.Diagnostics;
using Telerik.Windows.Documents.Flow.FormatProviders.Docx;
using Telerik.Windows.Documents.Flow.Model;
using Telerik.Windows.Documents.Flow.Model.Editing;

Step 2 : Create RadFlowDocument object.

RadFlowDocument document;

Step 3 : And add the DocxFormatProvider for importing the DOCX Template in RadFlowDocument object “document”.

DocxFormatProvider provider = new DocxFormatProvider();

string templatePath = "Template.docx";

  using (Stream input = File.OpenRead(templatePath))
   {
       document = provider.Import(input);
   }

Step 4 : Now add the RadFlowDocumentEditor for editing the RadFlowDocument with providing it’s object. and with the RadFlowDocumentEditor object “editor” we are inserting the text.

RadFlowDocumentEditor editor = new RadFlowDocumentEditor(document);
editor.InsertText("Telerik WordsProcessing Library");

Step 5 : Now Define the Output of Document path. and export the document using above mentioned RadFlowDocumentEditor object “provider”.


 string outputDocumentPath = "Output.docx";
     
 using (Stream output = File.OpenWrite(outputDocumentPath))
     {
          provider.Export(document, output);
     }

Step 6 : And I am opening the file after exporting using below line of code you can also remove that if you don’t want to open file.

 Process.Start(new ProcessStartInfo() { FileName = outputDocumentPath, UseShellExecute = true });

The whole program look likes below :

Now you can get the Word Document File with name of Output.docx.

And for more information about the RadFlowDocumentEditor you can find in the RadFlowDocumentEditor help article.

If you are new to this library, I would suggest starting with the Getting Started help article and checking the WordsProcessing`s Cross-Platform Support topic.

Hierarchical structure using Telerik TreeView in ASP.NET MVC

One of our customers required hierarchical UI to be implemented. The data was residing in an API and required remote data binding. This task is very easy to implement with Telerik TreeView from Telerik UI for ASP.NET MVC suite.

A TreeView component represents hierarchical data in a tree structure. It allows users to perform single or multiple selection of items, drag and drop of elements within the TreeView.

The Telerik UI for ASP.NET MVC TreeView component comes with built-in checkbox support, keyboard navigation, RTL support, accessibility and provides templates for complete customization of each node. You can bind the TreeView to various data sources and take advantage of its load on demand feature, and request data only when a node is expanded.

Let’s see how we can use Telerik TreeView control to implement heirarchial structures:

  1. Sample Database and Table Using below script

For hierarchical structure we need to do one to many relation in tables, but in a below example, we are doing relation one-to-many from the Products table to itself (in a single table). In the table, EmployeeId is primary key and ReportsTo is foreign key. See the highlighted lines below:

CREATE DATABASE [Sample]

GO
USE [Sample]
GO
/****** Object:  Table [dbo].[Employees]    Script Date: 2/16/2021 1:34:48 PM ******/
SET ANSI_NULLS ON
GO
SET QUOTED_IDENTIFIER ON
GO
CREATE TABLE [dbo].[Employees](
	[EmployeeID] [int] IDENTITY(1,1) NOT NULL,
	[LastName] [nvarchar](20) NOT NULL,
	[FirstName] [nvarchar](10) NOT NULL,
	[Title] [nvarchar](30) NULL,
	[TitleOfCourtesy] [nvarchar](25) NULL,
	[BirthDate] [datetime] NULL,
	[HireDate] [datetime] NULL,
	[Address] [nvarchar](60) NULL,
	[City] [nvarchar](15) NULL,
	[Region] [nvarchar](15) NULL,
	[PostalCode] [nvarchar](10) NULL,
	[Country] [nvarchar](15) NULL,
	[HomePhone] [nvarchar](24) NULL,
	[Extension] [nvarchar](4) NULL,
	[ReportsTo] [int] NULL,
 CONSTRAINT [PK_Employees] PRIMARY KEY CLUSTERED 
(
	[EmployeeID] ASC
)WITH (PAD_INDEX = OFF, STATISTICS_NORECOMPUTE = OFF, IGNORE_DUP_KEY = OFF, ALLOW_ROW_LOCKS = ON, ALLOW_PAGE_LOCKS = ON) ON [PRIMARY]
) ON [PRIMARY]
GO
SET IDENTITY_INSERT [dbo].[Employees] ON 

INSERT [dbo].[Employees] ([EmployeeID], [LastName], [FirstName], [Title], [TitleOfCourtesy], [BirthDate], [HireDate], [Address], [City], [Region], [PostalCode], [Country], [HomePhone], [Extension], [ReportsTo]) VALUES (1, N'Davolio', N'Nancy', N'Sales Representative', N'Ms.', CAST(N'1948-12-08T00:00:00.000' AS DateTime), CAST(N'1992-05-01T00:00:00.000' AS DateTime), N'507 - 20th Ave. E.
Apt. 2A', N'Seattle', N'WA', N'98122', N'USA', N'(206) 555-9857', N'5467', 2)

INSERT [dbo].[Employees] ([EmployeeID], [LastName], [FirstName], [Title], [TitleOfCourtesy], [BirthDate], [HireDate], [Address], [City], [Region], [PostalCode], [Country], [HomePhone], [Extension], [ReportsTo]) VALUES (2, N'Fuller', N'Andrew', N'Vice President, Sales', N'Dr.', CAST(N'1952-02-19T00:00:00.000' AS DateTime), CAST(N'1992-08-14T00:00:00.000' AS DateTime), N'908 W. Capital Way', N'Tacoma', N'WA', N'98401', N'USA', N'(206) 555-9482', N'3457', NULL)

INSERT [dbo].[Employees] ([EmployeeID], [LastName], [FirstName], [Title], [TitleOfCourtesy], [BirthDate], [HireDate], [Address], [City], [Region], [PostalCode], [Country], [HomePhone], [Extension], [ReportsTo]) VALUES (3, N'Leverling', N'Janet', N'Sales Representative', N'Ms.', CAST(N'1963-08-30T00:00:00.000' AS DateTime), CAST(N'1992-04-01T00:00:00.000' AS DateTime), N'722 Moss Bay Blvd.', N'Kirkland', N'WA', N'98033', N'USA', N'(206) 555-3412', N'3355', 2)

INSERT [dbo].[Employees] ([EmployeeID], [LastName], [FirstName], [Title], [TitleOfCourtesy], [BirthDate], [HireDate], [Address], [City], [Region], [PostalCode], [Country], [HomePhone], [Extension], [ReportsTo]) VALUES (4, N'Peacock', N'Margaret', N'Sales Representative', N'Mrs.', CAST(N'1937-09-19T00:00:00.000' AS DateTime), CAST(N'1993-05-03T00:00:00.000' AS DateTime), N'4110 Old Redmond Rd.', N'Redmond', N'WA', N'98052', N'USA', N'(206) 555-8122', N'5176', 2)

INSERT [dbo].[Employees] ([EmployeeID], [LastName], [FirstName], [Title], [TitleOfCourtesy], [BirthDate], [HireDate], [Address], [City], [Region], [PostalCode], [Country], [HomePhone], [Extension], [ReportsTo]) VALUES (5, N'Buchanan', N'Steven', N'Sales Manager', N'Mr.', CAST(N'1955-03-04T00:00:00.000' AS DateTime), CAST(N'1993-10-17T00:00:00.000' AS DateTime), N'14 Garrett Hill', N'London', NULL, N'SW1 8JR', N'UK', N'(71) 555-4848', N'3453', 2)

INSERT [dbo].[Employees] ([EmployeeID], [LastName], [FirstName], [Title], [TitleOfCourtesy], [BirthDate], [HireDate], [Address], [City], [Region], [PostalCode], [Country], [HomePhone], [Extension], [ReportsTo]) VALUES (6, N'Suyama', N'Michael', N'Sales Representative', N'Mr.', CAST(N'1963-07-02T00:00:00.000' AS DateTime), CAST(N'1993-10-17T00:00:00.000' AS DateTime), N'Coventry House
Miner Rd.', N'London', NULL, N'EC2 7JR', N'UK', N'(71) 555-7773', N'428', 5)

INSERT [dbo].[Employees] ([EmployeeID], [LastName], [FirstName], [Title], [TitleOfCourtesy], [BirthDate], [HireDate], [Address], [City], [Region], [PostalCode], [Country], [HomePhone], [Extension], [ReportsTo]) VALUES (7, N'King', N'Robert', N'Sales Representative', N'Mr.', CAST(N'1960-05-29T00:00:00.000' AS DateTime), CAST(N'1994-01-02T00:00:00.000' AS DateTime), N'Edgeham Hollow
Winchester Way', N'London', NULL, N'RG1 9SP', N'UK', N'(71) 555-5598', N'465', 5)

INSERT [dbo].[Employees] ([EmployeeID], [LastName], [FirstName], [Title], [TitleOfCourtesy], [BirthDate], [HireDate], [Address], [City], [Region], [PostalCode], [Country], [HomePhone], [Extension], [ReportsTo]) VALUES (8, N'Callahan', N'Laura', N'Inside Sales Coordinator', N'Ms.', CAST(N'1958-01-09T00:00:00.000' AS DateTime), CAST(N'1994-03-05T00:00:00.000' AS DateTime), N'4726 - 11th Ave. N.E.', N'Seattle', N'WA', N'98105', N'USA', N'(206) 555-1189', N'2344', 2)

INSERT [dbo].[Employees] ([EmployeeID], [LastName], [FirstName], [Title], [TitleOfCourtesy], [BirthDate], [HireDate], [Address], [City], [Region], [PostalCode], [Country], [HomePhone], [Extension], [ReportsTo]) VALUES (9, N'Dodsworth', N'Anne', N'Sales Representative', N'Ms.', CAST(N'1966-01-27T00:00:00.000' AS DateTime), CAST(N'1994-11-15T00:00:00.000' AS DateTime), N'7 Houndstooth Rd.', N'London', NULL, N'WG2 7LT', N'UK', N'(71) 555-4444', N'452', 5)

SET IDENTITY_INSERT [dbo].[Employees] OFF
GO

ALTER TABLE [dbo].[Employees]  WITH NOCHECK ADD  CONSTRAINT [FK_Employees_Employees] FOREIGN KEY([ReportsTo])
REFERENCES [dbo].[Employees] ([EmployeeID])
GO

ALTER TABLE [dbo].[Employees] CHECK CONSTRAINT [FK_Employees_Employees]
GO

ALTER TABLE [dbo].[Employees]  WITH NOCHECK ADD  CONSTRAINT [CK_Birthdate] CHECK  (([BirthDate] < getdate()))
GO

ALTER TABLE [dbo].[Employees] CHECK CONSTRAINT [CK_Birthdate]
GO

The Employee table should look like the below:

Next create Entity Module.

After Creation of Entity, Employee class look like below

public partial class Employee
    {
        public Employee()
        {
            this.Employees1 = new HashSet<Employee>();
        }
    
        public int EmployeeID { get; set; }
        public string LastName { get; set; }
        public string FirstName { get; set; }
        public string Title { get; set; }
        public string TitleOfCourtesy { get; set; }
        public Nullable<System.DateTime> BirthDate { get; set; }
        public Nullable<System.DateTime> HireDate { get; set; }
        public string Address { get; set; }
        public string City { get; set; }
        public string Region { get; set; }
        public string PostalCode { get; set; }
        public string Country { get; set; }
        public string HomePhone { get; set; }
        public string Extension { get; set; }
        public Nullable<int> ReportsTo { get; set; }
        public string PhotoPath { get; set; }
    
        public virtual ICollection<Employee> Employees1 { get; set; }
        public virtual Employee Employee1 { get; set; }
    }

2. Now in the controller TreeviewController.cs

Note also, that the hasChildren uses a navigation property generated in the EF model (Employees1). That would be present if you have created a relation one-to-many from the Products table to itself.

public JsonResult Remote_Data_Binding_Get_Employees(int? id)
{			
  using (TelerikEntities entities = new TelerikEntities())
  {
     var data = from e in entities.Employees
     where (id.HasValue ? e.ReportsTo == id : e. ReportsTo == null)
      select new
       {
         id = e.EmployeeID,
         Name = e.FirstName,
         hasChildren = e.Employees1.Any()

       };
      return Json(data.ToList(), JsonRequestBehavior.AllowGet);
   }
}

In the Remote_Data_Binding_Get_Employees action of the TreeviewController.cs you will notice the yellow colored variables:

Note that as the Name field is used in the controller, the same should also be used in the TreeView in index.cstml file and make sure return of data in list.

3. In View index.cshtml

<div class="demo-section k-content">
        @(Html.Kendo().TreeView()
        .Name("treeview")
        .DataTextField("Name")
        .DataSource(dataSource => dataSource
            .Read(read => read
                .Action("Remote_Data_Binding_Get_Employees", "TreeView")
                )
        )
    )
</div>

In a above code we are doing remote data binding in .Action function we are passing “Method name” and “Controller name”.

Here is the hierarchical output we have acheived:-

Make reusable web controls with Angular and Telerik Kendo UI

Angular requires the use of the entire framework for it to work making it a takeover for the entire application being built. Web Components provide a specification by which we make these Angular components available for use with plain simple HTML. It is a web standard for defining new HTML elements in a framework-agnostic way.

Specifically, Angular elements are Angular components packaged as custom elements (also called Web Components).

One of the questions that our customers ask us is when they use Kendo UI is Angular Elements supported? The answer is a resounding yes and we detail a simple step by step to showcase this capability by using Kendo UI charts control:

1. Install Angular CLI and create a new project

npm i -g @angular/cli
ng new angular-custom-elements

2. Activate your Trial or commercial License

Kendo UI for Angular is a professionally developed library distributed under a commercial license. Starting from December 2020, using any of the UI components from the Kendo UI for Angular library requires either a commercial license key or an active trial license key.

After login in your telerik account Download your Telerik license key and Save the kendo-ui-license.txt license key file in the project folder.

Install or Update a License Key

  • Copy the license key file (kendo-ui-license.txt) to the root folder of your project. Alternatively, copy the contents of the file to the KENDO_UI_LICENSE environment variable.
  • Install @progress/kendo-licensing as a project dependency by running npm install --save @progress/kendo-licensing or yarn add @progress/kendo-licensing.
  • Run npx kendo-ui-license activate or yarn run kendo-ui-license activate in the console.

Adding the Kendo UI Components

Kendo UI for Angular is distributed as multiple NPM packages scoped to @progress. For example, the name of the Grid package is @progress/kendo-angular-grid. As of the Angular 6 release, Angular CLI introduces the ng add command which provides for a faster and more user-friendly package installation. For more information, refer to the article on using Kendo UI for Angular with Angular CLI.

3. Let’s start and add the Charts package:

Angular CLI supports the addition of packages through the ng add command which executes in one step the set of otherwise individually needed commands.

ng add @progress/kendo-angular-charts

The command installs all necessary packages, sets up the default theme, and imports the component module. The full set of applied changes can be seen by running git diff at any time.

Manual Setup

All components that you reference during the installation will be present in the final bundle of your application. To avoid ending up with components you do not actually need, either:

  • Import all Charts components at once by using the ChartsModule, or
  • Import a specific Charts component by adding it as an individual NgModule.

Download and install the package.

npm install --save @progress/kendo-angular-charts @progress/kendo-angular-common @progress/kendo-angular-intl @progress/kendo-angular-l10n @progress/kendo-angular-popup @progress/kendo-drawing hammerjs @progress/kendo-licensing

Once installed, import Hammer.js and the NgModule of the components you need.

To get all package components, import the ChartsModule in your [application root]({{ site.data.url.angular[‘ngmodules’] }}#angular-modularity) or feature module in app.module.ts.

3. Add elements package

Custom elements are a Web Platform feature currently supported by Chrome, Edge (Chromium-based), Firefox, Opera, and Safari, and available in other browsers through polyfills

ng add @angular/elements

4. Create a component

ng g component chart --inline-style --inline-template -v None

5. Add properties to the component

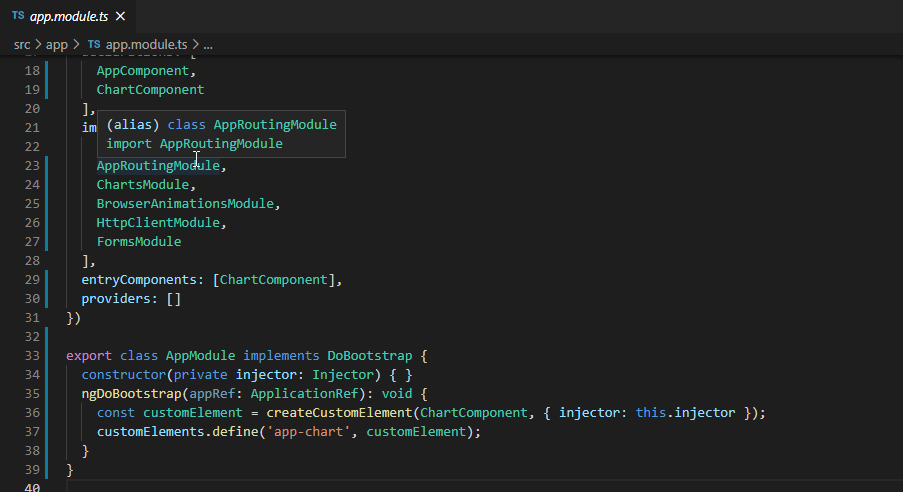
5. Update NgModule

6. Building the Angular Project for Production

ng build –prod –output-hashing=none

Now we need to create a build script(angular-elements-build.js) to produce only one JS file from the multiple files generated by the Angular CLI.

You need to install fs-extra and concat from npm using:

npm install fs-extra concat

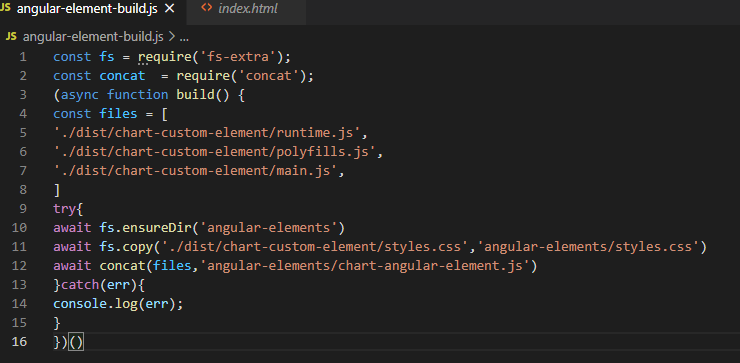
7. In your root application, create a build script file and add below code, angular-element-build.js

const fs = require('fs-extra');
const concat  = require('concat');
(async function build() {
const files = [
'./dist/chart-custom-element/runtime.js',
'./dist/chart-custom-element/polyfills.js',
'./dist/chart-custom-element/main.js',
]
try{
await fs.ensureDir('angular-elements')
await fs.copy('./dist/chart-custom-element/styles.css','angular-elements/styles.css')
await concat(files,'angular-elements/chart-angular-element.js')
}catch(err){
console.log(err);
}
})()

7. run the script using below command.

node angular-element-build.js

The above command will create an angular-elements folder and chat-angular-element.js and copy styles.css file inside in angular-elements folder

8. Use the Angular Element in simple HTML

Add index.html file in angular-elements folder with below code:

<!DOCTYPE html>
<html lang="en">
<head>
    <base href="/">
    <meta charset="utf-8">
    <meta name="viewport" content="width=device-width, initial-scale=1">
    <link rel="icon" type="image/x-icon" href="favicon.ico">
    <link rel="stylesheet" href="styles.css" />
    <title>Testing our custom chart element</title>
</head>
<body>
    <div class="container">
        New component
        <app-chart></app-chart>
        <script type="text/javascript" src="chart-angular-element.js"></script>
        <script>
            let arr = [2002, 2003, 2004, 2005, 2006, 2007, 2008, 2009, 2010, 2011];
            let arrseries = [{
                name: 'India',
                data: [3.907, 7.943, 7.848, 9.284, 9.263, 9.801, 3.890, 8.238, 9.552, 6.855]
            }, {
                name: 'Russian Federation',
                data: [4.743, 7.295, 7.175, 6.376, 8.153, 8.535, 5.247, -7.832, 4.3, 4.3]
            }, {
                name: 'Germany',
                data: [0.010, -0.375, 1.161, 0.684, 3.7, 3.269, 1.083, -5.127, 3.690, 2.995]
            }, {
                name: 'World',
                data: [1.988, 2.733, 3.994, 3.464, 4.001, 3.939, 1.333, -2.245, 4.339, 2.727]
            }]
            let title = "New Title"
            let querySelect = document.querySelector('app-chart');
            querySelect.categories = arr;
            querySelect.series = arrseries;
            querySelect.title = title;
        </script>
    </div>
</body>
</html>

Install live-server using below command:

npm install -g live-server

Navigate to your angular-element folder and run below command:

cd angular-element
npx live-server

Browser window will open with the URL http://localhost:8080/

Now you can see the angular component is working outside of the angular application.

Get Started with Kendo UI for Angular

Our customers enjoy building a good UI for their projects. They rely on Kendo UI to deliver an outstanding development experience along with the most popular JS framework of the modern web – Angular. Kendo UI for Angular is a professionally developed library distributed under a commercial license.

Some of them are not sure how to get started with Kendo UI for Angular. In the post below we detail how you can start using Kendo UI with Angular and include a Chart control:

First Step => Setting up the angular project

The easiest way to start with Angular is to use the Angular CLI Tool. To scaffold your project structure, follow its installation instructions.

npm install -g @angular/cli
ng new my-first-angular-project
cd my-first-angular-project

Second Step => Activate your Trial or commercial License

Starting from December 2020, using any of the UI components from the Kendo UI for Angular library requires either a commercial license key or an active trial license key.

After login in your telerik account Download your Telerik license key Next, save the kendo-ui-license.txt license key file in the project folder.

Install or Update a License Key

  • Copy the license key file (kendo-ui-license.txt) to the root folder of your project. Alternatively, copy the contents of the file to the KENDO_UI_LICENSE environment variable.
  • Install @progress/kendo-licensing as a project dependency by running npm install --save @progress/kendo-licensing or yarn add @progress/kendo-licensing.
  • Run npx kendo-ui-license activate or yarn run kendo-ui-license activate in the console.

Adding the Kendo UI Components

Kendo UI for Angular is distributed as multiple NPM packages scoped to @progress. For example, the name of the Grid package is @progress/kendo-angular-grid. As of the Angular 6 release, Angular CLI introduces the ng add command which provides for a faster and more user-friendly package installation. For more information, refer to the article on using Kendo UI for Angular with Angular CLI.

1. Let’s start and add the Charts package:

Angular CLI supports the addition of packages through the ng add command which executes in one step the set of otherwise individually needed commands.

ng add @progress/kendo-angular-charts

The command installs all necessary packages, sets up the default theme, and imports the component module. The full set of applied changes can be seen by running git diff at any time.

Manual Setup

All components that you reference during the installation will be present in the final bundle of your application. To avoid ending up with components you do not actually need, either:

  • Import all Charts components at once by using the ChartsModule, or
  • Import a specific Charts component by adding it as an individual NgModule.

Download and install the package.

npm install --save @progress/kendo-angular-charts @progress/kendo-angular-common @progress/kendo-angular-intl @progress/kendo-angular-l10n @progress/kendo-angular-popup @progress/kendo-drawing hammerjs @progress/kendo-licensing

Once installed, import Hammer.js and the NgModule of the components you need.

To get all package components, import the ChartsModule in your [application root]({{ site.data.url.angular[‘ngmodules’] }}#angular-modularity) or feature module in app.module.ts.

    import { NgModule } from '@angular/core';
    import { BrowserModule } from '@angular/platform-browser';
    import { BrowserAnimationsModule } from '@angular/platform-browser/animations';
    import { ChartsModule } from '@progress/kendo-angular-charts';
    import { AppComponent } from './app.component';

    import 'hammerjs';

    @NgModule({
        bootstrap:    [AppComponent],
        declarations: [AppComponent],
        imports:      [BrowserModule, BrowserAnimationsModule, ChartsModule]
    })
    export class AppModule {
    }

and Use Chart in app.component.js

import { Component } from '@angular/core';

@Component({
  selector: 'app-root',
  template:'<kendo-chart>
  <kendo-chart-title text="Units sold"></kendo-chart-title>
  <kendo-chart-category-axis>
      <kendo-chart-category-axis-item [categories]="['Q1', 'Q2', 'Q3', 'Q4']">
      </kendo-chart-category-axis-item>
  </kendo-chart-category-axis>
  <kendo-chart-series>
    <kendo-chart-series-item type="bar" [gap]="2" [spacing]=".25" [data]="[100, 123, 234, 343]">
    </kendo-chart-series-item>
    <kendo-chart-series-item type="bar" [data]="[120, 67, 231, 196]">
    </kendo-chart-series-item>
    <kendo-chart-series-item type="bar" [data]="[45, 124, 189, 143]">
    </kendo-chart-series-item>
    <kendo-chart-series-item type="bar" [data]="[87, 154, 210, 215]">
    </kendo-chart-series-item>
  </kendo-chart-series>
</kendo-chart>',
 
})
export class AppComponent {
  title = 'chart-sample';
}

Kendo UI for Angular provides themes that you can use to style your application.

Currently, the suite ships the following themes:

Let us know your experience getting started with Kendo UI in Angular…

How to use NLog with ASP.NET Core 2

We can make a ASP.NET Core app without any logging. But in the real world, we should use some form of logging. In this blog post we are providing an overview of 3rd Party Logging solutions such as NLog.

NLog is a flexible and free logging platform for various .NET platforms, including .NET standard. NLog makes it easy to write to several targets. (database, file, console) and change the logging configuration on-the-fly.

NLog supports the following platforms:

  • .NET Framework 3.5, 4, 4.5 – 4.8
  • .NET Framework 4 client profile
  • Xamarin Android
  • Xamarin iOs
  • Windows Phone 8
  • Silverlight 4 and 5
  • Mono 4
  • ASP.NET 4 (NLog.Web package)
  • ASP.NET Core (NLog.Web.AspNetCore package)
  • .NET Core (NLog.Extensions.Logging package)
  • .NET Standard 1.x – NLog 4.5
  • .NET Standard 2.x – NLog 4.5
  • UWP – NLog 4.5

Getting started with ASP.NET Core 2

Following are the steps to configure NLog in ASP.NET Core application

1. Add dependency in csproj manually or using NuGet

Install the latest:

  1. PM> Install-Package NLog  
  2. PM> Install-Package NLog.Web.AspNetCore 

Or in csproj:

<PackageReference Include="NLog.Web.AspNetCore" Version="4.9.3" />
<PackageReference Include="NLog" Version="4.7.6" />

2. Create a nlog.config file

Create nlog.config (lowercase all) file in the root of your project.

<?xml version="1.0" encoding="utf-8" ?>
<nlog xmlns="http://www.nlog-project.org/schemas/NLog.xsd"
      xmlns:xsi="http://www.w3.org/2001/XMLSchema-instance"
      autoReload="true"
      internalLogLevel="Info"
      internalLogFile="c:\temp\internal-nlog.txt">

  <!-- enable asp.net core layout renderers -->
  <extensions>
    <add assembly="NLog.Web.AspNetCore"/>
  </extensions>

  <!-- the targets to write to -->
  <targets>
    <!-- write logs to file  -->
    <target xsi:type="File" name="allfile" fileName="c:\temp\nlog-all-${shortdate}.log"
            layout="${longdate}|${event-properties:item=EventId_Id}|${uppercase:${level}}|${logger}|${message} ${exception:format=tostring}" />

    <!-- another file log, only own logs. Uses some ASP.NET core renderers -->
    <target xsi:type="File" name="ownFile-web" fileName="c:\temp\nlog-own-${shortdate}.log"
            layout="${longdate}|${event-properties:item=EventId_Id}|${uppercase:${level}}|${logger}|${message} ${exception:format=tostring}|url: ${aspnet-request-url}|action: ${aspnet-mvc-action}" />
  </targets>

  <!-- rules to map from logger name to target -->
  <rules>
    <!--All logs, including from Microsoft-->
    <logger name="*" minlevel="Trace" writeTo="allfile" />

    <!--Skip non-critical Microsoft logs and so log only own logs-->
    <logger name="Microsoft.*" maxlevel="Info" final="true" /> <!-- BlackHole without writeTo -->
    <logger name="*" minlevel="Trace" writeTo="ownFile-web" />
  </rules>
</nlog>

3. Enable copy to bin folder

or edit .csproj file manually and add:

<ItemGroup>
    <Content Update="nlog.config" CopyToOutputDirectory="PreserveNewest" />
</ItemGroup>
4. Update program.cs
using NLog.Web;
using Microsoft.Extensions.Logging;

public static void Main(string[] args)
{
    // NLog: setup the logger first to catch all errors
    var logger = NLog.Web.NLogBuilder.ConfigureNLog("nlog.config").GetCurrentClassLogger();
    try
    {
        logger.Debug("init main");
        CreateWebHostBuilder(args).Build().Run(); 
    }
    catch (Exception ex)
    {
        //NLog: catch setup errors
        logger.Error(ex, "Stopped program because of exception");
        throw;
    }
    finally
    {
        // Ensure to flush and stop internal timers/threads before application-exit (Avoid segmentation fault on Linux)
        NLog.LogManager.Shutdown();
    }
}

public static IWebHostBuilder CreateWebHostBuilder(string[] args) =>
    WebHost.CreateDefaultBuilder(args)
        .UseStartup<Startup>()
        .ConfigureLogging(logging =>
        {
            logging.ClearProviders();
            logging.SetMinimumLevel(Microsoft.Extensions.Logging.LogLevel.Trace);
        })
        .UseNLog();  // NLog: setup NLog for Dependency injection

5. Configure appsettings.json

The Logging configuration specified in appsettings.json overrides any call to SetMinimumLevel. So either remove "Default": or adjust it correctly to your needs.

{
    "Logging": {
        "LogLevel": {
            "Default": "Trace",
            "Microsoft": "Information"
        }
    }
}

Remember to also update any environment specific configuration to avoid any surprises. Ex appsettings.Development.json

6. Write logs

Inject the ILogger in your controller:

using Microsoft.Extensions.Logging;

public class HomeController : Controller
{
    private readonly ILogger<HomeController> _logger;

    public HomeController(ILogger<HomeController> logger)
    {
        _logger = logger;
    }

    public IActionResult Index()
    {
        _logger.LogInformation("Index page says hello");
        return View();
    }

7. Example Output

When starting the ASP.NET Core website, we get two files:

nlog-own-2017-10-10.log

2020-12-29 14:40:29.5143||DEBUG|ASP.NET_Core_2___VS2017.Program|init main |url: |action: 
2020-12-29 14:40:32.1326|0|INFO|ASP.NET_Core_2___VS2017.Controllers.HomeController|Hello, this is the index! |url: http://localhost/|action: Index

nlog-all-2017-10-10.log

2020-12-29 14:40:29.5143||DEBUG|ASP.NET_Core_2___VS2017.Program|init main 
2020-12-29 14:40:30.9739|0|INFO|Microsoft.AspNetCore.DataProtection.KeyManagement.XmlKeyManager|User profile is available. Using 'C:\Users\j.verdurmen\AppData\Local\ASP.NET\DataProtection-Keys' as key repository and Windows DPAPI to encrypt keys at rest. 
2020-12-29 14:40:30.9897|37|DEBUG|Microsoft.AspNetCore.DataProtection.Repositories.FileSystemXmlRepository|Reading data from file 'C:\Users\j.verdurmen\AppData\Local\ASP.NET\DataProtection-Keys\key-bfd1ce07-8dc6-4eef-a51a-d21ddb547109.xml'. 
2020-12-29 14:40:31.0004|18|DEBUG|Microsoft.AspNetCore.DataProtection.KeyManagement.XmlKeyManager|Found key {bfd1ce07-8dc6-4eef-a51a-d21ddb547109}. 
2020-12-29 14:40:31.0124|13|DEBUG|Microsoft.AspNetCore.DataProtection.KeyManagement.DefaultKeyResolver|Considering key {bfd1ce07-8dc6-4eef-a51a-d21ddb547109} with expiration date 2017-12-28 19:01:07Z as default key. 
2020-12-29 14:40:31.0422|0|DEBUG|Microsoft.AspNetCore.DataProtection.TypeForwardingActivator|Forwarded activator type request from Microsoft.AspNetCore.DataProtection.XmlEncryption.DpapiXmlDecryptor, Microsoft.AspNetCore.DataProtection, Version=2.0.0.0, Culture=neutral, PublicKeyToken=adb9793829ddae60 to Microsoft.AspNetCore.DataProtection.XmlEncryption.DpapiXmlDecryptor, Microsoft.AspNetCore.DataProtection, Culture=neutral, PublicKeyToken=adb9793829ddae60 
2020-12-29 14:40:31.0422|51|DEBUG|Microsoft.AspNetCore.DataProtection.XmlEncryption.DpapiXmlDecryptor|Decrypting secret element using Windows DPAPI. 
2020-12-29 14:40:31.0422|0|DEBUG|Microsoft.AspNetCore.DataProtection.TypeForwardingActivator|Forwarded activator type request from Microsoft.AspNetCore.DataProtection.AuthenticatedEncryption.ConfigurationModel.AuthenticatedEncryptorDescriptorDeserializer, Microsoft.AspNetCore.DataProtection, Version=2.0.0.0, Culture=neutral, PublicKeyToken=adb9793829ddae60 to Microsoft.AspNetCore.DataProtection.AuthenticatedEncryption.ConfigurationModel.AuthenticatedEncryptorDescriptorDeserializer, Microsoft.AspNetCore.DataProtection, Culture=neutral, PublicKeyToken=adb9793829ddae60 
2020-12-29 14:40:31.0422|4|DEBUG|Microsoft.AspNetCore.DataProtection.AuthenticatedEncryption.CngCbcAuthenticatedEncryptorFactory|Opening CNG algorithm 'AES' from provider '(null)' with chaining mode CBC. 
2020-12-29 14:40:31.0543|3|DEBUG|Microsoft.AspNetCore.DataProtection.AuthenticatedEncryption.CngCbcAuthenticatedEncryptorFactory|Opening CNG algorithm 'SHA256' from provider '(null)' with HMAC. 
2020-12-29 14:40:31.0543|2|DEBUG|Microsoft.AspNetCore.DataProtection.KeyManagement.KeyRingProvider|Using key {bfd1ce07-8dc6-4eef-a51a-d21ddb547109} as the default key. 
2020-12-29 14:40:31.0543|0|DEBUG|Microsoft.AspNetCore.DataProtection.Internal.DataProtectionStartupFilter|Key ring with default key {bfd1ce07-8dc6-4eef-a51a-d21ddb547109} was loaded during application startup. 
2020-12-29 14:40:31.4080|3|DEBUG|Microsoft.AspNetCore.Hosting.Internal.WebHost|Hosting starting 
2020-12-29 14:40:31.5508|4|DEBUG|Microsoft.AspNetCore.Hosting.Internal.WebHost|Hosting started 
2020-12-29 14:40:31.5508|0|DEBUG|Microsoft.AspNetCore.Hosting.Internal.WebHost|Loaded hosting startup assembly ASP.NET Core 2 - VS2017 
2020-12-29 14:40:31.5526|0|DEBUG|Microsoft.AspNetCore.Hosting.Internal.WebHost|Loaded hosting startup assembly Microsoft.AspNetCore.ApplicationInsights.HostingStartup 
2020-12-29 14:40:31.5526|0|DEBUG|Microsoft.AspNetCore.Hosting.Internal.WebHost|Loaded hosting startup assembly Microsoft.AspNetCore.Server.IISIntegration 
2020-12-29 14:40:31.6909|1|DEBUG|Microsoft.AspNetCore.Server.Kestrel|Connection id "0HL8G4U42CK64" started. 
2020-12-29 14:40:31.6909|1|DEBUG|Microsoft.AspNetCore.Server.Kestrel|Connection id "0HL8G4U42CK65" started. 
2020-12-29 14:40:31.7418|19|DEBUG|Microsoft.AspNetCore.Server.Kestrel.Transport.Libuv|Connection id "0HL8G4U42CK65" reset. 
2020-12-29 14:40:31.7418|10|DEBUG|Microsoft.AspNetCore.Server.Kestrel|Connection id "0HL8G4U42CK65" disconnecting. 
2020-12-29 14:40:31.7418|7|DEBUG|Microsoft.AspNetCore.Server.Kestrel.Transport.Libuv|Connection id "0HL8G4U42CK65" sending FIN. 
2020-12-29 14:40:31.7591|2|DEBUG|Microsoft.AspNetCore.Server.Kestrel|Connection id "0HL8G4U42CK65" stopped. 
2020-12-29 14:40:31.8153|1|INFO|Microsoft.AspNetCore.Hosting.Internal.WebHost|Request starting HTTP/1.1 GET http://localhost:56152/   
2020-12-29 14:40:31.8607|4|DEBUG|Microsoft.AspNetCore.StaticFiles.StaticFileMiddleware|The request path / does not match a supported file type 
2020-12-29 14:40:32.0160|1|DEBUG|Microsoft.AspNetCore.Routing.RouteBase|Request successfully matched the route with name 'default' and template '{controller=Home}/{action=Index}/{id?}'. 
2020-12-29 14:40:32.1120|1|DEBUG|Microsoft.AspNetCore.Mvc.Internal.ControllerActionInvoker|Executing action ASP.NET_Core_2___VS2017.Controllers.HomeController.Index (ASP.NET Core 2 - VS2017) 
2020-12-29 14:40:32.1326|1|INFO|Microsoft.AspNetCore.Mvc.Internal.ControllerActionInvoker|Executing action method ASP.NET_Core_2___VS2017.Controllers.HomeController.Index (ASP.NET Core 2 - VS2017) with arguments ((null)) - ModelState is Valid 
2020-12-29 14:40:32.1326|0|INFO|ASP.NET_Core_2___VS2017.Controllers.HomeController|Hello, this is the index! 
2020-12-29 14:40:32.1620|2|DEBUG|Microsoft.AspNetCore.Mvc.Internal.ControllerActionInvoker|Executed action method ASP.NET_Core_2___VS2017.Controllers.HomeController.Index (ASP.NET Core 2 - VS2017), returned result Microsoft.AspNetCore.Mvc.ViewResult. 
2020-12-29 14:40:32.1620|1|DEBUG|Microsoft.AspNetCore.Mvc.Razor.RazorViewEngine|View lookup cache miss for view 'Index' in controller 'Home'. 
2020-12-29 14:40:33.6906|1|DEBUG|Microsoft.AspNetCore.Mvc.Razor.Internal.RazorViewCompiler|Compilation of the generated code for the Razor file at 'X:\nlog\NLog.Web\examples\ASP.NET Core 2\Visual Studio 2017\ASP.NET Core 2 - VS2017\Views\Home\Index.cshtml' started. 
2020-12-29 14:40:35.7180|2|DEBUG|Microsoft.AspNetCore.Mvc.Razor.Internal.RazorViewCompiler|Compilation of the generated code for the Razor file at 'X:\nlog\NLog.Web\examples\ASP.NET Core 2\Visual Studio 2017\ASP.NET Core 2 - VS2017\Views\Home\Index.cshtml' completed in 2024.1338ms. 
2020-12-29 14:40:35.7988|1|DEBUG|Microsoft.AspNetCore.Mvc.Razor.Internal.RazorViewCompiler|Compilation of the generated code for the Razor file at 'X:\nlog\NLog.Web\examples\ASP.NET Core 2\Visual Studio 2017\ASP.NET Core 2 - VS2017\Views\_ViewStart.cshtml' started. 
2020-12-29 14:40:35.8637|2|DEBUG|Microsoft.AspNetCore.Mvc.Razor.Internal.RazorViewCompiler|Compilation of the generated code for the Razor file at 'X:\nlog\NLog.Web\examples\ASP.NET Core 2\Visual Studio 2017\ASP.NET Core 2 - VS2017\Views\_ViewStart.cshtml' completed in 63.9912ms. 
2020-12-29 14:40:35.8710|2|DEBUG|Microsoft.AspNetCore.Mvc.ViewFeatures.Internal.ViewResultExecutor|The view 'Index' was found. 
2020-12-29 14:40:35.8710|1|INFO|Microsoft.AspNetCore.Mvc.ViewFeatures.Internal.ViewResultExecutor|Executing ViewResult, running view at path /Views/Home/Index.cshtml. 
2020-12-29 14:40:35.9577|1|DEBUG|Microsoft.AspNetCore.Mvc.Razor.RazorViewEngine|View lookup cache miss for view '_Layout' in controller 'Home'. 
2020-12-29 14:40:36.0454|1|DEBUG|Microsoft.AspNetCore.Mvc.Razor.Internal.RazorViewCompiler|Compilation of the generated code for the Razor file at 'X:\nlog\NLog.Web\examples\ASP.NET Core 2\Visual Studio 2017\ASP.NET Core 2 - VS2017\Views\Shared\_Layout.cshtml' started. 
2020-12-29 14:40:36.2080|2|DEBUG|Microsoft.AspNetCore.Mvc.Razor.Internal.RazorViewCompiler|Compilation of the generated code for the Razor file at 'X:\nlog\NLog.Web\examples\ASP.NET Core 2\Visual Studio 2017\ASP.NET Core 2 - VS2017\Views\Shared\_Layout.cshtml' completed in 161.8031ms. 
2020-12-29 14:40:36.2209|2|DEBUG|Microsoft.AspNetCore.Mvc.Razor.TagHelpers.HeadTagHelper|Tag helper component 'Microsoft.AspNetCore.ApplicationInsights.HostingStartup.JavaScriptSnippetTagHelperComponent' initialized. 
2020-12-29 14:40:36.2209|3|DEBUG|Microsoft.AspNetCore.Mvc.Razor.TagHelpers.HeadTagHelper|Tag helper component 'Microsoft.AspNetCore.ApplicationInsights.HostingStartup.JavaScriptSnippetTagHelperComponent' processed. 
2020-12-29 14:40:36.2367|2|DEBUG|Microsoft.AspNetCore.Mvc.Razor.TagHelpers.BodyTagHelper|Tag helper component 'Microsoft.AspNetCore.ApplicationInsights.HostingStartup.JavaScriptSnippetTagHelperComponent' initialized. 
2020-12-29 14:40:36.2367|3|DEBUG|Microsoft.AspNetCore.Mvc.Razor.TagHelpers.BodyTagHelper|Tag helper component 'Microsoft.AspNetCore.ApplicationInsights.HostingStartup.JavaScriptSnippetTagHelperComponent' processed. 
2020-12-29 14:40:36.2942|2|INFO|Microsoft.AspNetCore.Mvc.Internal.ControllerActionInvoker|Executed action ASP.NET_Core_2___VS2017.Controllers.HomeController.Index (ASP.NET Core 2 - VS2017) in 4181.1451ms 
2020-12-29 14:40:36.3036|9|DEBUG|Microsoft.AspNetCore.Server.Kestrel|Connection id "0HL8G4U42CK64" completed keep alive response. 
2020-12-29 14:40:36.3273|2|INFO|Microsoft.AspNetCore.Hosting.Internal.WebHost|Request finished in 4515.4954ms 200 text/html; charset=utf-8 
2020-12-29 14:40:36.3273|1|DEBUG|Microsoft.AspNetCore.Server.Kestrel|Connection id "0HL8G4U42CK67" started. 
2020-12-29 14:40:36.3273|1|DEBUG|Microsoft.AspNetCore.Server.Kestrel|Connection id "0HL8G4U42CK66" started. 
2020-12-29 14:40:36.3386|1|INFO|Microsoft.AspNetCore.Hosting.Internal.WebHost|Request starting HTTP/1.1 GET http://localhost:56152/lib/bootstrap/dist/css/bootstrap.css   
2020-12-29 14:40:36.3386|1|INFO|Microsoft.AspNetCore.Hosting.Internal.WebHost|Request starting HTTP/1.1 GET http://localhost:56152/css/site.css   
2020-12-29 14:40:36.3610|2|INFO|Microsoft.AspNetCore.StaticFiles.StaticFileMiddleware|Sending file. Request path: '/css/site.css'. Physical path: 'X:\nlog\NLog.Web\examples\ASP.NET Core 2\Visual Studio 2017\ASP.NET Core 2 - VS2017\wwwroot\css\site.css' 
2020-12-29 14:40:36.3610|2|INFO|Microsoft.AspNetCore.StaticFiles.StaticFileMiddleware|Sending file. Request path: '/lib/bootstrap/dist/css/bootstrap.css'. Physical path: 'X:\nlog\NLog.Web\examples\ASP.NET Core 2\Visual Studio 2017\ASP.NET Core 2 - VS2017\wwwroot\lib\bootstrap\dist\css\bootstrap.css' 
2020-12-29 14:40:36.4312|9|DEBUG|Microsoft.AspNetCore.Server.Kestrel|Connection id "0HL8G4U42CK66" completed keep alive response. 
2020-12-29 14:40:36.4312|2|INFO|Microsoft.AspNetCore.Hosting.Internal.WebHost|Request finished in 90.8043ms 200 text/css 
2020-12-29 14:40:36.4312|9|DEBUG|Microsoft.AspNetCore.Server.Kestrel|Connection id "0HL8G4U42CK67" completed keep alive response. 
2020-12-29 14:40:36.4312|2|INFO|Microsoft.AspNetCore.Hosting.Internal.WebHost|Request finished in 98.4683ms 200 text/css 
2020-12-29 14:40:36.4710|1|DEBUG|Microsoft.AspNetCore.Server.Kestrel|Connection id "0HL8G4U42CK68" started. 
2020-12-29 14:40:36.4710|1|DEBUG|Microsoft.AspNetCore.Server.Kestrel|Connection id "0HL8G4U42CK69" started. 
2020-12-29 14:40:36.4819|1|INFO|Microsoft.AspNetCore.Hosting.Internal.WebHost|Request starting HTTP/1.1 GET http://localhost:56152/lib/jquery/dist/jquery.js   
2020-12-29 14:40:36.4819|1|INFO|Microsoft.AspNetCore.Hosting.Internal.WebHost|Request starting HTTP/1.1 GET http://localhost:56152/lib/bootstrap/dist/js/bootstrap.js   
2020-12-29 14:40:36.4819|1|INFO|Microsoft.AspNetCore.Hosting.Internal.WebHost|Request starting HTTP/1.1 GET http://localhost:56152/images/banner2.svg   
2020-12-29 14:40:36.4819|1|INFO|Microsoft.AspNetCore.Hosting.Internal.WebHost|Request starting HTTP/1.1 GET http://localhost:56152/js/site.js?v=ji3-IxbEzYWjzzLCGkF1KDjrT2jLbbrSYXw-AhMPNIA   
2020-12-29 14:40:36.4819|1|DEBUG|Microsoft.AspNetCore.Server.Kestrel|Connection id "0HL8G4U42CK6A" started. 
2020-12-29 14:40:36.4819|2|INFO|Microsoft.AspNetCore.StaticFiles.StaticFileMiddleware|Sending file. Request path: '/js/site.js'. Physical path: 'X:\nlog\NLog.Web\examples\ASP.NET Core 2\Visual Studio 2017\ASP.NET Core 2 - VS2017\wwwroot\js\site.js' 
2020-12-29 14:40:36.4819|2|INFO|Microsoft.AspNetCore.StaticFiles.StaticFileMiddleware|Sending file. Request path: '/lib/jquery/dist/jquery.js'. Physical path: 'X:\nlog\NLog.Web\examples\ASP.NET Core 2\Visual Studio 2017\ASP.NET Core 2 - VS2017\wwwroot\lib\jquery\dist\jquery.js' 
2020-12-29 14:40:36.4819|2|INFO|Microsoft.AspNetCore.StaticFiles.StaticFileMiddleware|Sending file. Request path: '/images/banner2.svg'. Physical path: 'X:\nlog\NLog.Web\examples\ASP.NET Core 2\Visual Studio 2017\ASP.NET Core 2 - VS2017\wwwroot\images\banner2.svg' 
2020-12-29 14:40:36.4933|9|DEBUG|Microsoft.AspNetCore.Server.Kestrel|Connection id "0HL8G4U42CK67" completed keep alive response. 
2020-12-29 14:40:36.4819|2|INFO|Microsoft.AspNetCore.StaticFiles.StaticFileMiddleware|Sending file. Request path: '/lib/bootstrap/dist/js/bootstrap.js'. Physical path: 'X:\nlog\NLog.Web\examples\ASP.NET Core 2\Visual Studio 2017\ASP.NET Core 2 - VS2017\wwwroot\lib\bootstrap\dist\js\bootstrap.js' 
2020-12-29 14:40:36.4933|2|INFO|Microsoft.AspNetCore.Hosting.Internal.WebHost|Request finished in 20.2541ms 200 application/javascript 
2020-12-29 14:40:36.5143|9|DEBUG|Microsoft.AspNetCore.Server.Kestrel|Connection id "0HL8G4U42CK66" completed keep alive response. 
2020-12-29 14:40:36.5143|2|INFO|Microsoft.AspNetCore.Hosting.Internal.WebHost|Request finished in 32.361ms 200 image/svg+xml 
2020-12-29 14:40:36.5143|1|INFO|Microsoft.AspNetCore.Hosting.Internal.WebHost|Request starting HTTP/1.1 GET http://localhost:56152/lib/bootstrap/dist/fonts/glyphicons-halflings-regular.woff2   
2020-12-29 14:40:36.5401|2|INFO|Microsoft.AspNetCore.StaticFiles.StaticFileMiddleware|Sending file. Request path: '/lib/bootstrap/dist/fonts/glyphicons-halflings-regular.woff2'. Physical path: 'X:\nlog\NLog.Web\examples\ASP.NET Core 2\Visual Studio 2017\ASP.NET Core 2 - VS2017\wwwroot\lib\bootstrap\dist\fonts\glyphicons-halflings-regular.woff2' 
2020-12-29 14:40:36.5401|1|INFO|Microsoft.AspNetCore.Hosting.Internal.WebHost|Request starting HTTP/1.1 GET http://localhost:56152/images/banner1.svg   
2020-12-29 14:40:36.5401|2|INFO|Microsoft.AspNetCore.StaticFiles.StaticFileMiddleware|Sending file. Request path: '/images/banner1.svg'. Physical path: 'X:\nlog\NLog.Web\examples\ASP.NET Core 2\Visual Studio 2017\ASP.NET Core 2 - VS2017\wwwroot\images\banner1.svg' 
2020-12-29 14:40:36.5539|9|DEBUG|Microsoft.AspNetCore.Server.Kestrel|Connection id "0HL8G4U42CK67" completed keep alive response. 
2020-12-29 14:40:36.5539|2|INFO|Microsoft.AspNetCore.Hosting.Internal.WebHost|Request finished in 39.9074ms 200 font/woff2 
2020-12-29 14:40:36.5745|1|INFO|Microsoft.AspNetCore.Hosting.Internal.WebHost|Request starting HTTP/1.1 GET http://localhost:56152/images/banner3.svg   
2020-12-29 14:40:36.5745|1|INFO|Microsoft.AspNetCore.Hosting.Internal.WebHost|Request starting HTTP/1.1 GET http://localhost:56152/images/banner4.svg   
2020-12-29 14:40:36.5951|9|DEBUG|Microsoft.AspNetCore.Server.Kestrel|Connection id "0HL8G4U42CK68" completed keep alive response. 
2020-12-29 14:40:36.6015|2|INFO|Microsoft.AspNetCore.Hosting.Internal.WebHost|Request finished in 119.5389ms 200 application/javascript 
2020-12-29 14:40:36.6015|2|INFO|Microsoft.AspNetCore.StaticFiles.StaticFileMiddleware|Sending file. Request path: '/images/banner4.svg'. Physical path: 'X:\nlog\NLog.Web\examples\ASP.NET Core 2\Visual Studio 2017\ASP.NET Core 2 - VS2017\wwwroot\images\banner4.svg' 
2020-12-29 14:40:36.5745|2|INFO|Microsoft.AspNetCore.StaticFiles.StaticFileMiddleware|Sending file. Request path: '/images/banner3.svg'. Physical path: 'X:\nlog\NLog.Web\examples\ASP.NET Core 2\Visual Studio 2017\ASP.NET Core 2 - VS2017\wwwroot\images\banner3.svg' 
2020-12-29 14:40:36.6946|9|DEBUG|Microsoft.AspNetCore.Server.Kestrel|Connection id "0HL8G4U42CK64" completed keep alive response. 
2020-12-29 14:40:36.6703|9|DEBUG|Microsoft.AspNetCore.Server.Kestrel|Connection id "0HL8G4U42CK66" completed keep alive response. 
2020-12-29 14:40:36.6946|2|INFO|Microsoft.AspNetCore.Hosting.Internal.WebHost|Request finished in 119.7561ms 200 image/svg+xml 
2020-12-29 14:40:36.6015|9|DEBUG|Microsoft.AspNetCore.Server.Kestrel|Connection id "0HL8G4U42CK69" completed keep alive response. 
2020-12-29 14:40:36.7137|2|INFO|Microsoft.AspNetCore.Hosting.Internal.WebHost|Request finished in 170.2078ms 200 image/svg+xml 
2020-12-29 14:40:36.7137|9|DEBUG|Microsoft.AspNetCore.Server.Kestrel|Connection id "0HL8G4U42CK6A" completed keep alive response. 
2020-12-29 14:40:36.7560|2|INFO|Microsoft.AspNetCore.Hosting.Internal.WebHost|Request finished in 181.4017ms 200 image/svg+xml 
2020-12-29 14:40:36.6946|2|INFO|Microsoft.AspNetCore.Hosting.Internal.WebHost|Request finished in 216.2838ms 200 application/javascript 
2020-12-29 14:42:21.6657|6|DEBUG|Microsoft.AspNetCore.Server.Kestrel.Transport.Libuv|Connection id "0HL8G4U42CK68" received FIN. 
2020-12-29 14:42:21.6657|6|DEBUG|Microsoft.AspNetCore.Server.Kestrel.Transport.Libuv|Connection id "0HL8G4U42CK67" received FIN. 
2020-12-29 14:42:21.6657|10|DEBUG|Microsoft.AspNetCore.Server.Kestrel|Connection id "0HL8G4U42CK67" disconnecting. 
2020-12-29 14:42:21.6657|6|DEBUG|Microsoft.AspNetCore.Server.Kestrel.Transport.Libuv|Connection id "0HL8G4U42CK69" received FIN. 
2020-12-29 14:42:21.6657|10|DEBUG|Microsoft.AspNetCore.Server.Kestrel|Connection id "0HL8G4U42CK69" disconnecting. 
2020-12-29 14:42:21.6657|7|DEBUG|Microsoft.AspNetCore.Server.Kestrel.Transport.Libuv|Connection id "0HL8G4U42CK67" sending FIN. 
2020-12-29 14:42:21.6657|10|DEBUG|Microsoft.AspNetCore.Server.Kestrel|Connection id "0HL8G4U42CK68" disconnecting. 
2020-12-29 14:42:21.6657|2|DEBUG|Microsoft.AspNetCore.Server.Kestrel|Connection id "0HL8G4U42CK69" stopped. 
2020-12-29 14:42:21.6800|6|DEBUG|Microsoft.AspNetCore.Server.Kestrel.Transport.Libuv|Connection id "0HL8G4U42CK66" received FIN. 
2020-12-29 14:42:21.6800|10|DEBUG|Microsoft.AspNetCore.Server.Kestrel|Connection id "0HL8G4U42CK66" disconnecting. 
2020-12-29 14:42:21.6657|7|DEBUG|Microsoft.AspNetCore.Server.Kestrel.Transport.Libuv|Connection id "0HL8G4U42CK69" sending FIN. 
2020-12-29 14:42:21.6657|2|DEBUG|Microsoft.AspNetCore.Server.Kestrel|Connection id "0HL8G4U42CK67" stopped. 
2020-12-29 14:42:21.6800|6|DEBUG|Microsoft.AspNetCore.Server.Kestrel.Transport.Libuv|Connection id "0HL8G4U42CK6A" received FIN. 
2020-12-29 14:42:21.6800|10|DEBUG|Microsoft.AspNetCore.Server.Kestrel|Connection id "0HL8G4U42CK6A" disconnecting. 
2020-12-29 14:42:21.6800|6|DEBUG|Microsoft.AspNetCore.Server.Kestrel.Transport.Libuv|Connection id "0HL8G4U42CK64" received FIN. 
2020-12-29 14:42:21.6800|10|DEBUG|Microsoft.AspNetCore.Server.Kestrel|Connection id "0HL8G4U42CK64" disconnecting. 
2020-12-29 14:42:21.6800|7|DEBUG|Microsoft.AspNetCore.Server.Kestrel.Transport.Libuv|Connection id "0HL8G4U42CK68" sending FIN. 
2020-12-29 14:42:21.6800|2|DEBUG|Microsoft.AspNetCore.Server.Kestrel|Connection id "0HL8G4U42CK68" stopped. 
2020-12-29 14:42:21.6800|7|DEBUG|Microsoft.AspNetCore.Server.Kestrel.Transport.Libuv|Connection id "0HL8G4U42CK66" sending FIN. 
2020-12-29 14:42:21.6800|2|DEBUG|Microsoft.AspNetCore.Server.Kestrel|Connection id "0HL8G4U42CK66" stopped. 
2020-12-29 14:42:21.6943|2|DEBUG|Microsoft.AspNetCore.Server.Kestrel|Connection id "0HL8G4U42CK6A" stopped. 
2020-12-29 14:42:21.6943|7|DEBUG|Microsoft.AspNetCore.Server.Kestrel.Transport.Libuv|Connection id "0HL8G4U42CK6A" sending FIN. 
2020-12-29 14:42:21.6943|7|DEBUG|Microsoft.AspNetCore.Server.Kestrel.Transport.Libuv|Connection id "0HL8G4U42CK64" sending FIN. 
2020-12-29 14:42:21.6943|2|DEBUG|Microsoft.AspNetCore.Server.Kestrel|Connection id "0HL8G4U42CK64" stopped. 

The file format can be defined using the layout attribute in a target element.

NLog is easy to use and configure with ASP.NET Core application. In this post, I have explained about NLog – file logging configuration with ASP.NET Core 2.

How to Connect Samples of Telerik Reporting to MySQL

Some of our customers don’t use Microsoft SQL Server as their database. What is not well known is that Telerik Reporting supports MySQL database out of the box.

Below, I detail the steps that are required to design reports using Telerik Report Designer from MySQL database.

  • First, install MySQL Connecter from below link.

https://dev.mysql.com/downloads/connector/net/

  • Please download AdventureWorks database for MySQL from below link and import this to your MySQL.

https://sourceforge.net/projects/awmysql/

  • After installing MySQL Connector you can see the “MySQL Data Provider” in drop-down list please select this. 
  • Enter the connection string of Adventureworks database according to the below picture and click on the next button.
  • Change the Alias if you want and click on the next button.
  • Change query according to DB and click on the Next button.
  • Below the screen comes and click on the Execute Query button.
  • After clicking on the Execute Query button, If data appears on a Screen the task completed click on the Finish button or not check the query again.

Above, we have seen how to enable Telerik Reporting Designer to fetch data from MySQL using the MySQL ADO.NET connector. There is one additional step that you need to do to render the report.

This step is to add MySQL nuget package into the host application. The package to add is MySQL.Data . This adds the capability to connect with MySQL from Telerik Reporting Host application.

Now your report is able to render data from MySQL database.