Test Studio has got all new user interface and look. Now it is lighter and more immersive. After installing latest version you will find TEST STUDIO Desktop home as given in below image.
There are three section
Recent Projects section
Option to create new project , open existing project and open sample project
Option to watch Get Started video right from launching pad
You can create new project by clicking on Create new project option. Here you select location to create project and can give a desired name to project.
In latest Test Studio desktop version Project dashboard look like below,
Right from project dashboard you can connect to TFS and do Check In and Check Out.
You can perform following operation on TFS from project dash board
Check in
Check out
Open existing project from source control
Connect to TFS
Right from project dash board you can connect to
Team Pulse
QC
Bug tracking tools
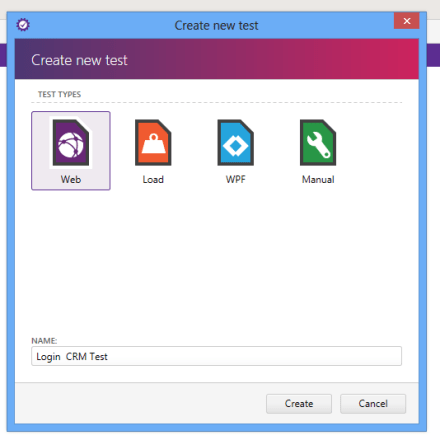
Now there is new experience to create new test also
Now you can record test in any browser. Test Studio supports cross browser recording. In later posts I will show you in detail recording options. In new version recorded tests look like as following,
In further posts we will explore other new features of new Test Studio Desktop. I hope you find this post useful. Thanks for reading.
In this post we will take a look on how to configure Find Logic of an element in Test Studio…
Being a Test Professional while automating test there is one common question all of us are worried about and question is,
Will Test fail if id of element being changed in development? Or what will happen if Element id is changed?
Yes Test will fail but there is a way you can change configuration and Find Logic
Test Studio allows you to change Find Logic at the project level. By Default Test Studio search an element on
Id of element
Name of element
You can browse to find logic setting of Test project by clicking on
Project -> Show Setting
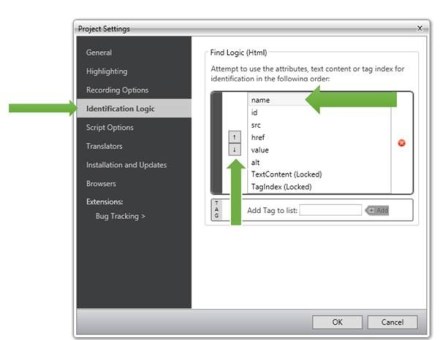
In Project Setting dialog box click on identification logic option. Here you can find identification logic and change it as per requirement to your project.
As you can clearly see that by default Test Studio find an element on its Id. If you believe that ID of elements are very much likely to be changed with each development cycle then you may opt to find an element on its other property. If you believe that Name of the elements are not expected to change frequently then you can consider to change project setting to find an element on its Name attribute.
To change Find Logic select any attribute then click on up/down arrow to change its position. For example Name is at second from top. To make it first attribute on which Test Studio will find element select Name and then click on up arrow button to bring it at the top in the list.
In this way you can configure Find Logic. You may notice that if required you can add new Tag to list as well. So we just witnessed that Test Studio as automated testing tool is very flexible and allows us to configure Find Logic as our own requirement.
I hope you find this post useful. To speedup automated testing do not forget to download trail of Test Studio from here
On Jun 13th we conducted a webinar titled “Reporting Solution for ASP.NET Applications using Telerik Reporting”. This is part of an ongoing webinar series we here at Telerik India are doing targeting APAC region. We call this the Telerik .NET Ninja Developer Webinar Series. You can take a look at the Jun-Jul schedule here: https://telerikhelper.net/2013/05/24/telerik-webcasts-june-july/
Telerik Reporting is a lightweight reporting solution for all .NET cloud, web, and desktop platforms (Azure, Silverlight, WPF, ASP.NET and Windows Forms) which targets developers and end-users alike. Rich interactive and reusable reports can be created by developers in Visual Studio, and by end users in the desktop-based Report Designer. With the help of Telerik Reporting users can examine and probe data, export reports to Microsoft Office Word and Excel for further analysis, and even present them as PowerPoint documents.
Slide Deck:
Here is the slide deck which I used for the webinar:
Webinar Video:
As usual we have this webinar recorded. So if you missed attending the webinar live, you still have a chance to catch up and that too at your own time. Here is the video recording:
Question & Answers:
During the webinar may questions were asked by the audience. We tried our best to answer as many as we can. We will try to address each and every questions from the webinar in this section.
Q: How to save report data in cache?
A: Data is provided to a Telerik Report using the DataSource property. So you can actually make use of the ASP.NET Caching mechanisms and store your report data. Then at runtime read the data from cache and provide it to the report data source.
Q: Does report have any source code?
A: Yes. The Report is a POCO class inhering from Telerik.Reporting base class. So although you design the report using the designer, it is basically a C# class file under the hood.
Q: Is it building the app while we see the preview?
A: When you preview, yes the class library project in which the report is hosted is built.
Q: Difference between Preview and Html Preview?
A: Preview uses Windows Host and it is as if you are hosting the report in a Windows Application. Html Preview uses IE as the host and it is as if you are hosting the report in a Web Application.
Q: How to create report from WCF service?
A: You can always feed the report with a data coming from WCF Service. Telerik Reporting support Business Objects as a valid data source.
Q: Can we export the report using report viewer?
A: Yes, absolutely. Export to PDF, Excel and other formats.
Q: Can we style and individual cells? and copy the style from one to other?
A: Yes each individual cells can be styled. You can copy one style to another in the designer.
Q: Can’t we add this thumbnail Image in during report creation through wizard ?
A: Yes you can. The demo was to showcase our Data Explorer window feature which makes it easy for your to drag and drop data fields on to the designer.
Q: will the Telerik menu come if we install Telerik Reporting in our machine
A: Yes. when you install Telerik Reporting you will see the Menu Item inside your VS.
Q: Can we give parameter at run time?
A: You normally define the report parameters at design time itself and use the report parameters in your queries to filter. You can always set value of a parameter at run time.
Q: Can we create a drop down list instead of textbox to pass a parameter?
A: Yes you can. In fact you do not have to do anything except to say that the report parameter supports MultiValues. You do this by setting the MultiValue=true in the report parameter properties.
Q: If any changes is done to Report Library as in this case today, will it get auto refresh?
A: You will need to redeploy the report library DLL to you Web Application Bin folder and you will have the refreshed report.
Q: Can we schedule the report subscriptions like SSRS?
A: Nope. Telerik Reporting is not a side reporting solution. So out of the box we do not have this feature. But having said that – its easy to build it. The reports are nothing but C# classes under the hood so you can build a scheduling agent which programmatically creates the report, export it to a format of your choice and send it through email.
Q: Can we call this report from c# code without report viewer and get result in the PDF file?
A: Yes you can. The report is basically a C# class file. You can instantiate this at runtime and export to any format of your choice.
Q: Can we edit any grid row/column as in other grid?
A: No. This is reporting so no editing feature.
Q: Can we use any of web control as input parameter for report viewer?
A: You do not need to use any web control. Report Viewer itself is a control as part of our RadControls for ASP.NET AJAX suite.
Q: Do you have loading window when you click on Print Preview?
A: Yes we have. When you click on Print Preview, we will show a “Generating Report” loading animation.
Q: Can we expand/collapse a particular group as a bunch of values?
A: Yes you can. The Expand/Collapse feature is supported.
Q: How can we display the Telerik reports using viewer in Winforms?
A: WinForms suite also contains Report Viewer control. So the same report can be displayed on WinForms too.
Q: Can we create charts – like pie, bar charts? A; Yes you can. Check out our demos to take a look at the charting capabilities.
Q: Can we have dependency of parameters, ex: first parameter is Countries, when country is selected, States should be displayed in second parameter
A: Yes you can. The cascading of parameters is possible.
Q: Can we directly print reports without print preview?
A: Yes. The report viewer has a print report button which will invoke the OS print dialog.
Q: Export functionality is inbuilt or we need to do some coding for it?
A: Export to different formats is in built in Report Viewer control. You don’t have to do anything extra to use the feature.
Q: Can I email the report directly without showing the report to user?
A: You will need to use Reporting API to achieve this functionality.
Q: Will it also be compatible with the recent version s of any report viewer like with excel 2010 or later versions?…I am asking in terms of generating output format
A: Yes the generated reports are compatible.
Q: Can we have docs/examples to implement Telerik reporting – sample projects?
A: Sample projects are installed once you install Telerik Reporting on your machine. More demos can be found at: http://demos.telerik.com/reporting/home.aspx
Q: Can we put a calendar in filters ?
A: When you create a parameter of type Date/Time, the UI for that parameter is automatically rendered as a calendar.
.NET Ninja T-Shirt Giveaway:
we select 2 person from the webinar attendees and give away our .NET Ninja T-Shirt in each of our webinars. we have picked up 2 lucky persons in this webinar too. They are:
Manoj Singh
Sulabh Sarna
Congratulations to the winners. We will be contacting you shortly and we will ship your t-shirts. Rest of the folks don’t worry – we still have loads of webinars lined up for this year. So do attend our future webinars without fail and try your luck to be the .NET Ninja.
Yes these kind of questions are very simple but have a sustainable impact while automating a test. Recently I got a question that,
“I want to verify number of cookies in web application while automating test. How Test Studio can help me in that “
This test scenario could be very important. Test Studio surprisingly simplify these kind of requirement while automating test. So to verify number of cookies in web application,
Once you have added reference of MS Unit Test and added a coded step start writing following scripts in coded step,
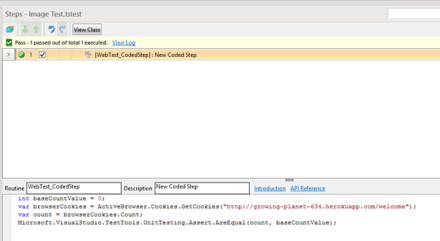
Read cookies of web application being in test as following. Do not forget to change URL with URL of web application you are testing.
Now in browserCookies all cookies are being read. You can read count of cookies as below,
Once you have cookies count in variable count you can verify its exact value and assert result using MS Unit Test Assert. This can be done as following
Where baseCountValue could be any constant value. Putting all together script of coded step would like following,
[CodedStep(@"New Coded Step")]

 public void WebTest_CodedStep()
 {
 int baseCountValue = 2;
 var browserCookies = ActiveBrowser.Cookies.GetCookies("URL of your App");
 var count = browserCookies.Count;
 Microsoft.VisualStudio.TestTools.UnitTesting.Assert.AreEqual(count, baseCountValue);

}
On running you can see that below test is verifying that number of cookies associated with URI is zero.
In this way you can verify number of cookies in Test Studio. I hope you find this post useful. Thanks for reading.
I hope you find this post useful. To speedup automated testing do not forget to download trial of Test Studio from here
More you meet people more questions you get. I love this part of my job, meeting and answering people queries. I usually talk to Test Professional who are doing manual testing. So some of their questions are very basic and this is expected because they are not coming from coding or programming background.
Recently in one of seminar I came across a question
“How can I use MS Unit Test Assertion in a Test Step while automating test with Test Studio? “
Answer of this questions is in three steps,
Step 1:
Add reference of Microsoft.VisualStudio.QualityTools.UnitTestFramework dll in Test Project
Step 2:
Create a coded step
Step 3:
Write Assertion in test
Add Reference
There are in two ways you can work on Test Studio. Either on Visual Studio plugin or on Test Studio standalone version.
Adding reference in Visual Studio is simpler. Right click on test project and from context menu select Add Reference. Browse to Microsoft.VisualStudio.QualityTools.UnitTestFramework.dll library and add reference in test project.
Even though you have added reference in Visual Studio make sure that you have added reference in test project opened in standalone version else you will get exception.
To add Microsoft.VisualStudio.QualityTools.UnitTestFramework.dll assembly in Test Studio standalone version you need to follow following steps,
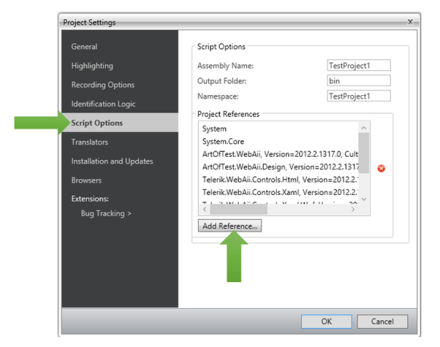
Select Project option in top menu
Click on Show Settings in project tab
On clicking on Show Settings you will get Project Settings dialog box. In dialog box click on Script Options. To add assembly reference click on Add Reference.
When you clock on Add Reference Test Studio will open File Chooser dialog box. In that browse Microsoft.VisualStudio.QualityTools.UnitTestFramework.dll assembly reference location in file system and select that to add as reference in current Test project.
Create a coded step
To create Coded Step in select Test and from menu
You will find coded step added as below,
Write Assertion in Test
Once Coded step is added you can write any assertion. To validate I am writing a very simple assertion as below,
You can view below code in Visual Studio,
[CodedStep(@"New Coded Step")]

 public void WebTest_CodedStep()
 {
 Microsoft.VisualStudio.TestTools.UnitTesting.Assert.AreEqual("TestStudio", "TestStudio");

}
In Test Studio standalone version codes step will look like as following,
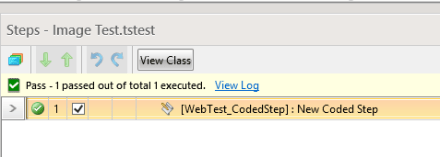
Now go ahead and execute test. You should able to get test passed successfully as given below,
I hope you find this post useful. To speedup automated testing do not forget to download trial of Test Studio from here
This post is a summary of the previous 12 blog posts where we have talked on how to upgrade our web application using the Telerik Ajax ASP.NET controls.We took an example of an Event Networking Application which is further explained in the first article. We started with testing the application to set a benchmark followed by implementing the Data Access Layer. Then we replaced almost all the controls with Rad controls. And in the end we have finally changed our interface to a new design. To do so we have used basic twitter bootstrap responsive css. To know more about implementing bootstrap click here.
Here we have elaborated on the following features of the application:
To see the difference in the User Interface changes between the old and the new web application we have highlighted some of the major features.
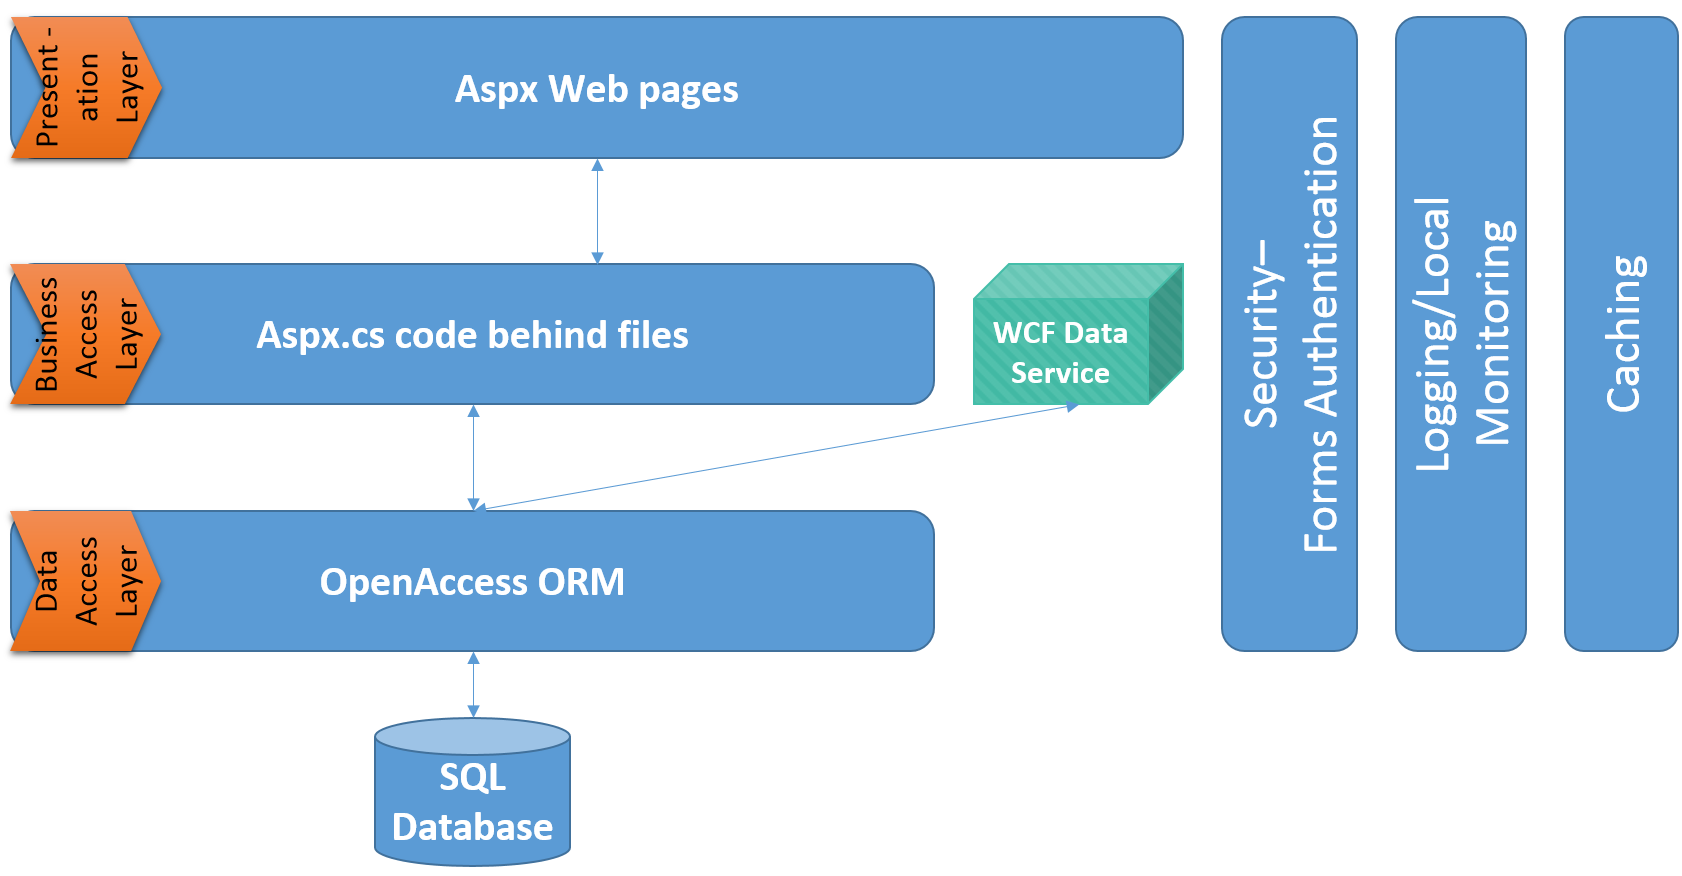
At the DAL we can see a new layer being created in the form of a project named EventNetworking.Data.
Following from the above we have a new architecture for our application.
A different UI can be seen as the bootstrap CSS has been implemented providing a responsive-UI. The visual changes can be seen as follows:
Directory
There is a new search criteria based on the Attendee name. Even the list can now be sorted only on the basis of the speakers.
Sessions
The basic UX has been modified to a RadGrid interface providing a better sorting, multiple-grouping as well as paging options.
MyScheduler
The scheduler where all the registered sessions were stored is now represented in a calendar form. Using RadScheduler the UI has turned very interactive and smooth.
Messages
The extensive vertical scrolling has been split into two pages namely inbox and outbox with almost a similar UI.
Edit Profile
The bootstrap CSS has made all the difference in this page.
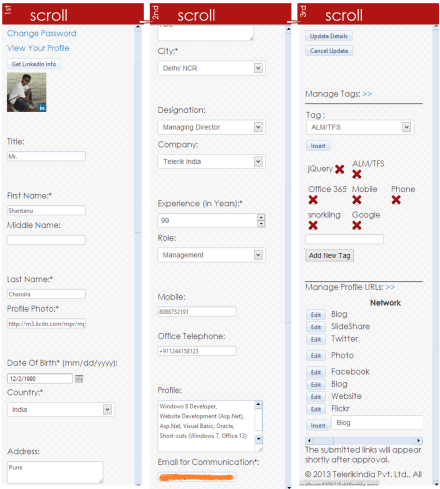
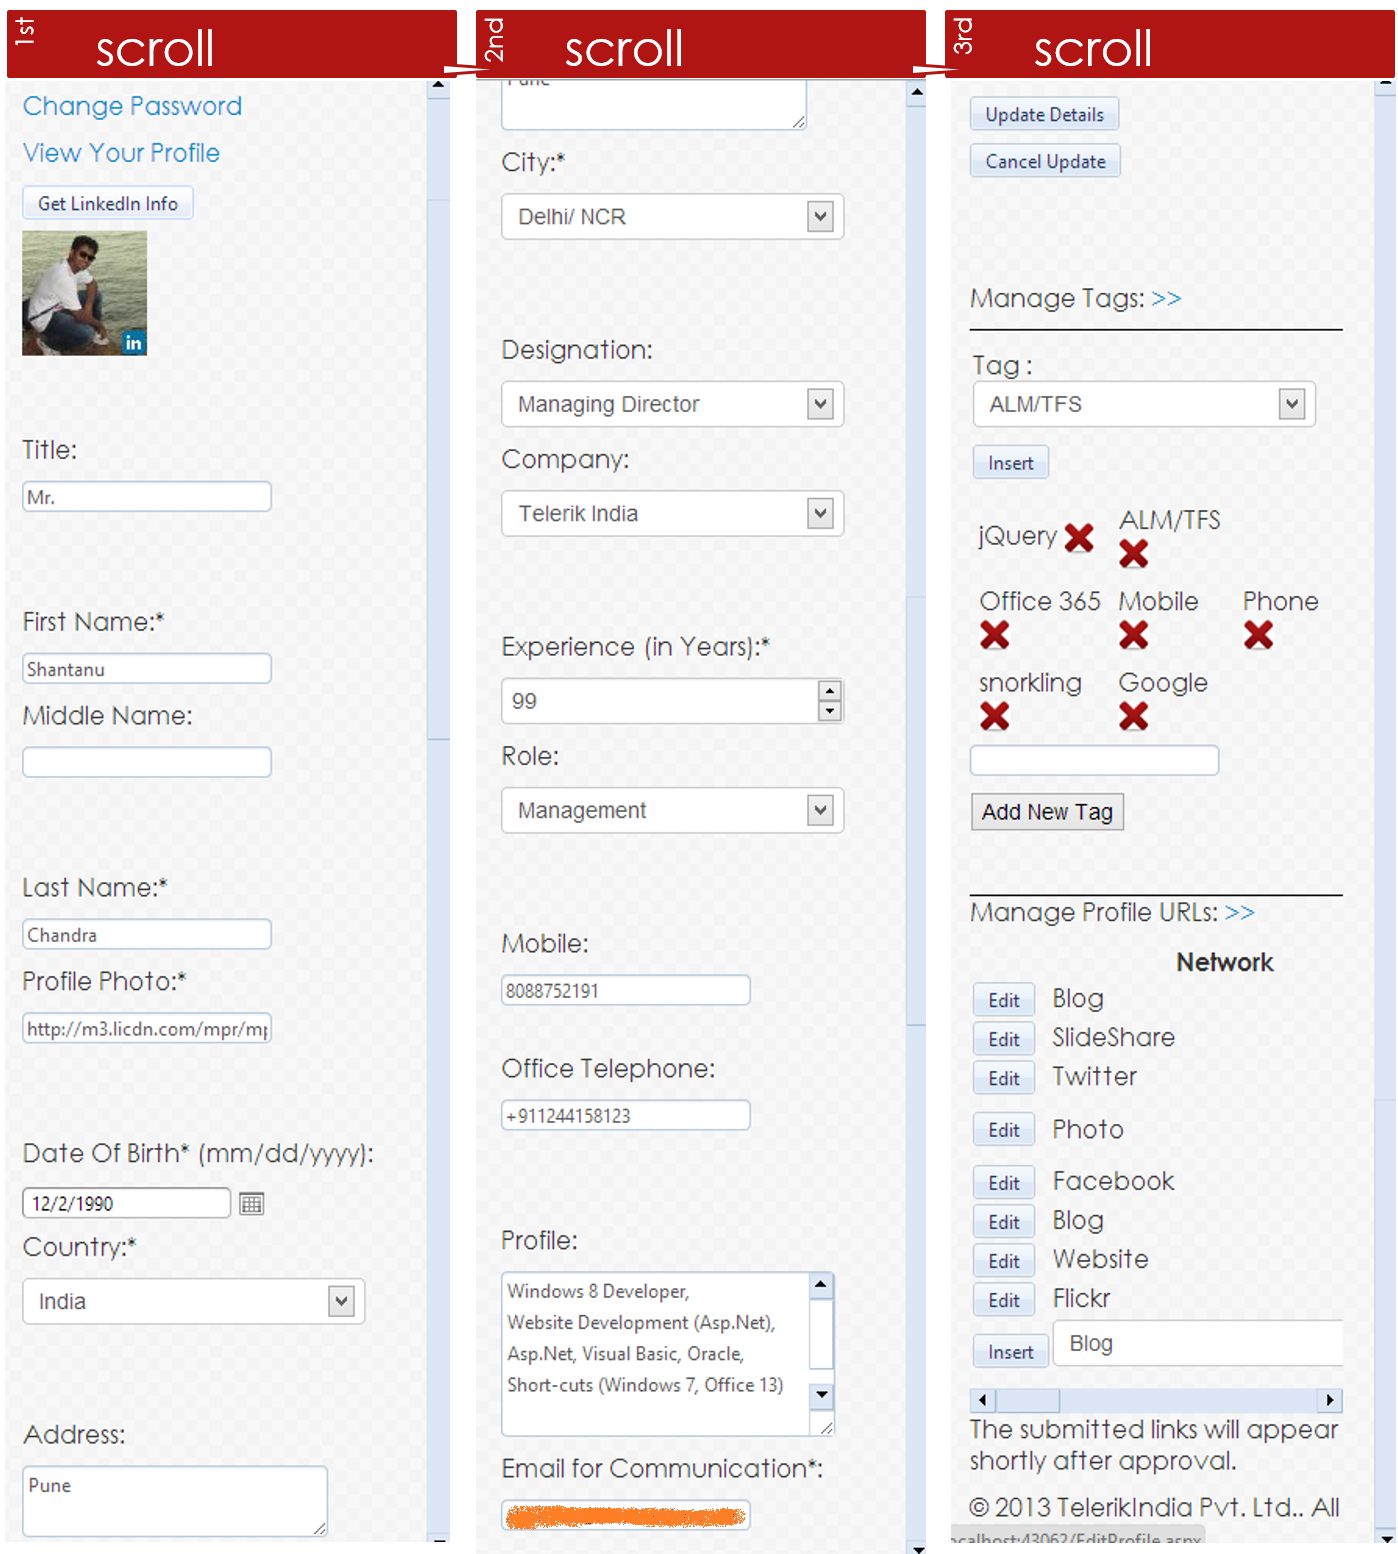
Edit Profile (Mobile Version)
The following snippet displays the responsiveness of our application. Edit profile, when viewed in a mobile browser, we could experience the details have automatically shrunk to fit on the screen. This reduces the navigation to one dimension hence increasing the user experience.
The back-end does not really affect a user. What affects the user is the interface and the smooth performance of the Web Application. That is what we have tried to justify in our application. These are not all but the major features that have made difference in our application. Please comment on where else can we tweak the UI.
Recently I was giving demo on Test Studio to one of the customer. In demo one of the participants raised a question that, “How could I use LINQ (Language Integrated Query) to insert some data back to database after test execution gets completed “
I demoed to team that how they could use LINQ in test. In this post, I will walk you through steps required to test with LINQ in Test Studio. We will insert data back to database as last step of the test.
Essentially we can achieve in these three steps
Write LINQ and business logic in different library
Add library as reference in test project
Write script of coded step calling library functions.
To start testing with LINQ, add a coded step in your test. To add coded step select Test from menu and then Script Step from ribbon as given in below image.
Once Code step is added export test project to Visual Studio. To export to visual studio from menu click on Export to Visual Studio as shown in image below,
Creating Library to work with LINQ
Now in visual studio you need to add operations related to LINQ in different class library. Idea is that we will create separate library for LINQ operation and later we will add that library to Test Studio.
Assume that we have created a library with name DataLibrary. This Library got
LINQ data context classes
We added a static class in which operation is being performed to insert data back to database.
So DataHelper class contains following code to insert data to database using LINQ.
public static class DataHelper
 {

public static void InsertItem()
 {
 DataClasses1DataContext context = new DataClasses1DataContext();
 Product p = new Product
 {
 Discontinued = false,
 ProductID = 99,
 CategoryID = 2,
 ProductName = "Test Studio 9",
 UnitPrice = 200
 };

context.Products.InsertOnSubmit(p);
 context.SubmitChanges();

 }

}
Adding Reference in Test Project
There are in two ways you can work on Test Studio. Either on Visual Studio plugin or on Test Studio standalone version.
Adding reference in Visual Studio is simpler. Right click on test project and from context menu select Add Reference. Browse to DataHelper.dll library and add reference in test project.
Even though you have added reference in Visual Studio make sure that you have added reference in test project opened in standalone version else you will get exception.
To add DataHelper.dll assembly in Test Studio standalone version you need to follow following steps,
Select Project option in top menu
Click on Show Settings in project tab
On clicking on Show Settings you will get Project Settings dialog box. In dialog box click on Script Options. To add assembly reference click on Add Reference.
When you clock on Add Reference Test Studio will open File Chooser dialog box. In that browse DataHelper.dll assembly reference location in file system and select that to add as reference in current Test project.
Writing Coded Step
Once reference of DataHelpe.dll is added in test project you need to write script for coded step. We can insert a row in database by calling static InsertItem method. So coded step will be as following
[CodedStep(@"New Coded Step")]
 public void LINQ_Test_CodedStep()
 {

DataHelper.InsertItem();

 }
In this way we can test with LINQ in Test Studio. To summarize
Write LINQ and business logic in different library
Add library as reference in test project
Write script of coded step calling library functions.
I hope you find this post useful. To speedup automated testing do not forget to download trail of Test Studio from here
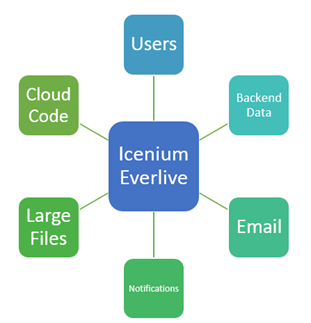
Before getting into discussion of “Why do I care about Icenium Everlive”, let us get into our developer shoes and understand few generic requirements of any application.
An Application may need,
Backend data which should be secure and scalable
User management. Various level of user authorizations and authentications
Email Services
Large files as BLOB at backend
Validation of data , users at backend
Various kind of notifications
Codes running at backend
Icenium Everlive helps to solve above listed requirements. It is Cloud Based Backend as a Service offering from Telerik. Any services of Icenium Everlive can be accessed via provided REST API.
It provides REST API, JavaScript SDK and .NET SDK to access above services.
Let is focus our discussion on problems Icenium Everlive helps us to solve. Below I am listing some of the problems and how Icenium Everlive helps to solve them.
Problem # 1: Creating and Managing Service Layer
If you want to work with backend data, probably you need to do following tasks
As you may be aware that working with Service layer may be quite complex and require lot of development time. If you are not coming from backend and service development background then learning curve is very sharp as well. In many of the cases you end up giving most of the time working with services and backend database than working on business requirement of application.
Icenium Everlive helps you solving this problem. It eliminates need of service layer from your application.
In few simple steps you can configure content types (backend data) and can use them in your application. Icenium Everlive provides you following options to work with backend data from application.
REST API
.Net SDK
JavaScript SDK
Essentially you can work with secure and scalable backend data without bothering about complexities of service layer.
Problem# 2 Working with Users and Roles
In any application User management is one of the most important task. Tasks like
Creating new users for application
Managing different Role for users
Authentication of Users
Different level of authorization
Notifications to Users
All above tasks can be complex to handle. Icenium Everlive provides you complete User Management over REST API. Along with REST API, JavaScript SDK and .NET SDK are available to work with Users. Essentially to create new user for application you need to do a function call. At the backend Users and Roles of your application are managed by Icenium Everlive.
So Icenium Everlive helps you to manage users of application.
Problem # 3: Sending Email notifications
Email notifications are essential part of any application. Working with Email may be complex, it requires setting up email servers, working with template etc.
Icenium Everlive gives you complete solution of Emails and Email notification. From backend Icenium Everlive can send email on behalf of your application. It can send notification email while registering new user to application and validate users email address as well. At any point of time application can send emails using Icenium Everlive using custom template. Everlive allows you to create and configure email template as well.
Problem # 4: Working with Large Files
High quality images, videos etc. are always integral part of certain kind of applications. Uploading and downloading large files are another complex tasks as an application developer you need to do. Icenium Everlive ease tasks of working around large files at the backend. It provides REST API along with JavaScript and .NET SDK to work with files.
Icenium Everlive helps,
Icenium Everlive provides backend services to speedup application development. As a developer we can clearly see that Icenium Everlive offers all back end functionality as service which we can leverage in different kind of applications. Certainly it is something we need to care about. In further posts I will get into other details of Icenium. Tune in for same. Thanks for reading.
On 23rd May 2013, we at Telerik India hosted a webinar on “Building Windows Phone 8 Apps using Kendo UI Mobile”. This webinar received great response from audience and we had around 150 developers attending webinar. Participants were very active during webinar and there were a flood of questions around Windows Phone 8, Coredova and Kendo UI.
We discussed following topics in webinar,
What is Hybrid App
Why we need Hybrid App
Setting Visual Studio2012 to develop Wp8 apps using coredova
Setting WP8 App project to work with Kendo UI
In demo part we covered following topics,
Creating Kendo Datasource
Consuming OData and REST Srervice in Kendo Datasource
Working with Kendo Template
Working with Layout , Views
Working with dynamic navigation
We learnt and experienced that how easily a developer could work with all complexities such that consuming services, navigating between views, working with layouts rendering native to WP 8, adaptive rendering etc. using Kendo UI Mobile.
If you create a Hybrid App for Windows Phone 8 using KendoUI Mobile and Coredova then with minimal or zero effort you can publish same app as iPhone app and Android App.
You can watch recorded webinar below,
As you can see in recorded webinar that we focused on writing codes and shown you how easily and quickly a Marketplace ready Windows Phone 8 app can be created using Kendo UI.
We had promised that we will be giving away 2 .NET Ninja T-Shirts as a webinar give away.
We normally pick 2 people randomly from the audience and raffle it out. So, as part of this webinar we are happy to say that the following 2 people are winners of our .NET Ninja T-Shirts:
Ramu Naik
Ardhendusekhar Kanungo
Congratulations to the winners. We will be contacting you shortly as we need your postal address to ship your t-shirts. Rest of you folks, don’t worry you still have chance to win the t-shirt. Do attend our next webinar which is on May 30 titled – MVVM and Validation with Kendo UI Web. Register for that webinar here
Recently I was demonstrating Test Studio to a group of Test Studio professionals. While working with Coded Step I had to add a .NET Assembly Reference. Adding reference in Visual Studio plugin is quite simple. However adding that in Test Studio standalone version requires certain steps.
In this post we will have a look on adding assembly reference in Test Studio standalone version. Follow following steps,
Select Project option in top menu
Click on Show Settings in project tab
On clicking on Show Settings you will get Project Settings dialog box. In dialog box click on Script Options. To add assembly reference click on Add Reference.
When you clock on Add Reference Test Studio will open File Chooser dialog box. In that browse .NET Assembly Reference location in file system and select that to add as reference in current Test project. I hope you find this post useful. Thanks for reading.
We are excited to share that Telerik India will be present at Great Indian Developer Conference. We will be around for all three days. We request you to visit our booth.
Along with technical presentations and discussions, we will give away 1 Micromax tablet in raffle daily.
Do not forget to visit our booth,
To gain knowledge on various technology trends
To know and learn more about various Telerik products
To get cool Ninja T-Shirts
To get a chance to win one Micromax tablet
We are helping GIDS by creating apps for the event as well. We have created apps for iPhone and Android devices.
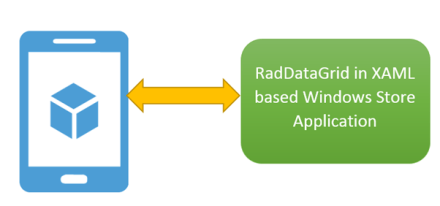
Recently I was in a Windows Azure event for local user group. Attendees were very excited about Windows Azure Mobile Services. When I discussed with them how more immersive and user friendly it could be working with data from Windows Azure Mobile Service Table in Telerik RadDataGrid, they got more excited. In this post we will go very basic and learn basic required steps to fetch data from Mobile Service Data Table in RadDataGrid.
If you are new to Mobile Services and Windows Store App development then before you proceed in this post, I recommend you to read these two posts
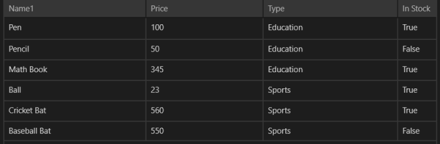
We are going to display data from techbloggers table. I have created this table in Windows Azure Mobile Service as shown below. There are three columns in table. We will display content from techbloggers Mobile Service table in RadDataGrid.
We need App URL and key. You need key and application URL to work with Mobile Services from Windows Store application. You will find key and application URL at the portal.
Now go ahead and create a Windows Store App by choosing Blank App project template from Windows Store project tab. After project being created add Rad Controls for Windows 8 reference and Windows Azure Mobile Services Managed Client reference in the project. To add reference right click on Reference in project and select Add Reference.
After adding reference on XAML add namespace on MainPage.xaml to work with RadDataGrid
Next add following namespaces on MainPage.xaml.cs to work with Mobile Services client.
using Microsoft.WindowsAzure.MobileServices;
using System.Runtime.Serialization;
Next you need to create entity class representing table from the Windows Azure Mobile Service. Let us create entity class as following. We are creating entity class TechBloggers.
public class TechBloggers
 {
 public int id { get; set; }
 [DataMember(Name = "name")]
 public string Name { get; set; }
 [DataMember(Name = "technology")]
 public string Technology { get; set; }

}
After creating entity class go ahead and add following global variables.
Once global variable is defined in the constructor of page you need to create instance of MobileServiceClient and MobileServiceTable. Let us go ahead and create that in constructor of the page.
public MainPage()
 {

 this.InitializeComponent();
 MobileServiceClient client = new MobileServiceClient("https://youappurl", "appkey");
 bloggerstable = client.GetTable<TechBloggers>();
 }
Next you need to put RadDataGrid on XAML and bind it to data source. RadDataGrid can be created as following
<telerik:RadDataGrid x:Name="BloggerGrid" />
Next you need to bind RadDataGrid to List of Bloggers. List of Bloggers will be fetched from Mobile Service data table. You can do this as following.
Next go ahead and run application. You will get records from Mobile Service table bind to RadDataGrid.
These are basic steps to fetch data from Windows Azure Mobile Services Table Data and display in RadDataGrid. In further posts we will get into further details of working with these two together. I hope you find this post useful. Thanks for reading.
I am very happy and excited to share with you that Telerik Products have been nominated in different categories in GIDS 2013 . We have been nominated in 7 different categories.
Telerik Products are nominated as follows, Please browse to question numbers as given below tp vote for your beloved Telerik Products. Navigate here to vote
Telerik TeamPulse is nominated under Collaboration Solution category. To vote for this select this option in Question number 2.
Telerik Sitefinity CMS is registered under Content Management category. To vote for this select this option in Question number 3.
Telerik TeamPulse is nominated under Change and Configuration Management category. To vote for this select this option in Question number 5.
Telerik TestStudio is nominated under Testing category. To vote for this select this option in Question number 6.
Telerik KendoUI is nominated under Web Development category. To vote for this select this option in Question number 8.
Telerik Icenium is nominated under Mobile Development category. To vote for this select this option in Question number 9.
Telerik Devcraft is nominated under Framework category. To vote for this select this option in Question number 10.
Your love and support will help us to build better products. Take few minutes out and Navigate here to vote.
We are committed to help you in “Delivering More Than Expected “. You may have further query feel free to reach me at dhananjay.kumar@telerik.com
In this webinar we will focus on Data Grid along with other controls. During webinar we will be selecting two active participants from the webinar and sending them the much in demand Telerik Ninja T-Shirt. You will be coming, right?


![clip_image001[6]](https://telerikhelper.net/wp-content/uploads/2013/06/clip_image00161.png "clip_image001[6]")


![clip_image001[6]](https://telerikhelper.net/wp-content/uploads/2013/06/clip_image0016.png "clip_image001[6]")


![image_thumb[2]](/Users/Dhananjay/AppData/Local/Temp/WindowsLiveWriter1286139640/supfiles2F3C9309/image[4].png "image_thumb[2]")
![clip_image001_thumb[2]](/Users/Dhananjay/AppData/Local/Temp/WindowsLiveWriter1286139640/supfiles2F3C9309/clip_image001[5].png "clip_image001_thumb[2]")
![clip_image003_thumb[2]](/Users/Dhananjay/AppData/Local/Temp/WindowsLiveWriter1286139640/supfiles2F3C9309/clip_image003[5].jpg "clip_image003_thumb[2]")
![clip_image005_thumb[2]](/Users/Dhananjay/AppData/Local/Temp/WindowsLiveWriter1286139640/supfiles2F3C9309/clip_image005[5].jpg "clip_image005_thumb[2]")
![clip_image006_thumb[2]](/Users/Dhananjay/AppData/Local/Temp/WindowsLiveWriter1286139640/supfiles2F3C9309/clip_image006[5].png "clip_image006_thumb[2]")
![clip_image007_thumb[2]](/Users/Dhananjay/AppData/Local/Temp/WindowsLiveWriter1286139640/supfiles2F3C9309/clip_image007[5].png "clip_image007_thumb[2]")
![clip_image009_thumb[2]](/Users/Dhananjay/AppData/Local/Temp/WindowsLiveWriter1286139640/supfiles2F3C9309/clip_image009[5].jpg "clip_image009_thumb[2]")
![clip_image010_thumb[2]](/Users/Dhananjay/AppData/Local/Temp/WindowsLiveWriter1286139640/supfiles2F3C9309/clip_image010[5].png "clip_image010_thumb[2]")