New Partner View

Mobilizing your SAP Data with Kendo UI Mobile – New Partner Screen – Part 4

This is 4th blog post in the series “Mobilizing Your SAP Data with Kendo UI”. So far we have seen how to set up the environment, create a mobile application and list business partners from the SAP Sales Order System and show a particular partners details. If you want to go through the first 3 part of this series, find the links below:

Mobilizing your SAP Data with Kendo UI Mobile – Get the Environment Ready – Part 1

Mobilizing your SAP Data with Kendo UI Mobile – Building the Mobile App – Part 2

Mobilizing your SAP Data with Kendo UI Mobile – Implementing Partner Details Screen – Part 3

In this blog post we will be creating a screen to add a new partner to the business partner’s collection. So without much further ado, let’s get on with the business.

Home View Recap:

If you have been following the series, you will know by now that our home view is a listing of the Business Partners in the Sales Order system. In the footer of this view, we had created a tab in the tab strip with an add button. By clicking this add button we will navigate to “newPartnerview.html”. Here is the code snippet of home view:


<div id="homeView" data-role="view" data-model="app.Partners">
<header data-role="header">
<div data-role="navbar">
Business Partners
</div>
</header>
<ul id="partners-listview" data-role="listview"
data-template="partnerTemplate"
data-bind="source: partners"></ul>
<div data-role="footer">
<div data-role="tabstrip">
<a href="views/newPartnerView.html" data-icon="add">New</a>
</div>
</div>
</div>

view raw

homeview.html

hosted with ❤ by GitHub

The way we navigate to new partner view is just by pointing the href attribute of the anchor to “view/newPartnerView.html”. Kendo will do the navigation to the new screen by adding the default transition that is slide.

New Partner View:

Create a new HTML file in views folder and name it “newPartnerView.html”. We will create the form as below:


<div id="newPartnerView" data-role="view" data-title="New Partner" data-model=app.Partner>
<header data-role="header">
<div data-role="navbar">
<a data-role="backbutton" data-icon="bck" data-align="left"></a>
<span data-role="view-title"></span>
<a data-role="button" data-align="right" data-icon="save" data-bind="events:{click : add}">Save</a>
</div>
</header>
<form id="new-partner-form">
<ul data-role="listview" data-style="inset" data-type="group">
<li>
Partner Info
<ul>
<li><label>Company Name: <input type="text" name="Company" /></label></li>
<li><label>Legal Form: <input type="text" name="LegalForm" /></label></li>
<li><label>Web Address: <input type="url" name="Web" /></label></li>
<li><label>Currency: <input type="text" name="Currency" /></label></li>
</ul>
</li>
<li>
Contact Info
<ul>
<li><label>Email: <input type="email" name="Email" /></label></li>
<li><label>Phone: <input type="text" name="Phone" /></label></li>
<li><label>Fax: <input type="text" name="Fax" /></label></li>
</ul>
</li>
<li>Address:
<ul>
<li><label>Building: <input type="text" name="Building" /></label></li>
<li><label>Street: <input type="text" name="Street" /></label></li>
<li><label>City: <input type="text" name="City" /></label></li>
<li><label>Postal Code: <input type="number" name="PostalCode" /></label></li>
<li><label>Country:
<select name="Country">
<option value="AR">Argentina</option>
<option value="AR">Austria</option>
<option value="BR">Brazil</option>
<option value="CA">Canada</option>
<option value="CN">China</option>
<option value="DN">Denmark</option>
<option value="FR">France</option>
<option value="DE">Germany</option>
<option value="GB">Great Britain</option>
<option value="IT">Italy</option>
<option value="IN">India</option>
<option value="JP">Japan</option>
<option value="MX">Mexico</option>
<option value="PL">Poland</option>
<option value="RU">Russia</option>
<option value="ES">Spain</option>
<option value="ZA">South Africa</option>
<option value="US">USA</option>
</select>
</label></li>
</ul>
</li>
</ul>
</form>
</div>

Notice that we use the Partner view model as the data model for new partner view. We have placed a save button in the header on the right hand side of the navbar. It is data bound to “add” method on the partner view model. The rest of the form is self-explanatory. Here is the code snippet of add method that we have added on the partner view model:


var app = app || {};
app.Partner = (function(){
'use strict'
var partnerViewModel = (function(){
var partnerUid;
var show = function(e){
partnerUid = e.view.params.uid;
var partner = app.Partners.partners.getByUid(partnerUid);
appSettings.sessionSettings.selectedPartner = partner;
kendo.bind(e.view.element, partner, kendo.mobile.ui)
}
var addPartner = function()
{
var partner = {};
$("#new-partner-form").serializeArray().forEach(function(record) {
partner[record.name] = record.value;
});
partner.BpRole = "01";
partner.AddressType = "02";
var startDate = new Date();
var endDate = new Date();
endDate.setFullYear(9999);
partner.AddressValStartDate=kendo.toString(startDate,"yyyy-M-ddTHH:mm:ss");
partner.AddressValEndDate=kendo.toString(endDate,"yyyy-M-ddTHH:mm:ss");
app.Partners.partners.add(partner);
app.Partners.partners.sync();
}
return {
show:show,
add:addPartner
};
}());
return partnerViewModel;
}())

In add method, we build a JSON object and make use of Partners view model >  partners datasource and call add on data source and tell the data source to sync the changes with the server. That’s all it is there to save a record if you use Kendo UI Data Source.

Update to Partners Data Source:

In part 2 of this series, we had created Partners view model and it had a partner’s data source. At that point we just had Read URL set up. But since we want to create a new record now, we set up Create URL on the data source. Here are the changes to the partners data source:


var partnersDataSource = new kendo.data.DataSource({
type:'odata',
transport:{
read:{
url:function(){
return appSettings.dataSettings.partnersReadUrl;
},
dataType:"json",
beforeSend: function(xhr) {
xhr.setRequestHeader("X-CSRF-Token", "fetch");
},
complete: function(xhr) {
appSettings.authSettings.token = xhr.getResponseHeader("X-CSRF-Token");
}
},
create:{
url : function()
{
return appSettings.dataSettings.partnersReadUrl;
},
dataType:"json",
beforeSend: function(xhr) {
xhr.setRequestHeader("X-CSRF-Token", appSettings.authSettings.token);
},
}
},
sort: {
field: "CompanyName",
dir: "asc"
},
schema: {
model: partnerModel
},
pageSize:50,
serverPaging:true,
serverSorting: true,
});

Notice the addition of create property to transport of Kendo UI data source. We also had to change the read property a little bit. If we have to send a create request to OData service, it is expecting a CSRF token. So, before we issue read instruction, we ask for CSRF token to be sent back to the client, and after read operation is completed, we fetch the token from the header and store it for further use. During create operation, we add the token to the header using the before send method of Kendo UI data source.

Running the App:

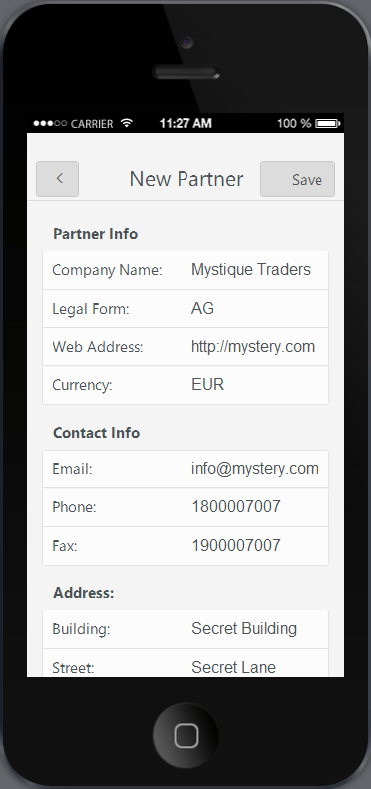
Now, our Create New Partner screen is complete.  Time to run the app and see the output. Here is the screenshot of the new partner creation screen:

New Partner View

New Partner View

Summary:

In this blog post we saw an entity creation scenario. We created a data entry screen for adding a new business partner to the system. And we hardly wrote any code. With Kendo UI Data Source, handling CRUD scenarios is very easy as the data source does all the heavy lifting.

Partner Details Screen

Mobilizing your SAP Data with Kendo UI Mobile – Implementing Partner Details Screen – Part 3

This blog post is a 3rd one in the series of “Mobilizing your SAP Data with Telerik Platform”. If you have not read my first 2 parts I suggest you take a look at those first. Here is the link to first 2 parts of this series:

Mobilizing your SAP Data with Kendo UI Mobile – Get the Environment Ready – Part 1

Mobilizing your SAP Data with Kendo UI Mobile – Building the Mobile App – Part 2

In Part 1 I wrote about how to get started with SAP. In Part 2 I talked about building a mobile app using Kendo UI Mobile. We connected with the SAP data through the OData service that SAP Netweaver Gateway system provides. We were also able to build the first screen of the app namely the Partners listing screen. In this blog post we will look at how to build a screen that shows the details of the selected Partner. Let’s get started

Recap – Partner Item Template:

In the part 1 when we built the Partners listing screen, we used Kendo UI Mobile ListView to list the partners from the system. Each item in the ListView will be rendered by making use of an item template we provided. Just to recap that code, here is the code snippet of the item template:


<script type="text/x-kendo-template" id="partnerTemplate">
<div data-role="touch" data-bind="events: { tap: partnerSelected }">
<div style="font-size:20px;font-weight:bold">
<span>${Company}</span>
</div>
<div>${City} ${PostalCode}, ${Country}</div>
</div>
</script>

Notice the usage of data-role=touch on the div and the data bind syntax where we trap the tap event and provide an event handler named “partnerSelected”. Here is the code snippet of the partnersViewModel where we have defined the partnerSelected event handler:


var partnersViewModel = (function(){
// Navigate to partner view When some partner is selected
var partnerSelected = function (e) {
app.application.navigate(appSettings.viewSettings.partnerView + '?uid=' + e.data.uid);
};
return {
partners: partnersModel.partners,
partnerSelected: partnerSelected,
};
}());

Handling Navigation to Partner View:

We saw that we have an event handler which handles the tap event of the partners listing listview. The code just navigates to a new view called partnerView. But the view name is not hard coded. It is coming from appsettings object which contains viewsettings and the value for partnerView. Also notice that we are passing the currently selected partner UID in the querystring. UID is the unique identifier that the Kendo UI Data Source maintains for each item in its data collection. We will use this information to get a single partner object from the collection using datasource method getbyid().

First let’s update the appsettings.js with viewsettings data. Here is the code snippet:


var appSettings = {
dataSettings:
{
partnersReadUrl : "http://<your server>/sap/opu/odata/sap/ZGWSAMPLE_SRV/BusinessPartnerCollection",
},
viewSettings:
{
partnerView: "views/partnerView.html",
}
};

Notice that we have the URI of the new view set to “views/partnerView.html”. Let’s create a new folder under the root of the project by name “views” and create a new html file called “partnerView.html”.

PartnerView Screen

Partner View Screen

When you add a new HTML file, the file content will have bare bone HTML code. Remove that basic HTML code as we don’t need that. Next we will create the partnerView UI.

Partner View UI:

As part of the partner view screen, we will just list out all the details of a partner like name, email, phone, address, etc. Here is the code snippet of the partner view:


<div data-role="view" id="partner-view" data-show="app.Partner.show">
<header data-role="header">
<div data-role="navbar">
Partner Details
<a data-align="left" data-icon="bck" data-role="backbutton"></a>
</div>
</header>
<ul id="partner-view-container" data-role="listview" data-style="inset">
<li>
<div align=center>
<span style="font-weight:bold;font-size:20px" data-bind="text: Company">
</span>
</div>
</li>
<li>
<div>
<span><b>Legal Form</b>:</span><br><span style="margin-left:5px;" data-bind="text:LegalForm"></span>
</div>
<div>
&nbsp;
</div>
<div>
<span><b>Email</b>:</span><span style="margin-left:5px;" data-bind="text:Email"></span>
</div>
<div>
&nbsp;
</div>
<div>
<span><b>Phone</b>:</span><span style="margin-left:5px;" data-bind="text:Phone"></span>
</div>
<div>
&nbsp;
</div>
<div>
<span><b>Fax</b>:</span><span style="margin-left:5px;" data-bind="text:Fax"></span>
</div>
<div>
&nbsp;
</div>
<div>
<span><b>Web</b>:</span><span style="margin-left:5px;" data-bind="text:Web"></span>
</div>
<div>
&nbsp;
</div>
<div>
<span><b>Address</b>:</span>
<br />
<span data-bind="text:Building"></span>, <span data-bind="text:Street"></span>, <span data-bind="text:City"></span> – <span data-bind="text:PostalCode"></span>, <span data-bind="text:Country"></span>
</div>
</li>
</ul>
<div data-role="footer">
<div data-role="tabstrip">
<a href="views/ordersView.html" data-icon="orders">Orders</a>
</div>
</div>
</div>
<style>
.km-orders:after,
.km-orders:before
{
content: "\e07a";
}
</style>

Let’s go over the code once. It’s a simple div with its data role set to view. This is how Kendo UI knows that this is a page or screen in the app. We are trapping the show method of the view through data-show attribute and is bound to Partner object’s show() method. We will see the partner object in next section. Then we have spans to output different property of the partner and we have data bound different properties to the text property of the span. Next let’s take a look at the Partner JavaScript file.

Partner JavaScript Object:

In previous section we saw that the partner view screen is data bound to partner JavaScript object. Create a new JavaScript file named “partner.js” in scripts folder. And paste the following code in the script file:


var app = app || {};
app.Partner = (function()
{
'use strict'
var partnerViewModel = (function()
{
var partnerUid;
var show = function(e){
partnerUid = e.view.params.uid;
var partner = app.Partners.partners.getByUid(partnerUid);
appSettings.sessionSettings.selectedPartner = partner;
kendo.bind(e.view.element, partner, kendo.mobile.ui)
}
return {
show:show,
};
}());
return partnerViewModel;
}())

view raw

partner.js

hosted with ❤ by GitHub

Pay close attention to show() method. Remember that when we navigate from the partners listing screen, we had passed a querystring value which was the UID of the partner object. Here in partner view show method, we retrieve the UID and piggyback on app.Partners.partners data source and use the data source method getByUid() to retrieve the partner object. Once we get the object we use kendo.bind() method to data bind it to the view. With this the view at runtime get data bound with the partner object and the spans will show the appropriate data as they have the data-bind syntax.

Running the App:

One last thing to do is adding a reference to partner.js. Add a script reference to partner.js in the script block of index.html. After adding the reference, select Run > In Simulator from the toolbar. Here is the screen shot of the partner view:

Partner Details Screen

Partner Details Screen

Don’t question me on the UI – I am a design handicap when it comes to UX. But we now have 2 screens as part of the application itself. We now have the Partners Listing screen and Partner Details screen. And we are making progress.

Summary:

In this blog post we looked at how to create Partner details screen. We created a HTML page and a corresponding JavaScript file. With the concept of DataBinding we were able to bind different properties of a Partner object to different span on the view. In the next part of this blog series, we will take a look at how to create a new partner right from the mobile app itself. So stay tuned.

Telerik Platform

Resources for Webinar “Mobilizing Your SAP Data with Telerik Platform”

On Jun 26 2014, we presented a webinar titled “Mobilizing Your SAP Data with Telerik Platform”. This was part of our regular webinars we do here in Telerik India. This is a recap of that webinar. You will find the slide deck that was used in the webinar and the video recording of the webinar.

This webinar we focused on a enterprise story. Most of the enterprises today have SAP rolled out in their organization. As you all know SAP is a enterprise software to manage business operations and customer relations. One of the challenges that enterprises face is – how to mobilize the SAP data. You may want to expose the SAP data and make that data available through a Mobile Application so that people on the field can use it.

In this webinar I explain how you can expose data from SAP and use Kendo UI Mobile controls which are part of Telerik Platform to create a Hybrid Mobile App and target it to any mobile platform.

Telerik Platform

Telerik Platform


Slidedeck:

Here is the slide deck that was used in the webinar:


Video Recording:

Here is the video recording of the webinar:


T-Shirt Giveaway:

As with any other webinars of ours, we have 2 lucky audience selected to receive our .NET Ninja t-shirt. Here are the 2 attendees who have been choosen:

  • Eknath Pawar
  • Ujjwal Kumar

Congratulations to the winners. We will contact you and ship your t-shirt. Others don’t worry as we still have a lot of webinars lined up. We look forward to your presence in our future webinars.

Till next time – Happy Coding.

Telerik AppBuilder

Resources for Webinar “Build Hybrid Mobile Applications for Nokia Lumia Devices”

On Jun 19 we conducted a webinar titled “Build Hybrid Mobile Applications for Nokia Lumia Devices”. This was part of our monthly webinar we do for APAC region. This blog post is a recap of the webinar and you will find the slide deck used in the webinar, video recording of the webinar, Q & A section and of course the t-shirt winners details. So read on.


AppBuilder

As part of the demo I used our AppBuilder Visual Studio extension to build a Hybrid Mobile App. AppBuilder is a service we offer as part of our Telerik Platform. Using our AppBuilder you can build iOS, Android and Windows Phone 8 hybrid apps using a single pure HTML5, CSS and JavaScript codebase. You can know more about our AppBuilder here. We use our Kendo UI Mobile control as the UI control set. Kendo UI Mobile is a adaptive rendering mobile control which provide native looking UI on platform they run. You can know more about Kendo UI here.

Telerik AppBuilder

Telerik AppBuilder

Slidedeck:

As with any webinar recap, here is the slide deck from the webinar:

Video Recording:


Q&A:

Q: What is difference between mobile app and hybrid app?
A: Hybrid App is a paradigm or a type of Mobile Application Development technique

Q: Can mobile web apps run without net connection also what about hybrid apps?
A: Mobile Web Apps are served from a server. So if there is no internet connection on the device, you can connect to your mobile web app. Where as a Hybrid App gets installed on the device. So you can pretty much handle the scenario of no connection and show a user friendly message.

Q: What is the basic Diff. B/w cordova (Phonegap) and Telerik Hybrid Mobile Developement?
A: Telerik Hybrid Mobile Apps use Kendo UI Mobile which can adapt to the platform they are running on and provide you a native look and feel for your app. Where as when you develop an app with Cordova, you will be using UI control sets like Jquery Mobile UI.

Q: Is Cordova a standard API across all hybrid applications OR do other equivalent APi’s exist?
A: With respect to Hybrid Mobile Apps, Cordova is the  only JS API which can provide you with the device capabilities.

Q: How many platforms can we target?
A: Windows Phone, iOS, Android and BlackBerry

Q: How much effort is required to repackage for diff platforms?
A: Using AppBuilder, you can package for iOS, Android and Windows Phone with one Button click.

Q: Are these controls free of cost?
A: The Kendo UI Mobile controls are free and open source. They are available as part of the Kendo UI Core. You can know more about Kendo UI Core here

Q: Can we develop for BlackBerry using Kendo UI ?
A: Yes you can. Kendo UI Mobile controls support Black Berry platform.

Q: Is AppBuilder only for creating hybrid apps and that too using Telerik?
A: Yes. AppBuilder is like Visual Studio for creating Hybrid Mobile Apps. AppBuilder can be used to build Hybrid Mobile App using any UI control set. For e.g. you can use Jquery Mobile as the UI control set for your application but use AppBuilder for coding, simulating and Building

Q: Does AppBuider work with VS 2012 as well?
A: Yes it does

Q: Can we add other plugins to this Kendo UI Mobile App?
A: Yes. Custom Cordova plugins can be added to Kendo UI Mobile Apps

Q: Does we have manifest file to put icons and dev information?
A: AppBuilder provides a project property feature where all meta data can be entered and during packaging it will convert it into a manifest.

Q: Where can i check other demos or source codes for mobile?
A: We have a whole list of Hybrid Mobile Application samples and can be found here.


T-Shirt Giveaway:

In each of our webinars, we give away our famous .NET Ninja t-shirt for 2 lucky audience. So in this webinar we have picked the following two folks as the winners of our t-shirts:

  • Ruth Pushpalatha
  • Rohit Vardhan

Congratulations to the winners. Those of you who did not win, dont worry. We have a lot of webinars lined up for the year. So keep coming back and try your luck.

Till next time – Happy Coding.

How to create Custom Theme for Kendo UI DataViz

Kendo UI DataViz is our Data Visualization package as part of the Kendo UI Framework. Kendo UI DataViz is HTML5 compliant and generates SVG (Scalable Vector Graphics) on HTMl5 supported browsers and falls back to VML (Vector Markup Language) on browsers that don’t support HTML5. VML is supported by pretty much all browser versions. If you are keen to know more about Kendo UI DataViz, head over to our DataViz demos online: http://demos.telerik.com/kendo-ui/area-charts/index

This blog post will walk you through how to create a custom theme for DataViz charts. Out of the box we ship the following 11 themes:

Default
image

Blue Opal
image

Bootstrap
image

Silver
image

Uniform
image

Metro
image

Black
image

Metro Black
image

High Contrast
image

Moonlight
image

Flat
image

I don’t know about you guys but I say those are pretty good themes for me. But we do understand that not all the times you will go with the default themes we ship. You may want to customize it to your organizational or even project color combination. So we will see how we can do the customization in the coming section.

Kendo UI Themebuilder:

The tool which will help you to customize Kendo UI themes is known as “Kendo UI ThemeBuilder”. It lets you modify themes so that they match the look and feel of our DataViz widgets to that of your site or app. It is an online tool and no we don’t charge you to use it. You can look at the ThemeBuilder tool here: http://demos.telerik.com/kendo-ui/themebuilder/

Steps to Customize DataViz Widgets:

  1. Navigate to ThemeBuilder tool online.
  2. To start customization, you are required to first select one of the default themes. This is like a foundation to start the customization. So select any default theme first.
    image 
  3. Next start the ThemeBuilder tool by clicking on the button named “Kendo UI ThemeBuilder”. This will launch the ThemeBuilder GUI tool and will appear on the right hand side of the page. Give it a couple seconds to load the GUI.
    image
  4. Since we want to customize the DataViz widgets, select the button labeled “DataViz” in the ThemeBuilder GUI tool. This will provide us with a UI which will help us to customize different aspects of the DataViz widgets.
    image 
  5. Things that can be customized on the DataViz Widgets are: Title, Legend, Charting Area, Axes, Tooltip, Series Colors and Gauge
  6. Scroll Down the page to see the DataViz widgets. Then change the appropriate widget property to your custom value. For e.g. I have changed the chart area color to a custom value and as soon as I do it – I get a instant update of how the widget will look like. Here is a snapshot of my changes:
    image
    Like this you can set your custom colors for all the customization points available for the widget.
  7. Once you are done with your changes, click on the “Get JSON” button available on top of the GUI tool. This will spit out a JSON structure of the changes you just did.
    image 
  8. The JSON code will look like below:
    image
    Notice that by default the custom code is named as “newTheme”. You can change that and provide your own custom name. Remember the name as this is the name you will use to set a theme on a DataViz widget. All we are doing is – we register this new theme with the DataViz ui and later when we set theme property of DataViz widgets to this custom theme name, Kendo UI will be able to apply your color schemes to the widgets.
  9. Copy the JSON code and add that into a new JavaScript file. Give JS file a meaningful name and include it in any page where you need the custom theme.

Using Custom Theme:

In the previous section, we saw how to create a custom theme. In order to use the custom theme, all you need to do is to set the “theme” property on DataViz widgets to the new custom theme name you have provided during registration. Here is a code snippet of setting the theme on a DataViz widget:

$("#area-chart").kendoChart({

        theme:"LohithTheme",

            transitions: false,

            title: {

                text: "Internet Users"

            },

            legend: {

                position: "bottom"

            },

            seriesDefaults: {

                type: "area"

            },

            series: [

                {

                    name: "United States",

                    data: [67.96, 68.93, 75, 74, 78]

                }, {

                    name: "World",

                    data: [15.7, 16.7, 20, 23.5, 26.6]

                }

            ],

            valueAxis: {

                labels: {

                    format: "{0}%"

                }

            },

            categoryAxis: {

                categories: [2005, 2006, 2007, 2008, 2009]

            },

            tooltip: {

                visible: true,

                format: "{0}%"

            }

        });

I have named my theme as “LohithTheme” and use that name while creating a chart.

I have put up a full fledged demo with a custom theme here: http://trykendoui.telerik.com/@kashyapa/icAJ. This is our new shiny playground for Keno UI called “Kenod UI Dojo”. In the code section you can review the JS code and when you click on Run button output will be shown on the right hand side. Here is snapshot of my custom theme in action:

image

And that’s as easy as it can get to customize a DataViz theme.

Hope this blog post helps you if you have a similar scenario of customizing our DataViz widgets. Do let us know your feedback on this blog post through the comments.

Till next time – Happy Coding.

Resources from webinar Kendo UI Mobile Tips and Tricks

On Feb 13 2014 we conducted the webinar on “Kendo UI Mobile Tips and Tricks”. This blog post will provide you some of the resources from the webinar like Slide Deck, Video recording of the webinar.

Kendo UI Mobile

Kendo UI Mobile helps you to build Cross Platform Mobile or Hybrid Applications with pure JavaScript and HTML5.

Learn more about Kendo UI Mobile here

Slide Deck

Here is the slide deck from the webinar


Video

As with every webinar, we have recorded this one too. Here is the video recording of the webinar for your leisure viewing


Thanks for attending webinar.

Kendo UI Grid Wrapper for ASP.NET MVC – Getting Started

Overview:

In this blog post I will be exploring how to get started with our Kendo UI Grid Wrapper for ASP.NET MVC. We will take a basic usage of displaying data in a grid format in an ASP.NET MVC view. To know more about Kendo UI Web controls head over to www.kendoui.com. If you want to follow along with this blog post, you can do so by downloading a 30 day free trial of Kendo UI Complete for ASP.NET MVC.

Getting Started:

First lets create a ASP.NET MVC project. I am using Visual Studio 2012. When you install Kendo UI, we also install certain project templates which make it easy to create kendo UI based ASP.NET MVC project. I assuming you have installed Kendo UI Web for the rest of the post. In Visual Studio, select File > New Project > Web > Kendo UI for ASP.NET MVC. Give it a name and wait for Visual Studio to spin up the new project.

Datasource:

For the sake of this blog post, I will be using Northwind database. I will also be using ADO.NET Entity Model to Northwind database and use Customers table data. So go ahead and add a ADO.NET Entity Model to your project. We will use the entity data model to fetch data and bind it to the grid. I have also created a CustomerViewModel so that I can use this as the Model to the view. Here is the code for the CustomerViewModel:


public class CustomerViewModel
{
public string CustomerID { get; set; }
public string CompanyName { get; set; }
public string ContactName { get; set; }
public string ContactTitle { get; set; }
public string Country { get; set; }
}

Home Controller & Index Action method changes:

We will read the customers data, build CustomerViewModel list and add this to view as a Model. Here is the Index Action method code snippet:


public ActionResult Index()
{
var customerViewModelList = GetCustomers();
return View(customerViewModelList);
}

GetCustomers is a helper method which converts Customers entity to CustomerViewModel entity and return a list. Here is the code snippet of GetCustomers method:


private IEnumerable<CustomerViewModel> GetCustomers()
{
var context = new NORTHWINDEntities();
var customers = context.Customers.Select(customer => new CustomerViewModel
{
CustomerID = customer.CustomerID,
CompanyName = customer.CompanyName,
ContactName = customer.ContactName,
ContactTitle = customer.ContactTitle,
Country = customer.Country,
});
return customers;
}

Adding Grid to View:

In order to use a grid on a view, you will use the GridBuilder. GridBuilder supports the following overloaded methods for creating the grid:


public virtual GridBuilder<T> Grid<T>() where T : class;

public virtual GridBuilder<DataRowView> Grid(DataTable dataSource);

public virtual GridBuilder<DataRowView> Grid(DataView dataSource);

public virtual GridBuilder<T> Grid<T>(IEnumerable<T> dataSource) where T : class;

public virtual GridBuilder<T> Grid<T>(string dataSourceViewDataKey) where T : class;

in this blog post we will be using the method where it allows us to pass a IEnumerable as the data source. First lets take a look at the code snippet. Following the snippet I will explain the code in detail:


@using GridGettingStarted.Models
@model IEnumerable<CustomerViewModel>
@(Html.Kendo().Grid(Model)
.Name("Grid")
.Columns(columns =>
{
columns.Bound(c => c.ContactName).Width(140);
columns.Bound(c => c.ContactTitle).Width(190);
columns.Bound(c => c.CompanyName);
columns.Bound(c => c.Country).Width(110);
})
.Pageable()
.Sortable()
.Groupable()
.Filterable()
)

Well that’s all it takes to create a grid in MVC. Now lets go over the code in detail.

  • We pass the Model which is IEnumerable<CustomerViewModel> in this case to the GridBuilder
  • All widgets in Kendo UI needs to be named, so we provide a name using the Name() method
  • We define columns of the grid using the Columns() method. We can provide lambda expression to indicate which columns should be bound
  • In order to allow paging on the grid, we just add the Pageable() method
  • Sorting on the grid is enabled by adding the Sorting() method
  • Grouping is enabled by adding the Groupable() method
  • Similarly, filtering is provided by adding the Filterable() method

Now build the project and run the application. Following is the output of the code we just wrote:

image

Server Operation False:

At this moment if you click on a pager link or try to sort or try to group, Kendo UI Grid will be default send a request back to Server. That’s the default behavior that the grid works with. It assumes that Server would like to perform operation before getting the data. In this scenario that is not intended for me. I have got all the data that I need and I have given it to the grid. So it should do all the operation at client side rather than sending a request to server. For this to happen we just need to let the Grid DataSource not to perform server operation. This can be done by setting the Grid DataSource setting as  below:


@(Html.Kendo().Grid(Model)
.Name("Grid")
.Columns(columns =>
{
columns.Bound(c => c.ContactName).Width(140);
columns.Bound(c => c.ContactTitle).Width(190);
columns.Bound(c => c.CompanyName);
columns.Bound(c => c.Country).Width(110);
})
.Pageable()
.Sortable()
.Groupable()
.Filterable()
.DataSource(source => source
.Ajax()
.ServerOperation(false)
)
)

now when you run the project and perform any operations, grid will not send a request to the server but do it client side.

Conclusion:

This blog post was like a primer to anybody who would like to get started with Kendo UI Grid Wrapper for ASP.NET MVC. With just 15 lines of settings you will have a full fledged grid in your app within no time. If you are interested in Kendo UI Grid, do download a 30 day free trial at www.kendoui.com.

How to insert data in Icenium Everlive using KendoUI DataSource

Read about Icenium here

Read more about Kendo UI DataSource here

Icenium Everlive is Backend as a Service offering from Telerik. In this post we will take a look on how easily KendoUI DataSource can be used to fetch data from Icenium Everlive.

Read : How to fetch data from Icenium Everlive using KendoUI DataSource

To start with, in Everlive I have created a content type with name Session. In Everlive Content type represents a data type or loosely I can say it represents a table. I have created content type with name Sessions. Now we need to insert and item in Sessions content type using Kendo UI DataSource.

Very first we need to add reference of Everlive as below,


<script src="scripts/everlive.all.min.js"></script>

After adding reference create instance of Everlive as below. You need to pass Everlive application key as parameter while creating instance of Everlive. You will find application key on Everlive portal.


var el = new Everlive('W1286lVOH0DXYZ');

Now you will be amazed seeing how easily you can insert item in Session content type using Kendo UI DataSource. Before creating an item or inserting an item, create Kendo UI DataSource as following.


var sessionDataSource = new kendo.data.DataSource({
 type: 'everlive',
 transport: {
 typeName: 'Sessions'
 },
 schema: {
 model: { id: Everlive.idField }
 }

});

While creating Kendo UI Data Source, we need to set following

  • type as everlive
  • In transport typeName as content type name. You need to provide name of the content type which data items you want to fetch. In this case we want items of Sessions content type so typeName is Sessions

Once Kendo UI DataSource is created, you need to create item to be inserted in Everlive . So let us go ahead and create item for Sessions content type as following,


var sessionItemToAdd = {
 'Name': 'Cloud',
 'Time': '09:00-10:00',
 'Level': '300',
 'SpeakerName': 'dj',
 'HallName': 'A',
 'Date': '3rd Oct',
 'Day': 'Day 1'

};

Now you have item to be inserted. Next add this item to DataSource using Add method. After adding that call sync() method on DataSource. You can achieve adding and syncing with Everlive server as given in below code,


sessionDataSource.add(sessionItemToAdd );
 sessionDataSource.sync();
 console.log("data inserted");

Putting above discussion all together, below function will add an item in Sessions content type.


function addSessions() {
 console.log("Entering");
 var sessionDataSource = new kendo.data.DataSource({
 type: 'everlive',
 transport: {
 typeName: 'Sessions'
 },
 schema: {
 model: { id: Everlive.idField }
 }

});
 var sessionItemToAdd = {
 'Name': 'Cloud',
 'Time': '09:00-10:00',
 'Level': '300',
 'SpeakerName': 'dj',
 'HallName': 'A',
 'Date': '3rd Oct',
 'Day': 'Day 1'
 };

sessionDataSource.add(sessionItemToAdd);
 sessionDataSource.sync();
 console.log("data inserted");
 }


This is the way you can add an item in Everlive content type. I hope you find this post useful. Thanks for reading.

Icenium Workshop in Pune

View event photos here

Telerik India conducted a full day Icenium Day in Pune on 26th Aug 2013.

clip_image002

It was invite only event and 30 energetic developers attended full day workshop on Icenium. There was high energy discussions around native v/s hybrid, JavaScript or C# etc. It was great gathering of prominent and opinionated developers.

We started day with introduction of Icenium and setting up development environment on participant machines. Some of the participants preferred to work on Icenium MIST, so they did not need any installation.

clip_image004

Whole day we covered following topics,

  • Why Cross Platform Mobile Application
  • Getting started with Icenium
  • Creating your first Cross Platform App
  • Managing Certificates in Icenium
  • Debugging with Live Sync
  • Understanding version control and Github integration
  • Building and packaging App
  • Publishing Apps to store
  • Working with Kendo UI Framework elements like DataSource and Template
  • Consuming Services like OData
  • Understanding layout , transition etc
  • Working with Icenium Everlive

This was Hands on Lab workshop and all participants wrote codes for whole day with sheer passion.After successful completion of labs each participant got a participation certificate.

clip_image002[6]

It was energetic learning day. We loved developers from Pune and excited to visit city again with more sharing on goodness of Telerik.

clip_image004[6]

View event photos here

MVVM using Kendo UI in three simple steps

Learn more about Kendo UI here

Find sample used in this blog on JSFiddle

Yes I know you love Kendo UI and you love MVVM as well. There are many libraries out there like Knockouts to help you creating HTML5 Apps adhering to MVVM pattern. In this post we will learn to create a simple application using MVVM.

Step 1: Create View Model

ViewModel can be created using Kendo.observable. Object of Kendo.observable will notify any changes to view. Let us create a studentViewModel as below.


var studentViewModel = kendo.observable({
                          name: "Dhananjay Kumar",
                          age : 30 ,
                          sayHello: function () {
                              var name = this.get("name");
                              var age = this.get("age");
                              alert("Hello, " + name + "You are" + age + "Years Old") ;
                                               }
                             });

studentViewModel contains two properties and one method sayHello.

Step 2: Create View

In second step let us go ahead and create View. You need to bind ViewModel to view.


<div id="studentview">
          <input data-bind="value: name" />
          <input data-bind="value: age" />
          <button data-bind="click: sayHello">Say Hello</button>
 </div>

Above in studentview , we are binding value of input types and click of button. There are many other HTML properties can be bind using Kendo UI MVVM like Text , Value , Visible , Html etc.

As you see we are using data-bind property to perform binding.

Step 3: Binding View and ViewModel

Third and final step you need to do is to bind View and ViewModel. Either you can bind ViewModel to a particular view (in this case div with id studentview) or you can bind ViewModel to any DOM element using body. Binding can be done as follows,

 kendo.bind($("#studentview"), studentViewModel);

This is all what you need to do to start creating HTML 5 Apps adhering MVVM pattern using Kendo UI. When you run app, you shall get expected output as below,

clip_image002

Last but not least do not forget to add references of KendoUI library in your project.

Find sample used in this blog on JSFiddle

I hope you find this post useful. Thanks for reading.

Learn more about Kendo UI here

JavaScript Objects and Inheritance using Kendo UI

Learn more about Kendo UI here

In this post we will take a look on JavaScript Inheritance using Kendo UI. To start with you create JavaScript object using Literals as following,


var Vehicle = {

model: "car",
 color: "red",
 sayGreeting: function () {

alert(this.model + this.color);
 }

};

There are other two ways to create JavaScript object also exists

  1. Using new operator
  2. Using Object.Create() static method.

Learn more about Objects in JavaScript here

Kendo UI gives you different syntax to create object and for inheritance.

image

Kendo UI gives you different syntax to create a JavaScript Object. You can create same Vehicle object using Kendo UI as below,

 var Vehicle = kendo.Class.extend({

model: "car",
 color: "red",
 sayGreeting: function () {

alert(this.model + this.color);
 }

});

You can use object created using Kendo UI as below,

var v = new Vehicle();
 v.sayGreeting();

You will get output as below,

clip_image001

In kendo UI , you can create object with Constructor as well. Using init method you can add a constructor to object. In below code snippet we are creating object with constructor.


var Vehicle = kendo.Class.extend({

model: "car",
 color: "red",
 init: function (model, color)
 {
 if(model) this.model = model;
 if(color) this.color = color;

},
 sayGreeting: function () {

alert(this.model +" "+this.color);
 }

});

Now you can create object passing with constructor as below,

 var v = new Vehicle("truck", "black");
 v.sayGreeting();

Above we are creating object passing argument to constructor and then calling sayGreeting() function as well. As output you will get alert message.

clip_image001[6]

Now we can extend object using extend method.


var luxuryVehicle = Vehicle.extend(
 {
 brand: "bmw",
 price : "23560$"

});

As you see that we added two more properties in child object. Let us go ahead and create a new instance of this object.


var a = new luxuryVehicle();
 a.color = "dark grey"
 a.sayGreeting();

Above we are overriding color property of parent class and calling method of parent class. As a output you will get overridden value of color and parents value for model.

clip_image001[8]

In this way you can work with object and inheritance in JavaScript using Kendo UI. I hope you find this post useful. Thanks for reading.

Learn more about Kendo UI here

Kendo UI Logo

Resources for Webinar “Developing ASP.NET MVC Applications Quicker with Kendo UI”

On Jul 11 we conducted a webinar titled “Developing ASP.NET MVC Application Quicker with kendo UI”. This is part of the ongoing webinar series we here at Telerik India are doing targeting the APAC region. We call this the Telerik .NET Ninja Developer Webinar series. You can take a look at the Jun-Jul schedule here: https://telerikhelper.net/2013/05/24/telerik-webcasts-june-july/

image

Kendo UI is a HTML5 based JavaScript framework for developing HTML5 based sites or apps. Its everything you need to develop the sites and apps. Its one package which will give you pretty much everything you need to develop a HTML5 based apps or sites. Although it is a client side framework and that means a lot of JavaScripting, we have you covered if you want to develop on the server side. We have what we call as ASP.NET MVC Wrappers for Kendo UI. This give you the power of JavaScript but the productivity of server side. So this webinar was all about how you can build UI quicker in ASP.NET MVC using Kendo UI.

Slide Deck:

Here is the slide deck which I used for the webinar:

Webinar Video:

For those of you who missed attending the webinar live, we have it covered for you. We record all our webinars and so was this one. Here is the recording of the webinar:

Questions & Answers:

During the webinar, my team tried hard to answer as many questions as we can. With the interest of the time we normally collect all your questions and try to answer them through this recap blog post. So here is all the questions and answers for them:

Q: What is the license cost or purchase cost for Kendo ?
A: kendo UI costing is available at this page: http://www.kendoui.com/purchase.aspx

Q: Can we use Kendo UI for asp .net apps without MVC?
A: Yes you can. But note that Kendo UI is all about client side. So no server side programming of Kendo UI controls. You will need to use JavaScript way of working with Kendo UI in technology other than ASP.NET MVC. The server side wrappers are available only for ASP.NET MVC.

Q: Is Kendo UI available as part of Telerik Controls ?
A: You can buy Kendo UI as a single product. Here is the Kendo UI pricing – http://www.kendoui.com/purchase.aspx.  Also, if you buy any of our DevCraft bundles, kendo UI is included in the bundle. Here is our DevCraft bundle pricing – http://www.telerik.com/purchase.aspx

Q: Any live application developed using kendo UI?
A: You can take a look at www.kendouimusicstore.com. This is a famous reference app for ASP.NET MVC which was developed by Microsoft. We took the same and converted it to a Kendo UI application with front end being completely done using Kendo UI controls and back end powered by Web API.

Q: Before starting development, which language knowledge required?
A: If you know JavaScript, then you know Kendo UI. Kendo UI is built on JQuery. So nothing new to learn. If you want to program Kendo UI using a server side technology – we support Server Side Wrappers for ASP.NET MVC, JSP and PHP.

Q: Can we use kendo UI with Web API?
A: Yes absolutely. Kendo UI has Data Source that easily connects with Web API.

Q: To develop app in Kendo UI little bit JS is enough?
A: Yes, you do require JS knowledge especially awareness of jquery kind of syntax. But you can directly use ASP.NET MVC, PHP or JSP server side technologies too.

Q: How do we decide between jQuery UI and Kendo UI? Do we have comparison charts between these products?
A: Take a look at this article – http://jqueryuivskendoui.com/

Q: Will Kendo UI Support SharePoint 2010?
A: Kendo UI is a client side control set. As long as you develop a webpart which supports accessing external JavaScript and Stylesheet, Kendo UI can be used anywhere.

Q: Can we use knockout.js in Kendo UI or it’s not required because it’s different JavaScript library similar to knockout.js
A: Kendo UI has all the capabilities that you require (even of KO). But you can also use KO with Kendo UI.

Q: What kindsof data sources are supported?
A: Out of the box Kendo UI Data Source can handle JSON and XML.

Q: Does it support multiple cultures?
A: Globalization is one of the features in built in Kendo UI. So you can include the appropriate culture Kendo UI JS file and set the culture you want to work with. Rest will be handled by Kendo UI.

Q: Is Kendo UI a jquery plugin?
A: Kendo UI is not a Jquery plugin or a clone. Kendo UI is written from ground up but is based on Jquery. Jquery is the only dependency Kendo UI has. All the constructs in Kendo UI are similar to Jquery so that the learning curve is less.

Q: What are the key features of Kendo UI Mobile?
A: You can take a look at our Kendo UI Mobile product page – http://www.kendoui.com/mobile.aspx

Q: Is there any Kendo Controls for Winforms?
A: No. Kendo UI is for Desktop Browser based application and Cross Platform Hybrid Mobile Application development. for WinForms we have a separate control suite which you can take a look at here – http://www.telerik.com/products/winforms.aspx

Q: Can we have Scheduler control in Kendo UI?
A: Yes. Scheduler control is available as part of Q2 2013 release of Kendo UI.

Q: Can we use Kendo UI to show data in modal and provide CRUD operations with validations in Kendo UI
A: Kendo UI Grid already supports this feature. Take a look at our Grid demos online at – http://demos.kendoui.com/web/grid/index.html

Q: Kendo UI is only a Java Script library or any server side components are also involved?
A: Kendo UI is a client side HTML5 based JavaScript framework. We have server side wrappers to speed up your Kendo UI programming. The wrappers just output the necessary JavaScript code which otherwise you would have to write.

Q: Can we bind data from SQL DB?
A: You need to create Web Service or Web API which can return the data as JSON. Kendo UI has a JavaScript data source which can work out of the box with a service returning JSON payload or xml payload.

Q: Does that mean apps developed using Kendo UI can be used on mobile browser?
A: Yes. Kendo UI Web controls are touch aware and can run on all modern browsers.

Q: How do we compile to native app after completing the app in Kendo UI mobile?
A: If you are using our Cloud Based IDE – ICENIUM, it lets you build for iOS and Android platform right from the IDE. Otherwise you will need to use PhoneGap build mechanism to generate the package.

Q: How Kendo UI is different when compared with Knockout.Js ?
A: As far as I know, Knockout.js is a library to achieve data binding where as Kendo UI is a complete framework which provide Widgets/MVVM/Validation etc.

Q: Is there any project template for VS2012 from kendo UI?
A: Yes. When you install Kendo UI using our installers, we ship in a Visual Studio project template to speed up your ASP.NET MVC development with Kendo UI.

Q: Can we integrate WPF app in this Kendo UI?
A: WPF is a different technology set. Kendo UI is meant for Web applications & not WPF.

Q: What are the mandatory script files need to be included in kendo UI on working in MVC 4?
A: You need to include Kendo UI Web JavaScript and Kendo Stylesheet files into your project.

Q: Does charts in DataViz support on IE8 ?
A: Yes, it is supported.

Q: Can the CSS be modified as per our need?
A: Yes absolutely. We even provide an online tool to facilitate this: http://demos.kendoui.com/themebuilder/index.html

Q: Can you talk about Kendo UI licensing?
A: Kendo UI is licensed on per developer basis. For more details and discounts, please write to sales@telerikindia.com

Q: Do you have any facility for group license?
A: Yes, absolutely. Please write to sales@telerikindia.com

Q: In the era where the line between PC/Laptop display and mobile display getting blurred day by day, e.g. PCs getting touchscreen, mobiles/tablets getting Full HD/Retina displays, how one should plan their investment for web application? I mean if we are targetting global reach, how you recommend Kendo UI for mobile/MVC?
A: Kendo UI Mobile is used to create Cross-Platform Apps. Using that you create apps for devices and phones . Kendo MVC Wrapper is used in MVC based web apps .

Q: Is this light weight control?
A: Yes, Kendo controls are very light weight controls with no addition to ViewState etc. Since it can use the client side processing capabilities as well, the performance is phenomenonal. It also supports virtualization etc.

Q: Can you elaborate more on “Virtualization”?
A: do take a look here: http://demos.kendoui.com/web/grid/virtualization-remote-data.html

Q: what is MVVM framework?
A: Kendo comes with its own optimized MVVM framework. Please refer to the following webcast that we had done on the same: https://telerikhelper.net/2013/05/31/resources-for-webinar-mvvm-validation-using-kendo-ui-in-web-applications/

Q: Can we use trail version control in any professional web site?
A: No, trial license explicitly forbids you from using it in live/professional web sites. Please write to sales@telerikindia.com and we can help you further with more information.

Q: Not clear how chart series changes according to data
A: Learn more about charts here http://demos.kendoui.com/dataviz/bar-charts/index.html

Q: How can we do conditional validation in KENDO UI?
A: Please do take a look at the demo here: http://demos.kendoui.com/web/validator/index.html

Q: Kendo is for web based or mobile based services?
A: Kendo UI web is meant for web apps. Kendo UI Mobile is meant for mobile. They both share a common base framework.

Q: Will there be wrapper for ASP.NET wrapper in future. We currently use ASP.NET Telerik.
A: We already have a wrapper for ASP.NET MVC. If you are using WebForms, the RadControls are the ideal controls to use. We are constantly adding & updating those controls.

Q: Can we use Kendo UI for java web application
A: Yes, we have a JSP wrapper for the same. More details here: http://www.kendoui.com/server-wrappers/jsp.aspx

Q: Can i use knockout.js with Kendo UI mvc
A: Pls take a look here: http://rniemeyer.github.io/knockout-kendo/

Q: Can we use kendo controls in VS2008
A: Sure, you can. they are simple JS libraries that can be added. It has no IDE requirements.

Q: Is there any other separate editor for Telerik development?
A: We don’t have any IDE requirement for Kendo UI. If you are doing MVC development you will want to use VS and Kendo UI wrapper for MVC

Q: Does the kendo mobile support in all the browser?
A: Yes. It only requires HTML 5 support in the browser. All modern browsers support that.

.NET Ninja T-Shirt Giveaway:

we select 2 person from the webinar attendees and give away our .NET Ninja T-Shirt in each of our webinars. we have picked up 2 lucky persons in this webinar too. They are:

  • Karthikeyan R

  • Harvinder Singh

Congratulations to the winners. We will be contacting you shortly and we will ship your t-shirts. Rest of the folks don’t worry – we still have loads of webinars lined up for this year. So do attend our future webinars without fail and try your luck to be the .NET Ninja.

Till next time – Happy Coding.

Resources for webinar “Building Uncomplicated Single Page Apps (SPAs) with Kendo UI”

On Jun 6th we conducted a webinar titled “Building Uncomplicated Single Page Apps (SPA) with Kendo UI”. This is part of an ongoing webinar series we here at Telerik India are doing targeting APAC region. We call this the Telerik .NET Ninja Developer Webinar Series. You can take a look at the Jun-Jul schedule here: https://telerikhelper.net/2013/05/24/telerik-webcasts-june-july/

SPA or Single Page Application is a way of building web applications which literally consists one single html page.  The application works by creating screens on the client side which is basically nothing but templates and getting the required data at different intervals as JSON payloads. So we showcased Kendo UI power and feature of building these SPA without any complication. The backbone of Kendo UI SPA is Rouer, View and Layout. So through this webinar I showcased how a SPA can be built with much hassle and very easily. Hope you go through the slide decks and the video recording of the webinar and find it useful for you.

Slide Deck:

Here is the slide deck used for the webinar:

Video Recording:

As many of you have been asking, we did record the webinar. So here is the video of the webinar:


Questions & Answers:

During the webinar there were many questions that you guys had asked. We tried our best to answer as many as we can. As a regular practice, we answer all the questions in the recap post. So here are all the questions and answers for them:

Q: where we can use SPA?
A: Anywhere User experience is critical – both enterprise and consumer apps.

Q: How does grid adapt to mobile?
A: Grids are not ideal for mobile applications. You may want to use ListView if you are primarily targeting mobiles.

Q: What is an Observable?
A: Observable is Kendo UI object that is used for supporting MVVM.

Q: How can i design Grid View UI as look like Windows 8?
A: You need to put custom CSS on Kendo Grid to achieve Windows 8 metro GridView look

Q: Do we have any IDE intelligent enough for kendo?
A; If you are using Visual Studio as IDE you will be able to get intellisense. Since its just plain JavaScript you can actually use any editors even Notepad.

Q: Can we have SPA project template for visual studio? i think development can be much quicker using that?
A: We currently don’t have it. Having said that its as easy as adding a stylesheet and a JavaScript and you have Kendo UI in your application. So you don’t need a SPA template as such. But our product team will start looking towards this.

Q: All the data binding must happen in a script tag?
A: Data binding happens in model that ultimately uses Kendo UI DataSource. It saves you a lot of writing AJAX code.

Q: What is a Router?
A: Router is the back bone of SPA feature using Kendo UI. It is responsible for tracking application state and navigating between the app states. You can read more on Router here: http://docs.kendoui.com/getting-started/framework/spa/router

Q: If our SPA is having multiple window and each window is having some sort of datagrids, charts , different lists etc, say various aspects of sales info. So, in that case where should we keep the templates, in the same page or we can put those in other files?
A: Templates can be in the same page or created as a separate script files. When you create templates as different files, you can use concept of Template Loader and load the template as you require. It all depends on your architecture.

Q: Can we create models on the fly? like dynamic?
A: Yes you can.

Q: Is kendo SPA having support for nested template?
A: Yes you can.

Q: Is there any Visual Studio plugin for Kendo UI SPA, which we can get from NuGet Package Manager? if not, does Telerik/Kendo UI has any plan to develop it? – it can be very useful for developers
A: Note that SPA is a feature available out of the box in Kendo UI solution. Kendo UI is available as NuGet package but be aware of the licensing terms. Kendo UI is not a free product. It is a licensed product.

Q: How we can change the Paging to Server side? We have to pass the page numbers and other parameters?
A: Kendo UI data source can page client side by default. If you don’t want that you can set ServerPaging to true and it will pass all the parameters required for paging to your service end point

Q: What about the performance of application when will have millions of record ? How it will be able to load in one time?
A: As a application architect you need to be wary of your data limits. Single Page Application is just a design paradigm of modern Web Applications. You will need to make sure you do paging on the server especially when you have million records. So you take control in this scenario for data loading.

Q: how to implement Kendo UI on SharePoint?
A: Kendo UI is all about 2 style sheet and 1 JavaScript file. So you can create your custom webpart and make sure to package the style sheet and javascript to the right location. The widgets will work as long as the path to the style sheet and script files are set correctly.

Q: Is Kendo UI libraries Open Source?
A: Nope. They are built, supported and sold by Telerik.

Q: Can I use WCF instead of Web API?
A: Yes. With HTTP binding that delivers JSON/ XML payload.

Q: You have edited the items only displaying in grid, if you want to edit more labels or data?
A: By default, the pop up mode of editing in Kendo UI Grid uses the column displayed to create the edit form. If you need to edit additional columns, you will need to create separate edit form and work with that.

Q: Can we use Kendo UI for offline purpose?
A: Kendo UI DataSource along with HTML 5 localStorage can be used.

Q: Data can be any custom XML. How difficult will it be to bind a custom XML with Kendo controls?
A: Yes any custom XML will do. It is as easy as just mapping what node maps to what property of the schema.

Q: IS JS wrapper. available in trial version for our Kendo UI POC that we need to show to our client?
A: Yes. Trial version is available on http://www.kendoui.com

Q: How to upgrade the Kendo UI version, once the application is already deployed
A: The Kendo UI is all about style sheet and JavaScript file. So you just swap the older version files with the new version files. That’s as easy as it can get.

Q: Does licensing allow to edit the source of kendo?
A: Yes. As a licensee you get the source code and you can modify it as per your needs. But you should know what you are doing :).

Q: Is there any service for android?
A: Yes. Please refer to Kendo UI Mobile. http://www.kendoui.com/mobile.aspx

Q: What is the licensing policy of Kendo UI?
A: The licensing is per developer and we do not charge you for deployments i.e. royalty free distribution.

Q: Will this support hybrid app development?
A: kendo UI Web is for web applications. If you are looking for Hybrid Mobile App Development you should take a look at Kendo UI Mobile. Kendo UI Mobile is a mobile control set which does adaptive rendering and is one of the best tools for Hybrid Mobile App development.

Q: What is the shortcut you are using to generate code snippet?
A: I was our Static Code Analysis product called JustCode. JustCode has a feature of Code Templates. So all my demo code were created as templates and a shortcut key associated with them. When have a key stroke which makes JustCode to autocomplete the code pertaining to the short cut key.

Q: Can we dynamically change the themes?
A: Yes you can. It is as easy as grabbing the link tag and changing the style sheet to be used.

Q: supports IE6?
A: We support IE7+ i.e IE8 and on wards.

Q: How it is differ from Upshot supported by Microsoft for SPA?
A: UpShot is not a SPA framework or solution rather it is a JavaScript library to make data retrieval in JavaScript easier. Where as Kendo UI is a complete framework which supports SPA feature out of the box and has a client side data source feature which does the data plumbing between server and client.

Q: Can we able to get the data through database connectivity?
A: The data is retrieved from DB in this demo as well. You need to build a service layer with Web API, WCF Data Service or WCF or any other non-.NET technology to retrieve data from the database

Q: Can we include 3rd party libraries in SPA application?
A: Yes, you are free to include 3rd party libraries. We can’t guarantee that there will be no conflicts.

Q: Does Telerik Test Studio support testing automation of all these?
A: Yes, Test Studio supports automation of Kendo UI controls.

Q: I see you used only JSONs as data type.. what other data-types available?
A: Kendo UI data source works very well with JSON and XML.

Q: Packaging support for android or IOS?
A: If you use our cloud based IDE called ICENIUM, it supports packaging for Android and iOS platforms with just a click.

Q: What about integration with Telerik controls?
A: Sure, this integrates with other Telerik controls too. Depending on the scenario, you can mix and match Telerik technologies.

.NET Ninja T-Shirt Giveaway:

As usual, we will be giving out 2 t-shirts in this webinar also. So following are the lucky winners of this webinar giveaway:

  • Udayakumar Mathivanan
  • Srinivas Abhishek

Congratulations to the winners. We will be contacting you soon on the email ids you have provided us during registration. The t-shirts will be shipped to you soon. Others don’t worry we still have a lot of webinars to go. So keep trying your luck by attending our webinars.

Conclusion:

In our endeavor to bring the Telerik technologies to each one of you, we are doing these series of webinars. Hope you are finding them useful. Looking forward to your presence in future webinars too. Till next time – Happy Coding!

Update:

Here is the GitHub repo to the source code of Kendo UI SPA demo: https://github.com/lohithgn/kendouispa/


Resources for Webinar “MVVM & Validation using Kendo UI in Web Applications”

On May 30 we conducted a webinar titled ”MVVM & Validation using Kendo UI in Web Applications”. We had around 600+ registrations for this webinar. We were very excited that many of you felt that the topic is an interesting one. So we are thankful to all of you who made it to the webinar. Hope you found the webinar useful and that it will be helpful in your day to day work.

image

Slide deck from the webinar:

If you missed attending the webinar, here is a chance to recap it through the slides. Here is the slide deck if you want to download:

Video Recording of webinar:

Many of you had asked if the webinar was recorded. Yes we do record all our webinars and here is the recording of this webinar. Hope this gives you a chance to catch up with the webinar:

Questions & Answers:

Many of you had a lot of questions during the webinar. We did try our best to answer many of them. So we are making sure that we address each one of them through this post. Here are the questions asked during the webinar and answers for the same:

Q: I am a .Net/Silverlight developer. What is the Usage of Kendo UI

A: Kendo can be used to develop HTML 5 apps. More details at: http://www.kendoui.com

Q: Can we use Kendo UI for Windows mobile or only for Androids?

A: Kendo UI Web can be used for Web App development. Kendo UI Mobile controls can be used for developing Hybrid Mobile Apps for multiple platforms i.e. iOS, Android, BB, WP8

Q: Can we use the Kendo UI using C# using .net ?

A: Kendo UI Web & DataViz provide server side wrappers for ASP.NET MVC. So you can program with your comfort of C# & Razor.

Q: Can we develop the Kendo Mobile Project on visual studio IDE, right?

A: Yes you can. Since its just a couple of stylesheet and  javascript, you can always use any editor of your choice. For Hybrid Mobile Application development we also have a cloud based IDE called Icenium – www.icenium.com

Q: By Kendo UI we can create widget – like calender, grid etc

A: Yes you can, though it is only one of its capabilties. Kendo UI Web already provide close to 20+ widgets out of the box. The demos for the available widgets can be found at: http://demos.kendoui.com/web/overview/index.html

Q: Is Kendo UI support all the browsers currently available?

A: We support the following – Internet Explorer 7+, Firefox ESR, Chrome, Safari 5+, and Opera 11+.

Q: Is it mandatory to use MVVM with Kendo UI?

A: No it is not. Kendo UI does support MVVM if you need it.

Q: Is Kendo UI a free version

A: No, Kendo is a paid product. You can

Q: So what is the next roadmap for Kendo?

A: Available here: http://www.kendoui.com/roadmap.aspx

Q: Does Icenium stores my code in a cloud based storage?

A: Yes. It does. The code is stored in Telerik servers. If you do not like our cloud, you can get a GitHub account and integrate Icenium with GitHub.

Q: Is Kendo UI like knockout.js, etc.,?

A: Knockout,js is a JavaScript library for supporting databinding on client side. Where as Kendo UI is a framework which supports the data binding out of the box. So you don’t need any extra library to support databinding and Kendo UI is the only thing you need.

Q: Can it run out of the browser?

A: it runs in the browser only. the browser can be on desktop or on mobile.

Q: So, If I use Kendo UI reference then we do not have to explicitly use jQuery.js reference?

A: Kendo UI depends on JQuery. So you will need to first reference JQuery and then Kendo UI scripts.

Q: In what all flavors(commercial) is Kendo available?

A: Details available here: http://www.kendoui.com/purchase.aspx. You can contact us at sales@telerikindia.com in case you want to make a purchase for yourself / organization.

Q: Does Kendo UI has specific framework for mobile ?

A: One part of Kendo UI known as Kendo UI Web is geared for mobile: http://www.kendoui.com/mobile.aspx

Q: What is this Kendo UI Framework, key points?

A: Marketing folks have done a good job and the features are provided here: http://www.kendoui.com/

Q: Can we use MVVM pattern in normal Asp.net web application?

A: Sure you can, using JavaScript.

Q: So what’s more beneficial to use KENDO UI rather than other available UI tool

A: 1. It is a fully integrated framework (data, UI, MVVM, charts, mobile) 2. Works better 3. Is continuously updated 4. Fully supported.

Q: Which all .Net framework version does Kendo UI supports?

A: Kendo UI Web is server technology obnoxious. Kendo UI is a HTML5 based client side framework. All you need is 2 stylesheet and a JavaScript. But we do provide Server Side Wrappers for ASP.NET MVC 3+.

Q: Does older versions of Visual Studio supports Kendo UI?

A: JavaScript API of Kendo can be used with any IDE (older versions of VS or Eclipse or Notepad)

Q: If i want by pass MVVM and use standard approach / does it support that , What is the licensing model with Kendo?

A: You can use Kendo UI without MVVM as well. MVVM is available in case you need it. Licensing is on a per developer basis.

Q: After getting product, is there any charge for support or maintenance from Kendo UI team?

A: The licenses are perpetual in nature. If you want product updates and support from the team, you have to maintain an active subscription by paying a renewal fee.

Q: Can we update the theme?

A: Yes. By simply changing the CSS file. And you can create your custom themes as well.

Q: Does Kendo UI has dependency on jQuery?

A: The only dependency Kendo UI has is that on JQuery and nothing else.

Q: Kendo provides any database also ?

A: No. Data has to be available over a Web Service. Kendo provides a client side data connectivity solutions.

Q: So after getting this product, is any training or demo free from kendo team?

A: A good getting started tutorial is available as Kendo Dojo: http://www.kendoui.com/dojo.aspx You can also request training from the product team as a paid activity.

Q: For email field, can we place two messages, suppose one for mandate entry and another for the format, ex: email is required and invalid email format?

A: Yes you can. you can use data-email-msg format to provide a message when email format fails.

Q: where can I view the old videos?

A: Telerik India Webinar resources: https://telerikhelper.net/category/webinars/. More Videos at: http://tv.telerik.com

Q: Definitely Kendo UI reduces the development effort. Can you quantify? How much it will reduce ?

A: We estimate this to be in the range of 20-30%.

Q: Does kendo use Knockoutjs for MVVM?

A: Nope. Kendo has its is own framework for MVVM. Doesn’t use KO.

Q: can we access server objects like sessions and application variables using Kendo?

A: No. Because Kendo UI is a client side framework.

Q: Do i need to download anything to use Kendo UI in VS2010?

A: Kendo UI can be used in 2 ways. Pure JavaScript way – for which you will  need the stylesheet and JavaScript. We provide Server Side Wrappers for ASP.NET MVC 3+. That will let you code Kendo UI from server side.

Q: More specific to Kendo UI : Does it take advantage of HTML5?

A: Kendo UI is based on HTML5 based. So we make use of HTML5 features to the core.

Q: How do we integrate web services in REST based calls in Kendo UI data binding?

A: Kendo UI has a feature known as Data Source. So this data source can be configured with CRUD endpoints and rest of the things will be done by the data source.

.NET Ninja T-Shirt Giveaway:

If you have been following our webinars you will know by now that we have been raffling out 2 .NET Ninja T-Shirts in each of our webinar. So we pick the following two people to receive our t-shirt for this webinar:

  • Mirang Parikh
  • Mohanrao Theeda

Congratulations to the winners. We will be contacting you shortly with the email you have provided. We will be shipping you your t-shirt. Rest of you folks don’t worry, we still have many more webinars to come. So make sure you attend without fail.

Till next time, Happy coding.